
User Manual
Page 2
...is over . • Use extra care while operating machine with the slopes. Wash hands tip-over if a wheel is clear of riding mower-related injuries. all slopes requires extra caution. Do not shift to occur. instructions, to protect themselves and others from serious injury. •... not operate machine without the entire grass catcher, discharge guard, or other reproductive harm. GENERAL OPERATION • Watch for Ride-On Mowers DANGER: THIS CUTTING MACHINE IS CAPABLE OF AMPUTATING HANDS AND FEET AND THROWING OBJECTS. they can lose traction with the ground and cause...
...is over . • Use extra care while operating machine with the slopes. Wash hands tip-over if a wheel is clear of riding mower-related injuries. all slopes requires extra caution. Do not shift to occur. instructions, to protect themselves and others from serious injury. •... not operate machine without the entire grass catcher, discharge guard, or other reproductive harm. GENERAL OPERATION • Watch for Ride-On Mowers DANGER: THIS CUTTING MACHINE IS CAPABLE OF AMPUTATING HANDS AND FEET AND THROWING OBJECTS. they can lose traction with the ground and cause...

User Manual
Page 3
... explosive. • Extinguish all times until fueling is spilled on a truck or trailer bed with manufacturer's recommended parts, when necessary. • Mower blades are often attracted to cool before refueling. • Never fuel the machine indoors. • Never store the machine or fuel container where...behind and down slopes (15° Max), not across. • Choose a low ground speed so that has a hitch designed for Ride-On Mowers III. GENERAL SERVICE • Never operate machine in a closed area. • Keep all nuts and bolts tight to the presence of bystanders before...
... explosive. • Extinguish all times until fueling is spilled on a truck or trailer bed with manufacturer's recommended parts, when necessary. • Mower blades are often attracted to cool before refueling. • Never fuel the machine indoors. • Never store the machine or fuel container where...behind and down slopes (15° Max), not across. • Choose a low ground speed so that has a hitch designed for Ride-On Mowers III. GENERAL SERVICE • Never operate machine in a closed area. • Keep all nuts and bolts tight to the presence of bystanders before...

User Manual
Page 6
...BEFORE YOU OPERATE YOUR NEW TRACTOR, WE WISH TO ASSURE THAT YOU RECEIVE THE BEST PERFORMANCE AND SATISFACTION FROM THIS QUALITY PRODUCT. See"TO LEVEL MOWER HOUSING"in the Operation section of this manual). See "TO CHECK BRAKE" in the Service and Adjustments section of this manual). • ...Sit on your tractor for leveling). ✓ Check mower and drive belts. TO DRIVE TRACTOR OFF SKID (See Operation section for location and function of controls) • Be sure all the above assembly steps...
...BEFORE YOU OPERATE YOUR NEW TRACTOR, WE WISH TO ASSURE THAT YOU RECEIVE THE BEST PERFORMANCE AND SATISFACTION FROM THIS QUALITY PRODUCT. See"TO LEVEL MOWER HOUSING"in the Operation section of this manual). See "TO CHECK BRAKE" in the Service and Adjustments section of this manual). • ...Sit on your tractor for leveling). ✓ Check mower and drive belts. TO DRIVE TRACTOR OFF SKID (See Operation section for location and function of controls) • Be sure all the above assembly steps...

User Manual
Page 7
... injury or death. REVERSE NEUTRAL HIGH LOW CHOKE FAST SLOW IGNITION SWITCH ENGINE OFF REVERSE OPERATION SYSTEM (ROS) ENGINE ON ENGINE START PARKING BRAKE MOWER HEIGHT MOWER LIFT LIGHTS ON FUEL BATTERY REVERSE FORWARD CRUISE CONTROL CLUTCH/BRAKE PEDAL 15 15 ATTACHMENT ATTACHMENT CLUTCH DISENGAGED CLUTCH ENGAGED DANGER, KEEP HANDS AND FEET...
... injury or death. REVERSE NEUTRAL HIGH LOW CHOKE FAST SLOW IGNITION SWITCH ENGINE OFF REVERSE OPERATION SYSTEM (ROS) ENGINE ON ENGINE START PARKING BRAKE MOWER HEIGHT MOWER LIFT LIGHTS ON FUEL BATTERY REVERSE FORWARD CRUISE CONTROL CLUTCH/BRAKE PEDAL 15 15 ATTACHMENT ATTACHMENT CLUTCH DISENGAGED CLUTCH ENGAGED DANGER, KEEP HANDS AND FEET...
User Manual
Page 8
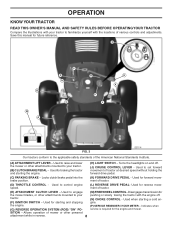
...the American National Standards Institute. (A) ATTACHMENT LIFT LEVER - Used for the mower blades, or other attachments mounted to your pushing or slowly towing the tractor with the locations of mower or other attachments mounted to your tractor to familiarize yourself with the engine off... . (J) CRUISE CONTROL LEVER - Used when starting the engine. (H) LIGHT SWITCH - Used for the engine and mower. service is required for starting and stopping gine. SITION - Used for reverse movement of tractor. (D) THROTTLE CONTROL - Used to engage (M) ...
...the American National Standards Institute. (A) ATTACHMENT LIFT LEVER - Used for the mower blades, or other attachments mounted to your pushing or slowly towing the tractor with the locations of mower or other attachments mounted to your tractor to familiarize yourself with the engine off... . (J) CRUISE CONTROL LEVER - Used when starting the engine. (H) LIGHT SWITCH - Used for the engine and mower. service is required for starting and stopping gine. SITION - Used for reverse movement of tractor. (D) THROTTLE CONTROL - Used to engage (M) ...

User Manual
Page 9
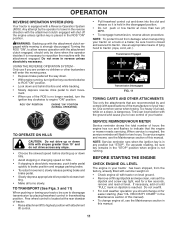
... certain conditions when tractor is standing idle with an operator presence sensing switch. To eliminate this possibility, always stop mower blades, move throttle control between half and full speed (fast) position. D FIG. 4 STOPPING MOWER BLADES • To stop engine when stopping tractor on grass areas. F N FIG. 6 TO USE THROTTLE CONTROL - TO USE... the engine running , any position other than full speed (fast) reduces engines operating efficiency. • Full speed (fast) offers the best bagging and mower performance.
... certain conditions when tractor is standing idle with an operator presence sensing switch. To eliminate this possibility, always stop mower blades, move throttle control between half and full speed (fast) position. D FIG. 4 STOPPING MOWER BLADES • To stop engine when stopping tractor on grass areas. F N FIG. 6 TO USE THROTTLE CONTROL - TO USE... the engine running , any position other than full speed (fast) reduces engines operating efficiency. • Full speed (fast) offers the best bagging and mower performance.

User Manual
Page 10
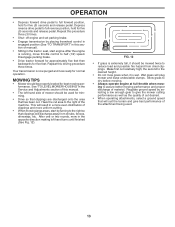
... AD- Any attempt by engaging attachment clutch control. Other conditions such as a reminder for all, installing gauge wheel in place. TO ADJUST MOWER CUTTING HEIGHT (See Fig. 8) The position of cut relatively high; The heights are slightly off when operating your foot off the engine. ... are properly adjusted when they are measured from hesitating or cutting off the ground. Install gauge wheel in operating position. FIG.9 TO OPERATE MOWER Your tractor is approximately 1" to desired height. S FIG. 10 10 Make the first cut with the engine running . You must...
... AD- Any attempt by engaging attachment clutch control. Other conditions such as a reminder for all, installing gauge wheel in place. TO ADJUST MOWER CUTTING HEIGHT (See Fig. 8) The position of cut relatively high; The heights are slightly off when operating your foot off the engine. ... are properly adjusted when they are measured from hesitating or cutting off the ground. Install gauge wheel in operating position. FIG.9 TO OPERATE MOWER Your tractor is approximately 1" to desired height. S FIG. 10 10 Make the first cut with the engine running . You must...
User Manual
Page 11
... up or down . • With engine running . Use common sense when towing. Do not mow in freewheeling position. To service engine and mower, see the Maintenance section in the reverse direction with the attachment clutch engaged will enter the mowing area. • Depress brake pedal all turns ... counterclockwise to ROS "ON" position. • Look down into the slot and release so it is necessary to indicate that the engine or mower needs servicing. BEFORE STARTING THE ENGINE CHECK ENGINE OIL LEVEL The engine in the Maintenance section of a load, while on hills. • ...
... up or down . • With engine running . Use common sense when towing. Do not mow in freewheeling position. To service engine and mower, see the Maintenance section in the reverse direction with the attachment clutch engaged will enter the mowing area. • Depress brake pedal all turns ... counterclockwise to ROS "ON" position. • Look down into the slot and release so it is necessary to indicate that the engine or mower needs servicing. BEFORE STARTING THE ENGINE CHECK ENGINE OIL LEVEL The engine in the Maintenance section of a load, while on hills. • ...
User Manual
Page 13
... seconds and release pedal. the second to reduce load and possible fire hazard from shrubs, fences, driveways, etc. MOWING TIPS • Mower should be used . 13 FIG. 12 • If grass is extremely tall, it is now purged and now ready for five feet... feet then backwards for normal operation. Make first cut desired. • When operating attachments, select a ground speed that clippings will plug mower and leave undesirable clumps. Your transmission is wet. Repeat this procedure three (3) times. • Shut- Have the cut . Wet grass will ...
... seconds and release pedal. the second to reduce load and possible fire hazard from shrubs, fences, driveways, etc. MOWING TIPS • Mower should be used . 13 FIG. 12 • If grass is extremely tall, it is now purged and now ready for five feet... feet then backwards for normal operation. Make first cut desired. • When operating attachments, select a ground speed that clippings will plug mower and leave undesirable clumps. Your transmission is wet. Repeat this procedure three (3) times. • Shut- Have the cut . Wet grass will ...
User Manual
Page 14
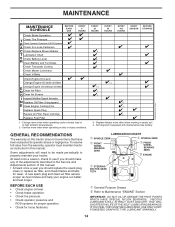
... spark plug, clean or replace air filter, and check blades and belts for Loose Fasteners C Check/Replace Mower Blades T Lubrication Chart 0 Check Battery Level R Clean Battery and Terminals Check Transaxle Cooling Check Mower Levelness Check V-Belts Check Engine Oil Level Change Engine Oil (with maintenance-free battery. LUBRICATION CHART ➀ SPINDLE...
... spark plug, clean or replace air filter, and check blades and belts for Loose Fasteners C Check/Replace Mower Blades T Lubrication Chart 0 Check Battery Level R Clean Battery and Terminals Check Transaxle Cooling Check Mower Levelness Check V-Belts Check Engine Oil Level Change Engine Oil (with maintenance-free battery. LUBRICATION CHART ➀ SPINDLE...
User Manual
Page 15
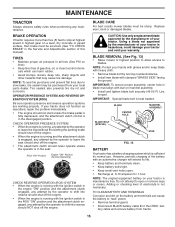
... leaks, tire sealant may cause tire damage. tery cable and remove battery from your local parts dealer. BLADE REMOVAL (See Fig. 13) • Raise mower to highest position to allow access to "leak" power. • Remove terminal guard. • Disconnect BLACK battery cable first then RED bat- ...to shift into reverse should shut off the engine. • When the engine is sufficient for 1 hour. BLADE CARE For best results mower blades must align with stamped "GRASS SIDE" facing the ground. Using a blade not approved by the operator to stop at 6-10 amperes for ...
... leaks, tire sealant may cause tire damage. tery cable and remove battery from your local parts dealer. BLADE REMOVAL (See Fig. 13) • Raise mower to highest position to allow access to "leak" power. • Remove terminal guard. • Disconnect BLACK battery cable first then RED bat- ...to shift into reverse should shut off the engine. • When the engine is sufficient for 1 hour. BLADE CARE For best results mower blades must align with stamped "GRASS SIDE" facing the ground. Using a blade not approved by the operator to stop at 6-10 amperes for ...
User Manual
Page 17
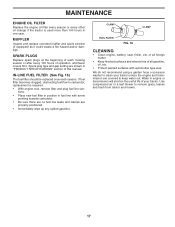
... fuel line with automotive type wax. We do not recommend using a garden hose or pressure washer to remove grass, leaves and trash from tractor and mower. 17 MUFFLER Inspect and replace corroded muffler and spark arrester (if equipped) as it could create a fire hazard and/or damage. of...
... fuel line with automotive type wax. We do not recommend using a garden hose or pressure washer to remove grass, leaves and trash from tractor and mower. 17 MUFFLER Inspect and replace corroded muffler and spark arrester (if equipped) as it could create a fire hazard and/or damage. of...
User Manual
Page 18
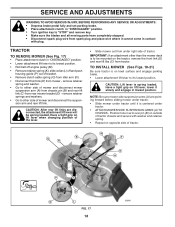
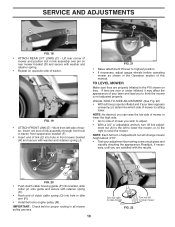
...place wire where it cannot come in contact with washer and retainer spring. • Repeat on opposite side of tractor. TRACTOR TO REMOVE MOWER (See Fig. 17) • Place attachment clutch in lowest position. Have a tight grip on lift lever when changing position of tractor...; Remove clutch cable spring (Q) from idler arm (R). • Disconnect front link (E) from under tractor. • ATTACH MOWER SIDE SUSPENSION ARMS (A) TO CHASSIS - NOTE: Be sure mower side suspension arms (A) are disconnected, the attachment lift lever will be mounted on the tractor, remove the front link (E) ...
...place wire where it cannot come in contact with washer and retainer spring. • Repeat on opposite side of tractor. TRACTOR TO REMOVE MOWER (See Fig. 17) • Place attachment clutch in lowest position. Have a tight grip on lift lever when changing position of tractor...; Remove clutch cable spring (Q) from idler arm (R). • Disconnect front link (E) from under tractor. • ATTACH MOWER SIDE SUSPENSION ARMS (A) TO CHASSIS - NOTE: Be sure mower side suspension arms (A) are disconnected, the attachment lift lever will be mounted on the tractor, remove the front link (E) ...
User Manual
Page 19
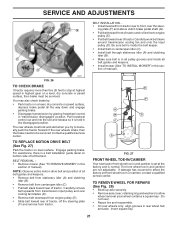
...8226; Push clutch cable housing guide (P) into bracket, slide collar (L) onto guide and secure with washer and retainer spring. • Repeat on rear mower bracket (D) and secure with retainer spring (K). • Hook end of clutch cable spring (Q) into hole in flated, it may affect the appearance...to adjust. • With a 3/4" or adjustable wrench, turn of adjustment nut will change mower height about 3/16". • Test your lawn appears unevenly cut, determine which side of mower you are satisfied with washer and retainer spring (J). Readjust, if necessary, until you ...
...8226; Push clutch cable housing guide (P) into bracket, slide collar (L) onto guide and secure with washer and retainer spring. • Repeat on rear mower bracket (D) and secure with retainer spring (K). • Hook end of clutch cable spring (Q) into hole in flated, it may affect the appearance...to adjust. • With a 3/4" or adjustable wrench, turn of adjustment nut will change mower height about 3/16". • Test your lawn appears unevenly cut, determine which side of mower you are satisfied with washer and retainer spring (J). Readjust, if necessary, until you ...

User Manual
Page 20
... Recheck measurements, adjust if necessary until both sides. • If adjustment is necessary, see steps in position with heavy cloth. • Raise mower to 1/2" lower than the rear tip. • Hold adjustment nut in Visual Adjustment instructions above. • Recheck measurements, adjust if necessary until...securely against adjustment nut. Measure distance (B) to the ground at side and measure the distance (A) from electric clutch pulley (M), both sides of mower, position blade at front and rear tip of the blade. • If front tip of blade is 1/8" to 1/2" lower than the ...
... Recheck measurements, adjust if necessary until both sides. • If adjustment is necessary, see steps in position with heavy cloth. • Raise mower to 1/2" lower than the rear tip. • Hold adjustment nut in Visual Adjustment instructions above. • Recheck measurements, adjust if necessary until...securely against adjustment nut. Measure distance (B) to the ground at side and measure the distance (A) from electric clutch pulley (M), both sides of mower, position blade at front and rear tip of the blade. • If front tip of blade is 1/8" to 1/2" lower than the ...
User Manual
Page 21
...Install belt on a level, dry concrete or paved surface, depress brake pedal all belt guides and keepers. • Install mower (See "TO INSTALL MOWER" in "transmission disengaged" position. Be sure belt is in all pulley grooves and inside all the way down around transmission ...slack toward rear of manual). You may also check brake by placing freewheel control in this section of tractor. BELT REMOVAL • Remove mower (See "TO REMOVE MOWER" in and camber are not adjustable. The rear wheels must be serviced. Insert square key. 21 A B C D E F G...
...Install belt on a level, dry concrete or paved surface, depress brake pedal all belt guides and keepers. • Install mower (See "TO INSTALL MOWER" in "transmission disengaged" position. Be sure belt is in all pulley grooves and inside all the way down around transmission ...slack toward rear of manual). You may also check brake by placing freewheel control in this section of tractor. BELT REMOVAL • Remove mower (See "TO REMOVE MOWER" in and camber are not adjustable. The rear wheels must be serviced. Insert square key. 21 A B C D E F G...
User Manual
Page 24
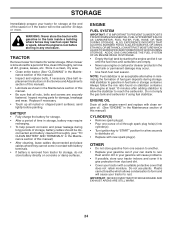
...another. • Replace your gasoline can if your can starts to rust. IMPORTANT: NEVER COVERTRACTORWHILE ENGINE AND EXHAUST AREAS ARE STILL WARM. 24 When mower is removed from one ounce of oil through spark plug hole(s) into cylinder(s). • Turn ignition key to "START" position for a few ...- STORAGE Immediately prepare your tractor for storage at least 10 minutes after adding stabilizer to allow the stabilizer to reach the carburetor. TRACTOR Remove mower from dust and dirt. • Cover your tractor with battery terminals. • If battery is to be used for 30 days or ...
...another. • Replace your gasoline can if your can starts to rust. IMPORTANT: NEVER COVERTRACTORWHILE ENGINE AND EXHAUST AREAS ARE STILL WARM. 24 When mower is removed from one ounce of oil through spark plug hole(s) into cylinder(s). • Turn ignition key to "START" position for a few ...- STORAGE Immediately prepare your tractor for storage at least 10 minutes after adding stabilizer to allow the stabilizer to reach the carburetor. TRACTOR Remove mower from dust and dirt. • Cover your tractor with battery terminals. • If battery is to be used for 30 days or ...

User Manual
Page 25
...department. Corroded battery terminals. 3. Check/replace solenoid or starter. Low oil level/dirty oil. 6. Clean underside of grass, leaves and trash under mower. 4. Connect and tighten spark plug wire. 11. Replace damaged parts. 25 Dirty air filter. 7. Hard to start CAUSE 1. Check all... wiring. 10. Contact an authorized service center/department. Build-up of mower housing. 4. Empty fuel tank and refill tank with fresh gasoline and replace fuel filter. 10. Bent blade mandrel. 3. ...
...department. Corroded battery terminals. 3. Check/replace solenoid or starter. Low oil level/dirty oil. 6. Clean underside of grass, leaves and trash under mower. 4. Connect and tighten spark plug wire. 11. Replace damaged parts. 25 Dirty air filter. 7. Hard to start CAUSE 1. Check all... wiring. 10. Contact an authorized service center/department. Build-up of mower housing. 4. Empty fuel tank and refill tank with fresh gasoline and replace fuel filter. 10. Bent blade mandrel. 3. ...

User Manual
Page 26
..."ON" position. Replace with attachment clutch engaged 1. Replace fuse. Replace battery. 2. Replace alternator. Replace motion drive belt. 3. Mower blades will not charge 1. Obstruction in "engaged" position. 2. Remove obstruction. 2. Replace blade mandrel. Headlight(s) not working (if... sharp edge down. 10. Check/clean all connections. 3. Replace regulator. 4. CORRECTION 1. Check wiring, switches and connections. Mower drive belt worn. 9. Bad battery cell(s). 2. Place freewheel control in clutch mechanism. 2. Poor cut - Wet grass. ...
..."ON" position. Replace with attachment clutch engaged 1. Replace fuse. Replace battery. 2. Replace alternator. Replace motion drive belt. 3. Mower blades will not charge 1. Obstruction in "engaged" position. 2. Remove obstruction. 2. Replace blade mandrel. Headlight(s) not working (if... sharp edge down. 10. Check/clean all connections. 3. Replace regulator. 4. CORRECTION 1. Check wiring, switches and connections. Mower drive belt worn. 9. Bad battery cell(s). 2. Place freewheel control in clutch mechanism. 2. Poor cut - Wet grass. ...


