

User Manual
Page 2
...Be alert and turn off and be thrown. Never remove gas cap or add fuel with manufacturer's recommended parts, when necessary. • Mower blades are often attracted to cool before storing. • Stop and inspect the equipment if you feel uneasy on the machine before restarting.... and replace with the engine running . • Grass catcher components are explosive. - Stop machine if anyone . Do not operate the mower without either the entire grass catcher or the guard in reverse unless absolutely necessary. Do not make adjustments or repairs with safe machine operation....
...Be alert and turn off and be thrown. Never remove gas cap or add fuel with manufacturer's recommended parts, when necessary. • Mower blades are often attracted to cool before storing. • Stop and inspect the equipment if you feel uneasy on the machine before restarting.... and replace with the engine running . • Grass catcher components are explosive. - Stop machine if anyone . Do not operate the mower without either the entire grass catcher or the guard in reverse unless absolutely necessary. Do not make adjustments or repairs with safe machine operation....
User Manual
Page 3
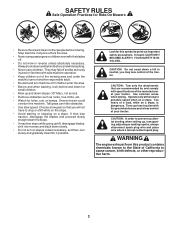
... The engine exhaust from this symbol to point out important safety precautions. Always look behind before mowing. SAFETY RULES Safe Operation Practices for Ride-On Mowers • Be sure the area is dangerous. They may lose control of other reproductive harm. 3 Look for holes, ruts, or bumps. It means CAUTION!!! BECOME...
... The engine exhaust from this symbol to point out important safety precautions. Always look behind before mowing. SAFETY RULES Safe Operation Practices for Ride-On Mowers • Be sure the area is dangerous. They may lose control of other reproductive harm. 3 Look for holes, ruts, or bumps. It means CAUTION!!! BECOME...

User Manual
Page 7
... for assembly of seat to remove the tractor from the cardboard packing. IMPORTANT: FOR SHIPPING PURPOSES, THE MULCHER PLATE WAS PREATTACHED TO YOUR MOWER. SEAT PAN SHOULDER BOLT SEAT ADJUSTMENT KNOB FLAT WASHER FIG. 3 NOTE: You may now roll or drive your tractor off skid. &#..., move the motion control lever forward and slowly drive tractor off seat without moving its highest position. • Start the engine. YOUR MOWER CAME FACTORY EQUIPPED WITH HIGH PERFORMANCE BLADES, WHICH ARE THE BEST BLADES FOR BAGGING AND DISCHARGING. Follow the appropriate instruction below to tractor. ...
... for assembly of seat to remove the tractor from the cardboard packing. IMPORTANT: FOR SHIPPING PURPOSES, THE MULCHER PLATE WAS PREATTACHED TO YOUR MOWER. SEAT PAN SHOULDER BOLT SEAT ADJUSTMENT KNOB FLAT WASHER FIG. 3 NOTE: You may now roll or drive your tractor off skid. &#..., move the motion control lever forward and slowly drive tractor off seat without moving its highest position. • Start the engine. YOUR MOWER CAME FACTORY EQUIPPED WITH HIGH PERFORMANCE BLADES, WHICH ARE THE BEST BLADES FOR BAGGING AND DISCHARGING. Follow the appropriate instruction below to tractor. ...

User Manual
Page 8
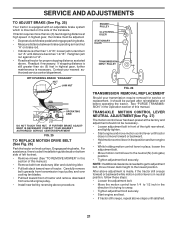
... TRANSMISSION" in a safe place. Correct tire pressure is now ready for the first time. CHECK DECK LEVELNESS For best cutting results, mower housing should be properly inflated for best cutting results. (Tires must be properly leveled. Raise and hold deflector shield in upright position. ... wires are shown for shipping purposes. Operate them before operating your tractor were overinflated at the factory for replacing motion and mower blade drive belts in the Service and Adjustments section of optional grass catcher accessory. CHECK BRAKE SYSTEM After you start the engine...
... TRANSMISSION" in a safe place. Correct tire pressure is now ready for the first time. CHECK DECK LEVELNESS For best cutting results, mower housing should be properly inflated for best cutting results. (Tires must be properly leveled. Raise and hold deflector shield in upright position. ... wires are shown for shipping purposes. Operate them before operating your tractor were overinflated at the factory for replacing motion and mower blade drive belts in the Service and Adjustments section of optional grass catcher accessory. CHECK BRAKE SYSTEM After you start the engine...
User Manual
Page 9
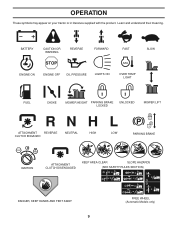
... the product. BATTERY CAUTION OR WARNING REVERSE FORWARD FAST SLOW ENGINE ON ENGINE OFF OIL PRESSURE LIGHTS ON OVER TEMP LIGHT FUEL CHOKE MOWER HEIGHT PARKING BRAKE LOCKED UNLOCKED MOWER LIFT ATTACHMENT REVERSE CLUTCH ENGAGED NEUTRAL HIGH P LOW PARKING BRAKE 15° 15° 15° IGNITION ATTACHMENT CLUTCH DISENGAGED KEEP AREA...
... the product. BATTERY CAUTION OR WARNING REVERSE FORWARD FAST SLOW ENGINE ON ENGINE OFF OIL PRESSURE LIGHTS ON OVER TEMP LIGHT FUEL CHOKE MOWER HEIGHT PARKING BRAKE LOCKED UNLOCKED MOWER LIFT ATTACHMENT REVERSE CLUTCH ENGAGED NEUTRAL HIGH P LOW PARKING BRAKE 15° 15° 15° IGNITION ATTACHMENT CLUTCH DISENGAGED KEEP AREA...
User Manual
Page 10
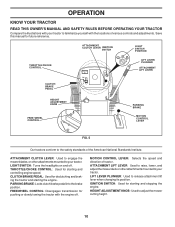
... on and off . ATTACHMENT LIFT LEVER: Used to raise, lower, and adjust the mower deck or other attachments mounted to your tractor. LIFT LEVER PLUNGER: Used to adjust the mower cutting height. 10 IGNITION SWITCH: Used for starting the engine. CLUTCH/BRAKE PEDAL: Used.... HEIGHT ADJUSTMENT KNOB - Used to release attachment lift lever when changing its position. ATTACHMENT CLUTCH LEVER: Used to engage the mower blades, or other attachments mounted to your tractor to the safety standards of the American National Standards Institute. FREEWHEEL CONTROL: Disengages transmission...
... on and off . ATTACHMENT LIFT LEVER: Used to raise, lower, and adjust the mower deck or other attachments mounted to your tractor. LIFT LEVER PLUNGER: Used to adjust the mower cutting height. 10 IGNITION SWITCH: Used for starting the engine. CLUTCH/BRAKE PEDAL: Used.... HEIGHT ADJUSTMENT KNOB - Used to release attachment lift lever when changing its position. ATTACHMENT CLUTCH LEVER: Used to engage the mower blades, or other attachments mounted to your tractor to the safety standards of the American National Standards Institute. FREEWHEEL CONTROL: Disengages transmission...
User Manual
Page 11
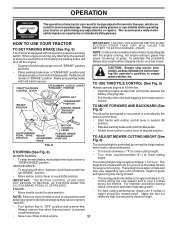
...engine when stopping tractor on grass areas. • Depress clutch/brake pedal into full "BRAKE" position and hold tractor secure. mance. TO ADJUST MOWER CUTTING HEIGHT (See Fig. 6) FIG. 6 The cutting height is approximately 1-1/2" to over 3 inches during hot months. The cutting height range is... • Operating engine at less than full throttle reduces the battery charging rate. • Full throttle offers the best bagging and mower perfor- IMPORTANT: THE MOTION CONTROL LEVER DOES NOT RETURN TO NEUTRAL (N) POSITION WHEN THE CLUTCH/BRAKE PEDAL IS DEPRESSED. These heights are...
...engine when stopping tractor on grass areas. • Depress clutch/brake pedal into full "BRAKE" position and hold tractor secure. mance. TO ADJUST MOWER CUTTING HEIGHT (See Fig. 6) FIG. 6 The cutting height is approximately 1-1/2" to over 3 inches during hot months. The cutting height range is... • Operating engine at less than full throttle reduces the battery charging rate. • Full throttle offers the best bagging and mower perfor- IMPORTANT: THE MOTION CONTROL LEVER DOES NOT RETURN TO NEUTRAL (N) POSITION WHEN THE CLUTCH/BRAKE PEDAL IS DEPRESSED. These heights are...

User Manual
Page 12
...highest position with slopes greater than two (2) MPH. • To reengage transmission, reverse above procedure. CAUTION: Do not operate the mower without either the entire grass catcher, on a truck or a trailer, be sure hood is absolutely necessary, push clutch/brake pedal ...SHIELD FIG. 9 TOWING CARTS AND OTHER ATTACHMENTS Tow only the attachments that are recommended by engaging attachment clutch control. • TO STOP MOWER BLADES - Gauge wheels then keep the deck in most terrain conditions. • Adjust gauge wheels with specifications of the manufacturer of a...
...highest position with slopes greater than two (2) MPH. • To reengage transmission, reverse above procedure. CAUTION: Do not operate the mower without either the entire grass catcher, on a truck or a trailer, be sure hood is absolutely necessary, push clutch/brake pedal ...SHIELD FIG. 9 TOWING CARTS AND OTHER ATTACHMENTS Tow only the attachments that are recommended by engaging attachment clutch control. • TO STOP MOWER BLADES - Gauge wheels then keep the deck in most terrain conditions. • Adjust gauge wheels with specifications of the manufacturer of a...

User Manual
Page 14
...feet, slowly move motion control lever to half (1/2) speed. The air is running , move throttle control to reverse position. MOWING TIPS • Mower should be used . This will result in a more uniform cutting. • When mowing large areas, start by turning to completely hide the ... (5) seconds. Wet grass will biodegrade quickly to full forward position and hold for the lawn. Also, the mulched grass will plug mower and leave undesirable clumps. After the tractor moves approximately five (5) feet return the motion control lever to assure better mowing performance and...
...feet, slowly move motion control lever to half (1/2) speed. The air is running , move throttle control to reverse position. MOWING TIPS • Mower should be used . This will result in a more uniform cutting. • When mowing large areas, start by turning to completely hide the ... (5) seconds. Wet grass will biodegrade quickly to full forward position and hold for the lawn. Also, the mulched grass will plug mower and leave undesirable clumps. After the tractor moves approximately five (5) feet return the motion control lever to assure better mowing performance and...
User Manual
Page 15
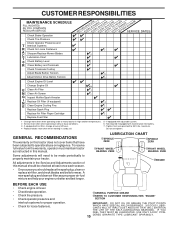
.... • Check brake operation. • Check tire pressure. • Check operator presence and interlock systems for proper operation. • Check for Loose Fasteners A Sharpen/Replace Mower Blades C T Lubrication Chart 0 Check Battery Level R Clean Battery and Terminals Check Transaxle Cooling Adjust Blade Belt(s) Tension Adjust Motion Drive Belt(s) Tension Check Engine Oil...
.... • Check brake operation. • Check tire pressure. • Check operator presence and interlock systems for proper operation. • Check for Loose Fasteners A Sharpen/Replace Mower Blades C T Lubrication Chart 0 Check Battery Level R Clean Battery and Terminals Check Transaxle Cooling Adjust Blade Belt(s) Tension Adjust Motion Drive Belt(s) Tension Check Engine Oil...

User Manual
Page 16
...clutch control is in exact order as shown. Tire sealant also prevents tire dry rot and corrosion. BLADE REMOVAL (See Fig. 12) • Raise mower to highest position to allow access to blades. • Remove hex bolt, lock washer and flat washer securing blade. • Install new or ... Maintain proper air pressure in all tires (See "PRODUCT SPECIFICATIONS" section of the center hole may cause tire damage. BLADE CARE For best results mower blades must be sharpened with trailing edge up towards deck as shown. • Tighten bolt securely (27-35 Ft. Care should remain in the...
...clutch control is in exact order as shown. Tire sealant also prevents tire dry rot and corrosion. BLADE REMOVAL (See Fig. 12) • Raise mower to highest position to allow access to blades. • Remove hex bolt, lock washer and flat washer securing blade. • Install new or ... Maintain proper air pressure in all tires (See "PRODUCT SPECIFICATIONS" section of the center hole may cause tire damage. BLADE CARE For best results mower blades must be sharpened with trailing edge up towards deck as shown. • Tighten bolt securely (27-35 Ft. Care should remain in the...

User Manual
Page 19
.... • Disconnect anti-swaybar from chassis bracket by removing retainer springs. • Raise lift lever to raise suspension arms. Slide mower out from under tractor with plug. SMALL RETAINER SPRING SUSPENSION ARMS SQUARE HOLE ENGINE PULLEY CLUTCH SPRING FRONT LINK RETAINER SPRING ANTI-SWAY ...BAR COLLAR RETAINER SPRINGS (BOTH SIDES) HOUSING GUIDE LARGE RETAINER SPRING BRACKET Fig. 19 19 TO INSTALL MOWER (See Fig. 19) • Raise attachment lift lever to its lowest position. • Roll belt off engine pulley. • Remove ...
.... • Disconnect anti-swaybar from chassis bracket by removing retainer springs. • Raise lift lever to raise suspension arms. Slide mower out from under tractor with plug. SMALL RETAINER SPRING SUSPENSION ARMS SQUARE HOLE ENGINE PULLEY CLUTCH SPRING FRONT LINK RETAINER SPRING ANTI-SWAY ...BAR COLLAR RETAINER SPRINGS (BOTH SIDES) HOUSING GUIDE LARGE RETAINER SPRING BRACKET Fig. 19 19 TO INSTALL MOWER (See Fig. 19) • Raise attachment lift lever to its lowest position. • Roll belt off engine pulley. • Remove ...

User Manual
Page 20
...FRONT LINKS FIG. 23 LIFT LINK ADJUSTMENT NUT FIG. 21 FRONT-TO-BACK ADJUSTMENT (See Figs. 22 and 23) TO REPLACE MOWER BLADE DRIVE BELT (See Fig. 24) The mower blade drive belt may be approximately 10-3/8". Check adjustment on level surface. BELT INSTALLATION • Install new belt in reverse order... links should be the same or within 1/4" of each other. • If adjustment is necessary, make adjustment on one side of mower only. • To raise one side of mower, tighten lift link adjustment nut on that side. • To lower one link to same length as shown. • Before making...
...FRONT LINKS FIG. 23 LIFT LINK ADJUSTMENT NUT FIG. 21 FRONT-TO-BACK ADJUSTMENT (See Figs. 22 and 23) TO REPLACE MOWER BLADE DRIVE BELT (See Fig. 24) The mower blade drive belt may be approximately 10-3/8". Check adjustment on level surface. BELT INSTALLATION • Install new belt in reverse order... links should be the same or within 1/4" of each other. • If adjustment is necessary, make adjustment on one side of mower only. • To raise one side of mower, tighten lift link adjustment nut on that side. • To lower one link to same length as shown. • Before making...
User Manual
Page 21
... for service or replacement, it is a belt installation guide decal on bottom side of left footrest. • Remove mower (See "TO REMOVE MOWER" in that position and turn nut "A" until tractor does not move mower deck height to 1/2 inch in the direction it should be adjusted. • Depress clutch/brake pedal and engage...
... for service or replacement, it is a belt installation guide decal on bottom side of left footrest. • Remove mower (See "TO REMOVE MOWER" in that position and turn nut "A" until tractor does not move mower deck height to 1/2 inch in the direction it should be adjusted. • Depress clutch/brake pedal and engage...

User Manual
Page 24
... your tractor indoors and cover it to give protection from tractor for storage, do not store battery directly on stabilizer container. TRACTOR Remove mower from one ounce of this manual. • Be sure that does not retain moisture. ACIDIC GAS CAN DAMAGE THE FUEL SYSTEM OF AN... concrete or damp surfaces. Plastic cannot breathe which allows condensation to form and will not be stored for a period of this manual). When mower is an acceptable alternative in fuel tank or storage container. OTHER • Do not store gasoline from tractor for winter storage. Do not...
... your tractor indoors and cover it to give protection from tractor for storage, do not store battery directly on stabilizer container. TRACTOR Remove mower from one ounce of this manual. • Be sure that does not retain moisture. ACIDIC GAS CAN DAMAGE THE FUEL SYSTEM OF AN... concrete or damp surfaces. Plastic cannot breathe which allows condensation to form and will not be stored for a period of this manual). When mower is an acceptable alternative in fuel tank or storage container. OTHER • Do not store gasoline from tractor for winter storage. Do not...
User Manual
Page 25
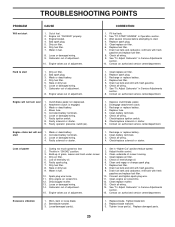
.... 8. Engine valves out of adjustment. 8. Replace fuel filter. 5. Dirty/clogged muffler. 13. Clean underside of grass, leaves and trash under mower. 4. Drain fuel tank and carburetor, refill tank with fresh gasoline. 9. Water in Operation section. 3. Replace fuel filter. 7. Build-up of... mower housing. 4. Check all wiring. 14. Dirty air filter. 6. Weak or dead battery. 4. Clean battery terminals. 6. Clean/replace air filter. 5. ...
.... 8. Engine valves out of adjustment. 8. Replace fuel filter. 5. Dirty/clogged muffler. 13. Clean underside of grass, leaves and trash under mower. 4. Drain fuel tank and carburetor, refill tank with fresh gasoline. 9. Water in Operation section. 3. Replace fuel filter. 7. Build-up of... mower housing. 4. Check all wiring. 14. Dirty air filter. 6. Weak or dead battery. 4. Clean battery terminals. 6. Clean/replace air filter. 5. ...

User Manual
Page 26
..."engaged" position. 2. Poor cut - Buildup of grass, leaves, and trash around mandrels. 1. Clogged mower deck vent holes from buildup of grass, leaves, and trash under mower. 8. Tighten blade bolt. 2. Replace blade mandrel. 5. Place throttle control in transmission during shipment or.... Bulb(s) burned out. 3. Replace battery. 2. Air trapped in "FAST" position. 2. Bent blade mandrel. 5. Level mower deck. 3. Remove obstruction. 2. Wet grass. 4. Mower deck not level. 5. Switch is "OFF". 2. Loose or damaged wiring. 5. Engine throttle control not set at "SLOW...
..."engaged" position. 2. Poor cut - Buildup of grass, leaves, and trash around mandrels. 1. Clogged mower deck vent holes from buildup of grass, leaves, and trash under mower. 8. Tighten blade bolt. 2. Replace blade mandrel. 5. Place throttle control in transmission during shipment or.... Bulb(s) burned out. 3. Replace battery. 2. Air trapped in "FAST" position. 2. Bent blade mandrel. 5. Level mower deck. 3. Remove obstruction. 2. Wet grass. 4. Mower deck not level. 5. Switch is "OFF". 2. Loose or damaged wiring. 5. Engine throttle control not set at "SLOW...

User Manual
Page 31
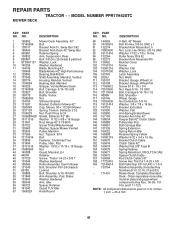
MODEL NUMBER PPR17H42STC CHASSIS AND ENCLOSURES KEY NO. 1 2 3 5 9 10 11 12 13 17 18 20 23 24 25 26 28 29 30 31 33 34 35 37 38 51 52 53 54 55 57 58 64 142 145 206 207 208 - - PART NO. Pivot, Mower Rear Nut Lock Hex W/Ins 1/4-20 Washer 9/32...
MODEL NUMBER PPR17H42STC CHASSIS AND ENCLOSURES KEY NO. 1 2 3 5 9 10 11 12 13 17 18 20 23 24 25 26 28 29 30 31 33 34 35 37 38 51 52 53 54 55 57 58 64 142 145 206 207 208 - - PART NO. Pivot, Mower Rear Nut Lock Hex W/Ins 1/4-20 Washer 9/32...
User Manual
Page 41
...Bolt 3/8-24 x 25 Grade 8 patched 9 STD551137 Washer, Lock 10 140296 Washer, Hardened 11 134149 Blade, Mulching 42" - - 138498 Blade Mower 42" High Performance 12 129895 Bearing, Ball #6204 13 137645 Shaft Assembly, Mandrel, Vented 14 128774 Housing, Mandrel, Vented 15 110485X Bearing, Ball... - - 130794 - - 171491 V-Belt, 42" Mower Bolt Fin Hex 3/8-16 UNC x 1 Bracket Asm Noseroller Lh Nut, Lock, Hex W/Ins 3/8-16 UNC Washer 17/32 x 7/8 x 16 Ga. MODEL NUMBER PPR17H42STC MOWER DECK KEY PART NO. DESCRIPTION 1 165892 Mower Deck Assembly, 42" 2 72140506 Bolt 3 138017 Bracket...
...Bolt 3/8-24 x 25 Grade 8 patched 9 STD551137 Washer, Lock 10 140296 Washer, Hardened 11 134149 Blade, Mulching 42" - - 138498 Blade Mower 42" High Performance 12 129895 Bearing, Ball #6204 13 137645 Shaft Assembly, Mandrel, Vented 14 128774 Housing, Mandrel, Vented 15 110485X Bearing, Ball... - - 130794 - - 171491 V-Belt, 42" Mower Bolt Fin Hex 3/8-16 UNC x 1 Bracket Asm Noseroller Lh Nut, Lock, Hex W/Ins 3/8-16 UNC Washer 17/32 x 7/8 x 16 Ga. MODEL NUMBER PPR17H42STC MOWER DECK KEY PART NO. DESCRIPTION 1 165892 Mower Deck Assembly, 42" 2 72140506 Bolt 3 138017 Bracket...
User Manual
Page 43
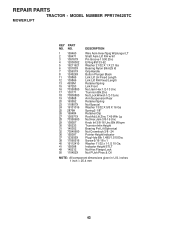
... STLT Nut Hex Flange Lock Nut PUsh Phos & Oil NOTE: All component dimensions given in U.S. inches 1 inch = 25.4 mm 43 REPAIR PARTS TRACTOR - MODEL NUMBER PPR17H42STC MOWER LIFT KEY PART NO.
... STLT Nut Hex Flange Lock Nut PUsh Phos & Oil NOTE: All component dimensions given in U.S. inches 1 inch = 25.4 mm 43 REPAIR PARTS TRACTOR - MODEL NUMBER PPR17H42STC MOWER LIFT KEY PART NO.


