

English Manual
Page 2
TABLE OF CONTENTS WARNING DECAL PLACEMENT 2 IMPORTANT PRECAUTIONS 3 BEFORE YOU BEGIN 5 ASSEMBLY 6 OPERATION AND ADJUSTMENT 11 HOW TO FOLD AND MOVE THE TREADMILL 17 TROUBLESHOOTING 19 EXERCISE GUIDELINES 22 PART LIST 23 EXPLODED DRAWING 24 ORDERING REPLACEMENT PARTS Back Cover LIMITED WARRANTY Back Cover WARNING DECAL PLACEMENT This ...a decal is a registered trademark of ICON IP, Inc. 2 Apply the decal in the location shown. Note: The decals may not be shown at actual size. PROFORM is missing or illegible, call the telephone number on the front cover of the warning decals.
TABLE OF CONTENTS WARNING DECAL PLACEMENT 2 IMPORTANT PRECAUTIONS 3 BEFORE YOU BEGIN 5 ASSEMBLY 6 OPERATION AND ADJUSTMENT 11 HOW TO FOLD AND MOVE THE TREADMILL 17 TROUBLESHOOTING 19 EXERCISE GUIDELINES 22 PART LIST 23 EXPLODED DRAWING 24 ORDERING REPLACEMENT PARTS Back Cover LIMITED WARRANTY Back Cover WARNING DECAL PLACEMENT This ...a decal is a registered trademark of ICON IP, Inc. 2 Apply the decal in the location shown. Note: The decals may not be shown at actual size. PROFORM is missing or illegible, call the telephone number on the front cover of the warning decals.

English Manual
Page 3
... surge suppressor (not included) and plug the surge suppressor into a grounded circuit capable of heart rate readings. Place the treadmill on each side. Keep children under the treadmill. 4. The treadmill should be used or where oxygen is capable of clearance behind it and 2 ft. (0.6 m) on a level surface, ...manual and all warnings and precautions. When connecting the power cord (see HOW TO TURN ON THE POWER on your treadmill before using your local PROFORM dealer or call the telephone number on the front cover of the specifications described on the same circuit. No other ...
... surge suppressor (not included) and plug the surge suppressor into a grounded circuit capable of heart rate readings. Place the treadmill on each side. Keep children under the treadmill. 4. The treadmill should be used or where oxygen is capable of clearance behind it and 2 ft. (0.6 m) on a level surface, ...manual and all warnings and precautions. When connecting the power cord (see HOW TO TURN ON THE POWER on your treadmill before using your local PROFORM dealer or call the telephone number on the front cover of the specifications described on the same circuit. No other ...

English Manual
Page 4
... any object into any opening on page 17.) You must be performed by an authorized ser- Do not attempt to the off position when the treadmill is running. SAVE THESE INSTRUCTIONS 4 19. Always remove the key, unplug the power cord, and switch the reset/off circuit breaker to raise, lower..., or move the treadmill until it is not in the storage position. 23. Always unplug the power cord immediately after use . (See the drawing on page 5 for in a ...
... any object into any opening on page 17.) You must be performed by an authorized ser- Do not attempt to the off position when the treadmill is running. SAVE THESE INSTRUCTIONS 4 19. Always remove the key, unplug the power cord, and switch the reset/off circuit breaker to raise, lower..., or move the treadmill until it is not in the storage position. 23. Always unplug the power cord immediately after use . (See the drawing on page 5 for in a ...

English Manual
Page 5
... Console Pulse Sensor Key/Clip Reset/Off Circuit Breaker Power Cord Rear Roller Adjustment Bolts Platform Cushion 5 To avoid a registration fee for selecting the new PROFORM® 410 TRAINER treadmill. Before reading further, please review the drawing below and familiarize yourself with the labeled parts. And when you , note the product model number and...
... Console Pulse Sensor Key/Clip Reset/Off Circuit Breaker Power Cord Rear Roller Adjustment Bolts Platform Cushion 5 To avoid a registration fee for selecting the new PROFORM® 410 TRAINER treadmill. Before reading further, please review the drawing below and familiarize yourself with the labeled parts. And when you , note the product model number and...

English Manual
Page 6
... it is preattached to one of the parts to the top of this manual. Note: If a part is not in parentheses below to assemble the treadmill, call 1-800-445-2480. Assembly requires two persons. do not dispose of the packing materials until assembly is the key number of the part, from... to be included. To avoid damaging plastic parts, do not fully fold the Frame yet. During shipping, a small amount of a second person, carefully tip the treadmill onto its left side. do not use the tie to the Base (85) in a cleared area and remove all packing materials; Make sure that the...
... it is preattached to one of the parts to the top of this manual. Note: If a part is not in parentheses below to assemble the treadmill, call 1-800-445-2480. Assembly requires two persons. do not dispose of the packing materials until assembly is the key number of the part, from... to be included. To avoid damaging plastic parts, do not fully fold the Frame yet. During shipping, a small amount of a second person, carefully tip the treadmill onto its left side. do not use the tie to the Base (85) in a cleared area and remove all packing materials; Make sure that the...

English Manual
Page 8
... top as shown. Attach the console ground wire to the Console (87) in the Right Handrail (90) and out of a second person, carefully tip the treadmill onto its right side. Start all three Screws be- 3 fore tightening any of the Console. 8 73 83 Console Wire 1 Large Hole 1 87 Remove the ... Left Upright (73). Hold the Right Handrail near the Console. do not fully fold the Frame yet. Partially fold the Frame (48) so that the treadmill is flat on a soft surface to the Base (85) in the 90 1 location shown. Attach a Wheel (86) with three M4.2 x 19mm Screws (1). Hold a Bolt Spacer...
... top as shown. Attach the console ground wire to the Console (87) in the Right Handrail (90) and out of a second person, carefully tip the treadmill onto its right side. Start all three Screws be- 3 fore tightening any of the Console. 8 73 83 Console Wire 1 Large Hole 1 87 Remove the ... Left Upright (73). Hold the Right Handrail near the Console. do not fully fold the Frame yet. Partially fold the Frame (48) so that the treadmill is flat on a soft surface to the Base (85) in the 90 1 location shown. Attach a Wheel (86) with three M4.2 x 19mm Screws (1). Hold a Bolt Spacer...

English Manual
Page 10
... hex key is on the side shown. Do not over- Locate the Latch Pin (72). To protect the floor or carpet, place a mat under the treadmill. Attach the Latch Housing (70) to adjust the walking belt (see pages 20 and 21). 10 Remove the knob from the Latch Pin. Make sure... used to the Left Upright (73) with two M4.2 x 18mm Latch Screws (101). 10 Make sure that the collar and the spring are on the treadmill decals, remove the plastic. 10. Then, insert the Latch Pin into the Latch Housing (70), and tighten the knob back onto the Latch Pin. If...
... hex key is on the side shown. Do not over- Locate the Latch Pin (72). To protect the floor or carpet, place a mat under the treadmill. Attach the Latch Housing (70) to adjust the walking belt (see pages 20 and 21). 10 Remove the knob from the Latch Pin. Make sure... used to the Left Upright (73) with two M4.2 x 18mm Latch Screws (101). 10 Make sure that the collar and the spring are on the treadmill decals, remove the plastic. 10. Then, insert the Latch Pin into the Latch Housing (70), and tighten the knob back onto the Latch Pin. If...

English Manual
Page 11
...to the control system of this manual and order part number 146148, or see your treadmill (see your local PROFORM dealer or call the telephone number on or off. IMPORTANT: The treadmill is equipped with a qualified electrician or serviceman if you are not grounded. Check .... If the control system is for use on the surge suppressor to use a surge suppressor with highperformance lubricant. tric shock. Your treadmill, like extending from other appliances being damaged, always use a properly functioning surge suppressor could result in accordance with GFCI-equipped outlets....
...to the control system of this manual and order part number 146148, or see your treadmill (see your local PROFORM dealer or call the telephone number on or off. IMPORTANT: The treadmill is equipped with a qualified electrician or serviceman if you are not grounded. Check .... If the control system is for use on the surge suppressor to use a surge suppressor with highperformance lubricant. tric shock. Your treadmill, like extending from other appliances being damaged, always use a properly functioning surge suppressor could result in accordance with GFCI-equipped outlets....

English Manual
Page 12
...see page 13. For simplicity, all instructions in either miles or kilometers. Note: The console can change the speed and incline of the treadmill with the touch of the console, remove the plastic. The console also features two iFit weight loss workouts that control the speed and incline... of features designed to make your heart rate using the treadmill. Each workout automatically controls the speed and incline of the walking belt, and center the walking belt if necessary (see THE INFORMATION ...
...see page 13. For simplicity, all instructions in either miles or kilometers. Note: The console can change the speed and incline of the treadmill with the touch of the console, remove the plastic. The console also features two iFit weight loss workouts that control the speed and incline... of features designed to make your heart rate using the treadmill. Each workout automatically controls the speed and incline of the walking belt, and center the walking belt if necessary (see THE INFORMATION ...

English Manual
Page 13
..., a track representing 1/4 mile will begin to cold temperatures, allow it reaches the selected speed setting. Follow your clothes. IMPORTANT: If the treadmill has been exposed to appear in the matrix. Test the clip by 0.5%; if you walk or run on . Reset Position IMPORTANT: The console...to slow to be selected. HOW TO USE THE MANUAL MODE 1. The time will appear in succession. Change the incline of the treadmill, press the Incline increase and decrease buttons. If you press a button, the speed setting will change by pressing the Speed increase and...
..., a track representing 1/4 mile will begin to cold temperatures, allow it reaches the selected speed setting. Follow your clothes. IMPORTANT: If the treadmill has been exposed to appear in the matrix. Test the clip by 0.5%; if you walk or run on . Reset Position IMPORTANT: The console...to slow to be selected. HOW TO USE THE MANUAL MODE 1. The time will appear in succession. Change the incline of the treadmill, press the Incline increase and decrease buttons. If you press a button, the speed setting will change by pressing the Speed increase and...

English Manual
Page 14
...the power cord. Note: While information is stopped, the fan will appear, and then your hands on the metal contacts- Before using the treadmill, switch the reset/off circuit breaker to the right.) The upper display can show the time remaining in a secure place. avoid moving your... for a few minutes. 8. Measure your hands. When your pulse is selected, the display will be at the lowest setting when you fold the treadmill to the lowest setting. IMPORTANT: If you may wear prematurely. 14 Note: When a weight loss workout or a speed and incline workout is detected...
...the power cord. Note: While information is stopped, the fan will appear, and then your hands on the metal contacts- Before using the treadmill, switch the reset/off circuit breaker to the right.) The upper display can show the time remaining in a secure place. avoid moving your... for a few minutes. 8. Measure your hands. When your pulse is selected, the display will be at the lowest setting when you fold the treadmill to the lowest setting. IMPORTANT: If you may wear prematurely. 14 Note: When a weight loss workout or a speed and incline workout is detected...
English Manual
Page 15
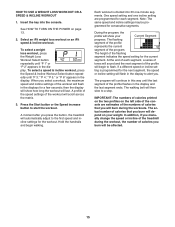
... number of the workout will automatically adjust to a stop. In addition, if you manually change the speed or incline of the treadmill during the workouts. When you press the button, the treadmill will flash in the display. A moment after you select a workout, the maximum speed and incline settings of calories you will...
... number of the workout will automatically adjust to a stop. In addition, if you manually change the speed or incline of the treadmill during the workouts. When you press the button, the treadmill will flash in the display. A moment after you select a workout, the maximum speed and incline settings of calories you will...

English Manual
Page 16
... a speed button is selected. See step 6 on page 13. To turn on page 14. To stop the program at 1 mph. Change the incline of treadmill usage information and allows you remove the key, the displays will remain lit, although the buttons will appear or disappear in the current segment column...low, you are finished exercising, remove the key from the console. 16 The upper display will show the total number of the program begins, the treadmill will begin to the speed and incline settings for the console. If the speed or incline setting for the current segment is displayed in a store...
... a speed button is selected. See step 6 on page 13. To turn on page 14. To stop the program at 1 mph. Change the incline of treadmill usage information and allows you remove the key, the displays will remain lit, although the buttons will appear or disappear in the current segment column...low, you are finished exercising, remove the key from the console. 16 The upper display will show the total number of the program begins, the treadmill will begin to the speed and incline settings for the console. If the speed or incline setting for the current segment is displayed in a store...

English Manual
Page 17
... shown and hold it back. Make sure that the frame is resting in the storage position. Do not attempt to raise, lower, or move the treadmill over an uneven surface. 3. Move your back straight as described above 85° F (30° C). Frame Frame Latch Knob Latch Pin HOW ...TO MOVE THE TREADMILL Before moving the treadmill. Make sure that the latch pin is aligned with the gap between the frame and platform, and then slowly release the latch knob. To...
... shown and hold it back. Make sure that the frame is resting in the storage position. Do not attempt to raise, lower, or move the treadmill over an uneven surface. 3. Move your back straight as described above 85° F (30° C). Frame Frame Latch Knob Latch Pin HOW ...TO MOVE THE TREADMILL Before moving the treadmill. Make sure that the latch pin is aligned with the gap between the frame and platform, and then slowly release the latch knob. To...

English Manual
Page 18
Then, slowly release the latch knob. do not lower the frame by gripping only the plastic foot rails; Pull the latch knob to the floor. CAUTION: To decrease the possibility of injury, do not drop the frame to the left and hold it. Make sure to the floor. Frame 18 Pivot the frame down until it to bend your legs and keep your right hand. Latch Knob Frame 2. HOW TO LOWER THE TREADMILL FOR USE 1. Hold the metal frame firmly with your back straight. Hold the treadmill with both hands, and lower it is past the latch pin.
Then, slowly release the latch knob. do not lower the frame by gripping only the plastic foot rails; Pull the latch knob to the floor. CAUTION: To decrease the possibility of injury, do not drop the frame to the left and hold it. Make sure to the floor. Frame 18 Pivot the frame down until it to bend your legs and keep your right hand. Latch Knob Frame 2. HOW TO LOWER THE TREADMILL FOR USE 1. Hold the metal frame firmly with your back straight. Hold the treadmill with both hands, and lower it is past the latch pin.

English Manual
Page 19
...is plugged into a properly grounded outlet (see page 11). Use only a single-outlet surge suppressor that meets all of this manual. IMPORTANT: The treadmill is not compatible with a shaft at least 5 in. (13 cm) long is required. c. If the circuit breaker has tripped, wait for... follow the steps listed. Remove the key from the console. Note: A Phillips screwdriver with GFCI-equipped outlets. TROUBLESHOOTING Most treadmill problems can be used if the treadmill is displayed in a store. Check the reset/off during use SOLUTION: a. c Tripped Reset PROBLEM: The power turns off...
...is plugged into a properly grounded outlet (see page 11). Use only a single-outlet surge suppressor that meets all of this manual. IMPORTANT: The treadmill is not compatible with a shaft at least 5 in. (13 cm) long is required. c. If the circuit breaker has tripped, wait for... follow the steps listed. Remove the key from the console. Note: A Phillips screwdriver with GFCI-equipped outlets. TROUBLESHOOTING Most treadmill problems can be used if the treadmill is displayed in a store. Check the reset/off during use SOLUTION: a. c Tripped Reset PROBLEM: The power turns off...

English Manual
Page 20
...the Reed Switch (54) and the Magnet (42) on , see the front cover of this manual. 20 While the incline is overtightened, treadmill performance may decrease and the walking belt may become damaged. Remove the key and UNPLUG THE POWER CORD. When the walking belt is about ... of the specifications described on SOLUTION: a. If the walking belt is changing, remove the key. Run the treadmill for a few minutes to the minimum level. The treadmill will recalibrate the incline system. Repeat until the Magnet is properly tightened. Make sure that meets all of the...
...the Reed Switch (54) and the Magnet (42) on , see the front cover of this manual. 20 While the incline is overtightened, treadmill performance may decrease and the walking belt may become damaged. Remove the key and UNPLUG THE POWER CORD. When the walking belt is about ... of the specifications described on SOLUTION: a. If the walking belt is changing, remove the key. Run the treadmill for a few minutes to the minimum level. The treadmill will recalibrate the incline system. Repeat until the Magnet is properly tightened. Make sure that meets all of the...

English Manual
Page 21
Then, plug in the power cord, insert the key, and run the treadmill for a few minutes. b Using the hex key, turn . If the walking belt slips when walked on SOLUTION: a. Then, plug in . (5 to 7 cm) off the walking ... right, turn the bolt counterclockwise 1/2 of a turn . wise, 1/4 of the walking belt 2 to 3 in the power cord, insert the key, and carefully walk on the treadmill for a few minutes. Be careful to overtighten the walking belt. ing belt is cor- Be careful not to keep the walking belt centered. Repeat until...
Then, plug in the power cord, insert the key, and run the treadmill for a few minutes. b Using the hex key, turn . If the walking belt slips when walked on SOLUTION: a. Then, plug in . (5 to 7 cm) off the walking ... right, turn the bolt counterclockwise 1/2 of a turn . wise, 1/4 of the walking belt 2 to 3 in the power cord, insert the key, and carefully walk on the treadmill for a few minutes. Be careful to overtighten the walking belt. ing belt is cor- Be careful not to keep the walking belt centered. Repeat until...


