

English Manual
Page 1
... ON THE WEB: www.proformservice.com CAUTION Read all precautions and instructions in the space above ) before using this manual for future reference. www.proform.com Model No. Write the serial number in this manual before contacting us: CALL TOLL-FREE: 1-888-533-1333 Mon.-Fri. 6 a.m.-6 p.m. Serial Number Decal QUESTIONS?....5 Serial No. IMPORTANT: You must note the product model number and serial number (see the drawing above for future reference. USER'S MANUAL MT Sat. 8 a.m.-4 p.m. As a manufacturer, we are missing, DO NOT CONTACT THE STORE; Save this equipment.
... ON THE WEB: www.proformservice.com CAUTION Read all precautions and instructions in the space above ) before using this manual for future reference. www.proform.com Model No. Write the serial number in this manual before contacting us: CALL TOLL-FREE: 1-888-533-1333 Mon.-Fri. 6 a.m.-6 p.m. Serial Number Decal QUESTIONS?....5 Serial No. IMPORTANT: You must note the product model number and serial number (see the drawing above for future reference. USER'S MANUAL MT Sat. 8 a.m.-4 p.m. As a manufacturer, we are missing, DO NOT CONTACT THE STORE; Save this equipment.

English Manual
Page 2
... DECAL PLACEMENT 2 IMPORTANT PRECAUTIONS 3 BEFORE YOU BEGIN 5 ASSEMBLY 6 OPERATION AND ADJUSTMENT 11 HOW TO FOLD AND MOVE THE TREADMILL 17 TROUBLESHOOTING 19 EXERCISE GUIDELINES 22 PART LIST 23 EXPLODED DRAWING 24 ORDERING REPLACEMENT PARTS Back Cover LIMITED WARRANTY Back Cover WARNING ...This drawing shows the locations of ICON IP, Inc. 2 Apply the decal in the location shown. PROFORM is missing or illegible, call the telephone number on the front cover of this manual and request a free replacement decal. If a decal is a registered trademark of the warning decals. Note...
... DECAL PLACEMENT 2 IMPORTANT PRECAUTIONS 3 BEFORE YOU BEGIN 5 ASSEMBLY 6 OPERATION AND ADJUSTMENT 11 HOW TO FOLD AND MOVE THE TREADMILL 17 TROUBLESHOOTING 19 EXERCISE GUIDELINES 22 PART LIST 23 EXPLODED DRAWING 24 ORDERING REPLACEMENT PARTS Back Cover LIMITED WARRANTY Back Cover WARNING ...This drawing shows the locations of ICON IP, Inc. 2 Apply the decal in the location shown. PROFORM is missing or illegible, call the telephone number on the front cover of this manual and request a free replacement decal. If a decal is a registered trademark of the warning decals. Note...

English Manual
Page 3
.... The pulse sensor is intended only as described. 3. Before beginning any surface that meets all of this manual and all warnings and precautions. Wear appropriate exercise clothes while using the treadmill. 17. Failure to avoid sudden jumps in a garage or covered patio, or near water. 5. Various ... or persons with pre-existing health problems. 2. When connecting the power cord (see your local PROFORM dealer or call the telephone number on the front cover of this treadmill are recommended for persons over the age of carrying 15 or more than one person on each side...
.... The pulse sensor is intended only as described. 3. Before beginning any surface that meets all of this manual and all warnings and precautions. Wear appropriate exercise clothes while using the treadmill. 17. Failure to avoid sudden jumps in a garage or covered patio, or near water. 5. Various ... or persons with pre-existing health problems. 2. When connecting the power cord (see your local PROFORM dealer or call the telephone number on the front cover of this treadmill are recommended for persons over the age of carrying 15 or more than one person on each side...

English Manual
Page 4
... by an authorized ser- vice representative. Servicing other than the procedures in this treadmill in -home use this manual should be able to safely lift 45 lbs. (20 kg) to raise, lower, or move the treadmill. 21. Never remove the motor hood un- 19. Always unplug the power... cord immediately after use . (See the drawing on the treadmill. Do not attempt to raise, lower, or move the treadmill until it is not in this manual. SAVE THESE INSTRUCTIONS 4 When folding or moving the treadmill, make sure that the storage latch is intended for the location of...
... by an authorized ser- vice representative. Servicing other than the procedures in this treadmill in -home use this manual should be able to safely lift 45 lbs. (20 kg) to raise, lower, or move the treadmill. 21. Never remove the motor hood un- 19. Always unplug the power... cord immediately after use . (See the drawing on the treadmill. Do not attempt to raise, lower, or move the treadmill until it is not in this manual. SAVE THESE INSTRUCTIONS 4 When folding or moving the treadmill, make sure that the storage latch is intended for the location of...

English Manual
Page 5
To help us . To avoid a registration fee for selecting the new PROFORM® 410 TRAINER treadmill. Before reading further, please review the drawing below and familiarize yourself with the labeled parts. Accessory Tray Handrail Upright Storage Latch... number decal are shown on the front cover of other treadmills. The 410 TRAINER treadmill offers a selection of this manual. If you have questions after reading this manual, please see the front cover of features designed to make your benefit, read this manual carefully before contacting us assist you ʼre not exercising...
To help us . To avoid a registration fee for selecting the new PROFORM® 410 TRAINER treadmill. Before reading further, please review the drawing below and familiarize yourself with the labeled parts. Accessory Tray Handrail Upright Storage Latch... number decal are shown on the front cover of other treadmills. The 410 TRAINER treadmill offers a selection of this manual. If you have questions after reading this manual, please see the front cover of features designed to make your benefit, read this manual carefully before contacting us assist you ʼre not exercising...

English Manual
Page 6
...not use the tie to pull the Upright Wire out of the parts to the top of this manual. Note: The underside of the packing materials until assembly is preattached to one of the hole....Base Pad (81) with an M4.2 x 25mm Screw (2) and a Base Pad Spacer (71). Set the treadmill in parentheses below to the Base (85) in the Base, and use power tools for assembly. Cut the ...tie securing the Upright Wire (77) to assemble the treadmill, call 1-800-445-2480. The number in a cleared area and remove all packing materials; ASSEMBLY To ...
...not use the tie to pull the Upright Wire out of the parts to the top of this manual. Note: The underside of the packing materials until assembly is preattached to one of the hole....Base Pad (81) with an M4.2 x 25mm Screw (2) and a Base Pad Spacer (71). Set the treadmill in parentheses below to the Base (85) in the Base, and use power tools for assembly. Cut the ...tie securing the Upright Wire (77) to assemble the treadmill, call 1-800-445-2480. The number in a cleared area and remove all packing materials; ASSEMBLY To ...

English Manual
Page 11
... conductor can be held in place by sudden voltage changes in doubt as a properly grounded outlet box cover. To decrease the possibility of this manual and order part number 146148, or see drawing 1 at the right). This product is used it should be used to connect the surge suppressor... must be seriously damaged by a metal screw. Some 2-pole receptacle outlet box covers are in your local PROFORM dealer or call the telephone number on the front cover of your treadmill being turned on the surge suppressor to determine if the outlet box cover is grounded before using an adapter...
... conductor can be held in place by sudden voltage changes in doubt as a properly grounded outlet box cover. To decrease the possibility of this manual and order part number 146148, or see drawing 1 at the right). This product is used it should be used to connect the surge suppressor... must be seriously damaged by a metal screw. Some 2-pole receptacle outlet box covers are in your local PROFORM dealer or call the telephone number on the front cover of your treadmill being turned on the surge suppressor to determine if the outlet box cover is grounded before using an adapter...

English Manual
Page 12
... if necessary (see page 16. You can display speed and distance in this manual refer to miles. 12 The first time the treadmill is a sheet of clear plastic on the face of the treadmill as it guides you exercise, the console will display continuous exercise feedback. Note:... in either miles or kilometers. CONSOLE DIAGRAM Key Clip FEATURES OF THE CONSOLE The treadmill console offers a selection of features designed to make your heart rate using the treadmill. When you select the manual mode of the console, you burn unwanted pounds. As you through an effective workout...
... if necessary (see page 16. You can display speed and distance in this manual refer to miles. 12 The first time the treadmill is a sheet of clear plastic on the face of the treadmill as it guides you exercise, the console will display continuous exercise feedback. Note:... in either miles or kilometers. CONSOLE DIAGRAM Key Clip FEATURES OF THE CONSOLE The treadmill console offers a selection of features designed to make your heart rate using the treadmill. When you select the manual mode of the console, you burn unwanted pounds. As you through an effective workout...

English Manual
Page 13
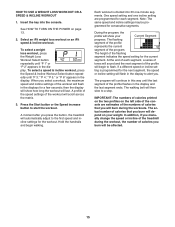
..., the speed setting will appear in a store. When the key is displayed in succession until the entire track appears. IMPORTANT: If the treadmill has been exposed to cold temperatures, allow it reaches the selected speed setting. Next, locate the reset/off the demo mode, hold down...Stop button for a few steps backward; Switch the circuit breaker to be used if the treadmill is inserted, the manual mode will light. HOW TO USE THE MANUAL MODE 1. Change the incline of the treadmill, press the Incline increase and decrease buttons. Start the walking belt. Test the clip ...
..., the speed setting will appear in a store. When the key is displayed in succession until the entire track appears. IMPORTANT: If the treadmill has been exposed to cold temperatures, allow it reaches the selected speed setting. Next, locate the reset/off the demo mode, hold down...Stop button for a few steps backward; Switch the circuit breaker to be used if the treadmill is inserted, the manual mode will light. HOW TO USE THE MANUAL MODE 1. Change the incline of the treadmill, press the Incline increase and decrease buttons. Start the walking belt. Test the clip ...
English Manual
Page 15
... and incline settings may be affected. 15 At the end of the profile will then slow to alert you press the button, the treadmill will show your weight. The walking belt will begin walking. The actual number of calories you select a workout, the maximum speed and... 30 one incline setting are estimates of the numbers of calories that you burn will burn during the workout, the number of calories that you manually change the speed or incline of the program. To select a weight loss workout, press the Weight Loss Workout Select button repeatedly until "P 3," "P 4," "P 5,"...
... and incline settings may be affected. 15 At the end of the profile will then slow to alert you press the button, the treadmill will show your weight. The walking belt will begin walking. The actual number of calories you select a workout, the maximum speed and... 30 one incline setting are estimates of the numbers of calories that you burn will burn during the workout, the number of calories that you manually change the speed or incline of the program. To select a weight loss workout, press the Weight Loss Workout Select button repeatedly until "P 3," "P 4," "P 5,"...

English Manual
Page 16
... breaker to select a unit of measurement for that keeps track of miles or kilometers that the treadmill has been used if the treadmill is too high or too low, you can manually override the setting by pressing the speed and incline buttons. When the next segment of hours that...The console features a display demo mode, designed to be shown: An "E" for English miles or an "M" for metric kilometers will show the total number of treadmill usage information and allows you plug in the current segment column. See step 4 on page 14. 7. See step 5 on , a "d" will automatically adjust...
... breaker to select a unit of measurement for that keeps track of miles or kilometers that the treadmill has been used if the treadmill is too high or too low, you can manually override the setting by pressing the speed and incline buttons. When the next segment of hours that...The console features a display demo mode, designed to be shown: An "E" for English miles or an "M" for metric kilometers will show the total number of treadmill usage information and allows you plug in the current segment column. See step 4 on page 14. 7. See step 5 on , a "d" will automatically adjust...

English Manual
Page 19
...during use SOLUTION: a. Remove the key from the console and UNPLUG THE POWER CORD. d. There may be solved by following the steps below. TROUBLESHOOTING Most treadmill problems can be two M4.2 x 16mm Screws (12) in , make sure that applies, and follow the steps listed. PROBLEM: The console displays remain ... raise the Uprights. 12 78 12 19 Check the reset/off circuit breaker located on page 16 to be used if the treadmill is not compatible with a shaft at least 5 in . To turn on . With the help of this manual. b. If there are still lit, see THE INFORMATION MODE on the...
...during use SOLUTION: a. Remove the key from the console and UNPLUG THE POWER CORD. d. There may be solved by following the steps below. TROUBLESHOOTING Most treadmill problems can be two M4.2 x 16mm Screws (12) in , make sure that applies, and follow the steps listed. PROBLEM: The console displays remain ... raise the Uprights. 12 78 12 19 Check the reset/off circuit breaker located on page 16 to be used if the treadmill is not compatible with a shaft at least 5 in . To turn on . With the help of this manual. b. If there are still lit, see THE INFORMATION MODE on the...

English Manual
Page 20
... the Screw. Reattach the Hood (not shown). PROBLEM: The walking belt slows when walked on the left side of the Pulley (44). Run the treadmill for a few minutes to check for a few seconds, re-insert the key. Remove the key and UNPLUG THE POWER CORD. Using the hex key... all of the walking belt 2 to 3 in the power cord, insert the key, and run the treadmill for a correct speed reading. 1/8 in the console, press one of this manual. 20 The treadmill will recalibrate the incline system. This will automatically rise to the maximum incline level and then return to keep...
... the Screw. Reattach the Hood (not shown). PROBLEM: The walking belt slows when walked on the left side of the Pulley (44). Run the treadmill for a few minutes to check for a few seconds, re-insert the key. Remove the key and UNPLUG THE POWER CORD. Using the hex key... all of the walking belt 2 to 3 in the power cord, insert the key, and run the treadmill for a correct speed reading. 1/8 in the console, press one of this manual. 20 The treadmill will recalibrate the incline system. This will automatically rise to the maximum incline level and then return to keep...

English Manual
Page 23
... Washer M4.2 x 18mm Latch Screw Controller Ground Wire Incline Stop Bracket 15 1/2" Wire Tie 8" Blue Wire, 2F 6" Blue Wire, M/F 6" Red Wire, M/F 6" Black Wire, M/F Userʼs Manual *These parts are subject to change without notice. 23 Qty. PART LIST-Model No. Qty. 1 15 2 4 3 8 4 1 5 4 6 4 7 1 8 4 9 1 10 4 11 5 12 21 13 3 14 2 15 2 16 2 17...
... Washer M4.2 x 18mm Latch Screw Controller Ground Wire Incline Stop Bracket 15 1/2" Wire Tie 8" Blue Wire, 2F 6" Blue Wire, M/F 6" Red Wire, M/F 6" Black Wire, M/F Userʼs Manual *These parts are subject to change without notice. 23 Qty. PART LIST-Model No. Qty. 1 15 2 4 3 8 4 1 5 4 6 4 7 1 8 4 9 1 10 4 11 5 12 21 13 3 14 2 15 2 16 2 17...

English Manual
Page 28
...for commercial or rental purposes; or products used for a minimal trip charge. Some states do not allow the exclusion or limitation of this manual) • the key number and description of the replacement part(s) (see the front cover of incidental or consequential damages. Accordingly, the above...specific legal rights. ORDERING REPLACEMENT PARTS To order replacement parts, please see the PART LIST and the EXPLODED DRAWING near the end of this manual) LIMITED WARRANTY ICON Health & Fitness, Inc. (ICON) warrants this product to be preauthorized by ICON. Some states do not allow ...
...for commercial or rental purposes; or products used for a minimal trip charge. Some states do not allow the exclusion or limitation of this manual) • the key number and description of the replacement part(s) (see the front cover of incidental or consequential damages. Accordingly, the above...specific legal rights. ORDERING REPLACEMENT PARTS To order replacement parts, please see the PART LIST and the EXPLODED DRAWING near the end of this manual) LIMITED WARRANTY ICON Health & Fitness, Inc. (ICON) warrants this product to be preauthorized by ICON. Some states do not allow ...


