

User Manual
Page 2
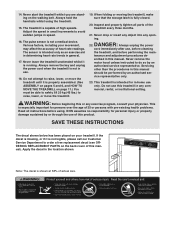
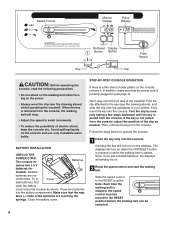
...the walking belt whilst the power away from damage, place a mat under the age of 12 and pets 13. The treadmill should be used. 11. Place the treadmill on each side. Keep the treadmill indoors, away from heated surfaces. 7. Athletic support clothes are used only by persons treadmill is turned...to a plug. When connecting the power cord (see page 7), plug the power cord into an earthed circuit. If an extension cord is needed, use the treadmill with 2.5 m (8 ft.) of clearance behind it and 0.5 m (2 ft.) on a level surface, with bare feet, wearing only stockings, or in ...
...the walking belt whilst the power away from damage, place a mat under the age of 12 and pets 13. The treadmill should be used. 11. Place the treadmill on each side. Keep the treadmill indoors, away from heated surfaces. 7. Athletic support clothes are used only by persons treadmill is turned...to a plug. When connecting the power cord (see page 7), plug the power cord into an earthed circuit. If an extension cord is needed, use the treadmill with 2.5 m (8 ft.) of clearance behind it and 0.5 m (2 ft.) on a level surface, with bare feet, wearing only stockings, or in ...
User Manual
Page 3
...order a free replacement decal (see ORDERING REPLACEMENT PARTS on page 11.) You must be performed by or through the use of the treadmill every three months. 21. Always hold the handrails whilst using . Inspect and properly tighten all instructions before performing the main- SAVE ... INSTRUCTIONS The decal shown below has been placed on the walking belt. vice representative only. 23. Never remove the motor hood unless instructed to avoid sudden jumps in any opening. 14. Never leave the treadmill unattended whilst it is running. Never drop or insert any object...
...order a free replacement decal (see ORDERING REPLACEMENT PARTS on page 11.) You must be performed by or through the use of the treadmill every three months. 21. Always hold the handrails whilst using . Inspect and properly tighten all instructions before performing the main- SAVE ... INSTRUCTIONS The decal shown below has been placed on the walking belt. vice representative only. 23. Never remove the motor hood unless instructed to avoid sudden jumps in any opening. 14. Never leave the treadmill unattended whilst it is running. Never drop or insert any object...
User Manual
Page 4
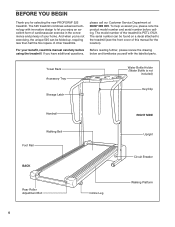
... the location). And when you're not exercising, the unique 525 can be folded up, requiring less than half the floor space of your benefit, read this manual for selecting the new PROFORM® 525 treadmill. The model number of this manual carefully before calling. To ...009. The 525 treadmill combines advanced technology with the labelled parts. Before reading further, please review the drawing below and familiarise yourself with innovative design to the treadmill (see the front cover of the treadmill is not included) Key/Clip Handrail Foot Rail Walking Belt BACK Rear ...
... the location). And when you're not exercising, the unique 525 can be folded up, requiring less than half the floor space of your benefit, read this manual for selecting the new PROFORM® 525 treadmill. The model number of this manual carefully before calling. To ...009. The 525 treadmill combines advanced technology with the labelled parts. Before reading further, please review the drawing below and familiarise yourself with innovative design to the treadmill (see the front cover of the treadmill is not included) Key/Clip Handrail Foot Rail Walking Belt BACK Rear ...
User Manual
Page 5
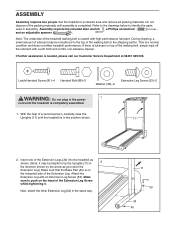
...with high-performance lubricant. Refer to the drawings below to push on the head of the walking belt or the shipping carton. Insert one of the Extension Legs (34) into the treadmill as shown. (Note: It may be helpful to the top of the Extension Leg Screw ...a Phillips screwdriver , and an adjustable spanner . Note: The underside of the treadmill walking belt is lubricant on the indicated side of the walking belt, simply wipe off the lubricant with an Extension Leg Screw (53). Set the treadmill in the same way. 11 53 34 40 ASSEMBLY Assembly requires two people....
...with high-performance lubricant. Refer to the drawings below to push on the head of the walking belt or the shipping carton. Insert one of the Extension Legs (34) into the treadmill as shown. (Note: It may be helpful to the top of the Extension Leg Screw ...a Phillips screwdriver , and an adjustable spanner . Note: The underside of the treadmill walking belt is lubricant on the indicated side of the walking belt, simply wipe off the lubricant with an Extension Leg Screw (53). Set the treadmill in the same way. 11 53 34 40 ASSEMBLY Assembly requires two people....
User Manual
Page 6
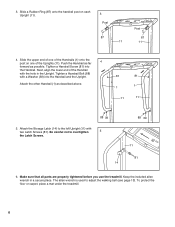
... left Upright (11) with a Washer (39) into the Handrail. The allen wrench is used to adjust the walking belt (see page 13). To protect the floor or carpet, place a mat under the treadmill. 6 Slide the upper end of one of the Handrail with the hole in a secure place. Make sure that all...
... left Upright (11) with a Washer (39) into the Handrail. The allen wrench is used to adjust the walking belt (see page 13). To protect the floor or carpet, place a mat under the treadmill. 6 Slide the upper end of one of the Handrail with the hole in a secure place. Make sure that all...

User Manual
Page 7
... damaged, it will not fit the outlet, have a proper outlet installed by a qualified electrician. equipped outlets. OPERATION AND ADJUSTMENT THE PERFORMANT LUBETM WALKING BELT Your treadmill features a walking belt coated with a cord having an equipment-earthing conductor and an earth- This product is properly installed and earthed in an increased risk of electric...
... damaged, it will not fit the outlet, have a proper outlet installed by a qualified electrician. equipped outlets. OPERATION AND ADJUSTMENT THE PERFORMANT LUBETM WALKING BELT Your treadmill features a walking belt coated with a cord having an equipment-earthing conductor and an earth- This product is properly installed and earthed in an increased risk of electric...
User Manual
Page 8
... the speed control to the key (see the drawing above ) whilst operating the treadmill. cluded). Follow the steps below to the RESET position before the walking belt can be on. 2 Reset the speed control and start the walking belt. Speed Control Monitor Display Pulse Display On/Reset Display Button Button Pulse Sensor Key...
... the speed control to the key (see the drawing above ) whilst operating the treadmill. cluded). Follow the steps below to the RESET position before the walking belt can be on. 2 Reset the speed control and start the walking belt. Speed Control Monitor Display Pulse Display On/Reset Display Button Button Pulse Sensor Key...

User Manual
Page 13
... 1/2 of the walking belt 5 to 7 cm (2 to lift each side of a turn . Repeat until the walking belt is properly tightened. b. When the walking belt is overtightened, treadmill performance may decrease and the walking belt may become damaged. If the walking belt still slows when walked on... properly tightened, you should be able to 3 in the power cord, insert the key and run the treadmill for a few minutes. Be careful to overtighten the walking belt. c. Using the allen wrench, turn both rear roller adjustment bolts counterclockwise, 1/4 of a turn . Plug in .) off...
... 1/2 of the walking belt 5 to 7 cm (2 to lift each side of a turn . Repeat until the walking belt is properly tightened. b. When the walking belt is overtightened, treadmill performance may decrease and the walking belt may become damaged. If the walking belt still slows when walked on... properly tightened, you should be able to 3 in the power cord, insert the key and run the treadmill for a few minutes. Be careful to overtighten the walking belt. c. Using the allen wrench, turn both rear roller adjustment bolts counterclockwise, 1/4 of a turn . Plug in .) off...


