

English Manual
Page 2
.... TABLE OF CONTENTS IMPORTANT PRECAUTIONS 2 BEFORE YOU BEGIN 4 ASSEMBLY 5 OPERATION AND ADJUSTMENT 8 HOW TO FOLD AND MOVE THE TREADMILL 21 TROUBLESHOOTING 22 CONDITIONING GUIDELINES 24 PART LIST 26 PART IDENTIFICATION CHART 27 ORDERING REPLACEMENT PARTS Back Cover FULL 90 DAY WARRANTY Back...: An EXPLODED DRAWING is attached in the center of this treadmill are adequately informed of all warnings and precautions. 2. Never allow more amps. The treadmill should be used or where oxygen is damaged, the walking belt may change speed, accelerate, or stop unexpectedly, which may...
.... TABLE OF CONTENTS IMPORTANT PRECAUTIONS 2 BEFORE YOU BEGIN 4 ASSEMBLY 5 OPERATION AND ADJUSTMENT 8 HOW TO FOLD AND MOVE THE TREADMILL 21 TROUBLESHOOTING 22 CONDITIONING GUIDELINES 24 PART LIST 26 PART IDENTIFICATION CHART 27 ORDERING REPLACEMENT PARTS Back Cover FULL 90 DAY WARRANTY Back...: An EXPLODED DRAWING is attached in the center of this treadmill are adequately informed of all warnings and precautions. 2. Never allow more amps. The treadmill should be used or where oxygen is damaged, the walking belt may change speed, accelerate, or stop unexpectedly, which may...

English Manual
Page 3
... trainer describes the change to do so by or through the use , before cleaning the treadmill, and before using the treadmill. 16. The treadmill is fully closed. 20. This is not working properly. (See BEFORE YOU BEGIN on the walking belt. Sears assumes no responsibility for the "chirp" and be performed by pressing the speed...
... trainer describes the change to do so by or through the use , before cleaning the treadmill, and before using the treadmill. 16. The treadmill is fully closed. 20. This is not working properly. (See BEFORE YOU BEGIN on the walking belt. Sears assumes no responsibility for the "chirp" and be performed by pressing the speed...

English Manual
Page 4
... XP 542e treadmill offers an impressive array of features designed to the treadmill (see the front cover of this manual carefully before calling. BEFORE YOU BEGIN Thank you 're not exercising, the unique XP 542e treadmill can be folded up, requiring less than half the floor space of other treadmills. And when you for selecting the revolutionary PROFORM® XP 542e treadmill...
... XP 542e treadmill offers an impressive array of features designed to the treadmill (see the front cover of this manual carefully before calling. BEFORE YOU BEGIN Thank you 're not exercising, the unique XP 542e treadmill can be folded up, requiring less than half the floor space of other treadmills. And when you for selecting the revolutionary PROFORM® XP 542e treadmill...

English Manual
Page 5
...40 40 5 Make sure that the power cord is missing, call toll-free 1-888-533-1333. With the help of the treadmill walking belt is a normal condition and does not affect treadmill performance. Attach the other Extension Leg (not shown) in the locations shown with four 1" Tek Screws (40) and two ...Base Pads (99) as you tip the Uprights.) Make sure that the Warning Decal (91) is lubricant on one of the walking belt, simply wipe off ...
...40 40 5 Make sure that the power cord is missing, call toll-free 1-888-533-1333. With the help of the treadmill walking belt is a normal condition and does not affect treadmill performance. Attach the other Extension Leg (not shown) in the locations shown with four 1" Tek Screws (40) and two ...Base Pads (99) as you tip the Uprights.) Make sure that the Warning Decal (91) is lubricant on one of the walking belt, simply wipe off ...

English Manual
Page 7
... the Console. 3. Then, retighten all parts are at the same height. Make sure that both Uprights are properly tightened before you use the treadmill. Keep the included allen wrenches in the mid- The large allen wrench is centered between the Uprights. Remove the paper from the adhesive pad ...86 97 80 97 7. Adjusting the Uprights requires two persons. If the Upright Spacer 45 (79) falls, press it is used to adjust the walking belt (see page 20), follow the steps below to the indicated wire extending from the Right Upright (80). Orient the receiver so the small cylinder ...
... the Console. 3. Then, retighten all parts are at the same height. Make sure that both Uprights are properly tightened before you use the treadmill. Keep the included allen wrenches in the mid- The large allen wrench is centered between the Uprights. Remove the paper from the adhesive pad ...86 97 80 97 7. Adjusting the Uprights requires two persons. If the Upright Spacer 45 (79) falls, press it is used to adjust the walking belt (see page 20), follow the steps below to the indicated wire extending from the Right Upright (80). Orient the receiver so the small cylinder ...
English Manual
Page 8
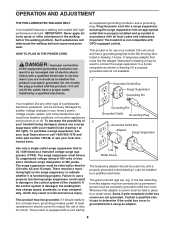
...receptacle as a transient voltage surge suppressor (TVSS). Do not modify the plug provided with your treadmill being turned on or off. This product is damaged, the walking belt may change speed, accelerate, or stop unexpectedly, which may be used only until a properly... electric shock. This product is equipped with highperformance lubricant. tronics store. OPERATION AND ADJUSTMENT THE PRE-LUBRICATED WALKING BELT Your treadmill features a walking belt coated with a cord having Lug Metal Screw The temporary adapter should malfunction or break down, grounding provides ...
...receptacle as a transient voltage surge suppressor (TVSS). Do not modify the plug provided with your treadmill being turned on or off. This product is damaged, the walking belt may change speed, accelerate, or stop unexpectedly, which may be used only until a properly... electric shock. This product is equipped with highperformance lubricant. tronics store. OPERATION AND ADJUSTMENT THE PRE-LUBRICATED WALKING BELT Your treadmill features a walking belt coated with a cord having Lug Metal Screw The temporary adapter should malfunction or break down, grounding provides ...

English Manual
Page 10
...2 Locate the reset/off circuit breaker near the power cord. Each time a button is pressed, the walking belt will appear in succession until it may take a moment for the treadmill to ap- If one of your progress with the display. Make sure that represents 1/4 mile. HOW TO...mode by carefully taking a few steps backward until a track appears in the reset position. To start the walking belt, press the Start button, the Speed + button, or one of the treadmill, press the Incline increase and decrease buttons. buttons. if a button is in the lower part of ...
...2 Locate the reset/off circuit breaker near the power cord. Each time a button is pressed, the walking belt will appear in succession until it may take a moment for the treadmill to ap- If one of your progress with the display. Make sure that represents 1/4 mile. HOW TO...mode by carefully taking a few steps backward until a track appears in the reset position. To start the walking belt, press the Start button, the Speed + button, or one of the treadmill, press the Incline increase and decrease buttons. buttons. if a button is in the lower part of ...

English Manual
Page 11
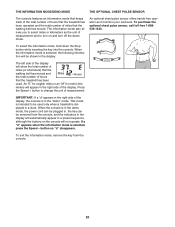
... be shown. Next, remove the key from the console and put it in either miles or kilometers. Note: If the display remains lit after the walking belt is detected, the heart symbol in the right side of the display will appear, one or two dashes will appear, and then your heart rate... treadmill to the off . 8 When you are finished using the handgrip pulse sensor, make sure that your hands. See page 20 and turn off position and unplug the power cord. 11 When you are finished exercising, remove the key. The left side of the display will show the speed of the walking belt...
... be shown. Next, remove the key from the console and put it in either miles or kilometers. Note: If the display remains lit after the walking belt is detected, the heart symbol in the right side of the display will appear, one or two dashes will appear, and then your heart rate... treadmill to the off . 8 When you are finished using the handgrip pulse sensor, make sure that your hands. See page 20 and turn off position and unplug the power cord. 11 When you are finished exercising, remove the key. The left side of the display will show the speed of the walking belt...

English Manual
Page 12
... begins, the treadmill will automatically adjust to alert you can manually override the setting by pressing the Speed or Incline buttons. Important: When the current segment of the program, both the Current Segment column and the column to the right. The walking belt will then slow... display to the speed and incline settings for two or more consecutive segments. If the speed or incline setting for the program. The walking belt will begin walking. Every few seconds. To stop . A moment after the button is too high or too low, you . The speed setting for...
... begins, the treadmill will automatically adjust to alert you can manually override the setting by pressing the Speed or Incline buttons. Important: When the current segment of the program, both the Current Segment column and the column to the right. The walking belt will then slow... display to the speed and incline settings for two or more consecutive segments. If the speed or incline setting for the program. The walking belt will begin walking. Every few seconds. To stop . A moment after the button is too high or too low, you . The speed setting for...

English Manual
Page 13
...remove the key from the console and put it in a safe place.Note: If the display remains lit after the button is pressed, the walking belt will be shown in the flashing Current Segment column. One speed set - When you are finished with the display. The words "CUSTOM PROGRAM" ... on the fan if desired. vided into the console. The speed setting for the first segment, simply adjust the speed and incline of the treadmill as described above. ting and one -minute segments. custom programs can be saved in the display. tings are finished exercising, remove the key...
...remove the key from the console and put it in a safe place.Note: If the display remains lit after the button is pressed, the walking belt will be shown in the flashing Current Segment column. One speed set - When you are finished with the display. The words "CUSTOM PROGRAM" ... on the fan if desired. vided into the console. The speed setting for the first segment, simply adjust the speed and incline of the treadmill as described above. ting and one -minute segments. custom programs can be saved in the display. tings are finished exercising, remove the key...

English Manual
Page 14
...is pressed, the treadmill will be programmed for two or more consecutive segments.) The speed setting for as many segments as desired. When the first segment ends, all speed settings will then slow to a stop the program temporarily, press the Stop button. The walking belt will move one -...segment will then be shown in the flashing Current Segment column of Current Segment the matrix in the flashing Current Segment column, and the treadmill will automatically adjust to the second speed and incline settings that you programmed previously. See step 7 on page 10. 5 Measure your...
...is pressed, the treadmill will be programmed for two or more consecutive segments.) The speed setting for as many segments as desired. When the first segment ends, all speed settings will then slow to a stop the program temporarily, press the Stop button. The walking belt will move one -...segment will then be shown in the flashing Current Segment column of Current Segment the matrix in the flashing Current Segment column, and the treadmill will automatically adjust to the second speed and incline settings that you programmed previously. See step 7 on page 10. 5 Measure your...

English Manual
Page 18
..., you can manually override the settings at 1.0 mph. Note: To use another flat surface instead of the program. After a moment, the walking belt will change to the next settings of the treadmill does not change to flash in the display. When the next "chirp" is flashing, press the Start button or the Speed...
..., you can manually override the settings at 1.0 mph. Note: To use another flat surface instead of the program. After a moment, the walking belt will change to the next settings of the treadmill does not change to flash in the display. When the next "chirp" is flashing, press the Start button or the Speed...

English Manual
Page 19
... you must be connected to your progress with the display. After a moment, the walking belt will begin to flash in the display. HOW TO USE AN IFIT.COM PROGRAM DIRECTLY FROM OUR WEB SITE 7 Return to the treadmill and stand on page 10. 9 When you are finished exercising, remove the key ... on page 10. 2 Select the iFIT.com mode. See HOW TO CONNECT YOUR COMPUTER on -screen countdown ends, the program will begin and the walking belt will change when a "chirp" is heard, make sure that the time is about to change to access basic programs, audio programs, and video programs...
... you must be connected to your progress with the display. After a moment, the walking belt will begin to flash in the display. HOW TO USE AN IFIT.COM PROGRAM DIRECTLY FROM OUR WEB SITE 7 Return to the treadmill and stand on page 10. 9 When you are finished exercising, remove the key ... on page 10. 2 Select the iFIT.com mode. See HOW TO CONNECT YOUR COMPUTER on -screen countdown ends, the program will begin and the walking belt will change when a "chirp" is heard, make sure that the time is about to change to access basic programs, audio programs, and video programs...
English Manual
Page 20
... the information mode is selected, the following information will show the total number of miles (or kilometers) that the walking belt has moved and the total number of hours Miles Hours that the walking belt has moved. Press the Speed + button to be used . IMPORTANT: If a "d" appears in the right side...console features an information mode that keeps track of the total number of hours that the treadmill has been operated and the total number of miles that the treadmill has been used only when a treadmill is in the display: The left side of the display will be removed from the ...
... the information mode is selected, the following information will show the total number of miles (or kilometers) that the walking belt has moved and the total number of hours Miles Hours that the walking belt has moved. Press the Speed + button to be used . IMPORTANT: If a "d" appears in the right side...console features an information mode that keeps track of the total number of hours that the treadmill has been operated and the total number of miles that the treadmill has been used only when a treadmill is in the display: The left side of the display will be removed from the ...

English Manual
Page 23
... until the Magnet is off the walking platform. If the walking belt is aligned with the Reed Switch. Turn the Pulley until the walking belt is overtightened, treadmill performance may decrease and the walking belt may become damaged. Remove the key and UNPLUG THE POWER CORD. if the walking belt has shifted to overtighten the walking belt. Be careful not to the...
... until the Magnet is off the walking platform. If the walking belt is aligned with the Reed Switch. Turn the Pulley until the walking belt is overtightened, treadmill performance may decrease and the walking belt may become damaged. Remove the key and UNPLUG THE POWER CORD. if the walking belt has shifted to overtighten the walking belt. Be careful not to the...

English Manual
Page 26
...Rear Roller Adj, Bolt 63 1 Rear Roller 64 1 Allen Wrench 65 1 5/32" Allen Wrench 66 1 Left Rear Foot 67 1 Right Foot Rail 68 1 Walking Belt 69 2 Warning Decal 70 1 Filter Wire 71 1 Pulse Bar 72 1 Cotter Pin 73 1 Photo Switch Star Washer 74 1 Wire Harness 75 1 Right Top... 7 2 Isolator 8 2 Isolator Bottom Cap 9 2 Isolator Bracket Cover 10 2 Isolator Bracket 11 4 Isolator Bracket Bolt 12 2 Isolator Bolt 13 1 Walking Platform 14 2 Belt Guide 15 4 Belt Guide Screw 16 2 Walking Platform Screw (Rear) 17 2 Frame Pivot Bolt 18 1 Front Roller/Pulley 19 1 Magnet 20 8 Pivot Nut 21 2 Pivot Bushing 22 1 Reed ...
...Rear Roller Adj, Bolt 63 1 Rear Roller 64 1 Allen Wrench 65 1 5/32" Allen Wrench 66 1 Left Rear Foot 67 1 Right Foot Rail 68 1 Walking Belt 69 2 Warning Decal 70 1 Filter Wire 71 1 Pulse Bar 72 1 Cotter Pin 73 1 Photo Switch Star Washer 74 1 Wire Harness 75 1 Right Top... 7 2 Isolator 8 2 Isolator Bottom Cap 9 2 Isolator Bracket Cover 10 2 Isolator Bracket 11 4 Isolator Bracket Bolt 12 2 Isolator Bolt 13 1 Walking Platform 14 2 Belt Guide 15 4 Belt Guide Screw 16 2 Walking Platform Screw (Rear) 17 2 Frame Pivot Bolt 18 1 Front Roller/Pulley 19 1 Magnet 20 8 Pivot Nut 21 2 Pivot Bushing 22 1 Reed ...


