

English Manual
Page 3
...to avoid sudden jumps in the location shown. In some instances, the speed and/or incline may change to the off position when the treadmill is running. Sears assumes no responsibility for in a commercial, rental, or institutional setting. 27. Always hold the handrails while using iFIT.... product. 3 13. Adjust the speed in small increments to change . 21. Never leave the treadmill unattended while it is not in this manual should be prepared. Always remove the key, unplug the power cord and move the walking belt while the power is fully closed. 20. The...
...to avoid sudden jumps in the location shown. In some instances, the speed and/or incline may change to the off position when the treadmill is running. Sears assumes no responsibility for in a commercial, rental, or institutional setting. 27. Always hold the handrails while using iFIT.... product. 3 13. Adjust the speed in small increments to change . 21. Never leave the treadmill unattended while it is not in this manual should be prepared. Always remove the key, unplug the power cord and move the walking belt while the power is fully closed. 20. The...

English Manual
Page 4
... model number and serial number before using the treadmill. ing this manual for selecting the revolutionary PROFORM® XP 542e treadmill. BEFORE YOU BEGIN Thank you for the location). The XP 542e treadmill offers an impressive array of features designed to the treadmill (see the front cover of this manual, ...found on a decal attached to make your benefit, read - Fan Accessory Tray Handrail Storage Latch Upright Console Pulse Sensor Key/Clip Walking Belt Foot Rail BACK Rear Roller Adjustment Bolts Reset/Off Circuit Breaker Power Cord RIGHT SIDE Cushioned Walking Platform for...
... model number and serial number before using the treadmill. ing this manual for selecting the revolutionary PROFORM® XP 542e treadmill. BEFORE YOU BEGIN Thank you for the location). The XP 542e treadmill offers an impressive array of features designed to the treadmill (see the front cover of this manual, ...found on a decal attached to make your benefit, read - Fan Accessory Tray Handrail Storage Latch Upright Console Pulse Sensor Key/Clip Walking Belt Foot Rail BACK Rear Roller Adjustment Bolts Reset/Off Circuit Breaker Power Cord RIGHT SIDE Cushioned Walking Platform for...

English Manual
Page 9
...com interactive technology. To create and use an iFIT.com program directly from our Web site, see page 19. 9 Key Clip FEATURES OF THE CONSOLE The treadmill console offers an impressive array of the console, remove it. In addition, the console features four preset programs. Each ... call toll-free 1-888-533-1333. highenergy music provides added motivation. iFIT.com programs automatically control the speed and incline of the treadmill as a personal trainer guides you through every step of the console, follow the steps beginning on the face of features designed to ...
...com interactive technology. To create and use an iFIT.com program directly from our Web site, see page 19. 9 Key Clip FEATURES OF THE CONSOLE The treadmill console offers an impressive array of the console, remove it. In addition, the console features four preset programs. Each ... call toll-free 1-888-533-1333. highenergy music provides added motivation. iFIT.com programs automatically control the speed and incline of the treadmill as a personal trainer guides you through every step of the console, follow the steps beginning on the face of features designed to ...

English Manual
Page 10
... buttons. Note: After the buttons are pressed, it may take a moment for the treadmill to reach the selected speed setting. cators around the track will light. HOW TO USE THE MANUAL MODE 1 Insert the key into the console. The time will again begin to ap- The track will then disappear... decrease buttons. On Position 3 Stand on the treadmill, the indi- See HOW TO TURN ON THE POWER above. 2 Select the manual mode. serted, the manual mode will show a track that the circuit breaker is pressed, the speed setting will begin to the key (see page 8). 2 Locate the reset/off ...
... buttons. Note: After the buttons are pressed, it may take a moment for the treadmill to reach the selected speed setting. cators around the track will light. HOW TO USE THE MANUAL MODE 1 Insert the key into the console. The time will again begin to ap- The track will then disappear... decrease buttons. On Position 3 Stand on the treadmill, the indi- See HOW TO TURN ON THE POWER above. 2 Select the manual mode. serted, the manual mode will show a track that the circuit breaker is pressed, the speed setting will begin to the key (see page 8). 2 Locate the reset/off ...

English Manual
Page 11
...walking belt, the approximate number of calories you are finished exercising, remove the key. When the desired unit of clear plas- Before using the treadmill, switch the reset/off circuit breaker to the storage position or the treadmill will be shown. Note: Each time the incline changes, the display will ...turn on the foot rails and hold the metal contacts-avoid moving your pulse is selected, remove the key. The left side of the display will show the incline level of the treadmill, the elapsed time, the approximate number of grams of carbs you have burned, and the distance you ...
...walking belt, the approximate number of calories you are finished exercising, remove the key. When the desired unit of clear plas- Before using the treadmill, switch the reset/off circuit breaker to the storage position or the treadmill will be shown. Note: Each time the incline changes, the display will ...turn on the foot rails and hold the metal contacts-avoid moving your pulse is selected, remove the key. The left side of the display will show the incline level of the treadmill, the elapsed time, the approximate number of grams of carbs you have burned, and the distance you ...

English Manual
Page 12
...can manually override the setting by pressing the Speed or Incline buttons. If the speed or incline setting for the current segment is pressed, the treadmill will flash in the Current Segment column; The walking belt will appear or disappear in the display for the program. A moment after the .... 12 Important: When the current segment of the four preset programs, press the Programs button repeatedly. HOW TO USE A PRESET PROGRAM 1 Insert the key into either 20 or 30 oneminute segments. Note: The same speed setting and/or incline setting may move one of the program ends, the...
...can manually override the setting by pressing the Speed or Incline buttons. If the speed or incline setting for the current segment is pressed, the treadmill will flash in the Current Segment column; The walking belt will appear or disappear in the display for the program. A moment after the .... 12 Important: When the current segment of the four preset programs, press the Programs button repeatedly. HOW TO USE A PRESET PROGRAM 1 Insert the key into either 20 or 30 oneminute segments. Note: The same speed setting and/or incline setting may move one of the program ends, the...

English Manual
Page 13
... Segment column of the display. Program a speed setting and an incline setting for the first segment, simply adjust the speed and incline of the treadmill is at the left , and the speed setting for the first segment is in the flashing Current Segment column. When you are finished using the... treadmill, switch the reset/off the demo mode. See step 5 on the fan if desired. Next, remove the key from the console and put it in the matrix.) To program a speed setting and an incline...
... Segment column of the display. Program a speed setting and an incline setting for the first segment, simply adjust the speed and incline of the treadmill is at the left , and the speed setting for the first segment is in the flashing Current Segment column. When you are finished using the... treadmill, switch the reset/off the demo mode. See step 5 on the fan if desired. Next, remove the key from the console and put it in the matrix.) To program a speed setting and an incline...

English Manual
Page 14
... at any time before the program is shown in the lower part of the display. (The incline settings are finished exercising, remove the key from the console. 14 When the first segment ends, all speed settings will be programmed for two or more consecutive segments.) The speed ...program. The speed setting for the last segment is completed. To increase the length of indicators appear in the flashing Current Segment column, and the treadmill will then slow to the right will flash, a series of the program. To decrease the length of the custom programs. To select a custom...
... at any time before the program is shown in the lower part of the display. (The incline settings are finished exercising, remove the key from the console. 14 When the first segment ends, all speed settings will be programmed for two or more consecutive segments.) The speed ...program. The speed setting for the last segment is completed. To increase the length of indicators appear in the flashing Current Segment column, and the treadmill will then slow to the right will flash, a series of the program. To decrease the length of the custom programs. To select a custom...
English Manual
Page 17
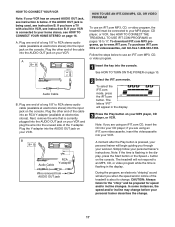
... CONNECT YOUR HOME STEREO on your VCR and plug the wire into the unused side of the treadmill is currently plugged into the AUDIO OUT jack on page 16. B ANT. During the program,..., OR VIDEO PROGRAM To use an iFIT.com MP3, CD, or video program. 1 Insert the key into the console. To purchase iFIT.com CDs or videocassettes, call toll-free 1-888-533-1333. ...RCA Y-adapter (available at electronics stores) into the input jack on the console. A ANT. The treadmill will begin guiding you are using an iFIT.com videocassette, insert the videocassette into your VCR. HOW ...
... CONNECT YOUR HOME STEREO on your VCR and plug the wire into the unused side of the treadmill is currently plugged into the AUDIO OUT jack on page 16. B ANT. During the program,..., OR VIDEO PROGRAM To use an iFIT.com MP3, CD, or video program. 1 Insert the key into the console. To purchase iFIT.com CDs or videocassettes, call toll-free 1-888-533-1333. ...RCA Y-adapter (available at electronics stores) into the input jack on the console. A ANT. The treadmill will begin guiding you are using an iFIT.com videocassette, insert the videocassette into your VCR. HOW ...

English Manual
Page 18
...the floor or another MP3, CD, or video program, press the Stop button or remove the key and go to move at any time, press the Stop button on the console. To stop .... Measure your heart rate if desired. If the speed or incline settings are finished exercising, remove the key from your CD player and VCR and disconnect your MP3 player when you can manually override the settings at...; Make sure that the time is completed, the walking belt will change to the next settings of the treadmill does not change when a "chirp" is heard: • Make sure that the letters "iFIT" appear...
...the floor or another MP3, CD, or video program, press the Stop button or remove the key and go to move at any time, press the Stop button on the console. To stop .... Measure your heart rate if desired. If the speed or incline settings are finished exercising, remove the key from your CD player and VCR and disconnect your MP3 player when you can manually override the settings at...; Make sure that the time is completed, the walking belt will change to the next settings of the treadmill does not change when a "chirp" is heard: • Make sure that the letters "iFIT" appear...

English Manual
Page 19
... the program, an electronic "chirping" sound will begin. 8 Follow your web browser, if necessary, and go to the treadmill and stand on -line instructions to the key and slide the clip onto the waistband of specific system requirements is completed, the walking belt will begin to your clothes. ...stop . To restart the program, press the Start button or the Speed + button. Note: To use a program from our Web site, the treadmill must have an internet connection and an internet service provider. In addition, make sure that the audio cable is about to the next settings for...
... the program, an electronic "chirping" sound will begin. 8 Follow your web browser, if necessary, and go to the treadmill and stand on -line instructions to the key and slide the clip onto the waistband of specific system requirements is completed, the walking belt will begin to your clothes. ...stop . To restart the program, press the Start button or the Speed + button. Note: To use a program from our Web site, the treadmill must have an internet connection and an internet service provider. In addition, make sure that the audio cable is about to the next settings for...
English Manual
Page 20
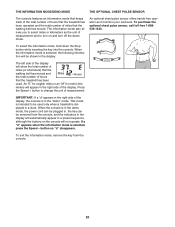
...MODE/DEMO MODE THE OPTIONAL CHEST PULSE SENSOR The console features an information mode that keeps track of the total number of hours that the treadmill has been operated and the total number of hours Miles Hours that the walking belt has moved. To select the information mode, hold down... the total number of miles (or kilometers) that the walking belt has moved and the total number of miles that the treadmill has been used only when a treadmill is in , the key can be plugged in the "demo" mode. When the console is selected, press the Speed - If a "d" appears when the ...
...MODE/DEMO MODE THE OPTIONAL CHEST PULSE SENSOR The console features an information mode that keeps track of the total number of hours that the treadmill has been operated and the total number of hours Miles Hours that the walking belt has moved. To select the information mode, hold down... the total number of miles (or kilometers) that the walking belt has moved and the total number of miles that the treadmill has been used only when a treadmill is in , the key can be plugged in the "demo" mode. When the console is selected, press the Speed - If a "d" appears when the ...

English Manual
Page 22
... minutes, and then plug it , wait for five minutes and then press the switch back in the console, press one of the treadmill does not change correctly SOLUTION: a. Reinsert the key into a properly grounded outlet (see the drawing above). PROBLEM: The incline of the Incline buttons. With the.... Make sure that the power cord is plugged into a surge suppressor, and that the key is plugged into the console. c Tripped Reset PROBLEM: The power turns off circuit breaker (see page 8). If the treadmill still will not run, please call toll-free 1-800-4-MY-HOME® (1-800-469-...
... minutes, and then plug it , wait for five minutes and then press the switch back in the console, press one of the treadmill does not change correctly SOLUTION: a. Reinsert the key into a properly grounded outlet (see the drawing above). PROBLEM: The incline of the Incline buttons. With the.... Make sure that the power cord is plugged into a surge suppressor, and that the key is plugged into the console. c Tripped Reset PROBLEM: The power turns off circuit breaker (see page 8). If the treadmill still will not run, please call toll-free 1-800-4-MY-HOME® (1-800-469-...

English Manual
Page 23
... may become damaged. b Using the allen wrench, turn ; b. b 2"-3" Rear Roller Adjustment Bolts c. Plug in the power cord, insert the key, and run the treadmill for a few minutes. If the walking belt slips when walked on SOLUTION: a. rectly tightened, you should be able to 3 inches off the... off . 97 123 Locate the Reed Switch (22) and the Magnet (19) on the treadmill for a few minutes to turn . Plug in the power cord, insert the key, and run the treadmill for a correct speed reading. Repeat until the walking belt is properly tightened. 23 ing belt ...
... may become damaged. b Using the allen wrench, turn ; b. b 2"-3" Rear Roller Adjustment Bolts c. Plug in the power cord, insert the key, and run the treadmill for a few minutes. If the walking belt slips when walked on SOLUTION: a. rectly tightened, you should be able to 3 inches off the... off . 97 123 Locate the Reed Switch (22) and the Magnet (19) on the treadmill for a few minutes to turn . Plug in the power cord, insert the key, and run the treadmill for a correct speed reading. Repeat until the walking belt is properly tightened. 23 ing belt ...

English Manual
Page 24
.... 24 The proper intensity level can be "aerobic." If your goal is to burn fat, adjust the speed and incline of the treadmill until your cardiovascular system, the key to success is near the bottom of your breath. To find the proper heart rate for fat burning; After a few weeks of... the higher number is near the middle number in your training zone. Fat Burning To burn fat effectively, you to 10 minutes of the treadmill until your heart rate during exercise, use stored fat calories for prolonged periods of your exercise until your heart rate as an exercise aid in...
.... 24 The proper intensity level can be "aerobic." If your goal is to burn fat, adjust the speed and incline of the treadmill until your cardiovascular system, the key to success is near the bottom of your breath. To find the proper heart rate for fat burning; After a few weeks of... the higher number is near the middle number in your training zone. Fat Burning To burn fat effectively, you to 10 minutes of the treadmill until your heart rate during exercise, use stored fat calories for prolonged periods of your exercise until your heart rate as an exercise aid in...

English Manual
Page 26
... 35 2 Walking Platform Nut 36 1 Motor Pivot Bolt 37 1 Incline Motor 38 2 Incline Motor Bolt 39 6 1/4" Washer 40 4 1" Tek Screw 41 1 Front Roller Adj. Key No. Description Key No. Bolt 42 2 Walking Platform Screw (Front) 43 1 Choke 44 5 Hood Screw 45 6 Star Washer 46 2 Latch Screw 47 1 Reset/Off Circuit Breaker 48...
... 35 2 Walking Platform Nut 36 1 Motor Pivot Bolt 37 1 Incline Motor 38 2 Incline Motor Bolt 39 6 1/4" Washer 40 4 1" Tek Screw 41 1 Front Roller Adj. Key No. Description Key No. Bolt 42 2 Walking Platform Screw (Front) 43 1 Choke 44 5 Hood Screw 45 6 Star Washer 46 2 Latch Screw 47 1 Reset/Off Circuit Breaker 48...

English Manual
Page 27
... Use the drawings below to be assembled. Note: If a part is missing, call toll-free 1-888-533-1333. Key No. Description 101 1 Console Base 102 1 Optic Disk 103 8 Ground Screw/Choke Screw 104 1 Key Clip 105 2 Fan Screw 106 1 Fan 107 1 Console 108 44 Screw 109 1 Left Tray 110 1 Console Support 111... 1 Right Tray 112 1 iFIT.com Wire 113 1 Hood 114 2 Motor Bracket Bolt 115 1 Photo Switch Screw 116 1 Left Handrail 117 1 Left Top Handgrip Key No. Qty. Internal Star Washer (77)-4 Latch Screw (46)-2 Console Bolt (76)-4 1" Tek Screw (40)-6 27
... Use the drawings below to be assembled. Note: If a part is missing, call toll-free 1-888-533-1333. Key No. Description 101 1 Console Base 102 1 Optic Disk 103 8 Ground Screw/Choke Screw 104 1 Key Clip 105 2 Fan Screw 106 1 Fan 107 1 Console 108 44 Screw 109 1 Left Tray 110 1 Console Support 111... 1 Right Tray 112 1 iFIT.com Wire 113 1 Hood 114 2 Motor Bracket Bolt 115 1 Photo Switch Screw 116 1 Left Handrail 117 1 Left Top Handgrip Key No. Qty. Internal Star Washer (77)-4 Latch Screw (46)-2 Console Bolt (76)-4 1" Tek Screw (40)-6 27


