

User Guide
Page 2
...warranty parts and service and attach it here. Keep your sales receipt for this camcorder. TO REDUCE THE RISK OF ELECTRIC SHOCK, DO NOT REMOVE THE COVER (OR BACK). Model No: SerialNo:_,, Purchase Date-_ _ Purchased From: CC6151 or CC6251 or CC6271 -, •_ : ;._. ,!. ': : WARNING: To...CAUTION: To prevent electric shock, match wide blade of the camcorder. introduire la lame de la prise et To reduce risk of injury, charge only rechargeable batteries recommended by the manufacturer for proof of batteries may void the user's authority to read all the safety ...
...warranty parts and service and attach it here. Keep your sales receipt for this camcorder. TO REDUCE THE RISK OF ELECTRIC SHOCK, DO NOT REMOVE THE COVER (OR BACK). Model No: SerialNo:_,, Purchase Date-_ _ Purchased From: CC6151 or CC6251 or CC6271 -, •_ : ;._. ,!. ': : WARNING: To...CAUTION: To prevent electric shock, match wide blade of the camcorder. introduire la lame de la prise et To reduce risk of injury, charge only rechargeable batteries recommended by the manufacturer for proof of batteries may void the user's authority to read all the safety ...

User Guide
Page 3
... Switch to OFF to Turn Off the Camcorder ........ 9 • Close the Lens Cover 9 • Review Camcorder's Operating Controls 10-11 Power Your Camcorder • Use the Adapter/Charger to Power Your Camcorder 12 • Use the Battery to Power Your Camcorder 13-15 • Use the Optional ...336-1900 (page 83) Accessories 800-338-0376 (pages 70-75) Safety Information i First Time Operation • Assistance 3 • Unpack the Camcorder and Accessories 3 • Attach the Adapter/Charger 4 • Adjust the Handstrap to Fit Your Hand 4 • Slide LENS COVER Control to...
... Switch to OFF to Turn Off the Camcorder ........ 9 • Close the Lens Cover 9 • Review Camcorder's Operating Controls 10-11 Power Your Camcorder • Use the Adapter/Charger to Power Your Camcorder 12 • Use the Battery to Power Your Camcorder 13-15 • Use the Optional ...336-1900 (page 83) Accessories 800-338-0376 (pages 70-75) Safety Information i First Time Operation • Assistance 3 • Unpack the Camcorder and Accessories 3 • Attach the Adapter/Charger 4 • Adjust the Handstrap to Fit Your Hand 4 • Slide LENS COVER Control to...

User Guide
Page 5
.... ACS091 4+ "{1 AC Adapter/Charger and DC Cable C...a..s..s.e..t.t..e...A...d..a..p...t.e..r........C...a..s.s..e..t.t.e... Model CC6151 or CC6251 or CC6271 Camcorder* (*Your camcorder may encounter. such as CR2025 available from most local drug stores and camera shops. Adapter Battery Part No. 241017 Part No. VCAll5A (Size "AA" 1.5 ...Volt) Part No. 233087 Q Clock Cell 3-Volt Micro Lithium Cell - Unpack the camcorder and accessories. • Save the packing ...
.... ACS091 4+ "{1 AC Adapter/Charger and DC Cable C...a..s..s.e..t.t..e...A...d..a..p...t.e..r........C...a..s.s..e..t.t.e... Model CC6151 or CC6251 or CC6271 Camcorder* (*Your camcorder may encounter. such as CR2025 available from most local drug stores and camera shops. Adapter Battery Part No. 241017 Part No. VCAll5A (Size "AA" 1.5 ...Volt) Part No. 233087 Q Clock Cell 3-Volt Micro Lithium Cell - Unpack the camcorder and accessories. • Save the packing ...

User Guide
Page 6
...-240, 50/60 Hz Adapter/ Charger Cable PUT Jack Since the battery must be charged before it can be used the first time, attach the adapter/charger to fit your hand, adjust the strap to the DC in jack on the camcorder as shown above. • Plug the adapter/charger's plug into...
...-240, 50/60 Hz Adapter/ Charger Cable PUT Jack Since the battery must be charged before it can be used the first time, attach the adapter/charger to fit your hand, adjust the strap to the DC in jack on the camcorder as shown above. • Plug the adapter/charger's plug into...

User Guide
Page 13
... -,4: _ .......... ..... 15. Review camcorder's operating controls. (continued) Shoulder Strap Attachment Ring EJECT Button PUSH Here to Close Cassette Compartment MENU Dial Model CC6271 Only: LIGHT OFF.A UTO.ON Switch Shoulder Strap Attachment Ring BATT. (Battery) RELEASE Button Models CC6251 and CC6271 ... C (Color) Controls (See Trouble Checks for Details) Focus Control Power Zoom Buttons LENS Control Clock Cell Battery Compartment Attach Rechargeable Battery Here Handstrap Attach Adapter/ Charger's DC Cord Here JLIP Connector (Located Under Small Cover) Indicator POWER (VCR...
... -,4: _ .......... ..... 15. Review camcorder's operating controls. (continued) Shoulder Strap Attachment Ring EJECT Button PUSH Here to Close Cassette Compartment MENU Dial Model CC6271 Only: LIGHT OFF.A UTO.ON Switch Shoulder Strap Attachment Ring BATT. (Battery) RELEASE Button Models CC6251 and CC6271 ... C (Color) Controls (See Trouble Checks for Details) Focus Control Power Zoom Buttons LENS Control Clock Cell Battery Compartment Attach Rechargeable Battery Here Handstrap Attach Adapter/ Charger's DC Cord Here JLIP Connector (Located Under Small Cover) Indicator POWER (VCR...

User Guide
Page 14
... household power. Plug the AC plug adapter into the AC plug adapter. • 2. Use the Adapter/Charger to Power Your Camcorder The adapter/charger attaches to power the camcorder or recharge the battery. Remove the DC cable from the wall outlet. 2. Plug the adapter/charger's plug into the AC _ outlet. 12 Plug the...
... household power. Plug the AC plug adapter into the AC plug adapter. • 2. Use the Adapter/Charger to Power Your Camcorder The adapter/charger attaches to power the camcorder or recharge the battery. Remove the DC cable from the wall outlet. 2. Plug the adapter/charger's plug into the AC _ outlet. 12 Plug the...

User Guide
Page 15
... clock cell before it can be charged as shown above. 2. Set the POWER switch to the right while removing the battery. Conserve battery power by turning the camcorder off during recording breaks. Marker Switch BATT. Please call 1-800-8-BATI'ERY for the BB700). Press the...RELEASE Button Attach the Charged Battery If the DC cable is attached to Power Your Camcorder The battery must be used in your local recycling center. 13 Remove the Battery Slide and hold the BATT. Use the Battery to the camcorder, remove it before attaching the battery. Note: Use the small ...
... clock cell before it can be charged as shown above. 2. Set the POWER switch to the right while removing the battery. Conserve battery power by turning the camcorder off during recording breaks. Marker Switch BATT. Please call 1-800-8-BATI'ERY for the BB700). Press the...RELEASE Button Attach the Charged Battery If the DC cable is attached to Power Your Camcorder The battery must be used in your local recycling center. 13 Remove the Battery Slide and hold the BATT. Use the Battery to the camcorder, remove it before attaching the battery. Note: Use the small ...

User Guide
Page 16
...Attach battery to Power Your Camcorder Hold Battery Flush and Slide (continued) Marks I CHG (Charge) Im REFRESH • Indicator Adapter/Charger To AC Wall Outlet 100- 240 Volts, 50/60 Hz. When discharging is charged, the CHG (charge) indicator stops flashing and lights. 5. After the battery is... long period of the arrow. 3. After the battery is properiy connected, the CHG indicator flashes. The REFRESH indicator lights and the battery begins discharging. 3. Button Charge the Battery If the DC cable is attached to charge a battery that has not been charged for the CHG indicator...
...Attach battery to Power Your Camcorder Hold Battery Flush and Slide (continued) Marks I CHG (Charge) Im REFRESH • Indicator Adapter/Charger To AC Wall Outlet 100- 240 Volts, 50/60 Hz. When discharging is charged, the CHG (charge) indicator stops flashing and lights. 5. After the battery is... long period of the arrow. 3. After the battery is properiy connected, the CHG indicator flashes. The REFRESH indicator lights and the battery begins discharging. 3. Button Charge the Battery If the DC cable is attached to charge a battery that has not been charged for the CHG indicator...

User Guide
Page 17
...8226; When _ appears, the battery is fully charged. • As the power is time to replace the battery. --_- • If the battery discharging must be stopped in the middle, remove the battery from the adapter/charger before replacing the battery. The camcorder turns off the cam- Set... the POWER switch to OFF to turn off automatically after a few seconds. Use the Battery to Power Your Camcorder (continued) Battery Level Indicator The battery level indicator appears ...
...8226; When _ appears, the battery is fully charged. • As the power is time to replace the battery. --_- • If the battery discharging must be stopped in the middle, remove the battery from the adapter/charger before replacing the battery. The camcorder turns off the cam- Set... the POWER switch to OFF to turn off automatically after a few seconds. Use the Battery to Power Your Camcorder (continued) Battery Level Indicator The battery level indicator appears ...

User Guide
Page 18
... power .... Set the POWER switch to OFF to tum off . . It converts 12-volts to turn on the camcorder. If the battery or DC cable is attached to power your camcorder from the cigarette lighter socket of the socket. 5. The power indicator on the car cord adapte r lights. 6. Optional Car... Cord Adapter The optional DCC08 car cord shown on page 70 allows you to the camcorder, remove it locks into ...
... power .... Set the POWER switch to OFF to tum off . . It converts 12-volts to turn on the camcorder. If the battery or DC cable is attached to power your camcorder from the cigarette lighter socket of the socket. 5. The power indicator on the car cord adapte r lights. 6. Optional Car... Cord Adapter The optional DCC08 car cord shown on page 70 allows you to the camcorder, remove it locks into ...

User Guide
Page 19
...clicks into place. Insert the clock cell with the "+" terminal facing out, and press it in the viewfinder when you turn on the camcorder if the cell is turned off, and remove any power supply attached to Remove Cell Clock Cell (+ Side Facing Out) Clock Cell ...replacing. Press release tab of clock cell compartment cover and open the compartment. 3. Insert Object Here to the camcorder. 2. To Remove Lithium Cell To remove battery, insert a pointed nonmetallic object between battery and compartment and lift. :, _ -t 17 Install the Clock Lithium Cell The clock cell indicator t_ flashes...
...clicks into place. Insert the clock cell with the "+" terminal facing out, and press it in the viewfinder when you turn on the camcorder if the cell is turned off, and remove any power supply attached to Remove Cell Clock Cell (+ Side Facing Out) Clock Cell ...replacing. Press release tab of clock cell compartment cover and open the compartment. 3. Insert Object Here to the camcorder. 2. To Remove Lithium Cell To remove battery, insert a pointed nonmetallic object between battery and compartment and lift. :, _ -t 17 Install the Clock Lithium Cell The clock cell indicator t_ flashes...
User Guide
Page 31
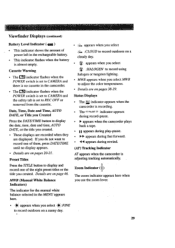
... battery is no display appears. • Details are on a sunny day. 29 appearswhen you use the zoom lever. • -,0,- Status Displays • The _, indicator appears when the camcorder is recording. • The = PAUS=E indicator appears during record-pause. • • appears when the camcorder ... DATE, or the title you created. • These displays are recorded when they are on pages 20-21. Viewfinder Displays (continued) Battery Level Indicator ( _il ) • This indicator shows the amount of the eight preset titles or the title you created. Cassette Warning...
... battery is no display appears. • Details are on a sunny day. 29 appearswhen you use the zoom lever. • -,0,- Status Displays • The _, indicator appears when the camcorder is recording. • The = PAUS=E indicator appears during record-pause. • • appears when the camcorder ... DATE, or the title you created. • These displays are recorded when they are on pages 20-21. Viewfinder Displays (continued) Battery Level Indicator ( _il ) • This indicator shows the amount of the eight preset titles or the title you created. Cassette Warning...

User Guide
Page 48
... Press In) Record a Preset Title or Title You Create o Make sure the camcorder is in recordpause and the AE dial is superimposed and recorded on page 17 before you Created Title Off- You must install the clock cell battery as shown on your tape whenever it . 46 No Title . up to remove...
... Press In) Record a Preset Title or Title You Create o Make sure the camcorder is in recordpause and the AE dial is superimposed and recorded on page 17 before you Created Title Off- You must install the clock cell battery as shown on your tape whenever it . 46 No Title . up to remove...
User Guide
Page 60
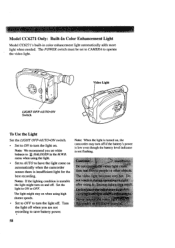
... Use the Light Set the LIGHT OFFoAUTO •ON switch. The light might turn off . Set to OFF to have the light come on , the camcorder may turn on when using the light. menu when using high shutter speeds. Notes: If the lighting condition is unstable the light might stay on... and off if the battery's power is low even though the battery level indicator is insufficient light for the best recording. Turn the light off . The POWER switch must be set white balance to...
... Use the Light Set the LIGHT OFFoAUTO •ON switch. The light might turn off . Set to OFF to have the light come on , the camcorder may turn on when using the light. menu when using high shutter speeds. Notes: If the lighting condition is unstable the light might stay on... and off if the battery's power is low even though the battery level indicator is insufficient light for the best recording. Turn the light off . The POWER switch must be set white balance to...
User Guide
Page 66
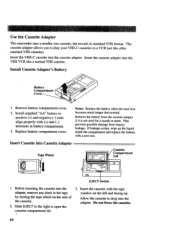
...month or more. Use the Cassette Adapter The camcorder uses a smaller size cassette, but records in the tape by turning the tape wheel on the left and facing up the liquid inside the compartment and replace the battery with a new one. The cassette adapter ...allows you to play your VHS-C cassettes in battery compartment. 3. Insert the cassette adapter into the adapter, remove any slack in standard VHS format. Replace battery compartment cover. Remove the battery from battery leakage. If leakage occurs, ...
...month or more. Use the Cassette Adapter The camcorder uses a smaller size cassette, but records in the tape by turning the tape wheel on the left and facing up the liquid inside the compartment and replace the battery with a new one. The cassette adapter ...allows you to play your VHS-C cassettes in battery compartment. 3. Insert the cassette adapter into the adapter, remove any slack in standard VHS format. Replace battery compartment cover. Remove the battery from battery leakage. If leakage occurs, ...

User Guide
Page 72
... case designed especially to provide protection and utility for lens filters, adapters, batteries, and tapes. If a dealer is designed specifically to convert power from your car, truck, or RV by using your compact VHS camcorder. The following pages have a selection of accessories to help make the process... of using the order form on page 73. Rugged fabric lined with storage for your compact VHS camcorder and most accessories. The DCC08 is not nearby, all accessories are designed to make your memorable moments look at some great ideas ...
... case designed especially to provide protection and utility for lens filters, adapters, batteries, and tapes. If a dealer is designed specifically to convert power from your car, truck, or RV by using your compact VHS camcorder. The following pages have a selection of accessories to help make the process... of using the order form on page 73. Rugged fabric lined with storage for your compact VHS camcorder and most accessories. The DCC08 is not nearby, all accessories are designed to make your memorable moments look at some great ideas ...

User Guide
Page 73
... (2-hour battery). 71 The FB 120 powers your camcorder. CPS91 AC Battery Charger The CPS91 battery chargerplugs directly into an AC outlet and charges the FB 1260, BB700, and FB 120 camcorder batteries. Charging takes approximately seven hours for the FB 1260 (1-hour battery), 11 hours... for the BB700, and 13 hours for sure footing. :'7 FB1260 and FB120 Rechargeable Batteries These rechargeable nickel-cadmium batteries are designed specifically for long ...
... (2-hour battery). 71 The FB 120 powers your camcorder. CPS91 AC Battery Charger The CPS91 battery chargerplugs directly into an AC outlet and charges the FB 1260, BB700, and FB 120 camcorder batteries. Charging takes approximately seven hours for the FB 1260 (1-hour battery), 11 hours... for the BB700, and 13 hours for sure footing. :'7 FB1260 and FB120 Rechargeable Batteries These rechargeable nickel-cadmium batteries are designed specifically for long ...

User Guide
Page 75
Super Lightweight Tripod Soft Camcorder Case Shoulder Strap Y-Adapter AC Battery Charger Car Cord Adapter Rechargeable Battery (Extended) Rechargeable Battery (Standard) 75-300 Cable Transformer Coaxial RF-Cable AC088 AC201A ACS091 AH25 CPS91 DCC08 FB 120 FB 1260 VH54 VH82 $ 39....Assembly (Model CC627i) 232845 233430 $ 71.35 $ 33.80 Total Prices are required by law to collect the appropriate sales tax for Camcorder Model CC6151/CC6251/CC6271 Description Part No. Shipping and Handling 5.00 Total Amount Enclosed $ Use VISA, MasterCard, or Discover. _D Money order or ...
Super Lightweight Tripod Soft Camcorder Case Shoulder Strap Y-Adapter AC Battery Charger Car Cord Adapter Rechargeable Battery (Extended) Rechargeable Battery (Standard) 75-300 Cable Transformer Coaxial RF-Cable AC088 AC201A ACS091 AH25 CPS91 DCC08 FB 120 FB 1260 VH54 VH82 $ 39....Assembly (Model CC627i) 232845 233430 $ 71.35 $ 33.80 Total Prices are required by law to collect the appropriate sales tax for Camcorder Model CC6151/CC6251/CC6271 Description Part No. Shipping and Handling 5.00 Total Amount Enclosed $ Use VISA, MasterCard, or Discover. _D Money order or ...
User Guide
Page 78
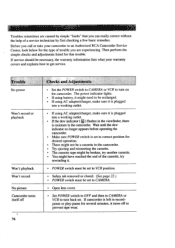
...end of a service technician by simple "faults" that trouble. Before you call or take your warranty covers and explains how to an Authorized RCA Camcorder Service Center, look below for that you are caused by first checking a few basic remedies. The power indicator lights. • If ..., make sure it is plugged into a working outlet. • If using battery, it is plugged into a working outlet. • If the dew indicator ( I'/] ) flashes in the viewf'mder, there is moisture in the camcorder. • Try ejecting and reinserting the cassette. • The cassette tape ...
...end of a service technician by simple "faults" that trouble. Before you call or take your warranty covers and explains how to an Authorized RCA Camcorder Service Center, look below for that you are caused by first checking a few basic remedies. The power indicator lights. • If ..., make sure it is plugged into a working outlet. • If using battery, it is plugged into a working outlet. • If the dew indicator ( I'/] ) flashes in the viewf'mder, there is moisture in the camcorder. • Try ejecting and reinserting the cassette. • The cassette tape ...
User Guide
Page 80
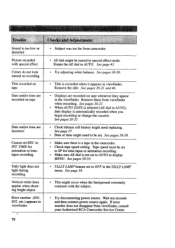
...; Title is automatically recorded when you begin recording or change the cassette. Remove them from viewf'mder, consult your Authorized RCA Camcorder Service Center. See pages 20-21. • Clock lithium cell battery might occur when the background extremely contrasts with specialeffect Colors do not look naturalonrecording Title recordedon tape Dateand/ortime are...
...; Title is automatically recorded when you begin recording or change the cassette. Remove them from viewf'mder, consult your Authorized RCA Camcorder Service Center. See pages 20-21. • Clock lithium cell battery might occur when the background extremely contrasts with specialeffect Colors do not look naturalonrecording Title recordedon tape Dateand/ortime are...


