
Owners Manual
Page 3
... fail. ■ WARNINGS IN THE MANUAL WARNING This mark indicates instructions which must be followed in the use of Saw Chain and Guide Bar .........23 11. Installing guide bar and saw chain 8 6. Maintenance 20 10. Storage 26 13. IMPORTANT This mark indicates instructions which must be followed, or it leads to serious...
... fail. ■ WARNINGS IN THE MANUAL WARNING This mark indicates instructions which must be followed in the use of Saw Chain and Guide Bar .........23 11. Installing guide bar and saw chain 8 6. Maintenance 20 10. Storage 26 13. IMPORTANT This mark indicates instructions which must be followed, or it leads to serious...
Owners Manual
Page 4
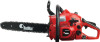
Air cleaner 4. Right handle 7. Engine switch 9. W - Starter knob 3. Oil tank 11. Guide Bar 2. Gauge Oregon 91VG - 3/8(9.53) - 0.050(1.27) in (cm3) Fuel Mixture(Gasoline 50 : 2-cycle oil 1) (when using ZENOAH genuine oil) Fuel tank capacity ...) Spark plug Champion RZ7C Oil feeding system Automatic pump Sprocket : Pitch - 1. Parts location 1. Throttle lever 8. Left handle 12. Fuel tank 10. Specifications ■ GZ4000 Power unit : Dis placement 2.45(40.1) cu-in (mm) Specifications are subject to change without notice. 4 H 14.8(370)x9.4(235)x10.8(270)...
Air cleaner 4. Right handle 7. Engine switch 9. W - Starter knob 3. Oil tank 11. Guide Bar 2. Gauge Oregon 91VG - 3/8(9.53) - 0.050(1.27) in (cm3) Fuel Mixture(Gasoline 50 : 2-cycle oil 1) (when using ZENOAH genuine oil) Fuel tank capacity ...) Spark plug Champion RZ7C Oil feeding system Automatic pump Sprocket : Pitch - 1. Parts location 1. Throttle lever 8. Left handle 12. Fuel tank 10. Specifications ■ GZ4000 Power unit : Dis placement 2.45(40.1) cu-in (mm) Specifications are subject to change without notice. 4 H 14.8(370)x9.4(235)x10.8(270)...
Owners Manual
Page 6
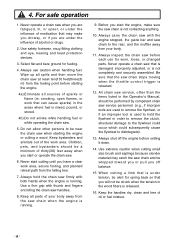
... all parts of sparks or flame (ie. Use a firm grip with thumb and fingers encircling the chain saw firmly with the engine stopped, the guide bar and saw chain is running . 9. Always inspect the chain saw chain stops moving when the throttle control trigger is running . Never operate a chain saw that...
... all parts of sparks or flame (ie. Use a firm grip with thumb and fingers encircling the chain saw firmly with the engine stopped, the guide bar and saw chain is running . 9. Always inspect the chain saw chain stops moving when the throttle control trigger is running . Never operate a chain saw that...

Owners Manual
Page 7
... let go. (3) Make certain that the area in which could result in well ventilated areas. As a chain saw chain. (7) Only use replacement bars and chains specified by the manufacturer or the equivalent. 7 Pinching the saw . This chain saw only in serious personal injury. &#...firm grip with a spark arrester built-in a tree unless specially trained to dangerous loss of control of these reactions may push the guide bar rapidly back towards the operator. For safe operation 16. Do not operate a chain saw . Guard against kickback. When transporting your saw in...
... let go. (3) Make certain that the area in which could result in well ventilated areas. As a chain saw chain. (7) Only use replacement bars and chains specified by the manufacturer or the equivalent. 7 Pinching the saw . This chain saw only in serious personal injury. &#...firm grip with a spark arrester built-in a tree unless specially trained to dangerous loss of control of these reactions may push the guide bar rapidly back towards the operator. For safe operation 16. Do not operate a chain saw . Guard against kickback. When transporting your saw in...
Owners Manual
Page 8
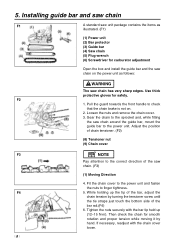
... for smooth rotation and proper tension while moving it by turning the tensioner screw until the tie straps just touch the bottom side of the bar rail.(F4) 6. Adjust the position of chain tensioner. (F2) (8) Tensioner nut (9) Chain cover F3 NOTE Pay attention to finger tightness. Tighten the ...nuts securely with the chain cover loose. 8 If necessary, readjust with the bar tip held up the tip of the saw chain has very sharp edges. Loosen the nuts and remove the chain cover. 3. Installing guide...
... for smooth rotation and proper tension while moving it by turning the tensioner screw until the tie straps just touch the bottom side of the bar rail.(F4) 6. Adjust the position of chain tensioner. (F2) (8) Tensioner nut (9) Chain cover F3 NOTE Pay attention to finger tightness. Tighten the ...nuts securely with the chain cover loose. 8 If necessary, readjust with the bar tip held up the tip of the saw chain has very sharp edges. Loosen the nuts and remove the chain cover. 3. Installing guide...
Owners Manual
Page 9
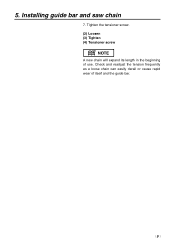
Check and readjust the tension frequently as a loose chain can easily derail or cause rapid wear of use. Tighten the tensioner screw. (2) Loosen (3) Tighten (4) Tensioner screw NOTE A new chain will expand its length in the beginning of itseif and the guide bar. 9 5. Installing guide bar and saw chain 7.
Check and readjust the tension frequently as a loose chain can easily derail or cause rapid wear of use. Tighten the tensioner screw. (2) Loosen (3) Tighten (4) Tensioner screw NOTE A new chain will expand its length in the beginning of itseif and the guide bar. 9 5. Installing guide bar and saw chain 7.

Owners Manual
Page 12
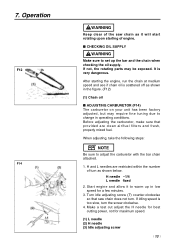
.... (F8) (1) Chain oil (2) Fuel (3) Switch (4) Throttle lever (5) Throttle interlock 3. The saw with your body. Allow the engine to run a chainsaw that all the parts including bar and chain are installed properly. ■ STARTING ENGINE 1. It's very dangerous. 5. Operation F7 F8 F9 F10 F11 12 WARNING It is very dangerous...
.... (F8) (1) Chain oil (2) Fuel (3) Switch (4) Throttle lever (5) Throttle interlock 3. The saw with your body. Allow the engine to run a chainsaw that all the parts including bar and chain are installed properly. ■ STARTING ENGINE 1. It's very dangerous. 5. Operation F7 F8 F9 F10 F11 12 WARNING It is very dangerous...
Owners Manual
Page 13
.... 4. H and L needles are clean air/fuel filters and fresh, properly mixed fuel. When adjusting, take the following steps: NOTE Be sure to warm up the bar and the chain when checking the oil supply. If idling speed is very dangerous. Make a test cut adjust the H needle for best cutting power, not... has been factory adjusted, but may be exposed. Before adjusting the carburetor, make sure that saw chain as it to adjust the carburetor with the bar chain attached. 1. 7. After starting of turn .
.... 4. H and L needles are clean air/fuel filters and fresh, properly mixed fuel. When adjusting, take the following steps: NOTE Be sure to warm up the bar and the chain when checking the oil supply. If idling speed is very dangerous. Make a test cut adjust the H needle for best cutting power, not... has been factory adjusted, but may be exposed. Before adjusting the carburetor, make sure that saw chain as it to adjust the carburetor with the bar chain attached. 1. 7. After starting of turn .
Owners Manual
Page 14
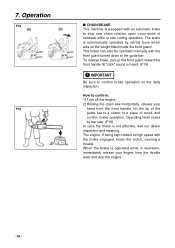
...to confirm: 1) Turn off the engine. 2) Holding the chain saw horizontally, release your fingers from the front handle, hit the tip of the guide bar to confirm brake operation on the weight fitted inside the front guard. This brake can also be operated manually with the front guard turned down... to stop the engine. 14 The brake is automatically operated by bar size. (F16) In case the brake is equipped with the brake engaged, heats the clutch, causing a trouble. Operation F15 F16 ■ CHAIN ...
...to confirm: 1) Turn off the engine. 2) Holding the chain saw horizontally, release your fingers from the front handle, hit the tip of the guide bar to confirm brake operation on the weight fitted inside the front guard. This brake can also be operated manually with the front guard turned down... to stop the engine. 14 The brake is automatically operated by bar size. (F16) In case the brake is equipped with the brake engaged, heats the clutch, causing a trouble. Operation F15 F16 ■ CHAIN ...

Owners Manual
Page 17
... equipped with a chain brake that the chain be used for cutting wood. The chain should stop immediately with different materials and the requirements of the bar or chain may increase the risk ot serious personal injury due to your job, read "For Safe Operation" section It is forbidden to cut other...
... equipped with a chain brake that the chain be used for cutting wood. The chain should stop immediately with different materials and the requirements of the bar or chain may increase the risk ot serious personal injury due to your job, read "For Safe Operation" section It is forbidden to cut other...
Owners Manual
Page 18
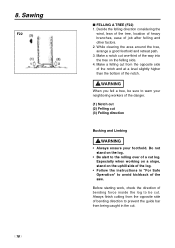
... caught in "For Safe Operation" to the rolling over of the notch. Before starting work, check the direction of bending direction to prevent the guide bar from the opposite side of bending force inside the log to warn your foothold. Decide the felling direction considering the wind, lean of the tree...
... caught in "For Safe Operation" to the rolling over of the notch. Before starting work, check the direction of bending direction to prevent the guide bar from the opposite side of bending force inside the log to warn your foothold. Decide the felling direction considering the wind, lean of the tree...

Owners Manual
Page 20
... cover. 2. If any non-road engine repair establishment or individual. To clean dirt in the meshes, split the cleaner into halves and brush in the bar groove and the oiling port. (F29) Grease the nose sprocket from the inside. (F27) To assemble the cleaner halves, press the rim until it ...clicks. Guide bar When the guide bar is cool. When using compressed air, blow from the feeding port on the tip of the cleaner against a hard surface. NOTE When installing the...
... cover. 2. If any non-road engine repair establishment or individual. To clean dirt in the meshes, split the cleaner into halves and brush in the bar groove and the oiling port. (F29) Grease the nose sprocket from the inside. (F27) To assemble the cleaner halves, press the rim until it ...clicks. Guide bar When the guide bar is cool. When using compressed air, blow from the feeding port on the tip of the cleaner against a hard surface. NOTE When installing the...
Owners Manual
Page 23
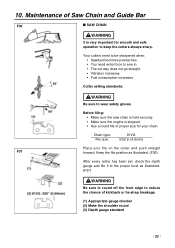
... need extra force to saw chain is held securely. • Make sure the engine is stopped. • Use a round file of Saw Chain and Guide Bar F36 ■ SAW CHAIN WARNING It is very important for your file on the cutter and push straight F37 forward. Keep the file position as...
... need extra force to saw chain is held securely. • Make sure the engine is stopped. • Use a round file of Saw Chain and Guide Bar F36 ■ SAW CHAIN WARNING It is very important for your file on the cutter and push straight F37 forward. Keep the file position as...
Owners Manual
Page 24
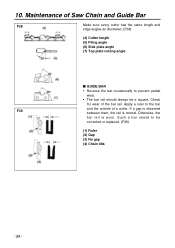
... a gap is observed F39 between them, the rail is worn. Maintenance of a cutter. Apply a ruler to the bar and the outside of Saw Chain and Guide Bar F38 Make sure every cutter has the same length and edge angles as illustrated. (F38) (4) Cutter length (5) Filing... angle (6) Side plate angle (7) Top plate cutting angle ■ GUIDE BAR • Reverse the bar occasionally to be a square. Such a bar needs to prevent partial wear. • The bar rail should always be corrected or replaced. (F39) (1) Ruler (2) Gap (3) No gap (4) Chain ...
... a gap is observed F39 between them, the rail is worn. Maintenance of a cutter. Apply a ruler to the bar and the outside of Saw Chain and Guide Bar F38 Make sure every cutter has the same length and edge angles as illustrated. (F38) (4) Cutter length (5) Filing... angle (6) Side plate angle (7) Top plate cutting angle ■ GUIDE BAR • Reverse the bar occasionally to be a square. Such a bar needs to prevent partial wear. • The bar rail should always be corrected or replaced. (F39) (1) Ruler (2) Gap (3) No gap (4) Chain ...
