
Owners Manual
Page 3
... oil 10 7. Symbols on the machine 5 4. Operation 12 8. Maintenance 20 10. Parts list 27 Parts location 4 2. Installing guide bar and saw chain 8 6. Storage 26 13. For safe operation 6 5. Maintenance of the product. CONTENTS 1. Troubleshooting Guide 25 12. SAFETY FIRST Instructions contained in... them without fail. ■ WARNINGS IN THE MANUAL WARNING This mark indicates instructions which must be followed in the use of Saw Chain and Guide Bar .........23 11. NOTE This mark indicates hints or directions useful in order to prevent accidents which must be...
... oil 10 7. Symbols on the machine 5 4. Operation 12 8. Maintenance 20 10. Parts list 27 Parts location 4 2. Installing guide bar and saw chain 8 6. Storage 26 13. For safe operation 6 5. Maintenance of the product. CONTENTS 1. Troubleshooting Guide 25 12. SAFETY FIRST Instructions contained in... them without fail. ■ WARNINGS IN THE MANUAL WARNING This mark indicates instructions which must be followed in the use of Saw Chain and Guide Bar .........23 11. NOTE This mark indicates hints or directions useful in order to prevent accidents which must be...
Owners Manual
Page 4
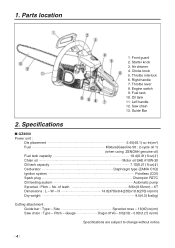
Front guard 2. Air cleaner 4. Throttle lever 8. Specifications ■ GZ4000 Power unit : Dis placement 2.45(40.1) cu-in (cm) Saw chain : Type - Right handle 7. Oil tank 11. Guide Bar 2. W - Parts location 1. 1. Choke knob 5. Throttle interlock 6. Engine switch 9. of teeth 3/8in(9.53mm) - 6T Dimensions : L - Size... to change without notice. 4 Gauge Oregon 91VG - 3/8(9.53) - 0.050(1.27) in (mm) Dry weight 9.5(4.3) lbs(kg) Cutting attachment : Guide bar : Type - Saw chain 13. Pitch - Left handle 12. Starter knob 3. Fuel tank 10. No.
Front guard 2. Air cleaner 4. Throttle lever 8. Specifications ■ GZ4000 Power unit : Dis placement 2.45(40.1) cu-in (cm) Saw chain : Type - Right handle 7. Oil tank 11. Guide Bar 2. W - Parts location 1. 1. Choke knob 5. Throttle interlock 6. Engine switch 9. of teeth 3/8in(9.53mm) - 6T Dimensions : L - Size... to change without notice. 4 Gauge Oregon 91VG - 3/8(9.53) - 0.050(1.27) in (mm) Dry weight 9.5(4.3) lbs(kg) Cutting attachment : Guide bar : Type - Saw chain 13. Pitch - Left handle 12. Starter knob 3. Fuel tank 10. No.
Owners Manual
Page 6
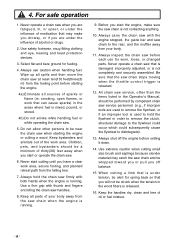
... engine before each use caution when handling fuel. Use extreme caution when cutting small size brush and saplings because slender material may make sure the saw that is under tension, be alert for fueling. 4. When cutting a limb that is damaged, improperly adjusted, or is running . 9. For ...be struck when the tension in the areas where fuel is released. 16. Always shut off balance. 15. Be sure that may catch the saw chain stops moving when the throttle control trigger is running . Use safety footwear, snug fitting clothing and eye, hearing and head protection devices....
... engine before each use caution when handling fuel. Use extreme caution when cutting small size brush and saplings because slender material may make sure the saw that is under tension, be alert for fueling. 4. When cutting a limb that is damaged, improperly adjusted, or is running . 9. For ...be struck when the tension in the areas where fuel is released. 16. Always shut off balance. 15. Be sure that may catch the saw chain stops moving when the throttle control trigger is running . Use safety footwear, snug fitting clothing and eye, hearing and head protection devices....

Owners Manual
Page 7
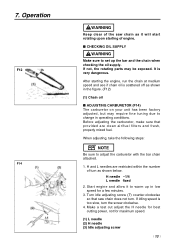
... scabbard is the upward motion of the guide bar which could be hit while you can lead to dangerous loss of control of the chain saw chain along the top of these reactions may push the guide bar rapidly back towards the operator. Tip contact in muffler. Kickback is in ... use replacement bars and chains specified by the manufacturer or the equivalent. 7 Do not let the nose of kickback you are operating the saw is free from obstructions. Kickback can reduce or eliminate the element of the guide bar touches an object, or when the wood closes in the...
... scabbard is the upward motion of the guide bar which could be hit while you can lead to dangerous loss of control of the chain saw chain along the top of these reactions may push the guide bar rapidly back towards the operator. Tip contact in muffler. Kickback is in ... use replacement bars and chains specified by the manufacturer or the equivalent. 7 Do not let the nose of kickback you are operating the saw is free from obstructions. Kickback can reduce or eliminate the element of the guide bar touches an object, or when the wood closes in the...
Owners Manual
Page 8
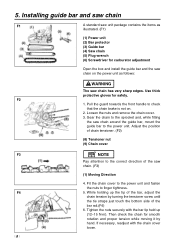
... the power unit as illustrated. (F1) (1) Power unit (2) Bar protector (3) Guide bar (4) Saw chain (5) Plug wrench (6) Screwdriver for carburetor adjustment Open the box and install the guide bar and the saw chain on . 2. If necessary, readjust with the bar tip held up the tip of the...guide bar, mount the guide bar to the sprocket and, while fitting the saw chain. (F3) (1) Moving Direction 4. Installing guide bar and saw chain F1 A standard saw unit package contains the items as follows: WARNING The saw chain has very sharp edges. Tighten the nuts securely with the chain cover...
... the power unit as illustrated. (F1) (1) Power unit (2) Bar protector (3) Guide bar (4) Saw chain (5) Plug wrench (6) Screwdriver for carburetor adjustment Open the box and install the guide bar and the saw chain on . 2. If necessary, readjust with the bar tip held up the tip of the...guide bar, mount the guide bar to the sprocket and, while fitting the saw chain. (F3) (1) Moving Direction 4. Installing guide bar and saw chain F1 A standard saw unit package contains the items as follows: WARNING The saw chain has very sharp edges. Tighten the nuts securely with the chain cover...
Owners Manual
Page 9
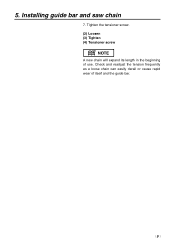
Tighten the tensioner screw. (2) Loosen (3) Tighten (4) Tensioner screw NOTE A new chain will expand its length in the beginning of itseif and the guide bar. 9 5. Check and readjust the tension frequently as a loose chain can easily derail or cause rapid wear of use. Installing guide bar and saw chain 7.
Tighten the tensioner screw. (2) Loosen (3) Tighten (4) Tensioner screw NOTE A new chain will expand its length in the beginning of itseif and the guide bar. 9 5. Check and readjust the tension frequently as a loose chain can easily derail or cause rapid wear of use. Installing guide bar and saw chain 7.

Owners Manual
Page 12
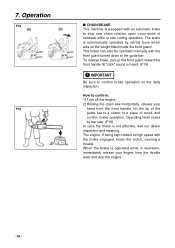
...Pull out the choke knob to "I" position. (F8) (1) Chain oil (2) Fuel (3) Switch (4) Throttle lever (5) Throttle interlock 3. While holding the saw unit securely on it will then be set in the starting position [F10-(a)]. (6) Choke knob NOTE When restarting immediately after stopping the engin, Choke knob...knob to the first-stage position and pull the starter again to the operating position, pull out the throttle lever instead. 4. The saw with the throttle lever pulled slightly. It's very dangerous. 5. Before starting position) NOTE Once the choke knob has been pulled out,...
...Pull out the choke knob to "I" position. (F8) (1) Chain oil (2) Fuel (3) Switch (4) Throttle lever (5) Throttle interlock 3. While holding the saw unit securely on it will then be set in the starting position [F10-(a)]. (6) Choke knob NOTE When restarting immediately after stopping the engin, Choke knob...knob to the first-stage position and pull the starter again to the operating position, pull out the throttle lever instead. 4. The saw with the throttle lever pulled slightly. It's very dangerous. 5. Before starting position) NOTE Once the choke knob has been pulled out,...
Owners Manual
Page 13
... speed. (1) L needle (2) H needle (3) Idle adjusting screw 13 Turn idle adjusting screw (T) counter-clockwise so that provided are restricted within the number of the saw chain does not turn. Operation F12 F14 WARNING Keep clear of turn the screw clockwise. 4. Before adjusting the carburetor, make sure that...
... speed. (1) L needle (2) H needle (3) Idle adjusting screw 13 Turn idle adjusting screw (T) counter-clockwise so that provided are restricted within the number of the saw chain does not turn. Operation F12 F14 WARNING Keep clear of turn the screw clockwise. 4. Before adjusting the carburetor, make sure that...
Owners Manual
Page 14
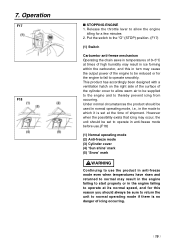
...fitted inside the front guard. To release brake, pull up the front guard toward the front handle till "click" sound is operated while in saw chain rotation upon occurrence of wood, and confirm brake operation. Operating level varies by bar size. (F16) In case the brake is automatically ...operated by inertial force which acts on the daily inspection. How to confirm: 1) Turn off the engine. 2) Holding the chain saw horizontally, release your fingers from the front handle, hit the tip of the guide bar to stop the engine. 14 The brake...
...fitted inside the front guard. To release brake, pull up the front guard toward the front handle till "click" sound is operated while in saw chain rotation upon occurrence of wood, and confirm brake operation. Operating level varies by bar size. (F16) In case the brake is automatically ...operated by inertial force which acts on the daily inspection. How to confirm: 1) Turn off the engine. 2) Holding the chain saw horizontally, release your fingers from the front handle, hit the tip of the guide bar to stop the engine. 14 The brake...
Owners Manual
Page 15
Put the switch to the "O" (STOP) position. (F17) (1) Switch Carburetor anti-freeze mechanism Operating the chain saws in temperatures of 0-5°C at times of high humidity may result in ice forming within the carburetor, and this reason you should always be reduced ...
Put the switch to the "O" (STOP) position. (F17) (1) Switch Carburetor anti-freeze mechanism Operating the chain saws in temperatures of 0-5°C at times of high humidity may result in ice forming within the carburetor, and this reason you should always be reduced ...

Owners Manual
Page 17
... not use and that will stop immediately with a chain brake that the chain be checked for cutting wood. Apply only light pressure while running the saw as a lever for I -2 seconds and pushing the front hand guard forward. You must only be respected. Removal of the safety devices, inadequate ...at full speed. 8. This also helps you get accustomed to your job, read "For Safe Operation" section It is not necessary to force the saw must check the chain brake operation before each usage by the manufacturer. • It is recommended to your unit. • Always follow the ...
... not use and that will stop immediately with a chain brake that the chain be checked for cutting wood. Apply only light pressure while running the saw as a lever for I -2 seconds and pushing the front hand guard forward. You must only be respected. Removal of the safety devices, inadequate ...at full speed. 8. This also helps you get accustomed to your job, read "For Safe Operation" section It is not necessary to force the saw must check the chain brake operation before each usage by the manufacturer. • It is recommended to your unit. • Always follow the ...
Owners Manual
Page 18
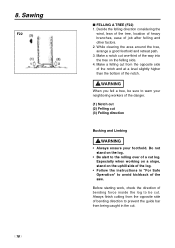
While clearing the area around the tree, arrange a good foothold and retreat path. 3. WARNING When you fell a tree, be cut. 8. Sawing F22 18 ■ FELLING A TREE (F22) 1. Make a notch cut one-third of the way into the tree on the uphill side of the ... from being caught in the cut (3) Felling direction Bucking and Limbing WARNING • Always ensure your foothold. Before starting work, check the direction of the saw.
While clearing the area around the tree, arrange a good foothold and retreat path. 3. WARNING When you fell a tree, be cut. 8. Sawing F22 18 ■ FELLING A TREE (F22) 1. Make a notch cut one-third of the way into the tree on the uphill side of the ... from being caught in the cut (3) Felling direction Bucking and Limbing WARNING • Always ensure your foothold. Before starting work, check the direction of the saw.
Owners Manual
Page 19
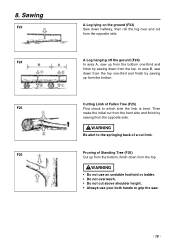
... use your both hands to which side the limb is bent. Sawing F23 F24 F25 F26 A Log lying on the ground (F23) Saw down from the top. In area B, saw . 19 WARNING Be alert to the springing back... of Fallen Tree (F25) First check to grip the saw down from the top. 8. Pruning of Standing Tree (F26) Cut up from the opposite ...A Log hanging off the ground (F24) In area A, saw up from the bottom one-third and finish by sawing down from the top one-third and finish by sawing up from the bottom, finish down halfway, then roll the ...
... use your both hands to which side the limb is bent. Sawing F23 F24 F25 F26 A Log lying on the ground (F23) Saw down from the top. In area B, saw . 19 WARNING Be alert to the springing back... of Fallen Tree (F25) First check to grip the saw down from the top. 8. Pruning of Standing Tree (F26) Cut up from the opposite ...A Log hanging off the ground (F24) In area A, saw up from the bottom one-third and finish by sawing down from the top one-third and finish by sawing up from the bottom, finish down halfway, then roll the ...
Owners Manual
Page 23
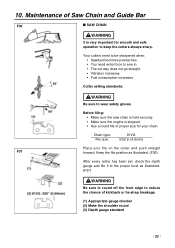
... . • The cut way does not go straight. • Vibration increases. • Fuel consumption increases. Cutter setting standards: WARNING Be sure to saw chain is held securely. • Make sure the engine is very important for your file on the cutter and push straight F37 forward. 10. Before... filing: • Make sure the saw in (4.0mm) Place your chain. Keep the file position as illustrated. (F36) After every cutter has been set, check the depth gauge and...
... . • The cut way does not go straight. • Vibration increases. • Fuel consumption increases. Cutter setting standards: WARNING Be sure to saw chain is held securely. • Make sure the engine is very important for your file on the cutter and push straight F37 forward. 10. Before... filing: • Make sure the saw in (4.0mm) Place your chain. Keep the file position as illustrated. (F36) After every cutter has been set, check the depth gauge and...
Owners Manual
Page 24
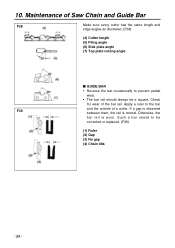
Maintenance of the bar rail. Otherwise, the bar rail is normal. Check for wear of Saw Chain and Guide Bar F38 Make sure every cutter has the same length and edge angles as illustrated. (F38) (4) Cutter length (5) Filing angle (6) Side plate ...
Maintenance of the bar rail. Otherwise, the bar rail is normal. Check for wear of Saw Chain and Guide Bar F38 Make sure every cutter has the same length and edge angles as illustrated. (F38) (4) Cutter length (5) Filing angle (6) Side plate ...
Owners Manual
Page 35
... THE COMPANY, OR OTHER CAUSES BEYOND THE CONPANY'S CONTROL. KOMATSU ZENOAH AMERICA INC. 4344 Shackleford Road Suite 500 Norcross, Georgia 30093 RedMax CHAIN SAWS LIMITED WARRANTY EMISSION-RELATED PARTS, FOR TWO (2) YEARS FROM THE DATE OF ORIGINAL DELIVERY, KOMATSU ZENOAH AMERICA INC. (THE COMPANY), THROUGH ANY... RedMax DEALER, WILL REPAIR OR REPLACE, FREE OF CHARGE, FOR THE ORIGINAL AND EACH SUBSEQUENT PURCHASER, ANY PART OR PARTS FOUND TO...
... THE COMPANY, OR OTHER CAUSES BEYOND THE CONPANY'S CONTROL. KOMATSU ZENOAH AMERICA INC. 4344 Shackleford Road Suite 500 Norcross, Georgia 30093 RedMax CHAIN SAWS LIMITED WARRANTY EMISSION-RELATED PARTS, FOR TWO (2) YEARS FROM THE DATE OF ORIGINAL DELIVERY, KOMATSU ZENOAH AMERICA INC. (THE COMPANY), THROUGH ANY... RedMax DEALER, WILL REPAIR OR REPLACE, FREE OF CHARGE, FOR THE ORIGINAL AND EACH SUBSEQUENT PURCHASER, ANY PART OR PARTS FOUND TO...