

Operating Instructions
Page 1
3228C/3235C/3245C Operating Instructions Copy Reference Placing Originals Copying Colour Adjustment/Program Troubleshooting User Tools (Copier / Document Server Features) Specifications Read this machine and keep it handy for future reference. For safe and correct use this manual carefully before you use , be sure to read the Safety Information in the "General Settings Guide" before using the machine.
3228C/3235C/3245C Operating Instructions Copy Reference Placing Originals Copying Colour Adjustment/Program Troubleshooting User Tools (Copier / Document Server Features) Specifications Read this machine and keep it handy for future reference. For safe and correct use this manual carefully before you use , be sure to read the Safety Information in the "General Settings Guide" before using the machine.

Operating Instructions
Page 3
...and therefore contains functions and settings that the administrators can use to machine type. ❒ Adobe Acrobat Reader/Adobe Reader is for administrators of the machine...refer to this manual) Describes operations, functions, and troubleshooting for the machine's copier function. ❖ Facsimile Reference Describes operations, functions, and troubleshooting for the ...10070; Facsimile Reference Describes advanced facsimile functions such as Tray Paper Settings), Document Server functions, and troubleshooting. Images, illustrations, functions, and supported operating systems may not...
...and therefore contains functions and settings that the administrators can use to machine type. ❒ Adobe Acrobat Reader/Adobe Reader is for administrators of the machine...refer to this manual) Describes operations, functions, and troubleshooting for the machine's copier function. ❖ Facsimile Reference Describes operations, functions, and troubleshooting for the ...10070; Facsimile Reference Describes advanced facsimile functions such as Tray Paper Settings), Document Server functions, and troubleshooting. Images, illustrations, functions, and supported operating systems may not...

Operating Instructions
Page 11
...OF CONTENTS Manuals for This Machine i What You Can Do with This Machine vi Notice ...1 How to Read This Manual 2 Machine Types ...3 Functions Requiring Optional Configurations 4 Control Panel...5 Display Panel ...7 1. Placing Originals Originals ...9 Sizes and Weights of the Paper 25 ... Colour Functions 28 Selecting a Colour Mode 28 Convert Colours ...29 Erase Colour ...30 Colour Background 31 Copier Functions 32 Adjusting Copy Image Density 32 Selecting the Original Type 33 Selecting Copy Paper 34 Preset Reduce/Enlarge 37 Zoom ...38 Auto Reduce / Enlarge 38 Size Magnification...
...OF CONTENTS Manuals for This Machine i What You Can Do with This Machine vi Notice ...1 How to Read This Manual 2 Machine Types ...3 Functions Requiring Optional Configurations 4 Control Panel...5 Display Panel ...7 1. Placing Originals Originals ...9 Sizes and Weights of the Paper 25 ... Colour Functions 28 Selecting a Colour Mode 28 Convert Colours ...29 Erase Colour ...30 Colour Background 31 Copier Functions 32 Adjusting Copy Image Density 32 Selecting the Original Type 33 Selecting Copy Paper 34 Preset Reduce/Enlarge 37 Zoom ...38 Auto Reduce / Enlarge 38 Size Magnification...

Operating Instructions
Page 19
...Program", p.92 "User Colour". See p.87 "Colour Adjustment". 6. Display panel Displays operation status, error messages, and function menus. You can also print these details. Note ❒ When image quality is adjusted, the lamp in the {Adjust/Program Colour} key is lit. 5. See p.85 "...Programs". 9. {Clear Modes} key Press to call when a malfunction occurs. See p.103 "User Tools (Copier / Document Server Features)". • Counter Press to meet your requirements. Screen Contrast knob Adjusts display panel brightness. 2. {User Tools/Counter} key •...
...Program", p.92 "User Colour". See p.87 "Colour Adjustment". 6. Display panel Displays operation status, error messages, and function menus. You can also print these details. Note ❒ When image quality is adjusted, the lamp in the {Adjust/Program Colour} key is lit. 5. See p.85 "...Programs". 9. {Clear Modes} key Press to call when a malfunction occurs. See p.103 "User Tools (Copier / Document Server Features)". • Counter Press to meet your requirements. Screen Contrast knob Adjusts display panel brightness. 2. {User Tools/Counter} key •...

Operating Instructions
Page 30
... has been fed, place the next instalments. Note ❒ When the Sort, Combine or Du- Preparation To use the SADF function, set the User Tools (Copier / Document Server Features) such that [SADF] is displayed when you to press the {Start} key. plex function is set , press the {#} key after all originals have...
... has been fed, place the next instalments. Note ❒ When the Sort, Combine or Du- Preparation To use the SADF function, set the User Tools (Copier / Document Server Features) such that [SADF] is displayed when you to press the {Start} key. plex function is set , press the {#} key after all originals have...

Operating Instructions
Page 46
...] to adjust ❖ Auto Image Density image density. Auto image density A Make sure [Auto Image Density] is selected. Copying Copier Functions Adjusting Copy Image Density Manual image density A There are three types of the original in nine increments. ❖ Combined auto and manual image density Use when copying originals with dirty backgrounds...
...] to adjust ❖ Auto Image Density image density. Auto image density A Make sure [Auto Image Density] is selected. Copying Copier Functions Adjusting Copy Image Density Manual image density A There are three types of the original in nine increments. ❖ Combined auto and manual image density Use when copying originals with dirty backgrounds...

Operating Instructions
Page 47
...to scan Map originals. If "Original Type Display" has been set to 2 "Hide", select "Map" from Copier / Docu- ment Server Features on paper (e.g. If the original type keys are not displayed A Press [Original Type]. Reference p.111 "Original Type Display" p.111 "Original Photo Type Priority" A Press the appropriate key ... / Photo When originals contain photographs or pictures alongside the text. ❖ Photo When you need to reproduce originals that are printed on the User Tools menu), select "Map" from the "Others" menu. Note ❒ If you select "Text / Photo" or ...
...to scan Map originals. If "Original Type Display" has been set to 2 "Hide", select "Map" from Copier / Docu- ment Server Features on paper (e.g. If the original type keys are not displayed A Press [Original Type]. Reference p.111 "Original Type Display" p.111 "Original Photo Type Priority" A Press the appropriate key ... / Photo When originals contain photographs or pictures alongside the text. ❖ Photo When you need to reproduce originals that are printed on the User Tools menu), select "Map" from the "Others" menu. Note ❒ If you select "Text / Photo" or ...

Operating Instructions
Page 49
B Select the paper type. 35 The selected paper tray is selected. Manual Paper Select A Select the paper tray, bypass tray or LCT. See "Paper Type" in "Tray Paper Settings", General Settings Guide. Auto Paper Select A Make sure [Auto Paper Select] is highlighted. Reference p.22 "Copying from the Bypass Tray" If the paper type keys are not automatically selected. Copier Functions 2 Note ❒ Trays with a key mark are not displayed A Press [Auto Paper Select].
B Select the paper type. 35 The selected paper tray is selected. Manual Paper Select A Select the paper tray, bypass tray or LCT. See "Paper Type" in "Tray Paper Settings", General Settings Guide. Auto Paper Select A Make sure [Auto Paper Select] is highlighted. Reference p.22 "Copying from the Bypass Tray" If the paper type keys are not automatically selected. Copier Functions 2 Note ❒ Trays with a key mark are not displayed A Press [Auto Paper Select].

Operating Instructions
Page 51
... assign this function to 93% of Reduce/Enlarge differs depending on how the original was scanned. Note ❒ To select a preset ratio on the ex- Copier Functions Preset Reduce/Enlarge You can select a preset ratio for Create Margin" 37 Reference Related default settings: p.113 "Copy Function Key: F1-F5" p.115 "Ratio...
... assign this function to 93% of Reduce/Enlarge differs depending on how the original was scanned. Note ❒ To select a preset ratio on the ex- Copier Functions Preset Reduce/Enlarge You can select a preset ratio for Create Margin" 37 Reference Related default settings: p.113 "Copy Function Key: F1-F5" p.115 "Ratio...

Operating Instructions
Page 53
... p.11 "Sizes difficult to detect" You can calculate an enlargement or reduction ratio based on the lengths of different sizes in the L orientation. B Press [Specifd. Copier Functions Note ❒ You cannot use the Rotated Copy function when enlarging to B4 JIS, A3 or 81/2" × 14", 11" × 17" size copy...
... p.11 "Sizes difficult to detect" You can calculate an enlargement or reduction ratio based on the lengths of different sizes in the L orientation. B Press [Specifd. Copier Functions Note ❒ You cannot use the Rotated Copy function when enlarging to B4 JIS, A3 or 81/2" × 14", 11" × 17" size copy...

Operating Instructions
Page 55
... size of the copy, as shown. Note ❒ To change the length, press the key you require. Horizontal original size 2. Horizontal copy size 4. B Press [Specifd. Copier Functions ❒ If you have incorrectly entered the ratio, readjust it using the number keys, and then press [#]. I Place the originals, and then press the...
... size of the copy, as shown. Note ❒ To change the length, press the key you require. Horizontal original size 2. Horizontal copy size 4. B Press [Specifd. Copier Functions ❒ If you have incorrectly entered the ratio, readjust it using the number keys, and then press [#]. I Place the originals, and then press the...
Operating Instructions
Page 57
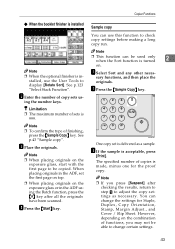
Copier Functions ❖ When the booklet finisher is installed Sample copy You can change certain settings. ...Margin Adjust., and Cover / Slip Sheet. Note ❒ When the optional finisher is 999. Note ❒ To confirm the type of sets is installed, use this function to check copy settings before making a long copy run. When placing originals in the ...ADF, set is acceptable, press [Print]. ZFNS016E One copy set the first page on top. ❒ When placing originals on . You can use the User ...
Copier Functions ❖ When the booklet finisher is installed Sample copy You can change certain settings. ...Margin Adjust., and Cover / Slip Sheet. Note ❒ When the optional finisher is 999. Note ❒ To confirm the type of sets is installed, use this function to check copy settings before making a long copy run. When placing originals in the ...ADF, set is acceptable, press [Print]. ZFNS016E One copy set the first page on top. ❒ When placing originals on . You can use the User ...
Operating Instructions
Page 59
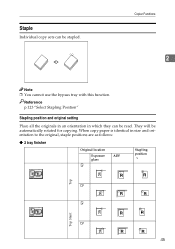
Reference p.123 "Select Stapling Position" Stapling position and original setting Place all the originals in an orientation in size and orientation to the original, staple positions are as follows: ❖ 2 tray finisher Original location Exposure glass K ADF Stapling position *1 Top L K Top Slant L 45 They will be read. When copy paper is identical in which they can be stapled. Copier Functions 2 Note ❒ You cannot use the bypass tray with this function. Staple Individual copy sets can be automatically rotated for copying.
Reference p.123 "Select Stapling Position" Stapling position and original setting Place all the originals in an orientation in size and orientation to the original, staple positions are as follows: ❖ 2 tray finisher Original location Exposure glass K ADF Stapling position *1 Top L K Top Slant L 45 They will be read. When copy paper is identical in which they can be stapled. Copier Functions 2 Note ❒ You cannot use the bypass tray with this function. Staple Individual copy sets can be automatically rotated for copying.

Operating Instructions
Page 63
Punch 2 You can make punch holes in the ADF, set the first page on top. ❒ When placing originals on the exposure glass, start with the first page to be copied. Copier Functions Note ❒ When placing originals on the exposure glass or in the ADF using the Batch function, press the {#} key after all the originals have been scanned. When placing originals in copies. ❖ 2 holes ❖ 3 holes GCPNCH1E ❖ 4 holes GCPNCH3E GCPNCH0E 49
Punch 2 You can make punch holes in the ADF, set the first page on top. ❒ When placing originals on the exposure glass, start with the first page to be copied. Copier Functions Note ❒ When placing originals on the exposure glass or in the ADF using the Batch function, press the {#} key after all the originals have been scanned. When placing originals in copies. ❖ 2 holes ❖ 3 holes GCPNCH1E ❖ 4 holes GCPNCH3E GCPNCH0E 49

Operating Instructions
Page 67
... of images on the front and back of copies, not the orientation of a two-sided original onto two separate pages. Copier Functions Duplex Original orientation and completed copies There are three types of duplex copies: ❖ 1 Sided→2 Sided Copy images differ according to the orientation in which you place originals (vertical...
... of images on the front and back of copies, not the orientation of a two-sided original onto two separate pages. Copier Functions Duplex Original orientation and completed copies There are three types of duplex copies: ❖ 1 Sided→2 Sided Copy images differ according to the orientation in which you place originals (vertical...

Operating Instructions
Page 69
... 1 Side Copies 4 two-sided originals onto one side of a sheet. ❖ 2 Sided 8 Pages → Combine 1 Side Copies 8 two-sided originals onto one side of a sheet. Copier Functions 1 Sided Combine Combine several pages onto one side of a sheet. ❖ Orientation of the original and combine image position • Open to leftR originals...
... 1 Side Copies 4 two-sided originals onto one side of a sheet. ❖ 2 Sided 8 Pages → Combine 1 Side Copies 8 two-sided originals onto one side of a sheet. Copier Functions 1 Sided Combine Combine several pages onto one side of a sheet. ❖ Orientation of the original and combine image position • Open to leftR originals...

Operating Instructions
Page 71
... of the original and combine image position" p.116 "Erase Original Shadow in Combine" p.117 "Copy Order in Combine" p.118 "Separation Line in Combine" GCSHVY2E 57 Copier Functions ❖ 1 Sided 16 Pages → Combine 2 Side Copies 16 one-sided originals onto a sheet, eight pages per side. ❖ 2 Sided 16 Pages → Combine...
... of the original and combine image position" p.116 "Erase Original Shadow in Combine" p.117 "Copy Order in Combine" p.118 "Separation Line in Combine" GCSHVY2E 57 Copier Functions ❖ 1 Sided 16 Pages → Combine 2 Side Copies 16 one-sided originals onto a sheet, eight pages per side. ❖ 2 Sided 16 Pages → Combine...

Operating Instructions
Page 73
...;2 Sided], or [Front&Back→2 Sided], and then press [OK]. F Make sure [Auto Paper Select] is se- Note ❒ Press the {#} key after all origi- Copier Functions ❖ Front&Back→2 Sided Copies both sides of a two-page spread original onto both sides of a sheet. sided) A5K × 2 sheets A5K ×...
...;2 Sided], or [Front&Back→2 Sided], and then press [OK]. F Make sure [Auto Paper Select] is se- Note ❒ Press the {#} key after all origi- Copier Functions ❖ Front&Back→2 Sided Copies both sides of a two-page spread original onto both sides of a sheet. sided) A5K × 2 sheets A5K ×...

Operating Instructions
Page 75
.... Open to make a magazine ❖ Open to left 2 ❖ Open to right GCAH030E ❖ Open to right GCBOOK5E GCAH040E How to fold copies to Left 2. Copier Functions ❖ 2 Sided→Magazine Copies two or more two-sided originals into magazine page order copies (when folded and stacked). ❖ Open to left...
.... Open to make a magazine ❖ Open to left 2 ❖ Open to right GCAH030E ❖ Open to right GCBOOK5E GCAH040E How to fold copies to Left 2. Copier Functions ❖ 2 Sided→Magazine Copies two or more two-sided originals into magazine page order copies (when folded and stacked). ❖ Open to left...

Operating Instructions
Page 77
... [#]. Limitation L Place the original on the exposure glass A Specify the location of the area's base point (X1, Y1), and its length and width (X2, Y2). Copier Functions C Press [Edit Image]. F Press [OK] twice. Note ❒ You can use the specified area repeat from the Exposure Glass. E E Make sure that [Whole Area...
... [#]. Limitation L Place the original on the exposure glass A Specify the location of the area's base point (X1, Y1), and its length and width (X2, Y2). Copier Functions C Press [Edit Image]. F Press [OK] twice. Note ❒ You can use the specified area repeat from the Exposure Glass. E E Make sure that [Whole Area...
