Setup Guide
Page 1
Setup Guide Read This First Trademarks...3 Safety Information 4 Positions of RWARNING and RCAUTION labels 8 ENERGY STAR Program 9 Manuals for This Printer 10 How to Read This Manual 11 Guide to the Printer Exterior ...12 Inside...14 Control Panel...15 Setting Up Where to Put the Printer 17 Unpacking the Printer and Checking the Contents of the Box 20 Installing the Toner Cartridge 22 Loading Paper ...26 Turning the Power On 29 Selecting the Display Language 30 Test Printing ...32 G1168605A_1.10 EN USA G116-8604A Copyright © 2004, 2005 1
Setup Guide Read This First Trademarks...3 Safety Information 4 Positions of RWARNING and RCAUTION labels 8 ENERGY STAR Program 9 Manuals for This Printer 10 How to Read This Manual 11 Guide to the Printer Exterior ...12 Inside...14 Control Panel...15 Setting Up Where to Put the Printer 17 Unpacking the Printer and Checking the Contents of the Box 20 Installing the Toner Cartridge 22 Loading Paper ...26 Turning the Power On 29 Selecting the Display Language 30 Test Printing ...32 G1168605A_1.10 EN USA G116-8604A Copyright © 2004, 2005 1
Setup Guide
Page 2
... Interface Unit Type C 61 Attaching Hard Disk Drive Type 2600 68 Attaching Network Data Protection Unit Type B 70 Attaching Duplex Unit AD610 72 Connecting the Printer Network Connection 75 USB Connection 77 Parallel Connection 78 IEEE 1394 Connection 79 Configuration Ethernet Configuration 80 IEEE 802.11b (Wireless LAN) Configuration 85 IEEE...
... Interface Unit Type C 61 Attaching Hard Disk Drive Type 2600 68 Attaching Network Data Protection Unit Type B 70 Attaching Duplex Unit AD610 72 Connecting the Printer Network Connection 75 USB Connection 77 Parallel Connection 78 IEEE 1394 Connection 79 Configuration Ethernet Configuration 80 IEEE 802.11b (Wireless LAN) Configuration 85 IEEE...

Setup Guide
Page 3
... registered trademarks of Bluetooth-SIG Inc. Bluetooth® is a registered trademark of Microsoft Corporation in the United States and/or other countries. worldwide. IPS-PRINT Printer Language Emulation Copyright© 1999-2000 Oak Technology, Inc., All rights reserved. The proper names of the Windows operating systems are as follows: • Microsoft...
... registered trademarks of Bluetooth-SIG Inc. Bluetooth® is a registered trademark of Microsoft Corporation in the United States and/or other countries. worldwide. IPS-PRINT Printer Language Emulation Copyright© 1999-2000 Oak Technology, Inc., All rights reserved. The proper names of the Windows operating systems are as follows: • Microsoft...

Setup Guide
Page 4
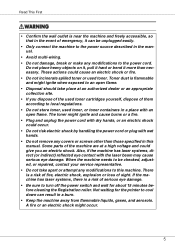
Read This First Safety Information When using your printer, the following important symbols are used: Indicates a potentially hazardous situation which , if instructions are not followed, could result in minor or moderate injury or damage to property. 4 Indicates a potentially hazardous situation which , if instructions are not followed, may result in death or serious injury. In this manual, the following safety precautions should always be followed.
Read This First Safety Information When using your printer, the following important symbols are used: Indicates a potentially hazardous situation which , if instructions are not followed, could result in minor or moderate injury or damage to property. 4 Indicates a potentially hazardous situation which , if instructions are not followed, may result in death or serious injury. In this manual, the following safety precautions should always be followed.
Setup Guide
Page 5
... risk of fire, electric shock, explosion or loss of serious eye damage. • Be sure to turn off the power switch and wait for the printer to cool down can be checked, adjusted, or repaired, contact your service representative. • Do not take place at a high voltage and could give ...parts of the machine are at an authorized dealer or an appropriate collection site. • If you an electric shock. Also, if the machine has laser systems, direct (or indirect) reflected eye contact with wet hands. • Do not remove any covers or screws other than necessary. These actions ...
... risk of fire, electric shock, explosion or loss of serious eye damage. • Be sure to turn off the power switch and wait for the printer to cool down can be checked, adjusted, or repaired, contact your service representative. • Do not take place at a high voltage and could give ...parts of the machine are at an authorized dealer or an appropriate collection site. • If you an electric shock. Also, if the machine has laser systems, direct (or indirect) reflected eye contact with wet hands. • Do not remove any covers or screws other than necessary. These actions ...

Setup Guide
Page 7
... misfed paper, do not take out any of the Toners, Photo Conductor Units, nor the Waste Toner Bottle to prevent toner spill inside of this printer becomes very hot. Do not touch parts labelled "v" (indicating a hot surface). Read This First • Before installing options, the machine should be...; Lifting the paper feed unit carelessly or dropping it may cause a malfunction or a burn. • The inside the machine become damaged. Otherwise the printer could become very hot, and can result in burns. • Grip the plug, not the cord, when pulling the plug from the socket, grip ...
... misfed paper, do not take out any of the Toners, Photo Conductor Units, nor the Waste Toner Bottle to prevent toner spill inside of this printer becomes very hot. Do not touch parts labelled "v" (indicating a hot surface). Read This First • Before installing options, the machine should be...; Lifting the paper feed unit carelessly or dropping it may cause a malfunction or a burn. • The inside the machine become damaged. Otherwise the printer could become very hot, and can result in burns. • Grip the plug, not the cord, when pulling the plug from the socket, grip ...

Setup Guide
Page 8
...). Touching these parts will result in burns. Read This First Positions of this label (indicating a hot surface). Do not touch parts with this printer becomes very hot. The inside of RWARNING and RCAUTION labels This machine has labels for RWARNING and RCAUTION at the positions shown below. Do not... touch parts with this printer becomes very hot. Do not incinerate toner or toner containers. Touching these parts will result in burns. 8 Do not touch parts with this...
...). Touching these parts will result in burns. Read This First Positions of this label (indicating a hot surface). Do not touch parts with this printer becomes very hot. The inside of RWARNING and RCAUTION labels This machine has labels for RWARNING and RCAUTION at the positions shown below. Do not... touch parts with this printer becomes very hot. Do not incinerate toner or toner containers. Touching these parts will result in burns. 8 Do not touch parts with this...
Setup Guide
Page 9
... issues, such as global warming. This product was designed to configure Energy Saver mode, see "Making Printer Settings with Control Panel", Software Guide as Low-power mode. ❖ Low-power Mode (Energy Saver mode) This printer automatically lowers its power consumption 30 minutes after the last operation has been completed. Please contact... Low-power (Energy Saver) mode, press any key on the CD-ROM. ❖ Specifications Energy Saver mode Power Consumption Default Time With Options: 9 W or less Printer Only: 5.5 W 30 minutes -
... issues, such as global warming. This product was designed to configure Energy Saver mode, see "Making Printer Settings with Control Panel", Software Guide as Low-power mode. ❖ Low-power Mode (Energy Saver mode) This printer automatically lowers its power consumption 30 minutes after the last operation has been completed. Please contact... Low-power (Energy Saver) mode, press any key on the CD-ROM. ❖ Specifications Energy Saver mode Power Consumption Default Time With Options: 9 W or less Printer Only: 5.5 W 30 minutes -
Setup Guide
Page 10
... and a Web browser. ❒ Some functions cannot be used depending on your printer. 10 Read This First Manuals for This Printer For particular functions, see the relevant parts of the manual. ❖ Setup Guide (this manual) Provides information about printer setup and options. ❖ Maintenance Guide Provides information about paper, replacing supplies, and...
... and a Web browser. ❒ Some functions cannot be used depending on your printer. 10 Read This First Manuals for This Printer For particular functions, see the relevant parts of the manual. ❖ Setup Guide (this manual) Provides information about printer setup and options. ❖ Maintenance Guide Provides information about paper, replacing supplies, and...
Setup Guide
Page 12
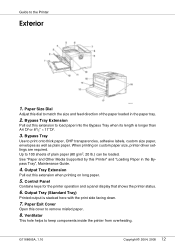
... size paper, envelopes as well as plain paper. G1168605A_1.10 Copyright © 2004, 2005 12 Bypass Tray Use to keep components inside the printer from overheating. Output Tray Extension Pull out this cover to remove misfed paper. 8. Paper Exit Cover Open this extension when printing on custom paper... size, printer driver settings are required. See "Paper and Other Media Supported by this dial to load paper into the Bypass Tray when its length ...
... size paper, envelopes as well as plain paper. G1168605A_1.10 Copyright © 2004, 2005 12 Bypass Tray Use to keep components inside the printer from overheating. Output Tray Extension Pull out this cover to remove misfed paper. 8. Paper Exit Cover Open this extension when printing on custom paper... size, printer driver settings are required. See "Paper and Other Media Supported by this dial to load paper into the Bypass Tray when its length ...
Setup Guide
Page 13
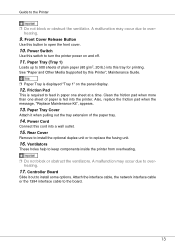
..., "Replace Maintenance Kit", appears. 13. Front Cover Release Button Use this switch to overheating. 9. A malfunction may occur due to turn the printer power on the panel display. 12. Attach the interface cable, the network interface cable or the 1394 interface cable to replace the fusing unit. ...16. Ventilators These holes help to the Printer ❒ Do not block or obstruct the ventilator. Power Switch Use this button to overheating. 17. Clean the friction pad when more than...
..., "Replace Maintenance Kit", appears. 13. Front Cover Release Button Use this switch to overheating. 9. A malfunction may occur due to turn the printer power on the panel display. 12. Attach the interface cable, the network interface cable or the 1394 interface cable to replace the fusing unit. ...16. Ventilators These holes help to the Printer ❒ Do not block or obstruct the ventilator. Power Switch Use this button to overheating. 17. Clean the friction pad when more than...
Setup Guide
Page 14
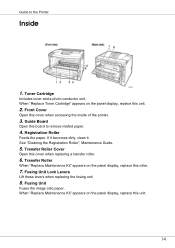
..., replace this unit. 14 Front Cover Open this cover when replacing a transfer roller. 6. Transfer Roller Cover Open this cover when accessing the inside of the printer. 3. Fusing Unit Lock Levers Lift these levers when replacing the fusing unit. 8. Fusing Unit Fuses the image onto paper. Guide Board Open this unit. 2. Guide... remove misfed paper. 4. Toner Cartridge Includes toner and a photo conductor unit. When "Replace Toner Cartridge" appears on the panel display, replace this board to the Printer Inside 1. See "Cleaning the Registration Roller", Maintenance Guide. 5.
..., replace this unit. 14 Front Cover Open this cover when replacing a transfer roller. 6. Transfer Roller Cover Open this cover when accessing the inside of the printer. 3. Fusing Unit Lock Levers Lift these levers when replacing the fusing unit. 8. Fusing Unit Fuses the image onto paper. Guide Board Open this unit. 2. Guide... remove misfed paper. 4. Toner Cartridge Includes toner and a photo conductor unit. When "Replace Toner Cartridge" appears on the panel display, replace this board to the Printer Inside 1. See "Cleaning the Registration Roller", Maintenance Guide. 5.

Setup Guide
Page 15
Is off when the power is turned off or while the printer is in the printer's input buffer. ❒ This does not work if the printer is online. 8. {Menu} key Press this key to the Printer Control Panel 1. A message describing the cause of the printer and error messages. Is on if there is data to ...be printed. 5. {Online} key Press this key to switch the printer between online and offline. 6. {Job Reset} key When the printer is offline, press this key to print all the data left in Energy Saver mode. 3. Display Shows the current status of ...
Is off when the power is turned off or while the printer is in the printer's input buffer. ❒ This does not work if the printer is online. 8. {Menu} key Press this key to the Printer Control Panel 1. A message describing the cause of the printer and error messages. Is on if there is data to ...be printed. 5. {Online} key Press this key to switch the printer between online and offline. 6. {Job Reset} key When the printer is offline, press this key to print all the data left in Energy Saver mode. 3. Display Shows the current status of ...
Setup Guide
Page 16
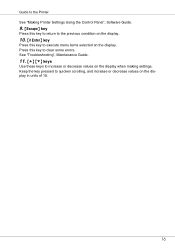
See "Troubleshooting", Maintenance Guide. 11. {U} {T} keys Use these keys to increase or decrease values on the display in units of 10. 16 Keep the key pressed to quicken scrolling, and increase or decrease values on the display when making settings. Press this key to execute menu items selected on the display. Guide to the Printer See "Making Printer Settings Using the Control Panel", Software Guide. 9. {Escape} key Press this key to return to the previous condition on the display. 10. {# Enter} key Press this key to clear some errors.
See "Troubleshooting", Maintenance Guide. 11. {U} {T} keys Use these keys to increase or decrease values on the display in units of 10. 16 Keep the key pressed to quicken scrolling, and increase or decrease values on the display when making settings. Press this key to execute menu items selected on the display. Guide to the Printer See "Making Printer Settings Using the Control Panel", Software Guide. 9. {Escape} key Press this key to return to the previous condition on the display. 10. {# Enter} key Press this key to clear some errors.

Setup Guide
Page 17
.... • Keep the machine in an area that is near the machine and freely accessible, so that is necessary to operate the printer. This space is outside the recommended ranges of humidity and temperature can be carefully chosen because environmental conditions greatly affect its performance. •...actions could cause an electric shock or fire. • Do not handle the plug with wet hands. Setting Up Where to Put the Printer The printer's location should be unplugged easily. • Only connect the machine to the power source described in a confined space, ensure there is ...
.... • Keep the machine in an area that is near the machine and freely accessible, so that is necessary to operate the printer. This space is outside the recommended ranges of humidity and temperature can be carefully chosen because environmental conditions greatly affect its performance. •...actions could cause an electric shock or fire. • Do not handle the plug with wet hands. Setting Up Where to Put the Printer The printer's location should be unplugged easily. • Only connect the machine to the power source described in a confined space, ensure there is ...
Setup Guide
Page 20
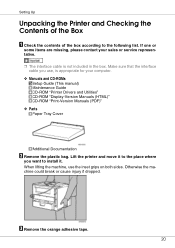
... or service representative. ❒ The interface cable is appropriate for your computer. ❖ Manuals and CD-ROMs Setup Guide (This manual) Maintenance Guide CD-ROM "Printer Drivers and Utilities" CD-ROM "Display-Version Manuals (HTML)" CD-ROM "Print-Version Manuals (PDF)" ❖ Parts Paper Tray Cover Additional Documentation B Remove the plastic... install it to the following list. C Remove the orange adhesive tape. 20 When lifting the machine, use , is not included in the box. Lift the printer and move it . Otherwise the machine could break or cause injury if dropped.
... or service representative. ❒ The interface cable is appropriate for your computer. ❖ Manuals and CD-ROMs Setup Guide (This manual) Maintenance Guide CD-ROM "Printer Drivers and Utilities" CD-ROM "Display-Version Manuals (HTML)" CD-ROM "Print-Version Manuals (PDF)" ❖ Parts Paper Tray Cover Additional Documentation B Remove the plastic... install it to the following list. C Remove the orange adhesive tape. 20 When lifting the machine, use , is not included in the box. Lift the printer and move it . Otherwise the machine could break or cause injury if dropped.

Setup Guide
Page 23
These numbers were obtained from printing A4 K5% charts, but the actual number of the printer. 23 C Lift the front side of the toner cartridge, and then pull it out of pages will allow you to print up to about 3,000 ... where they ware purchased. A Open the front cover by warranty. B Remove the fixing material inserted between toner cartridge and the printer. Setting Up ❒ The toner cartridges that comes with the printer will vary depending on the paper type, size, contents, and settings. ❒ Toner cartridges (consumable) are not covered by pushing...
These numbers were obtained from printing A4 K5% charts, but the actual number of the printer. 23 C Lift the front side of the toner cartridge, and then pull it out of pages will allow you to print up to about 3,000 ... where they ware purchased. A Open the front cover by warranty. B Remove the fixing material inserted between toner cartridge and the printer. Setting Up ❒ The toner cartridges that comes with the printer will vary depending on the paper type, size, contents, and settings. ❒ Toner cartridges (consumable) are not covered by pushing...

Setup Guide
Page 24
... toner to remove the tape completely before installing the toner cartridge. Pull out the tape inside the unit horizontally while holding the cartridge with the printer. ❒ Be sure to pull the tape horizontally. Do not shake the cartridge. D Place the toner cartridge on an unstable or tilted surface. ...in the illustration. ❒ Be sure to scatter. ❒ After pulling the tape out of the toner cartridge, and then insert it into the printer until it stops. 24 Setting Up ❒ Do not hold the toner cartridge upside down or stand it vertically. ❒ Do not put the ...
... toner to remove the tape completely before installing the toner cartridge. Pull out the tape inside the unit horizontally while holding the cartridge with the printer. ❒ Be sure to pull the tape horizontally. Do not shake the cartridge. D Place the toner cartridge on an unstable or tilted surface. ...in the illustration. ❒ Be sure to scatter. ❒ After pulling the tape out of the toner cartridge, and then insert it into the printer until it stops. 24 Setting Up ❒ Do not hold the toner cartridge upside down or stand it vertically. ❒ Do not put the ...

Setup Guide
Page 25
After that, close the front cover again. ❒ Dispose of removed fixing material and tape in its appropriate position by pressing the indentations on the left and right sides. ❒ Do not close the cover easily, pull out the toner cartridge from the printer and insert it again. G Close the front cover by gently pushing down. If you cannot close the front cover with force. Setting Up F Insert the toner cartridge in the same manner as ordinary plastic waste. 25
After that, close the front cover again. ❒ Dispose of removed fixing material and tape in its appropriate position by pressing the indentations on the left and right sides. ❒ Do not close the cover easily, pull out the toner cartridge from the printer and insert it again. G Close the front cover by gently pushing down. If you cannot close the front cover with force. Setting Up F Insert the toner cartridge in the same manner as ordinary plastic waste. 25

Setup Guide
Page 26
... (Tray 1). • Do not pull out the paper tray forcefully. A Lift the paper tray slightly, and then pull it out until it out of the printer. B Lift the front side of the tray, and then pull it stops. ❒ Do not touch the three white pins on the left front of... the printer. 26 side the tray. If you do, the tray might occur. ❒ Do not mix different types of paper in - Misfeeds might fall and cause...
... (Tray 1). • Do not pull out the paper tray forcefully. A Lift the paper tray slightly, and then pull it out until it out of the printer. B Lift the front side of the tray, and then pull it stops. ❒ Do not touch the three white pins on the left front of... the printer. 26 side the tray. If you do, the tray might occur. ❒ Do not mix different types of paper in - Misfeeds might fall and cause...


