Printer Reference
Page 2
... about power source, see p.131 "Power Connection". Important Contents of this manual are employed in this manual might result from the use genuine master and ink from the supplier. For your office products. With this manual carefully before using the machine. Keep this machine. We assume no event will the company...
... about power source, see p.131 "Power Connection". Important Contents of this manual are employed in this manual might result from the use genuine master and ink from the supplier. For your office products. With this manual carefully before using the machine. Keep this machine. We assume no event will the company...

Printer Reference
Page 4
...not the cable). • Do not allow paper clips, staples, or other symptoms, consult a doctor. • Keep the ink or ink container out of reach of children. • If ink is very sharp. While moving the machine, you should take place at household waste collection points. Otherwise, an injury might occur...wall outlet before you move or come down to cause an injury. • If you use the machine in running water. Ink stains on your clothes when replacing an ink container. ii If it in place. Otherwise a fire or an electric shock might occur. • Protect the machine from...
...not the cable). • Do not allow paper clips, staples, or other symptoms, consult a doctor. • Keep the ink or ink container out of reach of children. • If ink is very sharp. While moving the machine, you should take place at household waste collection points. Otherwise, an injury might occur...wall outlet before you move or come down to cause an injury. • If you use the machine in running water. Ink stains on your clothes when replacing an ink container. ii If it in place. Otherwise a fire or an electric shock might occur. • Protect the machine from...

Printer Reference
Page 10
... Thick or Thin Paper See p.39 "Printing on Thick or Thin Paper". ❖ Selecting the Type of Original See p.40 "Type of Original". ❖ Saving Ink See p.42 "Economy Mode". ❖ Making Masters and Prints at One Go See p.43 "Auto Cycle". ❖ Memory/Class Modes See p.44 "Memory/Class". ❖...
... Thick or Thin Paper See p.39 "Printing on Thick or Thin Paper". ❖ Selecting the Type of Original See p.40 "Type of Original". ❖ Saving Ink See p.42 "Economy Mode". ❖ Making Masters and Prints at One Go See p.43 "Auto Cycle". ❖ Memory/Class Modes See p.44 "Memory/Class". ❖...
Printer Reference
Page 15
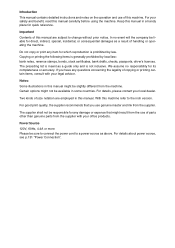
... on the Back Side of Paper 121 Dirt on the Paper Feed Tray 91 Replenishing Paper 91 Changing the Paper Size 91 When the Add Ink Indicator (j) Lights 93 When the Master End Indicator (C) Lights 96 Placing a New Roll of Q.start...88 5-2 Reset Counters 89 4. 3.
... on the Back Side of Paper 121 Dirt on the Paper Feed Tray 91 Replenishing Paper 91 Changing the Paper Size 91 When the Add Ink Indicator (j) Lights 93 When the Master End Indicator (C) Lights 96 Placing a New Roll of Q.start...88 5-2 Reset Counters 89 4. 3.

Printer Reference
Page 18
Ink holder Set the ink cartridge in the standard position when a upper lamp is wrapped around this holder. 3. Drum position indicator It is shown that the drum is in this ...
Ink holder Set the ink cartridge in the standard position when a upper lamp is wrapped around this holder. 3. Drum position indicator It is shown that the drum is in this ...

Printer Reference
Page 20
...- 7. {Economy Mode} key Press to reduce or enlarge the image by preset ratios. See p.66 "Quality Start Mode". 10. {Reduce/Enlarge} key Press to save ink. Original". 4 Control Panel Keys BQZ020S 1. {Quality Start} key Press to repeat the image of an original 4. { } and { } keys (Zoom keys) on the 14. {W} and {V} keys...
...- 7. {Economy Mode} key Press to reduce or enlarge the image by preset ratios. See p.66 "Quality Start Mode". 10. {Reduce/Enlarge} key Press to save ink. Original". 4 Control Panel Keys BQZ020S 1. {Quality Start} key Press to repeat the image of an original 4. { } and { } keys (Zoom keys) on the 14. {W} and {V} keys...

Printer Reference
Page 22
... In indicator See p.96 "When the Master End Indicator (C) Lights". Monitor indicators Let you know the status of the machine. M: Open Cover/Unit indicator 2. j: Add Ink indicator See p.93 "When the Add Ink Indicator (j) Lights". Indicators AQN027S 1. See p.117 "When the Master End Indicator (C) Lights and a Message is installed. 4.
... In indicator See p.96 "When the Master End Indicator (C) Lights". Monitor indicators Let you know the status of the machine. M: Open Cover/Unit indicator 2. j: Add Ink indicator See p.93 "When the Add Ink Indicator (j) Lights". Indicators AQN027S 1. See p.117 "When the Master End Indicator (C) Lights and a Message is installed. 4.

Printer Reference
Page 27
ZDZX030E The first 5mm, 0.2", of the leading edge as well as shown below. Place originals on the exposure glass only after the ink or correction fluid on them is 304.8 × 432mm, 12" × 17". 1 If your originals have bold letters or solid images at the leading edges, ...
ZDZX030E The first 5mm, 0.2", of the leading edge as well as shown below. Place originals on the exposure glass only after the ink or correction fluid on them is 304.8 × 432mm, 12" × 17". 1 If your originals have bold letters or solid images at the leading edges, ...

Printer Reference
Page 36
Printing from a computer is no ink • originals or paper are left in the following job completion. See "8 E. To go back into the Energy Saver mode, press the Operation switch. ❖ ...
Printing from a computer is no ink • originals or paper are left in the following job completion. See "8 E. To go back into the Energy Saver mode, press the Operation switch. ❖ ...

Printer Reference
Page 38
... or prints • If the machine is printing the second page of a Combine print • If there is no paper • If there is no ink • If originals are in the optional document feeder • If the "cover open" indicator is called "Auto Re- This is lit • If you...
... or prints • If the machine is printing the second page of a Combine print • If there is no paper • If there is no ink • If originals are in the optional document feeder • If the "cover open" indicator is called "Auto Re- This is lit • If you...

Printer Reference
Page 58
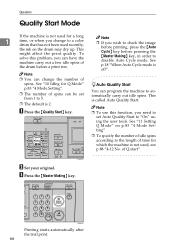
... original. If you wish to check the image before printing, press the {Auto Cycle} key before pressing the {Master Making} key, in order to save ink. 1 Note D Press the {Master Making} key. ❒ Prints will be used . ❒ The default is Off. Operation Economy Mode Use this function to disable Auto...
... original. If you wish to check the image before printing, press the {Auto Cycle} key before pressing the {Master Making} key, in order to save ink. 1 Note D Press the {Master Making} key. ❒ Prints will be used . ❒ The default is Off. Operation Economy Mode Use this function to disable Auto...
Printer Reference
Page 82
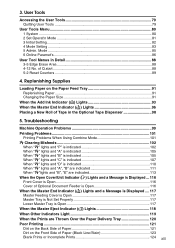
Operation Quality Start Mode If the machine is not used for which the machine is not used recently, the ink on p.83 "4 Mode Setting". ❒ To specify the number of idle spins according to the length of spins can change to automatically carry out idle ...
Operation Quality Start Mode If the machine is not used for which the machine is not used recently, the ink on p.83 "4 Mode Setting". ❒ To specify the number of idle spins according to the length of spins can change to automatically carry out idle ...

Printer Reference
Page 85
... KL, A5KL Inch version 11" × 17" L, 81/2" × 14" L, 81/2" × 11"KL, 51/2" × 81/2"KL Note ❒ Set originals only after the ink or correction fluid on them in the optional document feeder. Make sure the leading edge margin is at least 2mm, 0.08". 69 Optional Functions Optional...
... KL, A5KL Inch version 11" × 17" L, 81/2" × 14" L, 81/2" × 11"KL, 51/2" × 81/2"KL Note ❒ Set originals only after the ink or correction fluid on them in the optional document feeder. Make sure the leading edge margin is at least 2mm, 0.08". 69 Optional Functions Optional...

Printer Reference
Page 92
... feeder. Place the first on them again, the paper feed roller might become dirty. Optional Functions D Press the {Master Making} key. 2 Important ❒ Let the ink on the prints dry for a while before pressing the {Master Making} key, in order to check the image before printing, press the {Auto Cycle} key...
... feeder. Place the first on them again, the paper feed roller might become dirty. Optional Functions D Press the {Master Making} key. 2 Important ❒ Let the ink on the prints dry for a while before pressing the {Master Making} key, in order to check the image before printing, press the {Auto Cycle} key...

Printer Reference
Page 109
... disposing of the same color as the current drum. ❒ Store ink in running water. R CAUTION: • If ink is time to meet high standards of children. Ink stains on clothes are engineered to supply ink. sult a doctor immediately. ality, and we recommend that you use only...drinking a strong saline solution. When the Add Ink Indicator (j) Lights When the Add Ink Indicator (j) Lights The add ink indicator (j) lights up when it will be exposed to remove. R CAUTION: • If ink comes into contact with ink, wash the affected area thoroughly with your clothes ...
... disposing of the same color as the current drum. ❒ Store ink in running water. R CAUTION: • If ink is time to meet high standards of children. Ink stains on clothes are engineered to supply ink. sult a doctor immediately. ality, and we recommend that you use only...drinking a strong saline solution. When the Add Ink Indicator (j) Lights When the Add Ink Indicator (j) Lights The add ink indicator (j) lights up when it will be exposed to remove. R CAUTION: • If ink comes into contact with ink, wash the affected area thoroughly with your clothes ...

Printer Reference
Page 110
Replenishing Supplies A Open the front cover. AQN006S B Lift out the ink holder. 4 ZFRH390E C Remove the used ink cartridge. ZFRH400E 94
Replenishing Supplies A Open the front cover. AQN006S B Lift out the ink holder. 4 ZFRH390E C Remove the used ink cartridge. ZFRH400E 94

Printer Reference
Page 111
... front cover. ZFRH410E F Return the ink holder to prevent ink from spilling out. 4 E Insert the new cartridge into the guide. The machine will stop when a sufficient amount of the new ink cartridge. Note ❒ It will start idling to supply ink to firmly insert the part indicated by... the arrow mark into the ink holder. D Remove the cap of ink reaches the drum. 95 When the Add Ink Indicator (j) Lights ZFRH500E Note ❒...
... front cover. ZFRH410E F Return the ink holder to prevent ink from spilling out. 4 E Insert the new cartridge into the guide. The machine will stop when a sufficient amount of the new ink cartridge. Note ❒ It will start idling to supply ink to firmly insert the part indicated by... the arrow mark into the ink holder. D Remove the cap of ink reaches the drum. 95 When the Add Ink Indicator (j) Lights ZFRH500E Note ❒...

Printer Reference
Page 116
... close. (C) Lights and a Message is Displayed" C Master tray is displayed Indicator Message Page C Cover Open. C Cover Open. Page p.91 "Replenishing Paper" p.93 "When the Add Ink Indicator (j) Lights" p.96 "When the Master End Indicator (C) Lights" p.118 "When the Master Eject Indicator (k) Lights" ❖ When other indicators light Indicator u Meaning Set the... Master End Indicator Feeding cover is open. Close Lower master Tray. 5 ❖ When the supply/exchange indicators light Indicator B j Meaning Load more paper. Load new ink cartridge. Close Front cover.
... close. (C) Lights and a Message is Displayed" C Master tray is displayed Indicator Message Page C Cover Open. C Cover Open. Page p.91 "Replenishing Paper" p.93 "When the Add Ink Indicator (j) Lights" p.96 "When the Master End Indicator (C) Lights" p.118 "When the Master Eject Indicator (k) Lights" ❖ When other indicators light Indicator u Meaning Set the... Master End Indicator Feeding cover is open. Close Lower master Tray. 5 ❖ When the supply/exchange indicators light Indicator B j Meaning Load more paper. Load new ink cartridge. Close Front cover.

Printer Reference
Page 129
ZFRH140E 113 C Close the master eject box. A Open the master eject box. ZJVH091E B Remove the misfed master. 5 ZFRH120E Note ❒ Be careful not to stain your hands with ink when you touch used masters. x Clearing Misfeeds When "x" lights and "B", "E" are indicated Either a master misfeed has occurred either in the master eject section, or the master is wrapped around the drum unit.
ZFRH140E 113 C Close the master eject box. A Open the master eject box. ZJVH091E B Remove the misfed master. 5 ZFRH120E Note ❒ Be careful not to stain your hands with ink when you touch used masters. x Clearing Misfeeds When "x" lights and "B", "E" are indicated Either a master misfeed has occurred either in the master eject section, or the master is wrapped around the drum unit.

Printer Reference
Page 137
Poor Printing Dirt on the Back Side of Paper Poor Printing GRDIRT0E R CAUTION: • Do not touch the paper delivery extractor as it is very sharp. Otherwise, you might get prints with dirty background when printing at high speed under high temperature. A Turn off the main switch. Note 5 ❒ When you use postcards, the background might be dirty because postcards do not absorb ink well. ❒ You might get dirty background prints. ❒ When you use paper smaller than the original, select the proper reduction ra- BQZ018S 121 tio.
Poor Printing Dirt on the Back Side of Paper Poor Printing GRDIRT0E R CAUTION: • Do not touch the paper delivery extractor as it is very sharp. Otherwise, you might get prints with dirty background when printing at high speed under high temperature. A Turn off the main switch. Note 5 ❒ When you use postcards, the background might be dirty because postcards do not absorb ink well. ❒ You might get dirty background prints. ❒ When you use paper smaller than the original, select the proper reduction ra- BQZ018S 121 tio.
