Product Manual
Page 2
... THOMSON. http://www.iis.fhg.de/amm Portions utilize Microsoft Windows Media Technologies. Copyright © 1999-2009 Microsoft Corporation. VST Plug-in the United States and/or other countries. und Hardware GmbH. CUDA is a trademark of Steinberg Soft- ii Roxio Creator User Guide www.roxio.com Legal Information Copyright ©1994 - 2009 Sonic Solutions...
... THOMSON. http://www.iis.fhg.de/amm Portions utilize Microsoft Windows Media Technologies. Copyright © 1999-2009 Microsoft Corporation. VST Plug-in the United States and/or other countries. und Hardware GmbH. CUDA is a trademark of Steinberg Soft- ii Roxio Creator User Guide www.roxio.com Legal Information Copyright ©1994 - 2009 Sonic Solutions...

Product Manual
Page 8
The WinPE softare included with this document, nor from the use the Microsoft® Windows® Preinstallation Environment software from Microsoft Corporation ("WinPE"). NOTE: THIS SOFTWARE CONTAINS A SECURITY FEATURE THAT WILL CAUSE YOUR COMPUTER SYSTEM TO REBOOT WITHOUT PRIOR NOTIFICATION ... right to make changes in this product may be violating copyright law and be protected by one or more of damages and other remedies. viii Roxio Creator User Guide www.roxio.com Windows Pre-Installation Environment.
The WinPE softare included with this document, nor from the use the Microsoft® Windows® Preinstallation Environment software from Microsoft Corporation ("WinPE"). NOTE: THIS SOFTWARE CONTAINS A SECURITY FEATURE THAT WILL CAUSE YOUR COMPUTER SYSTEM TO REBOOT WITHOUT PRIOR NOTIFICATION ... right to make changes in this product may be violating copyright law and be protected by one or more of damages and other remedies. viii Roxio Creator User Guide www.roxio.com Windows Pre-Installation Environment.
Product Manual
Page 10
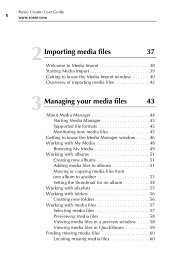
x Roxio Creator User Guide www.roxio.com 2 Importing media files 37 Welcome to Media Import 38 Starting Media Import 39 Getting to know the Media Import window 40 Overview of importing media files 42 3 Managing your media files 43 About Media Manager 44 Starting Media Manager 45 Supported file ...formats 45 Monitoring new media files 45 Getting to know the Media Manager window. . . . . .46 Working with My Media 48 Browsing My Media 49 Working with albums 51 Creating new albums 51 Adding media files to...
x Roxio Creator User Guide www.roxio.com 2 Importing media files 37 Welcome to Media Import 38 Starting Media Import 39 Getting to know the Media Import window 40 Overview of importing media files 42 3 Managing your media files 43 About Media Manager 44 Starting Media Manager 45 Supported file ...formats 45 Monitoring new media files 45 Getting to know the Media Manager window. . . . . .46 Working with My Media 48 Browsing My Media 49 Working with albums 51 Creating new albums 51 Adding media files to...
Product Manual
Page 11
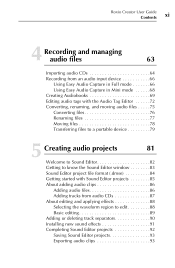
Roxio Creator User Guide Contents xi 4 Recording and managing audio files 63 Importing audio CDs 64 Recording from an audio input device 66 Using Easy Audio Capture ... 77 Moving files 78 Transferring files to a portable device 79 5 Creating audio projects 81 Welcome to Sound Editor 82 Getting to know the Sound Editor window 83 Sound Editor project file format (.dmse 84 Getting started with Sound Editor projects 85 About adding audio clips 86 Adding audio files 86 Adding...
Roxio Creator User Guide Contents xi 4 Recording and managing audio files 63 Importing audio CDs 64 Recording from an audio input device 66 Using Easy Audio Capture ... 77 Moving files 78 Transferring files to a portable device 79 5 Creating audio projects 81 Welcome to Sound Editor 82 Getting to know the Sound Editor window 83 Sound Editor project file format (.dmse 84 Getting started with Sound Editor projects 85 About adding audio clips 86 Adding audio files 86 Adding...
Product Manual
Page 13
Roxio Creator User Guide Contents xiii 7 Working with photo projects 117 Welcome to PhotoSuite 118 PhotoSuite's project file format (.DMSP 119 Supported file formats 119 Getting to know the PhotoSuite window 120 Using the Photo Projects Assistant 121 Creating new photo projects in PhotoSuite 122 Removing red eye 123 Cropping photos and objects 124...
Roxio Creator User Guide Contents xiii 7 Working with photo projects 117 Welcome to PhotoSuite 118 PhotoSuite's project file format (.DMSP 119 Supported file formats 119 Getting to know the PhotoSuite window 120 Using the Photo Projects Assistant 121 Creating new photo projects in PhotoSuite 122 Removing red eye 123 Cropping photos and objects 124...
Product Manual
Page 14
xiv Roxio Creator User Guide www.roxio.com 9 Copying video and creating video compilations 149 About Video Copy & Convert 150 The Video Copy & Convert window 151 Copying DVD-Video 152 Can I copy discs using one disc drive 152 Sources you can copy from 152 Copying DVD ... . . .160 Completing your compilation 160 Saving compilations 161 Using the project scheduler 161 10 Making advanced data discs 163 About Creator Classic 164 Getting to know the Creator Classic window . . . . .165 Deciding which type of project to create 166 Adding files and folders to your project 167 Burning...
xiv Roxio Creator User Guide www.roxio.com 9 Copying video and creating video compilations 149 About Video Copy & Convert 150 The Video Copy & Convert window 151 Copying DVD-Video 152 Can I copy discs using one disc drive 152 Sources you can copy from 152 Copying DVD ... . . .160 Completing your compilation 160 Saving compilations 161 Using the project scheduler 161 10 Making advanced data discs 163 About Creator Classic 164 Getting to know the Creator Classic window . . . . .165 Deciding which type of project to create 166 Adding files and folders to your project 167 Burning...
Product Manual
Page 15
Roxio Creator User Guide Contents xv 11 Watching movies 171 Welcome to CinePlayer 172 Getting to know CinePlayer 173 Playing discs 174 Playing video from video folders 175 12 Creating video productions 177 Welcome to VideoWave 178 Getting to know the VideoWave window 179 Task Pane 179 Preview area 180 Production Editor 180 Media...
Roxio Creator User Guide Contents xv 11 Watching movies 171 Welcome to CinePlayer 172 Getting to know CinePlayer 173 Playing discs 174 Playing video from video folders 175 12 Creating video productions 177 Welcome to VideoWave 178 Getting to know the VideoWave window 179 Task Pane 179 Preview area 180 Production Editor 180 Media...
Product Manual
Page 16
xvi Roxio Creator User Guide www.roxio.com 13 Video tools and assistants 187 Creating a slideshow 188 Using CineMagic to create movies 189 Creating a video disc using Plug & Burn 190 Converting files ... SmartSound background audio 195 Archiving AVCHD video 197 14 Creating advanced video discs with menus 199 Welcome to MyDVD 200 Getting to know the MyDVD window 201 Menu Edit view 201 Movie Edit view 203 Features available in both views 204 Overview of creating a MyDVD project 205 What are MyDVD projects...
xvi Roxio Creator User Guide www.roxio.com 13 Video tools and assistants 187 Creating a slideshow 188 Using CineMagic to create movies 189 Creating a video disc using Plug & Burn 190 Converting files ... SmartSound background audio 195 Archiving AVCHD video 197 14 Creating advanced video discs with menus 199 Welcome to MyDVD 200 Getting to know the MyDVD window 201 Menu Edit view 201 Movie Edit view 203 Features available in both views 204 Overview of creating a MyDVD project 205 What are MyDVD projects...

Product Manual
Page 17
Roxio Creator User Guide Contents xvii Resizing buttons 213 Changing button thumbnail images 213 Changing button styles 213 Working with text 214 Adding text to menus 214 ... projects as disc image files and disc volumes 219 15 Creating disc labels and inserts 221 About Label Creator 222 Overview of creating labels and disc inserts . . . . . .222 Getting to know the Label Creator window . . . . . .223 The Add Object area 223 The Edit Layout area 223 The Layout area 224 The Toolbars 224...
Roxio Creator User Guide Contents xvii Resizing buttons 213 Changing button thumbnail images 213 Changing button styles 213 Working with text 214 Adding text to menus 214 ... projects as disc image files and disc volumes 219 15 Creating disc labels and inserts 221 About Label Creator 222 Overview of creating labels and disc inserts . . . . . .222 Getting to know the Label Creator window . . . . . .223 The Add Object area 223 The Edit Layout area 223 The Layout area 224 The Toolbars 224...

Product Manual
Page 21
... Basic with Roxio Creator System requirements 21 System requirements Minimum System Requirements: ■ Microsoft® Windows 7 Home Premium; Any Internet charges are supported: ■ Apple iPod® ■ Apple iPhone® ■ iTunes 8.0 or above ■... Getting started with Service Pack 1; Recommended ■ Intel Core2 2.8 GHz or faster processor; Windows XP with Service Pack 3 ■ 2.0 GHz processor and 512 MB RAM (Windows XP); 2.0 GHz processor and 1 GB RAM (Windows 7 and Vista); ■ 1024x768 DirectX 9 compatible graphics card with an addtional 10 GB of...
... Basic with Roxio Creator System requirements 21 System requirements Minimum System Requirements: ■ Microsoft® Windows 7 Home Premium; Any Internet charges are supported: ■ Apple iPod® ■ Apple iPhone® ■ iTunes 8.0 or above ■... Getting started with Service Pack 1; Recommended ■ Intel Core2 2.8 GHz or faster processor; Windows XP with Service Pack 3 ■ 2.0 GHz processor and 512 MB RAM (Windows XP); 2.0 GHz processor and 1 GB RAM (Windows 7 and Vista); ■ 1024x768 DirectX 9 compatible graphics card with an addtional 10 GB of...

Product Manual
Page 24
.... If Autorun is enabled on your computer, the Creator installation window appears automatically and you can skip step 2 and step 3. 2 Choose Start > Run. 3 Type d:\setup (substitute the appropriate letter of your DVD drive. 24 Roxio Creator User Guide www.roxio.com Installing Creator Follow this procedure to the Creator install package. 2 Double-click the setup.exe file...
.... If Autorun is enabled on your computer, the Creator installation window appears automatically and you can skip step 2 and step 3. 2 Choose Start > Run. 3 Type d:\setup (substitute the appropriate letter of your DVD drive. 24 Roxio Creator User Guide www.roxio.com Installing Creator Follow this procedure to the Creator install package. 2 Double-click the setup.exe file...

Product Manual
Page 25
Creator's main window, featuring the project category tabs and links to begin. Starting a task Click one of the project category tabs on the left side of the tasks are built into the main Creator window; Some of the window, and a task list appears on its name. others open in a separate window. Double-click the Creator desktop icon to frequent tasks. Choose a task by clicking on the right. Getting started with Roxio Creator Getting to know Creator 25 Getting to know Creator Start your digital media projects from Creator's main window.
Creator's main window, featuring the project category tabs and links to begin. Starting a task Click one of the project category tabs on the left side of the tasks are built into the main Creator window; Some of the window, and a task list appears on its name. others open in a separate window. Double-click the Creator desktop icon to frequent tasks. Choose a task by clicking on the right. Getting started with Roxio Creator Getting to know Creator 25 Getting to know Creator Start your digital media projects from Creator's main window.

Product Manual
Page 30
... a disc that contains files copied from your computer. 30 Roxio Creator User Guide www.roxio.com Completing a typical task Each task in Creator is a little different. Others take a little time to frequently used tasks. To help you will look something like this: The Home window includes links to master. Since we are going to protecting...
... a disc that contains files copied from your computer. 30 Roxio Creator User Guide www.roxio.com Completing a typical task Each task in Creator is a little different. Others take a little time to frequently used tasks. To help you will look something like this: The Home window includes links to master. Since we are going to protecting...
Product Manual
Page 31
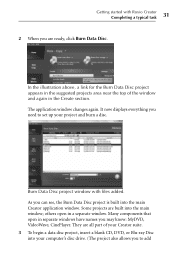
... 3 To begin a data disc project, insert a blank CD, DVD, or Blu-ray Disc into the main window; The application window changes again. Burn Data Disc project window with Roxio Creator Completing a typical task 31 2 When you to set up your computer's disc drive. (The project also allows ...you are ready, click Burn Data Disc. Many components that open in a separate window. others open in the Create section...
... 3 To begin a data disc project, insert a blank CD, DVD, or Blu-ray Disc into the main window; The application window changes again. Burn Data Disc project window with Roxio Creator Completing a typical task 31 2 When you to set up your computer's disc drive. (The project also allows ...you are ready, click Burn Data Disc. Many components that open in a separate window. others open in the Create section...
Product Manual
Page 32
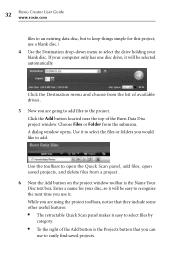
... it easy to select files by category. ■ To the right of the Burn Data Disc project window. A dialog window opens. Use the toolbars to open the Quick Scan panel, add files, open saved projects, and delete... files from a project. 6 Near the Add button on the project window toolbar is the Projects button that you would like to add. Enter a name for this project, use a...near the top of the Add button is the Name Your Disc text box. 32 Roxio Creator User Guide www.roxio.com files to an existing data disc, but to keep things simple for your ...
... it easy to select files by category. ■ To the right of the Burn Data Disc project window. A dialog window opens. Use the toolbars to open the Quick Scan panel, add files, open saved projects, and delete... files from a project. 6 Near the Add button on the project window toolbar is the Projects button that you would like to add. Enter a name for this project, use a...near the top of the Add button is the Name Your Disc text box. 32 Roxio Creator User Guide www.roxio.com files to an existing data disc, but to keep things simple for your ...
Product Manual
Page 33
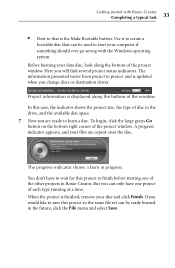
...To begin, click the large green Go button on the bottom right corner of the project window. A progress indicator appears, and your computer if something should ever go wrong with Roxio Creator Completing a typical task 33 ■ Next to finish before starting one project of disc ...used to project and is displayed along the bottom of the project window. Here you change discs or destination drives. The progress indicator shows a burn in Roxio Creator. You don't have one of the window. Project information is updated when you will find several project status indicators...
...To begin, click the large green Go button on the bottom right corner of the project window. A progress indicator appears, and your computer if something should ever go wrong with Roxio Creator Completing a typical task 33 ■ Next to finish before starting one project of disc ...used to project and is displayed along the bottom of the project window. Here you change discs or destination drives. The progress indicator shows a burn in Roxio Creator. You don't have one of the window. Project information is updated when you will find several project status indicators...
Product Manual
Page 37
37 Importing media files In this chapter Welcome to Media Import 38 Starting Media Import 39 Getting to know the Media Import window 40 Overview of importing media files 42
37 Importing media files In this chapter Welcome to Media Import 38 Starting Media Import 39 Getting to know the Media Import window 40 Overview of importing media files 42
Product Manual
Page 39
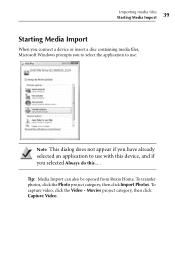
Importing media files Starting Media Import 39 Starting Media Import When you connect a device or insert a disc containing media files, Microsoft Windows prompts you to select the application to use: Note This dialog does not appear if you have already selected an application to use with this device, and if you selected Always do this... . Tip: Media Import can also be opened from Roxio Home. To transfer photos, click the Photo project category, then click Import Photos. Movies project category, then click Capture Video. To capture video, click the Video -
Importing media files Starting Media Import 39 Starting Media Import When you connect a device or insert a disc containing media files, Microsoft Windows prompts you to select the application to use: Note This dialog does not appear if you have already selected an application to use with this device, and if you selected Always do this... . Tip: Media Import can also be opened from Roxio Home. To transfer photos, click the Photo project category, then click Import Photos. Movies project category, then click Capture Video. To capture video, click the Video -

Product Manual
Page 40
... Media Type button Device dropdown list Media- With some exceptions, the list only includes devices that are displayed. 40 Roxio Creator User Guide www.roxio.com Getting to know the Media Import window The Media Import Home page provides an easy-to-use interface with which you open Media Import from... Roxio Home, only the button corresponding to your computer from any attached digital media devices. When you can transfer media files to the project you selected is a drop-down list At the top of the Media Import window are buttons that contain media...
... Media Type button Device dropdown list Media- With some exceptions, the list only includes devices that are displayed. 40 Roxio Creator User Guide www.roxio.com Getting to know the Media Import window The Media Import Home page provides an easy-to-use interface with which you open Media Import from... Roxio Home, only the button corresponding to your computer from any attached digital media devices. When you can transfer media files to the project you selected is a drop-down list At the top of the Media Import window are buttons that contain media...
Product Manual
Page 41
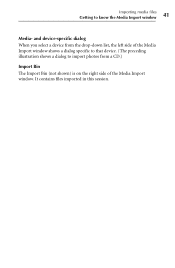
and device-specific dialog When you select a device from the drop-down list, the left side of the Media Import window shows a dialog specific to that device. (The preceding illustration shows a dialog to know the Media Import window 41 Media- It contains files imported in this session. Importing media files Getting to import photos from a CD.) Import Bin The Import Bin (not shown) is on the right side of the Media Import window.
and device-specific dialog When you select a device from the drop-down list, the left side of the Media Import window shows a dialog specific to that device. (The preceding illustration shows a dialog to know the Media Import window 41 Media- It contains files imported in this session. Importing media files Getting to import photos from a CD.) Import Bin The Import Bin (not shown) is on the right side of the Media Import window.