
User Guide
Page 1
Insert the software disc into your computer's CD drive. 2. At the following prompt, Click Install Driver: Sabrent USB-AVCPT USB 2.0 VIDEO & AUDIO CAPTURE DVD MAKER Driver Installation for Windows XP Note: Windows Vista/7 32-64 Bit instructions are located below these instructions 1. When prompted, Click on Run HAutorun.exe: 3.
Insert the software disc into your computer's CD drive. 2. At the following prompt, Click Install Driver: Sabrent USB-AVCPT USB 2.0 VIDEO & AUDIO CAPTURE DVD MAKER Driver Installation for Windows XP Note: Windows Vista/7 32-64 Bit instructions are located below these instructions 1. When prompted, Click on Run HAutorun.exe: 3.

User Guide
Page 3
6. Select "Yes, I want to restart my computer now", and click Finish: 8. Once restarted, plug the USB-AVCPT into a USB port. At the following prompt, Click on Finish: 7.
6. Select "Yes, I want to restart my computer now", and click Finish: 8. Once restarted, plug the USB-AVCPT into a USB port. At the following prompt, Click on Finish: 7.

User Guide
Page 4
Open the Device Manager and verify that the USB-AVCPT was correctly installed. (Note: Your installation may slightly vary based on the Start button, this will finalize the installation of results that there is an ...entry for Windows Vista/Windows 7 32/64 Bit 1. 9. Click on the OS you are running) Driver Installation for USB 2.0 Video Capture Controller with an exclamation point icon: Connect the USB-AVCPT device into an open USB port on your computer. 2. The Driver Software Installation utility will bring up the Start menu. In the list...
Open the Device Manager and verify that the USB-AVCPT was correctly installed. (Note: Your installation may slightly vary based on the Start button, this will finalize the installation of results that there is an ...entry for Windows Vista/Windows 7 32/64 Bit 1. 9. Click on the OS you are running) Driver Installation for USB 2.0 Video Capture Controller with an exclamation point icon: Connect the USB-AVCPT device into an open USB port on your computer. 2. The Driver Software Installation utility will bring up the Start menu. In the list...

User Guide
Page 5
At the following prompt, Click Install: Open a web browser and navigate to this URL to download the latest driver: http://sabrent.com/drivers/USB-AVCPT/USB-AVCPT-32bit-64bit-Vista-Win7.zip 5. Right-click on "Setup", and click on "Run as administrator": 7. 4. Right-click the downloaded Zip file and extract the files: 6.
At the following prompt, Click Install: Open a web browser and navigate to this URL to download the latest driver: http://sabrent.com/drivers/USB-AVCPT/USB-AVCPT-32bit-64bit-Vista-Win7.zip 5. Right-click on "Setup", and click on "Run as administrator": 7. 4. Right-click the downloaded Zip file and extract the files: 6.

User Guide
Page 6
In the search box (2.) type in Device Manager. Click Install: 9. In the list of results that there is an entry for STK1160 Grabber with a speaker icon, as well as an entry for USB Audio Interface: Verify that appears, click Device Manager (3.): 11. 8. Click Finish: 10. Click on the Start button, this will bring up the Start menu.
In the search box (2.) type in Device Manager. Click Install: 9. In the list of results that there is an entry for STK1160 Grabber with a speaker icon, as well as an entry for USB Audio Interface: Verify that appears, click Device Manager (3.): 11. 8. Click Finish: 10. Click on the Start button, this will bring up the Start menu.
User Guide
Page 13
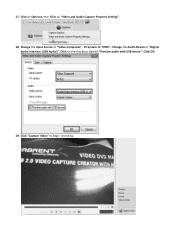
Click "Capture Video" to "Digital Audio Interface (USB Audio)". Click on "Video and Audio Capture Property Setting": 18. Change the Audio Device to begin recording: Click on Options, then Click on the checkbox labeled "Preview audio with USB device". Change the Input Source to "Video Composite", TV System to "NTSC". 17. Click OK: 19.
Click "Capture Video" to "Digital Audio Interface (USB Audio)". Click on "Video and Audio Capture Property Setting": 18. Change the Audio Device to begin recording: Click on Options, then Click on the checkbox labeled "Preview audio with USB device". Change the Input Source to "Video Composite", TV System to "NTSC". 17. Click OK: 19.
