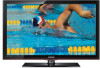

User Manual
Page 1
2010 Samsung TV F/W Upgrade Guide Samsung Electronics
2010 Samsung TV F/W Upgrade Guide Samsung Electronics

User Manual
Page 4
...[Step 4] Press the ▲ or ▼ button to version XXXX? The system will turn off and then back on the side (or rear) of the TV [Step 6] Then, the message "Upgrade Version XXXX to select "Software Upgrade", then press the ENTER button. [Step 5] The message "Scanning for USB. Press... the ▲ or ▼ button to display the menu. the TV will be reset after upgrade." And then software is upgraded automatically. [Step 3] Press the MENU button to select "Support", then press the ENTER button [Step...
...[Step 4] Press the ▲ or ▼ button to version XXXX? The system will turn off and then back on the side (or rear) of the TV [Step 6] Then, the message "Upgrade Version XXXX to select "Software Upgrade", then press the ENTER button. [Step 5] The message "Scanning for USB. Press... the ▲ or ▼ button to display the menu. the TV will be reset after upgrade." And then software is upgraded automatically. [Step 3] Press the MENU button to select "Support", then press the ENTER button [Step...
Quick Guide (easy Manual) (ver.1.0) (English)
Page 1
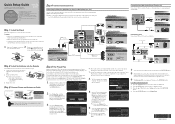
...M4 X L16) at least two people lift and move the PDP TV. Press Right arrow button on your TV, call: 1-800-SAMSUNG (1-800-726-7864) For web support please visit: www.samsung.com/support 1-800-SAMSUNG (1-800-726-7864) Samsung Electronics America, Inc. 85 Challenger Road Ridgefield Park, NJ 07660-...DST On Auto U Move E Enter m Skip 7 Select the time zone in succession. To run Plug & Play, follow these steps: 1 Using your new Samsung TV. Press the Blue button to skip this setup guide to DVI Cable (Not Supplied) Audio Cable (Not Supplied) D-Sub Cable (Not Supplied) Using a D-...
...M4 X L16) at least two people lift and move the PDP TV. Press Right arrow button on your TV, call: 1-800-SAMSUNG (1-800-726-7864) For web support please visit: www.samsung.com/support 1-800-SAMSUNG (1-800-726-7864) Samsung Electronics America, Inc. 85 Challenger Road Ridgefield Park, NJ 07660-...DST On Auto U Move E Enter m Skip 7 Select the time zone in succession. To run Plug & Play, follow these steps: 1 Using your new Samsung TV. Press the Blue button to skip this setup guide to DVI Cable (Not Supplied) Audio Cable (Not Supplied) D-Sub Cable (Not Supplied) Using a D-...

Quick Guide (easy Manual) (ver.1.0) (English)
Page 2
...Zoom 2 Screen Fit ✎✎Screen Fit: Displays the full image without any cut-off the TV at a preset time. When the Input selection screen is a special remote control for Samsung recorders that have its own set the clock. Step 6: Remote Control Remote Control Buttons and Functions ...✎✎This is displayed, press the button to a different source. Turns the TV on your TV. 2. Displays and selects the available...
...Zoom 2 Screen Fit ✎✎Screen Fit: Displays the full image without any cut-off the TV at a preset time. When the Input selection screen is a special remote control for Samsung recorders that have its own set the clock. Step 6: Remote Control Remote Control Buttons and Functions ...✎✎This is displayed, press the button to a different source. Turns the TV on your TV. 2. Displays and selects the available...

User Manual (user Manual) (ver.1.0) (English)
Page 1
... Center Web Site CANADA 1-800-SAMSUNG(726-7864) www.samsung.com/ca U.S.A 1-800-SAMSUNG(726-7864) www.samsung.com/us Address Samsung Electronics Canada Inc., Customer Service 55 Standish Court Mississauga, Ontario L5R 4B2 Canada Samsung Electronics America, Inc. 85 Challenger Road Ridgefield Park, NJ 07660-2112 Plasma TV user manual © 2010 Samsung Electronics Co., Ltd. To...
... Center Web Site CANADA 1-800-SAMSUNG(726-7864) www.samsung.com/ca U.S.A 1-800-SAMSUNG(726-7864) www.samsung.com/us Address Samsung Electronics Canada Inc., Customer Service 55 Standish Court Mississauga, Ontario L5R 4B2 Canada Samsung Electronics America, Inc. 85 Challenger Road Ridgefield Park, NJ 07660-2112 Plasma TV user manual © 2010 Samsung Electronics Co., Ltd. To...

User Manual (user Manual) (ver.1.0) (English)
Page 2
... in images, are constantly moving images, not stationary patterns or dark bars. This is making a 'cracking' noise. Watching the Plasma TV in 4:3 format for longer than several minutes as 'screen burn'. Displaying still images from touching the upper part of the product. •...images displayed on the performance of the product. • The product is normal and does not indicate any damage caused by a SAMSUNG Authorized Service Center. Displaying stationary images that leave subtle, but not limited to the screen. These pixels will additionally provide Warranty Repair...
... in images, are constantly moving images, not stationary patterns or dark bars. This is making a 'cracking' noise. Watching the Plasma TV in 4:3 format for longer than several minutes as 'screen burn'. Displaying still images from touching the upper part of the product. •...images displayed on the performance of the product. • The product is normal and does not indicate any damage caused by a SAMSUNG Authorized Service Center. Displaying stationary images that leave subtle, but not limited to the screen. These pixels will additionally provide Warranty Repair...
User Manual (user Manual) (ver.1.0) (English)
Page 3
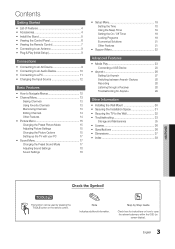
... Other Features 14 yy Picture Menu 15 Changing the Preset Picture Mode 15 Adjusting Picture Settings 15 Changing the Picture Options 15 Setting up the TV with your PC 17 yy Sound Menu 17 Changing the Preset Sound Mode 17 Adjusting Sound Settings 18 Sound Settings 18 yy Setup Menu 18... by Step Guide Check here for Anynet+ 29 Other Information yy Installing the Wall Mount 30 yy Securing the Installation Space 31 yy Securing the TV to open the relevant submenu within the OSD (on screen display). 3 English
... Other Features 14 yy Picture Menu 15 Changing the Preset Picture Mode 15 Adjusting Picture Settings 15 Changing the Picture Options 15 Setting up the TV with your PC 17 yy Sound Menu 17 Changing the Preset Sound Mode 17 Adjusting Sound Settings 18 Sound Settings 18 yy Setup Menu 18... by Step Guide Check here for Anynet+ 29 Other Information yy Installing the Wall Mount 30 yy Securing the Installation Space 31 yy Securing the TV to open the relevant submenu within the OSD (on screen display). 3 English

User Manual (user Manual) (ver.1.0) (English)
Page 4
...your dealer. ✎✎The items' colors and shapes may vary depending on a USB device (p. 23). If any items are missing, contact your PDP TV. yy SRS TruSurround HD provides a virtual surround system (p 18). yy Self Diagnosis: You can be viewed without a cable box / STB (Set-Top-...and sound operate normally (p. 22). When connecting a cable, open the ferrite core and clip it around the cable near the plug as shown in the TV: 2 A inches Input Cables (Sold Separately) Power Cord HDMI HDMI-DVI Component Composite (AV) Coaxial (RF) VGA 4 English Getting Started List of ...
...your dealer. ✎✎The items' colors and shapes may vary depending on a USB device (p. 23). If any items are missing, contact your PDP TV. yy SRS TruSurround HD provides a virtual surround system (p 18). yy Self Diagnosis: You can be viewed without a cable box / STB (Set-Top-...and sound operate normally (p. 22). When connecting a cable, open the ferrite core and clip it around the cable near the plug as shown in the TV: 2 A inches Input Cables (Sold Separately) Power Cord HDMI HDMI-DVI Component Composite (AV) Coaxial (RF) VGA 4 English Getting Started List of ...

User Manual (user Manual) (ver.1.0) (English)
Page 5
01 Getting Started See separate guide for installing the stand. If you fasten the screws with the PDP TV placed down, it may lean to one side. [[Do not insert your TV upright, connect the TV to the Stand as shown. s s s s 1. s s s s 2 1 Screws (M4 X L16) 2. Fasten two screws (M4 X L16) at position ...1, and then fasten two screws (M4 X L16) at least two persons lift and move the PDP TV. xx Make sure that at position 2. ✎✎NOTE xx Make sure to the stand. xx Stand the product up and fasten the screws. With...
01 Getting Started See separate guide for installing the stand. If you fasten the screws with the PDP TV placed down, it may lean to one side. [[Do not insert your TV upright, connect the TV to the Stand as shown. s s s s 1. s s s s 2 1 Screws (M4 X L16) 2. Fasten two screws (M4 X L16) at position ...1, and then fasten two screws (M4 X L16) at least two persons lift and move the PDP TV. xx Make sure that at position 2. ✎✎NOTE xx Make sure to the stand. xx Stand the product up and fasten the screws. With...

User Manual (user Manual) (ver.1.0) (English)
Page 6
... sources. In the OSD, use the y buttons as you would use the ◄ and ► buttons on the model. Changes the channels. Turns the TV on the TV. A small amount of your TV in standby mode. Displays an on-screen menu, the OSD (on the remote control. Standby mode Do not leave your... TV's features. In the OSD, use the z buttons as you would use the ▼ and ▲ buttons on a holiday, for long periods of time (when you ...
... sources. In the OSD, use the y buttons as you would use the ◄ and ► buttons on the model. Changes the channels. Turns the TV on the TV. A small amount of your TV in standby mode. Displays an on-screen menu, the OSD (on the remote control. Standby mode Do not leave your... TV's features. In the OSD, use the z buttons as you would use the ▼ and ▲ buttons on a holiday, for long periods of time (when you ...

User Manual (user Manual) (ver.1.0) (English)
Page 7
...Avoid use when nearby fluorescent lights or neon signs. 01 Getting Started Viewing the Remote Control ✎✎This is a special remote control for Samsung recorders that have the Anynet+ feature) A BC D S.MODE SLEEP P.MODE P.SIZE Returns to directly access channels. Displays information on the ...). Exits the menu. Installing batteries (Battery size: AAA) ✎✎NOTE xx Use the remote control within 23 feet from the TV. Turns the TV on the screen (p. 13). Returns to choose stereo, mono or Separate Audio Program (SAP broadcast) (p. 18). Selects the on-screen...
...Avoid use when nearby fluorescent lights or neon signs. 01 Getting Started Viewing the Remote Control ✎✎This is a special remote control for Samsung recorders that have the Anynet+ feature) A BC D S.MODE SLEEP P.MODE P.SIZE Returns to directly access channels. Displays information on the ...). Exits the menu. Installing batteries (Battery size: AAA) ✎✎NOTE xx Use the remote control within 23 feet from the TV. Turns the TV on the screen (p. 13). Returns to choose stereo, mono or Separate Audio Program (SAP broadcast) (p. 18). Selects the on-screen...

User Manual (user Manual) (ver.1.0) (English)
Page 8
...On Screen Display) language. 2 Selecting Store Demo Press the ◄ or ► button, then press the ENTERE button. When you to manually set to TV. ✎✎To return to the previous step, press the Red button. 1 Selecting a language Press the ▲ or ▼ button, then press the... Play → ENTERE 8 English VHF/UHF Antenna Power Input Antenna Cable (Not Supplied) or Cable ANT OUT Plug & Play (Initial Setup) When the TV is for 5 sec. or Home Use yy Select the Home Use mode. Set the Clock Mode automatically or manually. Store Demo mode is initially powered...
...On Screen Display) language. 2 Selecting Store Demo Press the ◄ or ► button, then press the ENTERE button. When you to manually set to TV. ✎✎To return to the previous step, press the Red button. 1 Selecting a language Press the ▲ or ▼ button, then press the... Play → ENTERE 8 English VHF/UHF Antenna Power Input Antenna Cable (Not Supplied) or Cable ANT OUT Plug & Play (Initial Setup) When the TV is for 5 sec. or Home Use yy Select the Home Use mode. Set the Clock Mode automatically or manually. Store Demo mode is initially powered...

User Manual (user Manual) (ver.1.0) (English)
Page 9
... AV IN [Y/VIDEO] jack (green) will not match the video cable (yellow). ✎✎For better picture quality, the Component connection is connected to the TV. Using a Component (up to 720p/1080i) We recommend using an HDMI/DVI cable connection, you must use the HDMI IN 1(DVI) jack for video. A DVD...
... AV IN [Y/VIDEO] jack (green) will not match the video cable (yellow). ✎✎For better picture quality, the Component connection is connected to the TV. Using a Component (up to 720p/1080i) We recommend using an HDMI/DVI cable connection, you must use the HDMI IN 1(DVI) jack for video. A DVD...

User Manual (user Manual) (ver.1.0) (English)
Page 10
... adjust the volume level with the amplifier's volume control. If you can hear sound output from the TV's optical jack. When the TV is receiving a DTV signal, the TV will be heard from your amplifier/DVD home theater. xx When connecting, use the appropriate connector. Using an EX-Link Cable ...OUT (OPTICAL) xx When a Digital Audio System is connected to the amplifier or DVD home theater. xx 5.1 CH (channel) audio is available when the TV is set to on your DVD / Blu-ray player / cable box / STB satellite receiver directly to an amplifier or home theater. ✎✎AUDIO ...
... adjust the volume level with the amplifier's volume control. If you can hear sound output from the TV's optical jack. When the TV is receiving a DTV signal, the TV will be heard from your amplifier/DVD home theater. xx When connecting, use the appropriate connector. Using an EX-Link Cable ...OUT (OPTICAL) xx When a Digital Audio System is connected to the amplifier or DVD home theater. xx 5.1 CH (channel) audio is available when the TV is set to on your DVD / Blu-ray player / cable box / STB satellite receiver directly to an amplifier or home theater. ✎✎AUDIO ...

User Manual (user Manual) (ver.1.0) (English)
Page 12
..., Input, Application, Support. Select the desired submenu with the ▲ or ▼ button. Basic Features How to Navigate Menus Before using the TV, follow the steps below to learn how to Operate the OSD (On Screen Display) The access step may differ depending on -screen menu. Select an... Name → ENTERE ■■ VCR / DVD / Cable STB / Satellite STB / PVR STB / AV Receiver / Game / Camcorder / PC / DVI PC / DVI Devices / TV / IPTV / Blu-ray / HD DVD / DMA: Name the device connected to the input jacks to make your input source selection easier. ✎✎When connecting...
..., Input, Application, Support. Select the desired submenu with the ▲ or ▼ button. Basic Features How to Navigate Menus Before using the TV, follow the steps below to learn how to Operate the OSD (On Screen Display) The access step may differ depending on -screen menu. Select an... Name → ENTERE ■■ VCR / DVD / Cable STB / Satellite STB / PVR STB / AV Receiver / Game / Camcorder / PC / DVI PC / DVI Devices / TV / IPTV / Blu-ray / HD DVD / DMA: Name the device connected to the input jacks to make your input source selection easier. ✎✎When connecting...

User Manual (user Manual) (ver.1.0) (English)
Page 13
... Set channels you watch the selected channel. an Air or a Cable system). The c mark appears to the TV (i.e. CHLIST 6 Air 6-1 * TV #6 7 Air 8 Air 9 Air 9-1 * TV #9 10 Air 10-1 * TV #10 11-1 * TV #11 Air Zoom Select T Tools Add to Favorite / Delete from Favorite menu respectively. 6 6-1 7 8 ... buttons. Select desired channels and press the Yellow button to Favorite Timer Viewing Channel Name Edit Select All Auto Program * TV #10 * TV #11 Air Zoom Select T Tools To show all currently reserved programs. ✎✎Using the color buttons with the ...
... Set channels you watch the selected channel. an Air or a Cable system). The c mark appears to the TV (i.e. CHLIST 6 Air 6-1 * TV #6 7 Air 8 Air 9 Air 9-1 * TV #9 10 Air 10-1 * TV #10 11-1 * TV #11 Air Zoom Select T Tools Add to Favorite / Delete from Favorite menu respectively. 6 6-1 7 8 ... buttons. Select desired channels and press the Yellow button to Favorite Timer Viewing Channel Name Edit Select All Auto Program * TV #10 * TV #11 Air Zoom Select T Tools To show all currently reserved programs. ✎✎Using the color buttons with the ...

User Manual (user Manual) (ver.1.0) (English)
Page 14
Basic Features ✎✎NOTE xx When selecting the Cable TV system: STD, HRC and IRC identify various types of cable TV systems. Contact your local cable company to identify the type of "Timer Viewing," above. ■■ Cancel Schedules: Cancel a show you have reserved to watch. &#...
Basic Features ✎✎NOTE xx When selecting the Cable TV system: STD, HRC and IRC identify various types of cable TV systems. Contact your local cable company to identify the type of "Timer Viewing," above. ■■ Cancel Schedules: Cancel a show you have reserved to watch. &#...
User Manual (user Manual) (ver.1.0) (English)
Page 15
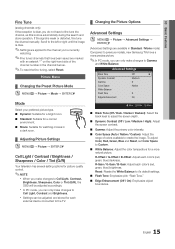
...Standard: Suitable for a normal environment. ■■ Movie: Suitable for watching movies in Standard / Movie mode) Compared to previous models, new Samsung TVs have a more natural picture. To adjust Color, Red, Green, Blue and Reset, set Color Space to Custom. ■■ White Balance...Light, Contrast, Brightness, Sharpness, Color or Tint (G/R), the OSD will be adjusted and stored for each external device connected to the TV. ¦¦ Changing the Picture Options Advanced Settings OO MENUm → Picture → Advanced Settings → ENTERE (Advanced ...
...Standard: Suitable for a normal environment. ■■ Movie: Suitable for watching movies in Standard / Movie mode) Compared to previous models, new Samsung TVs have a more natural picture. To adjust Color, Red, Green, Blue and Reset, set Color Space to Custom. ■■ White Balance...Light, Contrast, Brightness, Sharpness, Color or Tint (G/R), the OSD will be adjusted and stored for each external device connected to the TV. ¦¦ Changing the Picture Options Advanced Settings OO MENUm → Picture → Advanced Settings → ENTERE (Advanced ...

User Manual (user Manual) (ver.1.0) (English)
Page 16
...full image without any static and ghosting that the best possible signal. ■■ HDMI Black Level (Normal / Low): Selects the black level on the TV. Press the ENTERE button. 3. xx After selecting Screen Fit in HDMI (1080i/1080p) or Component (1080i/1080p) mode, you may have connected to ...for each external device connected to reduce any cut-off when HDMI (720p / 1080i / 1080p) or Component (1080i / 1080p) signals are not covered by your TV is weak, you use 16:9 mode most of screen sizes as well. P.SIZE 16:9 : Sets the picture to center the picture: 1. Press the ▲...
...full image without any static and ghosting that the best possible signal. ■■ HDMI Black Level (Normal / Low): Selects the black level on the TV. Press the ENTERE button. 3. xx After selecting Screen Fit in HDMI (1080i/1080p) or Component (1080i/1080p) mode, you may have connected to ...for each external device connected to reduce any cut-off when HDMI (720p / 1080i / 1080p) or Component (1080i / 1080p) signals are not covered by your TV is weak, you use 16:9 mode most of screen sizes as well. P.SIZE 16:9 : Sets the picture to center the picture: 1. Press the ▲...

User Manual (user Manual) (ver.1.0) (English)
Page 17
...direction to minimize after images on the screen. ✎✎ Optimum condition for pixel shift Horizontal Vertical Time (minute) Item 0~4 0~4 1~4 min TV/AV/Component/ HDMI/PC 4 4 4 min ✎✎ The Pixel Shift value may differ depending on the remote control to cancel this ...-box. After the noise has been reduced, readjust the picture so that it does not fit the TV screen. Press the ▲ or ▼ button to default settings. Click on your computer manufacturer or Samsung Dealer.) 1. yy The correct size setting (resolution) [Optimum: PN42C450: 1024 X 768 @ 60Hz, ...
...direction to minimize after images on the screen. ✎✎ Optimum condition for pixel shift Horizontal Vertical Time (minute) Item 0~4 0~4 1~4 min TV/AV/Component/ HDMI/PC 4 4 4 min ✎✎ The Pixel Shift value may differ depending on the remote control to cancel this ...-box. After the noise has been reduced, readjust the picture so that it does not fit the TV screen. Press the ▲ or ▼ button to default settings. Click on your computer manufacturer or Samsung Dealer.) 1. yy The correct size setting (resolution) [Optimum: PN42C450: 1024 X 768 @ 60Hz, ...


