

Owners Manual
Page 2
..., Mac OS X and PowerBook are trademarks of Apple, Inc., registered in this user's manual; tries and areas. • Other product and company names mentioned in the U.S. however,...manual may be responsible for any questionable points, errors or omissions, please contact us. (5) Notwithstanding article (3), SANYO will not be the trademarks or registered trademarks of profit or other matters deemed to result from using the Projector...change without notice. (3) The On-Screen Menu and figures in this manual may differ slightly from the product. (4) Great care has been taken in part or...
..., Mac OS X and PowerBook are trademarks of Apple, Inc., registered in this user's manual; tries and areas. • Other product and company names mentioned in the U.S. however,...manual may be responsible for any questionable points, errors or omissions, please contact us. (5) Notwithstanding article (3), SANYO will not be the trademarks or registered trademarks of profit or other matters deemed to result from using the Projector...change without notice. (3) The On-Screen Menu and figures in this manual may differ slightly from the product. (4) Great care has been taken in part or...

Owners Manual
Page 3
... RAIN OR MOISTURE. − This projector produces intense light from your local community waste collection/recycling center. Your SANYO product is unused for used electrical and electronic products. Please help us to operate improperly, read this manual thoroughly. CAUTION ON HANGING FROM THE ...CEILING When hanging the projector from the power outlet. To the Owner...
... RAIN OR MOISTURE. − This projector produces intense light from your local community waste collection/recycling center. Your SANYO product is unused for used electrical and electronic products. Please help us to operate improperly, read this manual thoroughly. CAUTION ON HANGING FROM THE ...CEILING When hanging the projector from the power outlet. To the Owner...

Owners Manual
Page 7
...CONVENIENT FEATURES ...43 TURNING OFF THE IMAGE AND SOUND...43 FREEZING A PICTURE...43 ADJUSTING THE FOCUS/ZOOM MANUALLY...44 v PROJECTING AN IMAGE (BASIC OPERATION) ...32 TURNING ON THE PROJECTOR...32 Note on Startup Screen (Menu Language Select screen) ...33 SELECTING AN INPUT SOURCE ...34 ADJUSTING... THE PICTURE POSITION AND PICTURE SIZE...35 Adjusting Picture Position Manually ...35 Lens Shift Adjustable Range ...36 From the Remote Control Unit ...37 Adjusting the Projector Level...38 OPTIMIZING AN RGB IMAGE AUTOMATICALLY ...39 Adjusting the Image Using AUTO PC...
...CONVENIENT FEATURES ...43 TURNING OFF THE IMAGE AND SOUND...43 FREEZING A PICTURE...43 ADJUSTING THE FOCUS/ZOOM MANUALLY...44 v PROJECTING AN IMAGE (BASIC OPERATION) ...32 TURNING ON THE PROJECTOR...32 Note on Startup Screen (Menu Language Select screen) ...33 SELECTING AN INPUT SOURCE ...34 ADJUSTING... THE PICTURE POSITION AND PICTURE SIZE...35 Adjusting Picture Position Manually ...35 Lens Shift Adjustable Range ...36 From the Remote Control Unit ...37 Adjusting the Projector Level...38 OPTIMIZING AN RGB IMAGE AUTOMATICALLY ...39 Adjusting the Image Using AUTO PC...
Owners Manual
Page 10
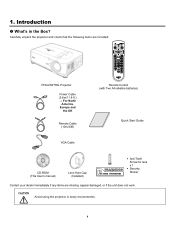
CAUTION Avoid using the projector in the Box? Carefully unpack the projector and check that the following items are included: PDG-DWT50L Projector Power Cable (3.6m/11.8 ft.) → For North America, Europe and the UK Remote Cable (10m/33ft) VGA Cable Remote Control (with Two AA alkaline batteries) Quick Start Guide CD-ROM (This User's manual) Lens Hole Cap (Installed) Anti-Theft Screw for lens x 1 Security Sticker Contact your dealer immediately if any items are missing, appear damaged, or if the unit does not work. Introduction What's in dusty environments. 1 1.
CAUTION Avoid using the projector in the Box? Carefully unpack the projector and check that the following items are included: PDG-DWT50L Projector Power Cable (3.6m/11.8 ft.) → For North America, Europe and the UK Remote Cable (10m/33ft) VGA Cable Remote Control (with Two AA alkaline batteries) Quick Start Guide CD-ROM (This User's manual) Lens Hole Cap (Installed) Anti-Theft Screw for lens x 1 Security Sticker Contact your dealer immediately if any items are missing, appear damaged, or if the unit does not work. Introduction What's in dusty environments. 1 1.
Owners Manual
Page 11
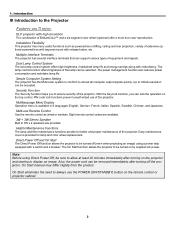
...the top control. Up to allow at least 20 minutes immediately after turning on the remote control or projector cabinet. 2 With the Key lock function, you 'll enjoy: DLP projector with release button, etc. Helpful Maintenance Functions The lamp and filter maintenance functions provide for lamp and color... lens shifting, ceiling and rear projection, variety of the lamp can be selected. On Start manual may differ slightly from the product. On Start eliminates the need to the Projector Features you can support various types of equipment and signals. Dual Lamp Control System The two-...
...the top control. Up to allow at least 20 minutes immediately after turning on the remote control or projector cabinet. 2 With the Key lock function, you 'll enjoy: DLP projector with release button, etc. Helpful Maintenance Functions The lamp and filter maintenance functions provide for lamp and color... lens shifting, ceiling and rear projection, variety of the lamp can be selected. On Start manual may differ slightly from the product. On Start eliminates the need to the Projector Features you can support various types of equipment and signals. Dual Lamp Control System The two-...

Owners Manual
Page 21
...: * To turn off certain reflective surfaces such as the corresponding buttons on the projector have the same functions as projector screens. 2. Be sure nothing obstructs the path between remote and projector is obstructed, you can disrupt remote control operation. 1. This user's manual describes the functions based on . Certain high-frequency fluorescent lights can bounce...
...: * To turn off certain reflective surfaces such as the corresponding buttons on the projector have the same functions as projector screens. 2. Be sure nothing obstructs the path between remote and projector is obstructed, you can disrupt remote control operation. 1. This user's manual describes the functions based on . Certain high-frequency fluorescent lights can bounce...
Owners Manual
Page 38
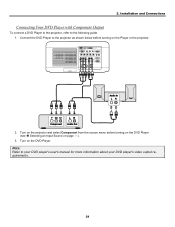
Turn on the projector and select Component from the source menu before turning on the Player or the projector. 2. Installation and Connections Connecting Your DVD Player with Component Output To connect a DVD Player to the projector, refer to your DVD player's user's manual for more information about your DVD player's video output requirements. 29 Connect the DVD Player to the projector as shown below before turning on the DVD Player (see Selecting an Input Source on the DVD Player. Turn on page 34). 3. Note: Refer to the following guide. 1. 2.
Turn on the projector and select Component from the source menu before turning on the Player or the projector. 2. Installation and Connections Connecting Your DVD Player with Component Output To connect a DVD Player to the projector, refer to your DVD player's user's manual for more information about your DVD player's video output requirements. 29 Connect the DVD Player to the projector as shown below before turning on the DVD Player (see Selecting an Input Source on the DVD Player. Turn on page 34). 3. Note: Refer to the following guide. 1. 2.

Owners Manual
Page 53
Convenient Features Adjusting the Focus/Zoom Manually The focus and zoom can be adjusted manually from the projector focus/zoom panel or from the remote control unit. Adjusting by Using the OSD Control Panel 1. Press the Focus or Zoom button on the projector panel to the projected image. 44 Adjust the Focus/Zoom using the increase and decrease buttons as required. 3. Press Cancel to return to display the appropriate window. 2. 4. Refer to the following guides to adjust the focus and zoom manually.
Convenient Features Adjusting the Focus/Zoom Manually The focus and zoom can be adjusted manually from the projector focus/zoom panel or from the remote control unit. Adjusting by Using the OSD Control Panel 1. Press the Focus or Zoom button on the projector panel to the projected image. 44 Adjust the Focus/Zoom using the increase and decrease buttons as required. 3. Press Cancel to return to display the appropriate window. 2. 4. Refer to the following guides to adjust the focus and zoom manually.

Owners Manual
Page 57
... 1. Adjust the Horizontal, Vertical, Total dots, or Fine sync sliding bars using ▲or▼ to adjust the Keystone Distortion manually. Convenient Features Adjusting Position/Total Dots/Fine Sync The Position/Total dots/Fine sync and Keystone Correction can be adjusted manually from the projector's control panel or from the remote control unit. 4.
... 1. Adjust the Horizontal, Vertical, Total dots, or Fine sync sliding bars using ▲or▼ to adjust the Keystone Distortion manually. Convenient Features Adjusting Position/Total Dots/Fine Sync The Position/Total dots/Fine sync and Keystone Correction can be adjusted manually from the projector's control panel or from the remote control unit. 4.
Owners Manual
Page 97
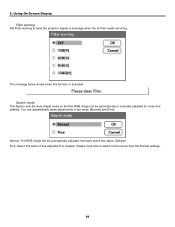
5. It takes more time to switch to have the projector display a message when the air filter needs servicing. Normal: The RGB image will be automatically or manually adjusted for noise and stability. Fine: Select this option if fine adjustment is activated. The message below shows when this option (Default). Search mode This ...
5. It takes more time to switch to have the projector display a message when the air filter needs servicing. Normal: The RGB image will be automatically or manually adjusted for noise and stability. Fine: Select this option if fine adjustment is activated. The message below shows when this option (Default). Search mode This ...

Owners Manual
Page 108
... 2000-2100 hour. Risk of explosion may explode as a result of vibration, shock or degradation as a result of hours of this manual.) Continuous use . Additionally, check carefully to do so, may differ from lamp to lamp and according to an end. The projection ...They should be disposed of according to the environment or conditions in a shorter period of time than other similar lamps. • If the projector indicates that there are positioned differently. Contact an authorized service station for each lamp. 6. Important: 1. Maintenance Replacing the Lamps When a lamp...
... 2000-2100 hour. Risk of explosion may explode as a result of vibration, shock or degradation as a result of hours of this manual.) Continuous use . Additionally, check carefully to do so, may differ from lamp to lamp and according to an end. The projection ...They should be disposed of according to the environment or conditions in a shorter period of time than other similar lamps. • If the projector indicates that there are positioned differently. Contact an authorized service station for each lamp. 6. Important: 1. Maintenance Replacing the Lamps When a lamp...

Owners Manual
Page 133
.... Still unchanged even though you adjusted the focus. Still unchanged even though you carry out [Reset] in the projector's menu. AUDIO OUT is displayed from your user's manual. Video and Audio No image is connected to your notebook PC's signal output to the PC first, then start ... No obstacles between the sensor of the image are not reversed in the vertical or horizontal direction. The remote control code conforms to the projector is not turned on the screen. button. No image (blue background, logo, no image even though you adjusted the volume level. No ...
.... Still unchanged even though you adjusted the focus. Still unchanged even though you carry out [Reset] in the projector's menu. AUDIO OUT is displayed from your user's manual. Video and Audio No image is connected to your notebook PC's signal output to the PC first, then start ... No obstacles between the sensor of the image are not reversed in the vertical or horizontal direction. The remote control code conforms to the projector is not turned on the screen. button. No image (blue background, logo, no image even though you adjusted the volume level. No ...

