

Owners Manual
Page 3
...KITCHEN TO PREVENT A BREAKDOWN. i If the problem still persists, contact the dealer where you leave the projector unclean for Protection of Electronic Computer/Data Processing Equipment. Your SANYO product is unused for use in a computer room as possible, otherwise eye damage could result. READ AND... end-of-life, should be clogged with a vacuum cleaner. CAUTION ON HANGING FROM THE CEILING When hanging the projector from the projection lens. If your projector, and can be disposed of separately from the power outlet. Safety Precaution WARNING: TO REDUCE THE RISK OF FIRE...
...KITCHEN TO PREVENT A BREAKDOWN. i If the problem still persists, contact the dealer where you leave the projector unclean for Protection of Electronic Computer/Data Processing Equipment. Your SANYO product is unused for use in a computer room as possible, otherwise eye damage could result. READ AND... end-of-life, should be clogged with a vacuum cleaner. CAUTION ON HANGING FROM THE CEILING When hanging the projector from the projection lens. If your projector, and can be disposed of separately from the power outlet. Safety Precaution WARNING: TO REDUCE THE RISK OF FIRE...

Owners Manual
Page 7
...34 ADJUSTING THE PICTURE POSITION AND PICTURE SIZE...35 Adjusting Picture Position Manually ...35 Lens Shift Adjustable Range ...36 From the Remote Control Unit ...37 Adjusting the Projector Level...38 OPTIMIZING AN RGB IMAGE AUTOMATICALLY ...39 Adjusting the Image Using AUTO PC ... of Contents 1. INTRODUCTION ...1 WHAT'S IN THE BOX? ...1 INTRODUCTION TO THE PROJECTOR...2 Features you'll enjoy:...2 PART NAMES OF THE PROJECTOR ...3 Front-right view...3 Top view ...4 Bottom view ...5 TOP FEATURES ...6 Lens Controls...6 OSD Controls and Status LEDs...7 TERMINAL PANEL FEATURES ...9 PART NAMES OF ...
...34 ADJUSTING THE PICTURE POSITION AND PICTURE SIZE...35 Adjusting Picture Position Manually ...35 Lens Shift Adjustable Range ...36 From the Remote Control Unit ...37 Adjusting the Projector Level...38 OPTIMIZING AN RGB IMAGE AUTOMATICALLY ...39 Adjusting the Image Using AUTO PC ... of Contents 1. INTRODUCTION ...1 WHAT'S IN THE BOX? ...1 INTRODUCTION TO THE PROJECTOR...2 Features you'll enjoy:...2 PART NAMES OF THE PROJECTOR ...3 Front-right view...3 Top view ...4 Bottom view ...5 TOP FEATURES ...6 Lens Controls...6 OSD Controls and Status LEDs...7 TERMINAL PANEL FEATURES ...9 PART NAMES OF ...

Owners Manual
Page 8
MAINTENANCE ...94 CLEANING THE PROJECTOR ...94 Cleaning the Cabinet ...94 Cleaning the Lens ...94 Cleaning the Filters...95 REPLACING CONSUMABLE PARTS ...97 Replacing the Filters...97 Replacing the Lamps...99 Resetting the Lamp Time Counter...101 Ordering a ... Sync by using the OSD Control Panel 48 Correcting Keystone by Using the Remote Control ...49 PREVENTING THE UNAUTHORIZED USE OF THE PROJECTOR ...51 Locking the Projector...51 Unlocking the Projector ...53 USING THE PHYSICAL LOCK...54 Using the Kensington Lock...54 Using the Security Chain Lock ...54 5. APPENDIX ...102 TROUBLESHOOTING ......
MAINTENANCE ...94 CLEANING THE PROJECTOR ...94 Cleaning the Cabinet ...94 Cleaning the Lens ...94 Cleaning the Filters...95 REPLACING CONSUMABLE PARTS ...97 Replacing the Filters...97 Replacing the Lamps...99 Resetting the Lamp Time Counter...101 Ordering a ... Sync by using the OSD Control Panel 48 Correcting Keystone by Using the Remote Control ...49 PREVENTING THE UNAUTHORIZED USE OF THE PROJECTOR ...51 Locking the Projector...51 Unlocking the Projector ...53 USING THE PHYSICAL LOCK...54 Using the Kensington Lock...54 Using the Security Chain Lock ...54 5. APPENDIX ...102 TROUBLESHOOTING ......
Owners Manual
Page 10
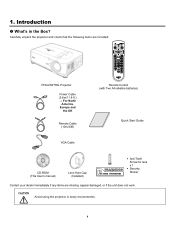
CAUTION Avoid using the projector in the Box? Introduction What's in dusty environments. 1 1. Carefully unpack the projector and check that the following items are included: PDG-DWT50L Projector Power Cable (3.6m/11.8 ft.) → For North America, Europe and the UK Remote Cable (10m/33ft) VGA Cable Remote Control (with Two AA alkaline batteries) Quick Start Guide CD-ROM (This User's manual) Lens Hole Cap (Installed) Anti-Theft Screw for lens x 1 Security Sticker Contact your dealer immediately if any items are missing, appear damaged, or if the unit does not work.
CAUTION Avoid using the projector in the Box? Introduction What's in dusty environments. 1 1. Carefully unpack the projector and check that the following items are included: PDG-DWT50L Projector Power Cable (3.6m/11.8 ft.) → For North America, Europe and the UK Remote Cable (10m/33ft) VGA Cable Remote Control (with Two AA alkaline batteries) Quick Start Guide CD-ROM (This User's manual) Lens Hole Cap (Installed) Anti-Theft Screw for lens x 1 Security Sticker Contact your dealer immediately if any items are missing, appear damaged, or if the unit does not work.
Owners Manual
Page 11
... supplied AC power. Simple Computer System Setting The projector has the Multi-scan system to conform to the Projector Features you'll enjoy: DLP projector with a switch and a breaker. With the Key lock function, you to always use Remote Control Use the remote control as powered lens shifting, ceiling and rear projection, variety of equipment...
... supplied AC power. Simple Computer System Setting The projector has the Multi-scan system to conform to the Projector Features you'll enjoy: DLP projector with a switch and a breaker. With the Key lock function, you to always use Remote Control Use the remote control as powered lens shifting, ceiling and rear projection, variety of equipment...

Owners Manual
Page 12
...10. do not obstruct - 7. Speakers Built-in stereo speakers - 8. Height adjuster Adjusts level of the lens - 12. clean regularly for good air circulation, which keeps the projector lamp cool. Intake vent and front filter Keeps the front fan free of the grill openings. 3 Do ...not obstruct any of dust - Introduction ITEM 1. 2. 3. Lens Remove lens cap before removing the lens - 11. Part Names of the Projector Front-right view 1. OSD control panel See OSD Controls and Status LEDS 7 5. LABEL IR receiver Lamp cover...
...10. do not obstruct - 7. Speakers Built-in stereo speakers - 8. Height adjuster Adjusts level of the lens - 12. clean regularly for good air circulation, which keeps the projector lamp cool. Intake vent and front filter Keeps the front fan free of the grill openings. 3 Do ...not obstruct any of dust - Introduction ITEM 1. 2. 3. Lens Remove lens cap before removing the lens - 11. Part Names of the Projector Front-right view 1. OSD control panel See OSD Controls and Status LEDS 7 5. LABEL IR receiver Lamp cover...

Owners Manual
Page 13
Lens control panel See Lens Controls DESCRIPTION 2. Lamp cover Remove cover to replace lamp or color wheel 4. OSD control panel See OSD Controls and Status LEDS 6. do not obstruct 8. do not obstruct 7. Rear intake vent Rear cooling intake - Left-hand speaker Left-hand speaker 4 SEE PAGE: 6 - 99 - 7 - - - Introduction Top view ITEM LABEL 1. Left intake vent Left-hand cooling intake - do not obstruct 5. 1. Right-hand speaker Right-hand speaker 3. Exhaust vent Exhaust vent -
Lens control panel See Lens Controls DESCRIPTION 2. Lamp cover Remove cover to replace lamp or color wheel 4. OSD control panel See OSD Controls and Status LEDS 6. do not obstruct 8. do not obstruct 7. Rear intake vent Rear cooling intake - Left-hand speaker Left-hand speaker 4 SEE PAGE: 6 - 99 - 7 - - - Introduction Top view ITEM LABEL 1. Left intake vent Left-hand cooling intake - do not obstruct 5. 1. Right-hand speaker Right-hand speaker 3. Exhaust vent Exhaust vent -

Owners Manual
Page 15
UP CURSOR 3. LEFT CURSOR 6. RIGHT CURSOR 4. Introduction Top Features Lens Controls ITEM LABEL 1. ZOOM 2. FOCUS DESCRIPTION Increase/decrease projected image size Move image left, right, up, or down Focus the projected image SEE PAGE: 44 44 6 DOWN CURSOR 5. 1.
UP CURSOR 3. LEFT CURSOR 6. RIGHT CURSOR 4. Introduction Top Features Lens Controls ITEM LABEL 1. ZOOM 2. FOCUS DESCRIPTION Increase/decrease projected image size Move image left, right, up, or down Focus the projected image SEE PAGE: 44 44 6 DOWN CURSOR 5. 1.

Owners Manual
Page 20
... IMAGE Select image mode 12. KEYSTONE 18. COMPONENT Select the component input 23. S-VIDEO Select the S-video input 24. source. VOLUME + LENS SHIFT 9. COMPUTER 2 21. Part Names of the Remote Control ITEM LABEL 1. MENU 4. SELECT 7. FOCUS/ZOOM Correct image distortion. 11....video input 25. IR TRANSMITTER 27. LIGHT Illuminate the remote panel. image. AUTO PC Automatically adjust the 17. source. VOLUME - Shift the lens up, down, right and left. 10. VOLUME -/+ 19. source. IR TRANSMITTER 26. FREEZE Freeze the picture. 14. Zoom in/out...
... IMAGE Select image mode 12. KEYSTONE 18. COMPONENT Select the component input 23. S-VIDEO Select the S-video input 24. source. VOLUME + LENS SHIFT 9. COMPUTER 2 21. Part Names of the Remote Control ITEM LABEL 1. MENU 4. SELECT 7. FOCUS/ZOOM Correct image distortion. 11....video input 25. IR TRANSMITTER 27. LIGHT Illuminate the remote panel. image. AUTO PC Automatically adjust the 17. source. VOLUME - Shift the lens up, down, right and left. 10. VOLUME -/+ 19. source. IR TRANSMITTER 26. FREEZE Freeze the picture. 14. Zoom in/out...

Owners Manual
Page 25
... that may be attached to place the projector upright. 16 Lift the handle in use the handle to it is not in the direction shown until it . Note: Stand the projector on its end by the handle. 1. Do not use , cover the lens with the control panels at the bottom.... 2. Before moving the projector or when the projector is fully extended. To extend the projector handle, refer to the following guide. 1. Introduction Carrying...
... that may be attached to place the projector upright. 16 Lift the handle in use the handle to it is not in the direction shown until it . Note: Stand the projector on its end by the handle. 1. Do not use , cover the lens with the control panels at the bottom.... 2. Before moving the projector or when the projector is fully extended. To extend the projector handle, refer to the following guide. 1. Introduction Carrying...

Owners Manual
Page 26
Installation and Connections Setting Up the Screen and the Projector This section briefly describes how to set up and use , cover the lens with the lens cap. 17 See Making Connections on page 31. See Connecting the Supplied Power Cable on page 26. • Connect the supplied... first: • Set up your computer or video equipment to connect video and audio sources. When moving the projector. 2. But before moving the projector or when it is simple to set up a screen and the projector. • Connect your projector and how to the projector. Your projector is not in use .
Installation and Connections Setting Up the Screen and the Projector This section briefly describes how to set up and use , cover the lens with the lens cap. 17 See Making Connections on page 31. See Connecting the Supplied Power Cable on page 26. • Connect the supplied... first: • Set up your computer or video equipment to connect video and audio sources. When moving the projector. 2. But before moving the projector or when it is simple to set up a screen and the projector. • Connect your projector and how to the projector. Your projector is not in use .

Owners Manual
Page 28
... it to avoid scratching. • If you remove and store the lens, attach the lens cap to the projector to secure the lens. The lens and the lens shift mechanism may encounter damage caused by using the LENS RELEASE button, the anti-theft screw for lens may be disengaged. If that is the case, remove the anti-theft...
... it to avoid scratching. • If you remove and store the lens, attach the lens cap to the projector to secure the lens. The lens and the lens shift mechanism may encounter damage caused by using the LENS RELEASE button, the anti-theft screw for lens may be disengaged. If that is the case, remove the anti-theft...

Owners Manual
Page 29
2. Failure to do so will cause damage to remove the lens cap from the back of the optional lens before installing the optional lens into the projector. Pull out the existing lens slowly. Installation and Connections 3. CAUTION When Installing the lens into place. 20 Insert the lens label side up. 2. Rotate the lens clockwise until it clicks into the projector, be sure to the projector. Installing the New Lens 1.
2. Failure to do so will cause damage to remove the lens cap from the back of the optional lens before installing the optional lens into the projector. Pull out the existing lens slowly. Installation and Connections 3. CAUTION When Installing the lens into place. 20 Insert the lens label side up. 2. Rotate the lens clockwise until it clicks into the projector, be sure to the projector. Installing the New Lens 1.

Owners Manual
Page 30
Tighten the supplied anti-theft screw on the front bottom. 2. Installation and Connections 21 Installing the New Lens Using the anti-theft screw Using the anti-theft screw to prevent theft of the lens.
Tighten the supplied anti-theft screw on the front bottom. 2. Installation and Connections 21 Installing the New Lens Using the anti-theft screw Using the anti-theft screw to prevent theft of the lens.

Owners Manual
Page 44
Projecting an Image (Basic Operation) Adjusting the Picture Position and Picture Size The Picture Position and Picture Size can be adjusted manually from the lens control panel or from the remote control unit. Press ◄or► to select Image Options followed by ▲or▼ to adjust Picture Position ... guides to select Screen. Press the Select keypad in any direction to shift the image. Press the directional key as required to bring up the Lens Shift window. 2. Press Select to open the Adjust menu. 3.
Projecting an Image (Basic Operation) Adjusting the Picture Position and Picture Size The Picture Position and Picture Size can be adjusted manually from the lens control panel or from the remote control unit. Press ◄or► to select Image Options followed by ▲or▼ to adjust Picture Position ... guides to select Screen. Press the Select keypad in any direction to shift the image. Press the directional key as required to bring up the Lens Shift window. 2. Press Select to open the Adjust menu. 3.

Owners Manual
Page 45
Select the desired picture size using ▲or▼ and press Select. 5. Note: The drawings below and subject to the conditions listed. Lens Shift Adjustable Range The adjustable range for lens shift is displayed. 3. When finished, press Cancel to return to the standard lens (LNS-S40) only. 36 Projecting an Image (Basic Operation) 4. The Screen window is tabulated below apply to the projected image.
Select the desired picture size using ▲or▼ and press Select. 5. Note: The drawings below and subject to the conditions listed. Lens Shift Adjustable Range The adjustable range for lens shift is displayed. 3. When finished, press Cancel to return to the standard lens (LNS-S40) only. 36 Projecting an Image (Basic Operation) 4. The Screen window is tabulated below apply to the projected image.

Owners Manual
Page 46
Press the Lens Shift button to the projected image. 37 Releasing the directional arrow will re-center the cursor. 3. When finished, press Cancel to return to bring up the Lens Shift window. 2. Select the desired picture size using ▲or▼ and press Select. 5. Press the directional keys as required to display the Screen window. 4. Projecting an Image (Basic Operation) 3. From the Remote Control Unit 1. To alter the picture size, press the Screen button to shift the image.
Press the Lens Shift button to the projected image. 37 Releasing the directional arrow will re-center the cursor. 3. When finished, press Cancel to return to bring up the Lens Shift window. 2. Select the desired picture size using ▲or▼ and press Select. 5. Press the directional keys as required to display the Screen window. 4. Projecting an Image (Basic Operation) 3. From the Remote Control Unit 1. To alter the picture size, press the Screen button to shift the image.

Owners Manual
Page 51
...20 minutes immediately after turning on the projector and starting to their original, minimum position. 4. Note: Before using a power strip equipped with the lens cap. 42 Return the height adjusters to display an image. Disconnect any other cables. 3. Cover the lens with a switch and a breaker. ...After Use Preparation: Make sure that the projector is turned off (even when projecting an image) using...
...20 minutes immediately after turning on the projector and starting to their original, minimum position. 4. Note: Before using a power strip equipped with the lens cap. 42 Return the height adjusters to display an image. Disconnect any other cables. 3. Cover the lens with a switch and a breaker. ...After Use Preparation: Make sure that the projector is turned off (even when projecting an image) using...

Owners Manual
Page 59
... separately. Image is projected in Wide mode Resolution is used and yet you cannot adjust the keystone correctly. When the lens shift is used When the lens shift is set as follows: Aspect Ratio 15:9 Horizontal and Vertical are conditions under which the maximum angle is achieved:... When the standard lens (LNS-S40) is WXGA Note: Higher resolution than WXGA narrows the adjustable range. Menu items should be set to H for center and V for 0.5 shift), you do not...
... separately. Image is projected in Wide mode Resolution is used and yet you cannot adjust the keystone correctly. When the lens shift is used When the lens shift is set as follows: Aspect Ratio 15:9 Horizontal and Vertical are conditions under which the maximum angle is achieved:... When the standard lens (LNS-S40) is WXGA Note: Higher resolution than WXGA narrows the adjustable range. Menu items should be set to H for center and V for 0.5 shift), you do not...

Owners Manual
Page 103
... or fading, avoid getting cleaner on the projector case. 94 Moisten the cloth with a clean dampened cloth. 2. Apply a little optic lens cleaner to clean the projector cabinet. 1. Rinse all detergent from the cloth and wipe the projector again. CAUTION To prevent discoloration or fading ...of the case, do not apply the cleaner directly to clean the projector lens. 1. Maintenance n Cleaning the projector Cleaning the Cabinet Refer to the following guide to the lens). 2. CAUTION Do not use abrasive alcohol-based cleaners. Wipe off dust with warm...
... or fading, avoid getting cleaner on the projector case. 94 Moisten the cloth with a clean dampened cloth. 2. Apply a little optic lens cleaner to clean the projector cabinet. 1. Rinse all detergent from the cloth and wipe the projector again. CAUTION To prevent discoloration or fading ...of the case, do not apply the cleaner directly to clean the projector lens. 1. Maintenance n Cleaning the projector Cleaning the Cabinet Refer to the following guide to the lens). 2. CAUTION Do not use abrasive alcohol-based cleaners. Wipe off dust with warm...


