

Owners Manual
Page 2
... deemed to change without notice. (3) The On-Screen Menu and figures in this manual may differ slightly from using the Projector. tries and areas. • Other product and company names mentioned in this user's manual; BrilliantColor and DynamicBlack are trademarks... of Texas Instruments. • IBM is a registered trademark of Texas Instruments. © SANYO Electric Co., Ltd. 2007 • DLP is a trademark or registered trademark of International Business Machines Corporation. • Macintosh, Mac OS X and PowerBook are trademarks...
... deemed to change without notice. (3) The On-Screen Menu and figures in this manual may differ slightly from using the Projector. tries and areas. • Other product and company names mentioned in this user's manual; BrilliantColor and DynamicBlack are trademarks... of Texas Instruments. • IBM is a registered trademark of Texas Instruments. © SANYO Electric Co., Ltd. 2007 • DLP is a trademark or registered trademark of International Business Machines Corporation. • Macintosh, Mac OS X and PowerBook are trademarks...

Owners Manual
Page 3
...REPLACEMENT. REFER SERVICING TO QUALIFIED SERVICE PERSONNEL. Heat build-up can reduce the service life of the projector cabinet is unused for used electrical and electronic products. Your SANYO product is to operate improperly, read this booklet. READ AND KEEP THIS USER'S MANUAL FOR LATER... USE. Operating the projector properly enables you to come. If the problem still persists, contact the dealer where you leave the projector unclean for a long...
...REPLACEMENT. REFER SERVICING TO QUALIFIED SERVICE PERSONNEL. Heat build-up can reduce the service life of the projector cabinet is unused for used electrical and electronic products. Your SANYO product is to operate improperly, read this booklet. READ AND KEEP THIS USER'S MANUAL FOR LATER... USE. Operating the projector properly enables you to come. If the problem still persists, contact the dealer where you leave the projector unclean for a long...

Owners Manual
Page 4
...manufacturer, or sold with care. e. f. Wanneer dezeleeg zijn, moet u ze niet weggooien maar inleveren als KCA. Unplug this projector, ask the service technician to perform routine safety checks to determine that could result in damage and will prevent damage due to dangerous...recommended by the manufacturers. For added protection to ensure reliable operation of the cabinet are covered by following conditions: a. This projector should be blocked by the manufacturer that have the same characteristics as they may cause the appliance and cart combination to persons...
...manufacturer, or sold with care. e. f. Wanneer dezeleeg zijn, moet u ze niet weggooien maar inleveren als KCA. Unplug this projector, ask the service technician to perform routine safety checks to determine that could result in damage and will prevent damage due to dangerous...recommended by the manufacturers. For added protection to ensure reliable operation of the cabinet are covered by following conditions: a. This projector should be blocked by the manufacturer that have the same characteristics as they may cause the appliance and cart combination to persons...

Owners Manual
Page 5
...the Filters" on the cabinet will void the warranty on the cabinet. Cooling fans are provided for a long time may not only damage the projector and may require costly repairs but may reduce the lamp lifetime and cause a fire hazard. IMPORTANT! When the "Please clean filter" message is ...from getting inside the projector. Damages to the projector caused by drawing air into the housing and the filter is exhausted from the air vents. − Keep the exhaust vent at least...
...the Filters" on the cabinet will void the warranty on the cabinet. Cooling fans are provided for a long time may not only damage the projector and may require costly repairs but may reduce the lamp lifetime and cause a fire hazard. IMPORTANT! When the "Please clean filter" message is ...from getting inside the projector. Damages to the projector caused by drawing air into the housing and the filter is exhausted from the air vents. − Keep the exhaust vent at least...

Owners Manual
Page 6
...is required to comply with class B limits in a residential installation. red or orange). Model Number(s) Trade Name Responsible party Address Telephone No. : PDG-DWT50L : Sanyo : SANYO FISHER COMPANY : 21605 Plummer Street, Chatsworth, California 91311 U.S.A. : (818)998-7322 AC Power Cord Requirement The AC Power Cord supplied with the...following code: Green-and-yellow Earth Blue Neutral Brown Live As the colors of the wires in the mains lead of this projector meets the requirement for the United Kingdom: This cord is already fitted with the letter N or colored black. iv Do ...
...is required to comply with class B limits in a residential installation. red or orange). Model Number(s) Trade Name Responsible party Address Telephone No. : PDG-DWT50L : Sanyo : SANYO FISHER COMPANY : 21605 Plummer Street, Chatsworth, California 91311 U.S.A. : (818)998-7322 AC Power Cord Requirement The AC Power Cord supplied with the...following code: Green-and-yellow Earth Blue Neutral Brown Live As the colors of the wires in the mains lead of this projector meets the requirement for the United Kingdom: This cord is already fitted with the letter N or colored black. iv Do ...

Owners Manual
Page 7
...30 CONNECTING THE SUPPLIED POWER CABLE ...31 NOTE ON THE POWER CORD ...31 3. PROJECTING AN IMAGE (BASIC OPERATION) ...32 TURNING ON THE PROJECTOR...32 Note on Startup Screen (Menu Language Select screen) ...33 SELECTING AN INPUT SOURCE ...34 ADJUSTING THE PICTURE POSITION AND PICTURE SIZE...35 ...Adjusting Picture Position Manually ...35 Lens Shift Adjustable Range ...36 From the Remote Control Unit ...37 Adjusting the Projector Level...38 OPTIMIZING AN RGB IMAGE AUTOMATICALLY ...39 Adjusting the Image Using AUTO PC ADJ...39 ADJUSTING VOLUME UP AND DOWN ...40 TURNING...
...30 CONNECTING THE SUPPLIED POWER CABLE ...31 NOTE ON THE POWER CORD ...31 3. PROJECTING AN IMAGE (BASIC OPERATION) ...32 TURNING ON THE PROJECTOR...32 Note on Startup Screen (Menu Language Select screen) ...33 SELECTING AN INPUT SOURCE ...34 ADJUSTING THE PICTURE POSITION AND PICTURE SIZE...35 ...Adjusting Picture Position Manually ...35 Lens Shift Adjustable Range ...36 From the Remote Control Unit ...37 Adjusting the Projector Level...38 OPTIMIZING AN RGB IMAGE AUTOMATICALLY ...39 Adjusting the Image Using AUTO PC ADJ...39 ADJUSTING VOLUME UP AND DOWN ...40 TURNING...

Owners Manual
Page 8
...the OSD Control Panel 48 Correcting Keystone by Using the Remote Control ...49 PREVENTING THE UNAUTHORIZED USE OF THE PROJECTOR ...51 Locking the Projector...51 Unlocking the Projector ...53 USING THE PHYSICAL LOCK...54 Using the Kensington Lock...54 Using the Security Chain Lock ...54 5. USING...FUNCTIONS...89 Usage time ...89 Input ...90 Network...91 Version...92 RESET MENU DESCRIPTIONS AND FUNCTIONS...93 6. MAINTENANCE ...94 CLEANING THE PROJECTOR ...94 Cleaning the Cabinet ...94 Cleaning the Lens ...94 Cleaning the Filters...95 REPLACING CONSUMABLE PARTS ...97 Replacing the Filters...97 ...
...the OSD Control Panel 48 Correcting Keystone by Using the Remote Control ...49 PREVENTING THE UNAUTHORIZED USE OF THE PROJECTOR ...51 Locking the Projector...51 Unlocking the Projector ...53 USING THE PHYSICAL LOCK...54 Using the Kensington Lock...54 Using the Security Chain Lock ...54 5. USING...FUNCTIONS...89 Usage time ...89 Input ...90 Network...91 Version...92 RESET MENU DESCRIPTIONS AND FUNCTIONS...93 6. MAINTENANCE ...94 CLEANING THE PROJECTOR ...94 Cleaning the Cabinet ...94 Cleaning the Lens ...94 Cleaning the Filters...95 REPLACING CONSUMABLE PARTS ...97 Replacing the Filters...97 ...

Owners Manual
Page 9
TROUBLESHOOTING CHECK LIST ...124 vii SPECIFICATIONS ...107 PROJECTOR SPECIFICATIONS...107 Optical Specifications ...107 Electrical Specifications ...108 Mechanical Specifications ...109 Environmental Considerations ...109 Regulations ...109 Optional Parts ...110 CABINET DIMENSIONS...111 PIN ASSIGNMENTS OF ... for Operation by Using a Browser 118 Configuring Network Settings...119 Structure of Contents Lamp Problems ...105 Remote Control Problems ...106 Audio Problems ...106 HAVING THE PROJECTOR SERVICED ...106 8. Table of the HTTP Server...121 15 PIN GPIO CONTROL ...123 9.
TROUBLESHOOTING CHECK LIST ...124 vii SPECIFICATIONS ...107 PROJECTOR SPECIFICATIONS...107 Optical Specifications ...107 Electrical Specifications ...108 Mechanical Specifications ...109 Environmental Considerations ...109 Regulations ...109 Optional Parts ...110 CABINET DIMENSIONS...111 PIN ASSIGNMENTS OF ... for Operation by Using a Browser 118 Configuring Network Settings...119 Structure of Contents Lamp Problems ...105 Remote Control Problems ...106 Audio Problems ...106 HAVING THE PROJECTOR SERVICED ...106 8. Table of the HTTP Server...121 15 PIN GPIO CONTROL ...123 9.
Owners Manual
Page 10
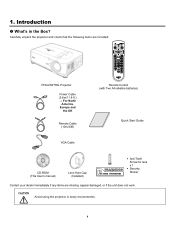
CAUTION Avoid using the projector in the Box? 1. Carefully unpack the projector and check that the following items are included: PDG-DWT50L Projector Power Cable (3.6m/11.8 ft.) → For North America, Europe and the UK Remote Cable (10m/33ft) VGA Cable Remote Control (with Two AA alkaline batteries) Quick Start Guide CD-ROM (This User's manual) Lens Hole Cap (Installed) Anti-Theft Screw for lens x 1 Security Sticker Contact your dealer immediately if any items are missing, appear damaged, or if the unit does not work. Introduction What's in dusty environments. 1
CAUTION Avoid using the projector in the Box? 1. Carefully unpack the projector and check that the following items are included: PDG-DWT50L Projector Power Cable (3.6m/11.8 ft.) → For North America, Europe and the UK Remote Cable (10m/33ft) VGA Cable Remote Control (with Two AA alkaline batteries) Quick Start Guide CD-ROM (This User's manual) Lens Hole Cap (Installed) Anti-Theft Screw for lens x 1 Security Sticker Contact your dealer immediately if any items are missing, appear damaged, or if the unit does not work. Introduction What's in dusty environments. 1
Owners Manual
Page 11
...the power cord can be selected. Up to UXGA resolution can be sure to the Projector Features you can be accepted. With the Key lock function, you 'll enjoy: DLP projector with high resolution The combination of extensive optional powered lens with bayonet mount with release button..., etc. Installation Flexibility This projector has many useful functions such as wired or wireless. Dual Lamp ...
...the power cord can be selected. Up to UXGA resolution can be sure to the Projector Features you can be accepted. With the Key lock function, you 'll enjoy: DLP projector with high resolution The combination of extensive optional powered lens with bayonet mount with release button..., etc. Installation Flexibility This projector has many useful functions such as wired or wireless. Dual Lamp ...

Owners Manual
Page 12
...cooling vent - Height adjuster Adjusts level of the lens - 12. I/O connector panel Connect various input devices 9 6. Anti-Theft screw Prevent theft of projector 5 9. Speakers Built-in stereo speakers - 8. Intake vent and front filter Keeps the front fan free of the grill openings. 3 do not obstruct... 95 Important: Grill openings on the projector allow for good air circulation, which keeps the projector lamp cool. Lens Remove lens cap before removing the lens - 11. Do not obstruct any of dust ...
...cooling vent - Height adjuster Adjusts level of the lens - 12. I/O connector panel Connect various input devices 9 6. Anti-Theft screw Prevent theft of projector 5 9. Speakers Built-in stereo speakers - 8. Intake vent and front filter Keeps the front fan free of the grill openings. 3 do not obstruct... 95 Important: Grill openings on the projector allow for good air circulation, which keeps the projector lamp cool. Lens Remove lens cap before removing the lens - 11. Do not obstruct any of dust ...

Owners Manual
Page 14
... - 3. see Using the Physical Lock 54 6. maximum depth of dust - Front filter Keep the fan free of the projector. Security chain opening Attach anti-theft device - clean regularly for information on mounting the projector on a ceiling - 5. Introduction ITEM LABEL DESCRIPTION SEE PAGES: 1. distance from ceiling/ wall: 20 cm (0.7 feet) for optimum performance...
... - 3. see Using the Physical Lock 54 6. maximum depth of dust - Front filter Keep the fan free of the projector. Security chain opening Attach anti-theft device - clean regularly for information on mounting the projector on a ceiling - 5. Introduction ITEM LABEL DESCRIPTION SEE PAGES: 1. distance from ceiling/ wall: 20 cm (0.7 feet) for optimum performance...

Owners Manual
Page 16
VOLUME Increase volume INCREASE 4. UP/ DOWN/ LEFT/ RIGHT BUTTONS Navigate and change settings in standby mode. 7. Press to place the projector in the OSD RIGHT CURSOR/ 3. MENU Open / Close the OSD 2. CANCEL Exit the On-Screen Display (OSD) 5. INPUT Change or select the input device 6. LAMP 2 (LED) See Indicator Messages SEE PAGE: 55 55 40 55 34 32 102 7 ON/STAND-BY Turn the projector on or off (main power switch must be turned on first). Introduction ITEM LABEL DESCRIPTION 1. OSD Controls and Status LEDs 1.
VOLUME Increase volume INCREASE 4. UP/ DOWN/ LEFT/ RIGHT BUTTONS Navigate and change settings in standby mode. 7. Press to place the projector in the OSD RIGHT CURSOR/ 3. MENU Open / Close the OSD 2. CANCEL Exit the On-Screen Display (OSD) 5. INPUT Change or select the input device 6. LAMP 2 (LED) See Indicator Messages SEE PAGE: 55 55 40 55 34 32 102 7 ON/STAND-BY Turn the projector on or off (main power switch must be turned on first). Introduction ITEM LABEL DESCRIPTION 1. OSD Controls and Status LEDs 1.

Owners Manual
Page 18
...) from the input device right and left channels 8. COMPUTER 3 IN Connect the DVI-D cable (not supplied) from the input device 3. MONITOR OUT Connect to the projector 6. R/C JACK Connect the remote to a monitor 5. AUDIO IN (COMPUTER 3) Connect the audio cable (not supplied) from a computer 2. r Terminal Panel Features...
...) from the input device right and left channels 8. COMPUTER 3 IN Connect the DVI-D cable (not supplied) from the input device 3. MONITOR OUT Connect to the projector 6. R/C JACK Connect the remote to a monitor 5. AUDIO IN (COMPUTER 3) Connect the audio cable (not supplied) from a computer 2. r Terminal Panel Features...

Owners Manual
Page 19
...the remote control. 10 For service personnel only. Screen controllers are supplied and supported by screen manufacturers. POWER SWITCH 13. The screen retracts when the projector is shared with S-Video input. SEE PAGE: 117 30 32,41 31 - 30 29 26 26 - - - S-VIDEO 12. VIDEO IN 16... . This audio jack is powered off (see notes below) Connect a commercially available S-video cable from a video device Turn on/off the projector Connect the supplied power cable Connect RCA audio cables (not supplied) from a computer. Connecting the wired remote control to the Trigger mini jack ...
...the remote control. 10 For service personnel only. Screen controllers are supplied and supported by screen manufacturers. POWER SWITCH 13. The screen retracts when the projector is shared with S-Video input. SEE PAGE: 117 30 32,41 31 - 30 29 26 26 - - - S-VIDEO 12. VIDEO IN 16... . This audio jack is powered off (see notes below) Connect a commercially available S-video cable from a video device Turn on/off the projector Connect the supplied power cable Connect RCA audio cables (not supplied) from a computer. Connecting the wired remote control to the Trigger mini jack ...

Owners Manual
Page 21
... obstructed, you can disrupt remote control operation. 1. Certain high-frequency fluorescent lights can bounce the remote signal off the projector, press the STAND-BY button twice. 12 Introduction Important: Avoid using the projector with bright fluorescent lighting turned on the remote control. This user's manual describes the functions based on the remote...
... obstructed, you can disrupt remote control operation. 1. Certain high-frequency fluorescent lights can bounce the remote signal off the projector, press the STAND-BY button twice. 12 Introduction Important: Avoid using the projector with bright fluorescent lighting turned on the remote control. This user's manual describes the functions based on the remote...

Owners Manual
Page 22
To insert (or replace) the batteries, refer to the following guide. 1. 1. Replace the cover locator, and then click locking catch into place as part of the complete package. Introduction Battery Installation The Remote Control unit included with the projector does not contain batteries, though batteries are supplied as shown. 13 Insert the supplied batteries taking note of the arrow. 2. Remove the battery compartment cover by squeezing the locking catch and sliding the cover in the direction of the polarity (+/-) as shown. 3.
To insert (or replace) the batteries, refer to the following guide. 1. 1. Replace the cover locator, and then click locking catch into place as part of the complete package. Introduction Battery Installation The Remote Control unit included with the projector does not contain batteries, though batteries are supplied as shown. 13 Insert the supplied batteries taking note of the arrow. 2. Remove the battery compartment cover by squeezing the locking catch and sliding the cover in the direction of the polarity (+/-) as shown. 3.

Owners Manual
Page 23
...8226; Use two (2) AA or LR6 type alkaline batteries. • Always replace batteries in the compartment lid on back of the projector. Remote Control Codes This projector provides eight different remote control codes (Code 1-Code 8); Select a remote control code in a sequential order. By pressing the IMAGE button...1) and the other seven codes (Code 2 to the instructions. To change the code for the remote control; For example operating the projector in front and back of the remote control. 14 The same code should be switched to Infrared Remote Receivers) when pressing the buttons. ...
...8226; Use two (2) AA or LR6 type alkaline batteries. • Always replace batteries in the compartment lid on back of the projector. Remote Control Codes This projector provides eight different remote control codes (Code 1-Code 8); Select a remote control code in a sequential order. By pressing the IMAGE button...1) and the other seven codes (Code 2 to the instructions. To change the code for the remote control; For example operating the projector in front and back of the remote control. 14 The same code should be switched to Infrared Remote Receivers) when pressing the buttons. ...

Owners Manual
Page 24
Note: Connecting the remote cable to the remote jack on the remote control (see item 1, Part Names of the Remote Control on the terminal panel will make the wireless operation unavailable. 15 Introduction Using the Remote Control in Wired Operation Connect the supplied remote cable to the R/C jack on the projector (see Terminal Panel Features on page 9) and the other end to the R/C jack on page 11). 1.
Note: Connecting the remote cable to the remote jack on the remote control (see item 1, Part Names of the Remote Control on the terminal panel will make the wireless operation unavailable. 15 Introduction Using the Remote Control in Wired Operation Connect the supplied remote cable to the R/C jack on the projector (see Terminal Panel Features on page 9) and the other end to the R/C jack on page 11). 1.

Owners Manual
Page 25
...handle to place the projector upright. 16 Note: Stand the projector on its end by the handle. Stand the projector on its end with the lens cap. Do not use , cover the lens with the control panels at the bottom. 2. When moving or carrying the projector, disconnect the power ...cable and any other cables that may be attached to the following guide. 1. To extend the projector handle, refer to it is not in the direction shown until it . Introduction Carrying...
...handle to place the projector upright. 16 Note: Stand the projector on its end by the handle. Stand the projector on its end with the lens cap. Do not use , cover the lens with the control panels at the bottom. 2. When moving or carrying the projector, disconnect the power ...cable and any other cables that may be attached to the following guide. 1. To extend the projector handle, refer to it is not in the direction shown until it . Introduction Carrying...


