
User Manual
Page 1
INSTRUCTION MANUAL Dual Camera VPC-FH1EX VPC-FH1 VPC-FH1GX Important note This manual explains how to read these products will be labeled as such. Keep this manual in a safe place for later reference. Any information regarding only one of these instructions carefully before using the camera. Please read and understand the separate booklet "SAFETY MANUAL". Make sure to safely operate the VPC-FH1EX, VPC-FH1 and VPC-FH1GX.
INSTRUCTION MANUAL Dual Camera VPC-FH1EX VPC-FH1 VPC-FH1GX Important note This manual explains how to read these products will be labeled as such. Keep this manual in a safe place for later reference. Any information regarding only one of these instructions carefully before using the camera. Please read and understand the separate booklet "SAFETY MANUAL". Make sure to safely operate the VPC-FH1EX, VPC-FH1 and VPC-FH1GX.

User Manual
Page 2
... into an outlet on , the user is subject to correct the interference by the party responsible for help. Declaration of Conformity Model number: VPC-FH1 Trade Name: SANYO Responsible party: SANYO FISHER COMPANY Address: 21605 Plummer Street, Chatsworth, California 91311 Telephone No.: (818) 998-7322 This device complies with the laws of the...
... into an outlet on , the user is subject to correct the interference by the party responsible for help. Declaration of Conformity Model number: VPC-FH1 Trade Name: SANYO Responsible party: SANYO FISHER COMPANY Address: 21605 Plummer Street, Chatsworth, California 91311 Telephone No.: (818) 998-7322 This device complies with the laws of the...

User Manual
Page 3
... concentration. English ii The symbol mark means that the battery or accumulator contains a heavy metal at your household waste. SANYO FISHER Sales (Europe) GmbH Stahlgruberring 4, D-81829 München, Germany SANYO Electric Co., Ltd. 1-1, Sanyo-cho, Daito City, Osaka 574-8534, Japan FOR RUSSIAN USERS This product is certified by the Russian Federation. This...
... concentration. English ii The symbol mark means that the battery or accumulator contains a heavy metal at your household waste. SANYO FISHER Sales (Europe) GmbH Stahlgruberring 4, D-81829 München, Germany SANYO Electric Co., Ltd. 1-1, Sanyo-cho, Daito City, Osaka 574-8534, Japan FOR RUSSIAN USERS This product is certified by the Russian Federation. This...

User Manual
Page 4
HOW TO READ THIS MANUAL For first-time users Please read the sections on "SETUP" and "SIMPLE" in this manual, as well as the included "QUICK GUIDE" to familiarize yourself with your camera's operation. ↓ To use a computer to edit the recorded data or to save data to a DVD, please read the "Xacti Software CD INSTRUCTION MANUAL". You may find the answers to . Symbols used in this manual HINT Points giving some extended instructions or special points to pay attention to questions or problems concerning camera operation in the sections "COMMONLY ASKED QUESTIONS" (page 153) and "...
HOW TO READ THIS MANUAL For first-time users Please read the sections on "SETUP" and "SIMPLE" in this manual, as well as the included "QUICK GUIDE" to familiarize yourself with your camera's operation. ↓ To use a computer to edit the recorded data or to save data to a DVD, please read the "Xacti Software CD INSTRUCTION MANUAL". You may find the answers to . Symbols used in this manual HINT Points giving some extended instructions or special points to pay attention to questions or problems concerning camera operation in the sections "COMMONLY ASKED QUESTIONS" (page 153) and "...

User Manual
Page 5
h An SD Memory Card is referred to the camera. Please purchase a commercially sold card. Monitor unit 1 Open Card slot cover 2 Open SD Memory Card 3 Insert 2 Connect the AC adaptor to as the "card". h In this manual, the SD Memory Card is not included with your camera. DC IN terminal cover 1 Open AC adaptor To power outlet English iv SHOOT, PLAY BACK AND SAVE Preparing the camera 1 Insert the SD Memory Card.
h An SD Memory Card is referred to the camera. Please purchase a commercially sold card. Monitor unit 1 Open Card slot cover 2 Open SD Memory Card 3 Insert 2 Connect the AC adaptor to as the "card". h In this manual, the SD Memory Card is not included with your camera. DC IN terminal cover 1 Open AC adaptor To power outlet English iv SHOOT, PLAY BACK AND SAVE Preparing the camera 1 Insert the SD Memory Card.
User Manual
Page 6
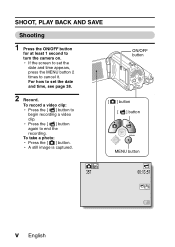
To take a photo: h Press the [ ] button. To record a video clip: h Press the [ ] button to end the recording. For how to set the date and time appears, press the MENU button 2 times to cancel it. h Press the [ ] button again to begin recording a video clip. h A still image is captured. h If the screen to turn the camera on. SHOOT, PLAY BACK AND SAVE Shooting 1 Press the ON/OFF button for at least 1 second to set the date and time, see page 38. 2 Record. ON/OFF button [ ] button [ ] button MENU button 357 00:13:51 v English
To take a photo: h Press the [ ] button. To record a video clip: h Press the [ ] button to end the recording. For how to set the date and time appears, press the MENU button 2 times to cancel it. h Press the [ ] button again to begin recording a video clip. h A still image is captured. h If the screen to turn the camera on. SHOOT, PLAY BACK AND SAVE Shooting 1 Press the ON/OFF button for at least 1 second to set the date and time, see page 38. 2 Record. ON/OFF button [ ] button [ ] button MENU button 357 00:13:51 v English
User Manual
Page 7
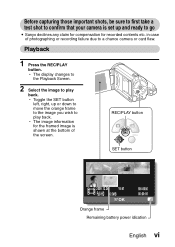
... to the image you wish to play back. Playback 1 Press the REC/PLAY button. h Toggle the SET button left, right, up and ready to go i Sanyo declines any claim for compensation for the framed image is shown at the bottom of photographing or recording failure due to a chance camera or card...
... to the image you wish to play back. Playback 1 Press the REC/PLAY button. h Toggle the SET button left, right, up and ready to go i Sanyo declines any claim for compensation for the framed image is shown at the bottom of photographing or recording failure due to a chance camera or card...
User Manual
Page 8
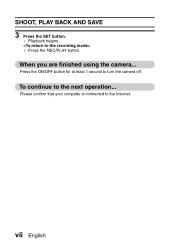
When you are finished using the camera... Press the ON/OFF button for at least 1 second to the Internet. vii English SHOOT, PLAY BACK AND SAVE 3 Press the SET button. Please confirm that your computer is connected to turn the camera off. h Playback begins. h Press the REC/PLAY button. To continue to the next operation...
When you are finished using the camera... Press the ON/OFF button for at least 1 second to the Internet. vii English SHOOT, PLAY BACK AND SAVE 3 Press the SET button. Please confirm that your computer is connected to turn the camera off. h Playback begins. h Press the REC/PLAY button. To continue to the next operation...
User Manual
Page 9
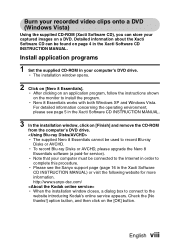
...for more information. h Note that your computer must be used to complete this procedure. For detailed information concerning the operating environment, please see the Sanyo support page (page 16 in the Xacti Software CD INSTRUCTION MANUAL. 3 In the installation window, click on a DVD. English viii h Please...the Xacti Software CD can store your captured images on [Finish] and remove the CD-ROM from the computer's DVD drive. http://www.sanyo-dsc.com/ h When the installation window closes, a dialog box to connect to install the program. h Nero 8 Essentials works with ...
...for more information. h Note that your computer must be used to complete this procedure. For detailed information concerning the operating environment, please see the Sanyo support page (page 16 in the Xacti Software CD INSTRUCTION MANUAL. 3 In the installation window, click on a DVD. English viii h Please...the Xacti Software CD can store your captured images on [Finish] and remove the CD-ROM from the computer's DVD drive. http://www.sanyo-dsc.com/ h When the installation window closes, a dialog box to connect to install the program. h Nero 8 Essentials works with ...
User Manual
Page 10
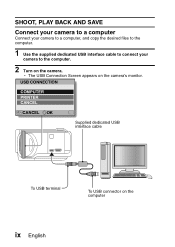
USB CONNECTION COMPUTER PRINTER CANCEL CANCEL OK Supplied dedicated USB interface cable To USB terminal To USB connector on the camera. SHOOT, PLAY BACK AND SAVE Connect your camera to a computer Connect your camera to a computer, and copy the desired files to the computer. 1 Use the supplied dedicated USB interface cable to connect your camera to the computer. 2 Turn on the computer ix English h The USB Connection Screen appears on the camera's monitor.
USB CONNECTION COMPUTER PRINTER CANCEL CANCEL OK Supplied dedicated USB interface cable To USB terminal To USB connector on the camera. SHOOT, PLAY BACK AND SAVE Connect your camera to a computer Connect your camera to a computer, and copy the desired files to the computer. 1 Use the supplied dedicated USB interface cable to connect your camera to the computer. 2 Turn on the computer ix English h The USB Connection Screen appears on the camera's monitor.

User Manual
Page 11
... screen to copy all the camera's still image and video clip files at once, please see the support pages at the website below: http://www.sanyo-dsc.com/ English x h The card is recognized as a disk, and the [XACTI (E:)] icon appears in the task tray, showing that the camera is ... Software CD INSTRUCTION MANUAL]). h The drive name (E:) may be different on the hard disk to which to the computer's hard disk. XACTI (E:)\DCIM\***SANYO (*** represents numbers [page 12 in the following folder. h The data recorded with your computer. 3 Select "COMPUTER", and press the SET button.
... screen to copy all the camera's still image and video clip files at once, please see the support pages at the website below: http://www.sanyo-dsc.com/ English x h The card is recognized as a disk, and the [XACTI (E:)] icon appears in the task tray, showing that the camera is ... Software CD INSTRUCTION MANUAL]). h The drive name (E:) may be different on the hard disk to which to the computer's hard disk. XACTI (E:)\DCIM\***SANYO (*** represents numbers [page 12 in the following folder. h The data recorded with your computer. 3 Select "COMPUTER", and press the SET button.

User Manual
Page 12
h The specifications for Nero Vision. For information on other operations, please see the Help file for the Nero 8 Essentials edition that is included with your camera are different from those of the commercially sold edition. To access the Nero Vision Help file, click the [?] button on the Nero Vision start screen appears. h Nero Vision starts up, and the start screen. 1 Insert a blank DVD in your recorded data onto a DVD in the mpeg2 format. SHOOT, PLAY BACK AND SAVE Burn video clips onto a DVD (For Windows Vista users) Here's how to write your computer's DVD drive. 2 Click ...
h The specifications for Nero Vision. For information on other operations, please see the Help file for the Nero 8 Essentials edition that is included with your camera are different from those of the commercially sold edition. To access the Nero Vision Help file, click the [?] button on the Nero Vision start screen appears. h Nero Vision starts up, and the start screen. 1 Insert a blank DVD in your recorded data onto a DVD in the mpeg2 format. SHOOT, PLAY BACK AND SAVE Burn video clips onto a DVD (For Windows Vista users) Here's how to write your computer's DVD drive. 2 Click ...

User Manual
Page 13
h The number of each screen. 3 Under the "What would you can find an explanation of times for example), please follow the instructions on the screen to use the functions) via the Internet or FAX appears. h The Hints window opens, in which you like to import and export MPEG-2 type files. When this limitation has been exceeded (by multiple installations, for third party patent activation is necessary in the Hints window select [Disable]. 4 Click on "Third party patent activation" on [DVD-video]. h The screen to activate third party patent activation (the certification process ...
h The number of each screen. 3 Under the "What would you can find an explanation of times for example), please follow the instructions on the screen to use the functions) via the Internet or FAX appears. h The Hints window opens, in which you like to import and export MPEG-2 type files. When this limitation has been exceeded (by multiple installations, for third party patent activation is necessary in the Hints window select [Disable]. 4 Click on "Third party patent activation" on [DVD-video]. h The screen to activate third party patent activation (the certification process ...

User Manual
Page 14
h Click on a file to burn to DVD opens. 7 Click on the files while holding down the [Ctrl] key. h The screen to do?" heading, click [Add video files]. xiii English SHOOT, PLAY BACK AND SAVE 5 Click the [Close] button. h The window to select files to burn to DVD. h Click the [Back] button. 6 Under the "What would you like to make a DVD-video opens.
h Click on a file to burn to DVD opens. 7 Click on the files while holding down the [Ctrl] key. h The screen to do?" heading, click [Add video files]. xiii English SHOOT, PLAY BACK AND SAVE 5 Click the [Close] button. h The window to select files to burn to DVD. h Click the [Back] button. 6 Under the "What would you like to make a DVD-video opens.

User Manual
Page 15
h A pulldown menu appears. 2 Click [Remove]. English xiv h When you wish to play the file appears. Click the [Next] button when you want to return to the previous window. 1 Right-click on the file in the "Content" field that you double-click a file in the "Content" field. h The selected files are shown in the "Content" field, the window to deselect. 8 Click the [Open] button. h The selected file is removed from the "Content" field.
h A pulldown menu appears. 2 Click [Remove]. English xiv h When you wish to play the file appears. Click the [Next] button when you want to return to the previous window. 1 Right-click on the file in the "Content" field that you double-click a file in the "Content" field. h The selected files are shown in the "Content" field, the window to deselect. 8 Click the [Open] button. h The selected file is removed from the "Content" field.

User Manual
Page 16
xv English SHOOT, PLAY BACK AND SAVE 9 Click the [Next] button. h The window to edit the disk menu appears.
xv English SHOOT, PLAY BACK AND SAVE 9 Click the [Next] button. h The window to edit the disk menu appears.
User Manual
Page 17
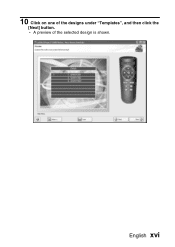
English xvi 10 Click on one of the selected design is shown. h A preview of the designs under "Templates", and then click the [Next] button.
English xvi 10 Click on one of the selected design is shown. h A preview of the designs under "Templates", and then click the [Next] button.
User Manual
Page 18
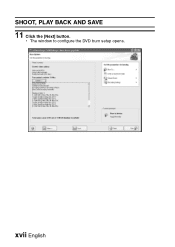
xvii English h The window to configure the DVD burn setup opens. SHOOT, PLAY BACK AND SAVE 11 Click the [Next] button.
xvii English h The window to configure the DVD burn setup opens. SHOOT, PLAY BACK AND SAVE 11 Click the [Next] button.
User Manual
Page 19
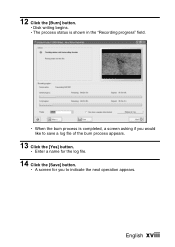
h Enter a name for you would like to indicate the next operation appears. hThe process status is completed, a screen asking if you to save a log file of the burn process appears. 13 Click the [Yes] button. h A screen for the log file. 14 Click the [Save] button. English xviii 12 Click the [Burn] button. h When the burn process is shown in the "Recording progress" field. hDisk writing begins.
h Enter a name for you would like to indicate the next operation appears. hThe process status is completed, a screen asking if you to save a log file of the burn process appears. 13 Click the [Yes] button. h A screen for the log file. 14 Click the [Save] button. English xviii 12 Click the [Burn] button. h When the burn process is shown in the "Recording progress" field. hDisk writing begins.
User Manual
Page 20
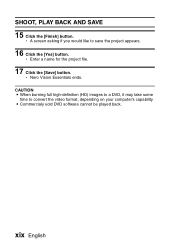
i Commercialy sold DVD software cannot be played back. h Nero Vision Essentials ends. xix English CAUTION i When burning full high-definition (HD) images to a DVD, it may take some time to save the project appears. 16 Click the [Yes] button. h A screen asking if you would like to convert the video format, depending on your computer's capability. h Enter a name for the project file. 17 Click the [Save] button. SHOOT, PLAY BACK AND SAVE 15 Click the [Finish] button.
i Commercialy sold DVD software cannot be played back. h Nero Vision Essentials ends. xix English CAUTION i When burning full high-definition (HD) images to a DVD, it may take some time to save the project appears. 16 Click the [Yes] button. h A screen asking if you would like to convert the video format, depending on your computer's capability. h Enter a name for the project file. 17 Click the [Save] button. SHOOT, PLAY BACK AND SAVE 15 Click the [Finish] button.
