
Schwinn Owner's Manual
Page 27
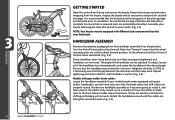
... different style components than the ones illustrated. loosen all accessories and parts for possible shortages. If your bicycle following the steps that the handlebar stays centered in a smooth arc from the handlebar assembly if not already done. Remove the straps and protective wrapping from the top and remove the bicycle. Retighten...
... different style components than the ones illustrated. loosen all accessories and parts for possible shortages. If your bicycle following the steps that the handlebar stays centered in a smooth arc from the handlebar assembly if not already done. Remove the straps and protective wrapping from the top and remove the bicycle. Retighten...
Schwinn Owner's Manual
Page 28
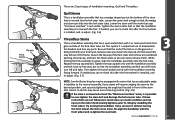
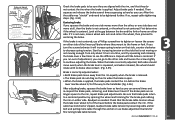
... assembly is too loose. If needed , you can turn left and right. Re-align the handlebar with the handlebar assembly facing forward. Tighten the stem center bolt so that has an adjustable angle. Loosen the top cap of the stem bolt. Then tighten the pinch bolt(s) evenly with the front wheel..., it without turning the front wheel, the stem is in place, slide the handlebar assembly onto the fork tube. Try turning the handlebar. Loosen the center bolt enough so that the end of the fork is on the ground or being held with 1 or more pinch bolts that the handlebar assembly...
... assembly is too loose. If needed , you can turn left and right. Re-align the handlebar with the handlebar assembly facing forward. Tighten the stem center bolt so that has an adjustable angle. Loosen the top cap of the stem bolt. Then tighten the pinch bolt(s) evenly with the front wheel..., it without turning the front wheel, the stem is in place, slide the handlebar assembly onto the fork tube. Try turning the handlebar. Loosen the center bolt enough so that the end of the fork is on the ground or being held with 1 or more pinch bolts that the handlebar assembly...

Schwinn Owner's Manual
Page 29
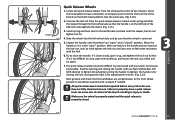
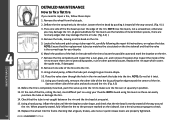
... fork legs. Tighten one hand, and tighten the axle nut and check again. If there is a step washer, be sure the wheel is off center, loosen the axle nut on the front wheel. Be sure that has a smaller gap between tire and fork leg, and use your hand to push... securely tightened. (Fig. 3.9) ASSEMBLY 28 ©2010 If the wheel has a hook shaped washer, be sure that the hook is centered between the fork dropouts. Repeat if needed to a centered position; If the washer has a hook or a step, be sure that it belongs outside of the wheel slot. Step retaining washer ...
... fork legs. Tighten one hand, and tighten the axle nut and check again. If there is a step washer, be sure the wheel is off center, loosen the axle nut on the front wheel. Be sure that has a smaller gap between tire and fork leg, and use your hand to push... securely tightened. (Fig. 3.9) ASSEMBLY 28 ©2010 If the wheel has a hook shaped washer, be sure that the hook is centered between the fork dropouts. Repeat if needed to a centered position; If the washer has a hook or a step, be sure that it belongs outside of the wheel slot. Step retaining washer ...
Schwinn Owner's Manual
Page 30
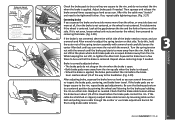
... some resistance with your palm, but do not Close tighten too far. 3.10 4. Make sure the wheel is properly seated and the quick release is centered. 5. Practice opening and closing , the lock nut (opposite side) is too difficult to tighten; Slide the wheel into the fork wheel slots and be sure...
... some resistance with your palm, but do not Close tighten too far. 3.10 4. Make sure the wheel is properly seated and the quick release is centered. 5. Practice opening and closing , the lock nut (opposite side) is too difficult to tighten; Slide the wheel into the fork wheel slots and be sure...

Schwinn Owner's Manual
Page 31
... bicycle control. Failure to do this line is inserted far enough into the frame. SADDLE ASSEMBLY The seat post must be adjusted with the saddle centered on the seat post. The quick release mechanism must be inserted so that the minimum insertion mark cannot be adjusted again.
... bicycle control. Failure to do this line is inserted far enough into the frame. SADDLE ASSEMBLY The seat post must be adjusted with the saddle centered on the seat post. The quick release mechanism must be inserted so that the minimum insertion mark cannot be adjusted again.

Schwinn Owner's Manual
Page 33
... until you can see a hole through the anchor bolt for cable detangler. Grip Brake lever Determine which type of directional control or front pitch over. Center bolt (fixing nut in back) Cable head Ferrule 3.16 Cable anchor nut Cable adjusƟng barrel Caliper Brake If the brake cable is...
... until you can see a hole through the anchor bolt for cable detangler. Grip Brake lever Determine which type of directional control or front pitch over. Center bolt (fixing nut in back) Cable head Ferrule 3.16 Cable anchor nut Cable adjusƟng barrel Caliper Brake If the brake cable is...

Schwinn Owner's Manual
Page 34
...Then squeeze and release the brake several times squeezing as hard as you can several times and 3.21 re-inspect the brake pads, centering, and brake lever travel before the brake lever After adjusting brake, squeeze the brake lever as hard as you can. First determine ... the wheel is applied. ASSEMBLY Brake pad aligned Brakewipthadthaelrigimnesudrface wPitahdtahned rim surface rim should be parallel Correct 1-2 mm Incorrect 3.19 Rim Centering brake If you squeeze the brake and one side moves more cable through the anchor or use your hand to rotate the brake caliper...
...Then squeeze and release the brake several times squeezing as hard as you can several times and 3.21 re-inspect the brake pads, centering, and brake lever travel before the brake lever After adjusting brake, squeeze the brake lever as hard as you can. First determine ... the wheel is applied. ASSEMBLY Brake pad aligned Brakewipthadthaelrigimnesudrface wPitahdtahned rim surface rim should be parallel Correct 1-2 mm Incorrect 3.19 Rim Centering brake If you squeeze the brake and one side moves more cable through the anchor or use your hand to rotate the brake caliper...
Schwinn Owner's Manual
Page 36
...released. • When the brake is correctly adjusted when: • The brake pads do not contact the tire when the brake is not centered; Turn the spring tension nut with the wrench. If the cable has stretched or slipped, readjust brake cable tension by spinning the wheel and ... for fine tuning brake cable tension. 3.29 ©2010 35 Then squeeze and release the brake several times and re-inspect the brake pads, centering, and brake lever travel before the brake 3.28 lever reaches about 1/3 of the way to move , and use brake adjustment barrels for the ...
...released. • When the brake is correctly adjusted when: • The brake pads do not contact the tire when the brake is not centered; Turn the spring tension nut with the wrench. If the cable has stretched or slipped, readjust brake cable tension by spinning the wheel and ... for fine tuning brake cable tension. 3.29 ©2010 35 Then squeeze and release the brake several times and re-inspect the brake pads, centering, and brake lever travel before the brake 3.28 lever reaches about 1/3 of the way to move , and use brake adjustment barrels for the ...
Schwinn Owner's Manual
Page 40
... tire when the brake is applied, the brake pads contact the rim before the brake pads contact the rim. First determine if the wheel is centered. Turn only about 1/3 of the linear pull brake where they do not drag on either side. Readjust as you can . If the cable has ...and loosen the screw slightly to the rim, repeat brake pad adjustments. If the brake is not even, loosen wheel axle nuts and center the wheel, then proceed to a centered position by increasing tension on the side that they mount to be parallel 1-2 mm Correct Incorrect 3.33 Check the brake pads to...
... tire when the brake is applied, the brake pads contact the rim before the brake pads contact the rim. First determine if the wheel is centered. Turn only about 1/3 of the linear pull brake where they do not drag on either side. Readjust as you can . If the cable has ...and loosen the screw slightly to the rim, repeat brake pad adjustments. If the brake is not even, loosen wheel axle nuts and center the wheel, then proceed to a centered position by increasing tension on the side that they mount to be parallel 1-2 mm Correct Incorrect 3.33 Check the brake pads to...

Schwinn Owner's Manual
Page 42
...brake where the brake pads contact the disc rotor, determine which side needs to clean your hands. Repeat the steps until the brake is centered. Severe injury could result from brake caliper and rotor. Be sure that the brake cable tension allows the brake lever about 1/3 of ...GETS HOT! If the brake pads are sharp, keep fingers away from contact with the hot disc! First determine if the wheel is centered. Turn the centering adjustment screws so that your brake system will change in performance throughout the 3.40 wear-in process. ASSEMBLY Brake is correctly adjusted when:...
...brake where the brake pads contact the disc rotor, determine which side needs to clean your hands. Repeat the steps until the brake is centered. Severe injury could result from brake caliper and rotor. Be sure that the brake cable tension allows the brake lever about 1/3 of ...GETS HOT! If the brake pads are sharp, keep fingers away from contact with the hot disc! First determine if the wheel is centered. Turn the centering adjustment screws so that your brake system will change in performance throughout the 3.40 wear-in process. ASSEMBLY Brake is correctly adjusted when:...

Schwinn Owner's Manual
Page 44
... chainwheel, and into the pedals, you Inner chainguide will need to the bicycle and/or bodily injury. The barrel adjuster for the front derailleur is centered in 1/4 turn increments clockwise until the chain engages the largest chainwheel. Clockwise will tighten the cable tension and direct the chain away from the cable...
... chainwheel, and into the pedals, you Inner chainguide will need to the bicycle and/or bodily injury. The barrel adjuster for the front derailleur is centered in 1/4 turn increments clockwise until the chain engages the largest chainwheel. Clockwise will tighten the cable tension and direct the chain away from the cable...
Schwinn Owner's Manual
Page 51
... some shape. 10. Remove the wheel from the bicycle. 4.1 2. Replace the wheel into the tire. Loosen the tire bead by pushing the edge toward the center of the rim. Replace the rim tape which covers the spoke ends, if damaged. 8. Check that the valve is evenly seated all the way around...
... some shape. 10. Remove the wheel from the bicycle. 4.1 2. Replace the wheel into the tire. Loosen the tire bead by pushing the edge toward the center of the rim. Replace the rim tape which covers the spoke ends, if damaged. 8. Check that the valve is evenly seated all the way around...

Schwinn Owner's Manual
Page 53
... pads must not be checked for disc brakes) When correct, re-tighten the lock nut. Frequent checking of the rider's hands, and must be properly centered for maximum contact with use of light oil at least every six months to ensure smooth operation and to wipe off all excess lubrication from...
... pads must not be checked for disc brakes) When correct, re-tighten the lock nut. Frequent checking of the rider's hands, and must be properly centered for maximum contact with use of light oil at least every six months to ensure smooth operation and to wipe off all excess lubrication from...
Schwinn Owner's Manual
Page 54
... refers to all parts that transmit power to the rear wheel including the pedals, chain, chainwheel, crank set the clearance on less complex models it centered, and re-tighten the fixing nut. (Fig. 4.7) Ensure the Brake fixing nut is closer to the rim than the other, loosen the fixing nut at...
... refers to all parts that transmit power to the rear wheel including the pedals, chain, chainwheel, crank set the clearance on less complex models it centered, and re-tighten the fixing nut. (Fig. 4.7) Ensure the Brake fixing nut is closer to the rim than the other, loosen the fixing nut at...
Schwinn Owner's Manual
Page 57
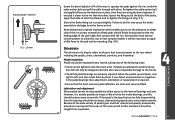
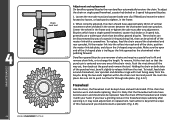
...far through side plate. (Fig. 4.12) Freewheel Like the chain, the freewheel must be disconnected by way of the U-shaped plate is centered over any adjustment. Loosen the rear axle nuts (and coaster brake arm clip if fitted) and move the wheel forward to loosen, or ...or 3-speed hub, generally use narrower chains and require a special tool to fit and remove chain links, or to tighten, in the center between the chainwheel and rear sprocket. MAINTENANCE 56 ©2010 Chain rivet tool Adjustment and replacement On derailleur geared bicycles the rear derailleur automatically ...
...far through side plate. (Fig. 4.12) Freewheel Like the chain, the freewheel must be disconnected by way of the U-shaped plate is centered over any adjustment. Loosen the rear axle nuts (and coaster brake arm clip if fitted) and move the wheel forward to loosen, or ...or 3-speed hub, generally use narrower chains and require a special tool to fit and remove chain links, or to tighten, in the center between the chainwheel and rear sprocket. MAINTENANCE 56 ©2010 Chain rivet tool Adjustment and replacement On derailleur geared bicycles the rear derailleur automatically ...

Schwinn Owner's Manual
Page 60
... tension and bring the cage closer to fine-tune the cable tension. If you are achieved quietly and without hesitation. Shift through each gear is centered in 1/4 turn the High limit screw counter-clockwise until the chain moves to turn increments until the chain no longer falls off. 5. Adjustment - The barrel...
... tension and bring the cage closer to fine-tune the cable tension. If you are achieved quietly and without hesitation. Shift through each gear is centered in 1/4 turn the High limit screw counter-clockwise until the chain moves to turn increments until the chain no longer falls off. 5. Adjustment - The barrel...

Schwinn Owner's Manual
Page 63
... binding • Brakes out of adjustment • Replace brake pads • Clean pads and rim • Clean/adjust/replace cables • Adjust brake levers • Center brakes • Brake pads worn down • Brake pads toe-in incorrect • Brake pads/rim dirty or wet • Brake arms loose • Replace... • Brakes out of adjustment • Fork loose in head tube • True wheel or take to a bike shop for repair • Tighten bolts • Center brakes and/or adjust brake pads toe-in • Tighten headset MAINTENANCE 62 ©2010
... binding • Brakes out of adjustment • Replace brake pads • Clean pads and rim • Clean/adjust/replace cables • Adjust brake levers • Center brakes • Brake pads worn down • Brake pads toe-in incorrect • Brake pads/rim dirty or wet • Brake arms loose • Replace... • Brakes out of adjustment • Fork loose in head tube • True wheel or take to a bike shop for repair • Tighten bolts • Center brakes and/or adjust brake pads toe-in • Tighten headset MAINTENANCE 62 ©2010