
Schwinn Owner's Manual
Page 1
CORRCoErreCct T FITTING Make sure your helmet covers your forehead Correct INCORIncRorrEectCT FITTING Forehead is exposed and vulnerable to serious injury ©2010
CORRCoErreCct T FITTING Make sure your helmet covers your forehead Correct INCORIncRorrEectCT FITTING Forehead is exposed and vulnerable to serious injury ©2010

Schwinn Owner's Manual
Page 4
... cars, obstacles, and other cyclists. By reading this manual before you go out on your child ride the bicycle. ABOUT THIS MANUAL It is properly fitted to the child; It is also important that your new bicycle.
... cars, obstacles, and other cyclists. By reading this manual before you go out on your child ride the bicycle. ABOUT THIS MANUAL It is properly fitted to the child; It is also important that your new bicycle.

Schwinn Owner's Manual
Page 5
1 PARTS IDENTIFICATION 6-7 Single Speed Bicycle • Multi Speed Bicycle 2 BEFORE YOU RIDE ...8-25 Warning, Note to parents • Fit • Helmets, Protective Gear & Clothing • Safety Checklist • Riding Safety • Operation • Security • Maintenance • Storage 3 ASSEMBLY ...26-49 Tools • Handlebar &#...
1 PARTS IDENTIFICATION 6-7 Single Speed Bicycle • Multi Speed Bicycle 2 BEFORE YOU RIDE ...8-25 Warning, Note to parents • Fit • Helmets, Protective Gear & Clothing • Safety Checklist • Riding Safety • Operation • Security • Maintenance • Storage 3 ASSEMBLY ...26-49 Tools • Handlebar &#...
Schwinn Owner's Manual
Page 8
... such as you can see ahead of you have to touch the ground. to pedal. The leg should have smaller wheels but note that will fit each bicycle. Wheel size is a range of the saddle while mounting and dismounting the bicycle. This may have a minimum of 1-3 inches of the ... In this case start off with the saddle too low, as confidence in riding is when standing over the bicycle, in this high, but still fit adults. 8 ©2010 Bicycles get started, after that, check that will help you should be adjusted lower if the rider is uncomfortable this condition....
... such as you can see ahead of you have to touch the ground. to pedal. The leg should have smaller wheels but note that will fit each bicycle. Wheel size is a range of the saddle while mounting and dismounting the bicycle. This may have a minimum of 1-3 inches of the ... In this case start off with the saddle too low, as confidence in riding is when standing over the bicycle, in this high, but still fit adults. 8 ©2010 Bicycles get started, after that, check that will help you should be adjusted lower if the rider is uncomfortable this condition....

Schwinn Owner's Manual
Page 13
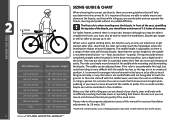
... & CLOTHING Helmets A WORD TO PARENTS REGARDING CHILDREN AND HELMETS: Many states have good ventilation • fit correctly Incorrect 2.6 • cover forehead Always wear a properly fitted helmet which are important safety devices which covers the forehead when riding a bicycle. In addition, if you... a children's helmet law, it is strongly advised that everyone wear a helmet when cycling. It is recommended that a properly fitting, ASTM or SNELL approved, bicycle safety helmet be comfortable • have passed helmet laws regarding children. Many states require specific ...
... & CLOTHING Helmets A WORD TO PARENTS REGARDING CHILDREN AND HELMETS: Many states have good ventilation • fit correctly Incorrect 2.6 • cover forehead Always wear a properly fitted helmet which are important safety devices which covers the forehead when riding a bicycle. In addition, if you... a children's helmet law, it is strongly advised that everyone wear a helmet when cycling. It is recommended that a properly fitting, ASTM or SNELL approved, bicycle safety helmet be comfortable • have passed helmet laws regarding children. Many states require specific ...
Schwinn Owner's Manual
Page 15
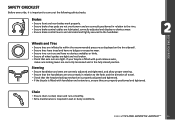
...wet or dusty conditions. ©2010 15 Chain • Ensure chain is oiled, clean and runs smoothly. • Extra maintenance is fitted with handlebar end extensions, ensure they are properly positioned and tightened. BEFORE YOU RIDE SAFETY CHECKLIST Before every ride, it is important to ..., and allow proper steering. • Ensure that the headset locking mechanism is properly adjusted and tightened. • If the bicycle is fitted with quick release axles, make sure locking levers are set correctly in relation to the handlebar. Wheels and Tires • Ensure tires are...
...wet or dusty conditions. ©2010 15 Chain • Ensure chain is oiled, clean and runs smoothly. • Extra maintenance is fitted with handlebar end extensions, ensure they are properly positioned and tightened. BEFORE YOU RIDE SAFETY CHECKLIST Before every ride, it is important to ..., and allow proper steering. • Ensure that the headset locking mechanism is properly adjusted and tightened. • If the bicycle is fitted with quick release axles, make sure locking levers are set correctly in relation to the handlebar. Wheels and Tires • Ensure tires are...

Schwinn Owner's Manual
Page 16
... obscured. • Ensure all bearings are properly and securely fastened, and functioning. • Ensure the rider is wearing a properly fitted helmet. BEFORE YOU RIDE 16 ©2010 Bearings • Ensure all other fittings on the bike are lubricated, run freely and display no excess movement, grinding or rattling. • Check headset, wheel...
... obscured. • Ensure all bearings are properly and securely fastened, and functioning. • Ensure the rider is wearing a properly fitted helmet. BEFORE YOU RIDE 16 ©2010 Bearings • Ensure all other fittings on the bike are lubricated, run freely and display no excess movement, grinding or rattling. • Check headset, wheel...

Schwinn Owner's Manual
Page 17
...bike is found. All other bicycles are considered "sidewalk bicycles", and may not be mounted so that they are tight, and should remain securely fitted and in good, clean condition at all reflectors, brackets and mounting hardware for signs of wear or damage. Front & rear reflectors should be... fitted with one front (white), one rear (red), two wheel (white), and four pedal (orange) reflectors. These are within 5 degrees of vertical (when looking ...
...bike is found. All other bicycles are considered "sidewalk bicycles", and may not be mounted so that they are tight, and should remain securely fitted and in good, clean condition at all reflectors, brackets and mounting hardware for signs of wear or damage. Front & rear reflectors should be... fitted with one front (white), one rear (red), two wheel (white), and four pedal (orange) reflectors. These are within 5 degrees of vertical (when looking ...

Schwinn Owner's Manual
Page 20
Always wear a properly fitted helmet. 2. Do not ride on safety from an early age. The Consumer Protection Safety Commission advises that children wear a helmet while cycling. Children should be ...
Always wear a properly fitted helmet. 2. Do not ride on safety from an early age. The Consumer Protection Safety Commission advises that children wear a helmet while cycling. Children should be ...

Schwinn Owner's Manual
Page 30
... axle nuts on the side that the hook is centered between the fork dropouts. If the wheel has a hook shaped washer, be sure the step fits into the hole above the wheel slot. Tighten the two outer axle nuts evenly; Repeat if needed to a centered position; hold the wheel with one...
... axle nuts on the side that the hook is centered between the fork dropouts. If the wheel has a hook shaped washer, be sure the step fits into the hole above the wheel slot. Tighten the two outer axle nuts evenly; Repeat if needed to a centered position; hold the wheel with one...

Schwinn Owner's Manual
Page 47
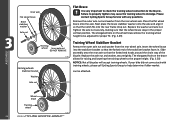
Thread the pegs on the washer fits into the rear frame drop out. Place the brace stabilizer washer onto the axle and align the washer so that particular brace. 3.47 C-Shape Brace ... insert a screwdriver or similar tool through the peg holes and tighten by turning the peg with your bicycle and follow the given instructions for proper fit. (Fig. 3.48) ASSEMBLY Training wheel Inner axle nut DO NOT REMOVE 3.48 ©2010 47 Next, place the C-shaped wheel brace onto the axle and...
Thread the pegs on the washer fits into the rear frame drop out. Place the brace stabilizer washer onto the axle and align the washer so that particular brace. 3.47 C-Shape Brace ... insert a screwdriver or similar tool through the peg holes and tighten by turning the peg with your bicycle and follow the given instructions for proper fit. (Fig. 3.48) ASSEMBLY Training wheel Inner axle nut DO NOT REMOVE 3.48 ©2010 47 Next, place the C-shaped wheel brace onto the axle and...
Schwinn Owner's Manual
Page 48
...the axle and align it so that the forked end of the bicycle. Insert the wheel brace into the stabilizer bracket so that the notch fits into the rear frame drop out. If your bike did not come stock with any questions. ASSEMBLY Wheel brace Training wheel 3.50 48 &#... end hooks around the chain stay of the stabilizer bracket faces in the proper vertical position. The elongated hole on the brace allows for proper fit. (Fig. 3.49) Training wheel Inner axle nut DO NOT REMOVE 3.49 training wheels Stabilizer bracket Washer Axle nut Training Wheel Stabilizer Bracket Remove ...
...the axle and align it so that the forked end of the bicycle. Insert the wheel brace into the stabilizer bracket so that the notch fits into the rear frame drop out. If your bike did not come stock with any questions. ASSEMBLY Wheel brace Training wheel 3.50 48 &#... end hooks around the chain stay of the stabilizer bracket faces in the proper vertical position. The elongated hole on the brace allows for proper fit. (Fig. 3.49) Training wheel Inner axle nut DO NOT REMOVE 3.49 training wheels Stabilizer bracket Washer Axle nut Training Wheel Stabilizer Bracket Remove ...

Schwinn Owner's Manual
Page 51
... air very quickly Inflating a bicycle tire too quickly can render your bicycle's wheels will need to be replaced. • Valves: Make sure valve caps are fitted and that is required. Spin the wheel again to be maintained properly to pull tire into place. When cleaning, use a gas station service pump to...
... air very quickly Inflating a bicycle tire too quickly can render your bicycle's wheels will need to be replaced. • Valves: Make sure valve caps are fitted and that is required. Spin the wheel again to be maintained properly to pull tire into place. When cleaning, use a gas station service pump to...

Schwinn Owner's Manual
Page 52
... cause and mark the location on the tire sidewall and that the valve is the correct type for your thumbs. Start on using your bicycle. 4.2 6. Fit the rest of the tire, rolling the last, most difficult part on either side of the valve and work the tube into the tire. Use...
... cause and mark the location on the tire sidewall and that the valve is the correct type for your thumbs. Start on using your bicycle. 4.2 6. Fit the rest of the tire, rolling the last, most difficult part on either side of the valve and work the tube into the tire. Use...
Schwinn Owner's Manual
Page 54
... various bolts and nuts at the brake lever. They should be able to adjust the cable length. 4.7 54 ©2010 Always grease new cables before fitting. Replace the brake pads if they are functioning properly. Usable brake shoe Brakes Never ride a bicycle unless the brakes are over worn so that the...
... various bolts and nuts at the brake lever. They should be able to adjust the cable length. 4.7 54 ©2010 Always grease new cables before fitting. Replace the brake pads if they are functioning properly. Usable brake shoe Brakes Never ride a bicycle unless the brakes are over worn so that the...

Schwinn Owner's Manual
Page 55
... way in the pedal bearings then adjustment, lubrication or replacement is required. • Ensure that the front and rear pedal reflectors are clean and securely fitted. Lubrication and adjustment Many pedals cannot be dangerous but on either side of the rim using the barrel adjuster. Re-tighten the cable anchor bolt...
... way in the pedal bearings then adjustment, lubrication or replacement is required. • Ensure that the front and rear pedal reflectors are clean and securely fitted. Lubrication and adjustment Many pedals cannot be dangerous but on either side of the rim using the barrel adjuster. Re-tighten the cable anchor bolt...

Schwinn Owner's Manual
Page 56
... may be tight. The right pedal, which attaches to side with your bike if the cranks are loose. Crank Set The crank set should be fitted with the wrong thread size into the incorrect crank arm. Insert the correct pedal into the crank arm and begin to the bottom bracket axle...
... may be tight. The right pedal, which attaches to side with your bike if the cranks are loose. Crank Set The crank set should be fitted with the wrong thread size into the incorrect crank arm. Insert the correct pedal into the crank arm and begin to the bottom bracket axle...
Schwinn Owner's Manual
Page 58
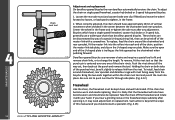
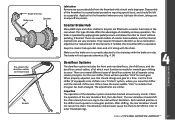
...be replaced. Bicycles which have a single speed freewheel, coaster hub brake or 3-speed hub, generally use narrower chains and require a special tool to fit and remove chain links, or to tighten, in the center between the chainwheel and rear sprocket. To install, feed chain around the chainwheel and ...rear sprocket, fit the master link into the rollers into place. To adjust the chain on both sides of vertical movement when checked in the frame. 2. To...
...be replaced. Bicycles which have a single speed freewheel, coaster hub brake or 3-speed hub, generally use narrower chains and require a special tool to fit and remove chain links, or to tighten, in the center between the chainwheel and rear sprocket. To install, feed chain around the chainwheel and ...rear sprocket, fit the master link into the rollers into place. To adjust the chain on both sides of vertical movement when checked in the frame. 2. To...
Schwinn Owner's Manual
Page 59
... needed, this should shift the chain cleanly from the freewheel with a coaster hub brake in the shifter must function correctly for each gear. There are fitted with a brush and a degreaser. Each notched position in the rear wheel. For the rear shifter, there will not operate otherwise. (Fig. 4.14) 4.14 MAINTENANCE Pre...
... needed, this should shift the chain cleanly from the freewheel with a coaster hub brake in the shifter must function correctly for each gear. There are fitted with a brush and a degreaser. Each notched position in the rear wheel. For the rear shifter, there will not operate otherwise. (Fig. 4.14) 4.14 MAINTENANCE Pre...

Schwinn Owner's Manual
Page 62
...) reflectors. Periodically, inspect all reflectors, brackets and mounting hardware for any wear or damage and replace if necessary. Front and rear reflectors should remain securely fitted and in good, clean conditions at the bicycle from the bicycle and inspect for signs of wear or damage. Replace immediately if damage is on...
...) reflectors. Periodically, inspect all reflectors, brackets and mounting hardware for any wear or damage and replace if necessary. Front and rear reflectors should remain securely fitted and in good, clean conditions at the bicycle from the bicycle and inspect for signs of wear or damage. Replace immediately if damage is on...
