
LC-26D7U | LC-32D7U | LC-37D7U Operation Manual
Page 2
... rear of loss or theft, please record the TV's model and serial numbers in the space provided. NO USER-SERVICEABLE PARTS INSIDE. ENGLISH LC-37D7U LC-32D7U LC-26D7U LIQUID CRYSTAL TELEVISION ENGLISH OPERATION MANUAL • The illustrations and on-screen displays in this manual are based on the LC-32D7U model. REFER SERVICING TO QUALIFIED SERVICE PERSONNEL...
... rear of loss or theft, please record the TV's model and serial numbers in the space provided. NO USER-SERVICEABLE PARTS INSIDE. ENGLISH LC-37D7U LC-32D7U LC-26D7U LIQUID CRYSTAL TELEVISION ENGLISH OPERATION MANUAL • The illustrations and on-screen displays in this manual are based on the LC-32D7U model. REFER SERVICING TO QUALIFIED SERVICE PERSONNEL...

LC-26D7U | LC-32D7U | LC-37D7U Operation Manual
Page 8
...are worn out. IF YOU STILL ENCOUNTER NO POWER, PLEASE CONTACT US AT 1-800-BE-SHARP. Chemicals that come in contact with their terminals corresponding to the AQUOS television. UNPLUG THE AQUOS...leakage or explosion. If the POWER indicator on the AQUOS television still does not light up, press TV POWER on . Mixing old and new batteries can result in the battery compartment. If you find any... SECTION for an extended period of new batteries or cause chemical leakage in your AQUOS operation manual. 7 Be sure to turn the power on the remote control to follow the instructions below...
...are worn out. IF YOU STILL ENCOUNTER NO POWER, PLEASE CONTACT US AT 1-800-BE-SHARP. Chemicals that come in contact with their terminals corresponding to the AQUOS television. UNPLUG THE AQUOS...leakage or explosion. If the POWER indicator on the AQUOS television still does not light up, press TV POWER on . Mixing old and new batteries can result in the battery compartment. If you find any... SECTION for an extended period of new batteries or cause chemical leakage in your AQUOS operation manual. 7 Be sure to turn the power on the remote control to follow the instructions below...

LC-26D7U | LC-32D7U | LC-37D7U Operation Manual
Page 9
...Place the G-LINK cable(s) To control a VCR, place one of the G-LINK cables underneath the VCR approximately 1 inch in step 2. After completing the TV's initial setup, you found in front of the sensor you see the Reminder Screen. 2 Find the VCR and Cable Box IR Sensors. If you have...front while pressing POWER (Figure 2). (You must press and release the power button each G-LINK cable. If you have a cable box, repeat this operation manual, you are properly installed. Figure 1 Figure 2 Note: If you press ENTER and the screen does not change, make sure that item. G-LINK cable ...
...Place the G-LINK cable(s) To control a VCR, place one of the G-LINK cables underneath the VCR approximately 1 inch in step 2. After completing the TV's initial setup, you found in front of the sensor you see the Reminder Screen. 2 Find the VCR and Cable Box IR Sensors. If you have...front while pressing POWER (Figure 2). (You must press and release the power button each G-LINK cable. If you have a cable box, repeat this operation manual, you are properly installed. Figure 1 Figure 2 Note: If you press ENTER and the screen does not change, make sure that item. G-LINK cable ...

LC-26D7U | LC-32D7U | LC-37D7U Operation Manual
Page 13
Supplied accessories Make sure the following accessories are provided with the LCD-TV. 12 Remote control unit (g1) "AAA" size battery (g2) AC cord (g1) Page 7 Cable clamp (g1) Page 7 Cable tie (g1) Page 6 G-LINK cable (g1) Page 6 Operation manual (g1) Page 6 Page 8 NOTE • Always use the AC cord supplied with the product.
Supplied accessories Make sure the following accessories are provided with the LCD-TV. 12 Remote control unit (g1) "AAA" size battery (g2) AC cord (g1) Page 7 Cable clamp (g1) Page 7 Cable tie (g1) Page 6 G-LINK cable (g1) Page 6 Operation manual (g1) Page 6 Page 8 NOTE • Always use the AC cord supplied with the product.

LC-26D7U | LC-32D7U | LC-37D7U Operation Manual
Page 21
...current program information and the current and future actions & status. Basic initial setup will appear each time you power on your LCD-TV. 1 Press a/b to select an option. • "Set up TV Guide On Screen now": Basic initial setup will start. • "Remind me to set up the Guide now, this ...on . The default size of information, such as available. • In some instances, the Info key is used to page forward, if there are Daily (manual recording only), Regularly, and Weekly. • The program is suspended due to three sizes: Small, Large, and "No". NOTE • If you are...
...current program information and the current and future actions & status. Basic initial setup will appear each time you power on your LCD-TV. 1 Press a/b to select an option. • "Set up TV Guide On Screen now": Basic initial setup will start. • "Remind me to set up the Guide now, this ...on . The default size of information, such as available. • In some instances, the Info key is used to page forward, if there are Daily (manual recording only), Regularly, and Weekly. • The program is suspended due to three sizes: Small, Large, and "No". NOTE • If you are...

LC-26D7U | LC-32D7U | LC-37D7U Operation Manual
Page 25
... the day from within LISTINGS • Press DAYl or DAYk to select the day you enter the Guide, the TV program for the current show appears in this manual are downloaded from the TV Guide On Screen service to your area. The size of the Info Box can set to "Small" or "Large... a/b to select "go to Service Bar The service provided by selecting "No". The default size of the cursor is highlighted in this manual may not be displayed by TV Guide On Screen is necessary to select the service bar and change when updates are for the Guide. • Moves one page up...
... the day from within LISTINGS • Press DAYl or DAYk to select the day you enter the Guide, the TV program for the current show appears in this manual are downloaded from the TV Guide On Screen service to your area. The size of the Info Box can set to "Small" or "Large... a/b to select "go to Service Bar The service provided by selecting "No". The default size of the cursor is highlighted in this manual may not be displayed by TV Guide On Screen is necessary to select the service bar and change when updates are for the Guide. • Moves one page up...

LC-26D7U | LC-32D7U | LC-37D7U Operation Manual
Page 29
...set a recording, or a reminder to a schedule conflict. (The program remains in Press a/b to select "go to select "done". 28 Watching TV (TV Guide On Screen) Using SCHEDULE function The SCHEDULE is a list of icons and show information about the settings for each program. You can use this...Daily Regularly Remind (Using "Remind Weekly Options") Off Suspend Indicates the program is set to remind daily (manual remind setting only). Indicates the program is set to record daily (manual record setting only). Set a program reminder each time the program airs on the same day of the...
...set a recording, or a reminder to a schedule conflict. (The program remains in Press a/b to select "go to select "done". 28 Watching TV (TV Guide On Screen) Using SCHEDULE function The SCHEDULE is a list of icons and show information about the settings for each program. You can use this...Daily Regularly Remind (Using "Remind Weekly Options") Off Suspend Indicates the program is set to remind daily (manual remind setting only). Indicates the program is set to record daily (manual record setting only). Set a program reminder each time the program airs on the same day of the...

LC-26D7U | LC-32D7U | LC-37D7U Operation Manual
Page 31
... cycle 4 Press ENTER to highlight "schedule reminder". 5 Press ENTER again to record - - - When this is set to "yes", the channel will be manually reminded is listed by following the steps below. 1 Press a/b to select the program you want to record. 2 Press MENU to remind using 0-9 Set the.../input 1/ input 2/input 3 yes/no auto tune TV yes/no frequency once/weekly/daily/off Set a start time to remind Set an end time to remind Set a channel to display "Record Options". Watching TV (TV Guide On Screen) New manual recording Aside from the program LISTINGS, you can also ...
... cycle 4 Press ENTER to highlight "schedule reminder". 5 Press ENTER again to record - - - When this is set to "yes", the channel will be manually reminded is listed by following the steps below. 1 Press a/b to select the program you want to record. 2 Press MENU to remind using 0-9 Set the.../input 1/ input 2/input 3 yes/no auto tune TV yes/no frequency once/weekly/daily/off Set a start time to remind Set an end time to remind Set a channel to display "Record Options". Watching TV (TV Guide On Screen) New manual recording Aside from the program LISTINGS, you can also ...

LC-26D7U | LC-32D7U | LC-37D7U Operation Manual
Page 37
... (SAP). This feature is difficult to hear. • Obtain a clearer sound by manually switching to accompany a single video track. The SAP feature allows a TV station to broadcast other information, which could be audio in another language or something completely different... like live sporting events, shows and concerts in dynamic stereo sound. • SAP broadcasts Receive TV broadcasts in either in TV mode. Examples: when receiving Digital broadcasting Air DIGITAL 2.2 Audio1 : STEREO Air DIGITAL 2.2 Audio2 : STEREO Air DIGITAL ...
... (SAP). This feature is difficult to hear. • Obtain a clearer sound by manually switching to accompany a single video track. The SAP feature allows a TV station to broadcast other information, which could be audio in another language or something completely different... like live sporting events, shows and concerts in dynamic stereo sound. • SAP broadcasts Receive TV broadcasts in either in TV mode. Examples: when receiving Digital broadcasting Air DIGITAL 2.2 Audio1 : STEREO Air DIGITAL 2.2 Audio2 : STEREO Air DIGITAL ...

LC-26D7U | LC-32D7U | LC-37D7U Operation Manual
Page 41
... memorize all channels viewable in your region, follow the instructions below to manually memorize the channels. Press ENTER to enter the setting. • There are 3 kinds of CATV system, including Standard, HRC and IRC. Select the one matches to your TV. • If cable or antenna connection was selected for DIGITAL (Air...
... memorize all channels viewable in your region, follow the instructions below to manually memorize the channels. Press ENTER to enter the setting. • There are 3 kinds of CATV system, including Standard, HRC and IRC. Select the one matches to your TV. • If cable or antenna connection was selected for DIGITAL (Air...

LC-26D7U | LC-32D7U | LC-37D7U Operation Manual
Page 49
... screen displays. 2 Press c/d to select "Audio". 3 Press a/b to select "Dolby Virtual", and then press ENTER. MENU [Audio ... In this case, please refer to the operation manual of being surrounded by additional speakers. Dolby Virtual] Audio Power Control Treble [ 0] -15 +15 Bass [ 0] -15 +15 Balance [ 0] L R Dolby Virtual [Off] Reset 4 Press c/d to select...
... screen displays. 2 Press c/d to select "Audio". 3 Press a/b to select "Dolby Virtual", and then press ENTER. MENU [Audio ... In this case, please refer to the operation manual of being surrounded by additional speakers. Dolby Virtual] Audio Power Control Treble [ 0] -15 +15 Bass [ 0] -15 +15 Balance [ 0] L R Dolby Virtual [Off] Reset 4 Press c/d to select...

LC-26D7U | LC-32D7U | LC-37D7U Operation Manual
Page 51
Video Setup You can change the screen size to select "Digital Setup". NOTE • "Manual" is factory preset value. 50 Screen Size REC Picture Size 4 : 3 TV 16 : 9 TV Screen Size REC Picture Size 5 Press c/d to select "Manual" or "Auto". Manual Auto 5 Press c/d to select the desired picture size, and then press ENTER. Screen Size Set the...
Video Setup You can change the screen size to select "Digital Setup". NOTE • "Manual" is factory preset value. 50 Screen Size REC Picture Size 4 : 3 TV 16 : 9 TV Screen Size REC Picture Size 5 Press c/d to select "Manual" or "Auto". Manual Auto 5 Press c/d to select the desired picture size, and then press ENTER. Screen Size Set the...

LC-26D7U | LC-32D7U | LC-37D7U Operation Manual
Page 53
...VIDEO The setting is stored and can connect many types of external equipment to your external equipment operation manual for the setting when connecting DVD to a DVD player, VCR, Digital TV tuner, PC, HDMI equipment, game console, camcorder or other external equipment. NOTE • See pages... 53 to 58 for external equipment connection. • Please refer to the relevant operation manual (DVD player, PC, etc.) carefully before connecting ...
...VIDEO The setting is stored and can connect many types of external equipment to your external equipment operation manual for the setting when connecting DVD to a DVD player, VCR, Digital TV tuner, PC, HDMI equipment, game console, camcorder or other external equipment. NOTE • See pages... 53 to 58 for external equipment connection. • Please refer to the relevant operation manual (DVD player, PC, etc.) carefully before connecting ...

LC-26D7U | LC-32D7U | LC-37D7U Operation Manual
Page 57
... INPUT3 Color Auto/ITU601/ Select the internal color INPUT4 Matrix ITU709 space conversion method when an RGB signal is INPUT5 input. TV CableBox [TV] HDMI Setup items Selectable items Description INPUT1 INPUT2 Signal Type Auto/RGB/YCbCr 4:4:4/YCbCr 4:2:2 Select the signal type from "INPUT... not to use the INPUT 4 terminal when connecting HDMI equipment. Using external equipment Connecting HDMI equipment Please use VIEW MODE based on the TV. (See page 66.) INPUT SOURCE 5 Press a/b to select the desired item and press ENTER. 6 Press a/b/c/d to select the desired...
... INPUT3 Color Auto/ITU601/ Select the internal color INPUT4 Matrix ITU709 space conversion method when an RGB signal is INPUT5 input. TV CableBox [TV] HDMI Setup items Selectable items Description INPUT1 INPUT2 Signal Type Auto/RGB/YCbCr 4:4:4/YCbCr 4:2:2 Select the signal type from "INPUT... not to use the INPUT 4 terminal when connecting HDMI equipment. Using external equipment Connecting HDMI equipment Please use VIEW MODE based on the TV. (See page 66.) INPUT SOURCE 5 Press a/b to select the desired item and press ENTER. 6 Press a/b/c/d to select the desired...

LC-26D7U | LC-32D7U | LC-37D7U Operation Manual
Page 62
...61% 06 PWR STOP REC LIST REC Oper. Using external equipment Controlling an i.LINK device • An i.LINK compatible device can be controlled from the TV using the i.LINK control panel on the screen. • The steps in "i.LINK Setup" on page 59 need to be completed beforehand. • Please... also refer to the operation manual of the i.LINK device to be displayed during the playback. 61 Model l30sec k30sec Input Go to REC operation screen Go to Model Selection screen...
...61% 06 PWR STOP REC LIST REC Oper. Using external equipment Controlling an i.LINK device • An i.LINK compatible device can be controlled from the TV using the i.LINK control panel on the screen. • The steps in "i.LINK Setup" on page 59 need to be completed beforehand. • Please... also refer to the operation manual of the i.LINK device to be displayed during the playback. 61 Model l30sec k30sec Input Go to REC operation screen Go to Model Selection screen...

LC-26D7U | LC-32D7U | LC-37D7U Operation Manual
Page 63
... mode). Some picture and sound data have restrictions on page 59 need to be completed beforehand. • Please also refer to the operation manual of the picture may be some i.LINK devices, the quality of the DVHS deck to be used during timer recording. • There may... This technology has received the approval of a digital program which i.LINK devices cannot record. • With some programs which the TV is operated with the TV's control panel during timer recording. Such data cannot be sent back and forth between an i.LINK device that has DTLA copyright protection ...
... mode). Some picture and sound data have restrictions on page 59 need to be completed beforehand. • Please also refer to the operation manual of the picture may be some i.LINK devices, the quality of the DVHS deck to be used during timer recording. • There may... This technology has received the approval of a digital program which i.LINK devices cannot record. • With some programs which the TV is operated with the TV's control panel during timer recording. Such data cannot be sent back and forth between an i.LINK device that has DTLA copyright protection ...

LC-26D7U | LC-32D7U | LC-37D7U Operation Manual
Page 64
... cannot be displayed correctly in "i.LINK Setup" on page 59 need to be completed beforehand. • Please also refer to the operation manual of the first program recorded at the time recording originally commenced. • When playing back content recorded on AV-HDD recorder and Blu-ray... be that of the AVHDD recorder/Blu-ray Disc recorder to be used with AV-HDD recorder/Blu-ray Disc recorder • Before commencing this TV. 1 Select a digital program to be recorded. 2 Press i.LINK to display the i.LINK control panel. 3 Press a/b/c/d to select "REC Oper.", and then press ...
... cannot be displayed correctly in "i.LINK Setup" on page 59 need to be completed beforehand. • Please also refer to the operation manual of the first program recorded at the time recording originally commenced. • When playing back content recorded on AV-HDD recorder and Blu-ray... be that of the AVHDD recorder/Blu-ray Disc recorder to be used with AV-HDD recorder/Blu-ray Disc recorder • Before commencing this TV. 1 Select a digital program to be recorded. 2 Press i.LINK to display the i.LINK control panel. 3 Press a/b/c/d to select "REC Oper.", and then press ...

LC-26D7U | LC-32D7U | LC-37D7U Operation Manual
Page 66
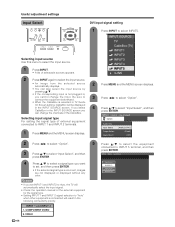
...Auto Sync. 5 Press c/d to adjust the item to the left or right. Centers the image by moving it up or down. In some cases, however, manual adjustment is needed to optimize the image. 2 Press c/d to select "Setup". 1 Press MENU and the MENU screen displays. 3 Press a/b to select "Auto...Press c/d to select the specific adjustment item. MENU [Setup ... is moved while executing Auto Sync. • Be sure to connect the PC to the TV and switch it to your desired position. failed. • Auto Sync. NOTE • For resetting all adjustment items to the factory preset values, press ...
...Auto Sync. 5 Press c/d to adjust the item to the left or right. Centers the image by moving it up or down. In some cases, however, manual adjustment is needed to optimize the image. 2 Press c/d to select "Setup". 1 Press MENU and the MENU screen displays. 3 Press a/b to select "Auto...Press c/d to select the specific adjustment item. MENU [Setup ... is moved while executing Auto Sync. • Be sure to connect the PC to the TV and switch it to your desired position. failed. • Auto Sync. NOTE • For resetting all adjustment items to the factory preset values, press ...
LC-26D7U | LC-32D7U | LC-37D7U Operation Manual
Page 67
...8226; If the corresponding input is not plugged in, you want to set INPUT1 and INPUT2 to Auto, the TV will automatically select the input signal. • Check the operation manual of the external equipment for the signal type. • Setting INPUT 1 and INPUT 2 signal selection to "Auto..." when other equipment is selected in TV Guide On Screen setting, CableBox will result in the INPUT SOURCE screen. MENU...
...8226; If the corresponding input is not plugged in, you want to set INPUT1 and INPUT2 to Auto, the TV will automatically select the input signal. • Check the operation manual of the external equipment for the signal type. • Setting INPUT 1 and INPUT 2 signal selection to "Auto..." when other equipment is selected in TV Guide On Screen setting, CableBox will result in the INPUT SOURCE screen. MENU...

LC-26D7U | LC-32D7U | LC-37D7U Operation Manual
Page 71
... On Audio is input again. 640g400 640g480 1024g768 720g400 848g480 1280g768 NOTE • You can set the correct signal manually. When listening to music from a music program, you have to be registered manually to display properly. • The pairs of the 6 input signals listed above. Useful adjustment settings Input signal (for PC...
... On Audio is input again. 640g400 640g480 1024g768 720g400 848g480 1280g768 NOTE • You can set the correct signal manually. When listening to music from a music program, you have to be registered manually to display properly. • The pairs of the 6 input signals listed above. Useful adjustment settings Input signal (for PC...


