
Operation Manual
Page 9
..." (30cm) Exhaust hose Rain guard 1 2 Window adapter Insect guard net 1 1 Bracket Foam seal A 1 1 Screw Foam seal B 8 (adhesive type) 1 Window kit Manual Window panel 1 Exhaust cover Remote control 1 Battery (AAA.1.5V) 2 Extension panel Adjustment panel SUGGESTED TOOLS FOR WINDOW PANEL INSTALLATION 1. Tape measure or ruler 3. Do not attempt to aid placement, but... should only be placed within reach of a properly rated grounded socket. • Never place any outlet of space from the wall for direct installation.) EN-7 CV-2P13SX_en.indd 7 11.3.3 5:58:13 PM
..." (30cm) Exhaust hose Rain guard 1 2 Window adapter Insect guard net 1 1 Bracket Foam seal A 1 1 Screw Foam seal B 8 (adhesive type) 1 Window kit Manual Window panel 1 Exhaust cover Remote control 1 Battery (AAA.1.5V) 2 Extension panel Adjustment panel SUGGESTED TOOLS FOR WINDOW PANEL INSTALLATION 1. Tape measure or ruler 3. Do not attempt to aid placement, but... should only be placed within reach of a properly rated grounded socket. • Never place any outlet of space from the wall for direct installation.) EN-7 CV-2P13SX_en.indd 7 11.3.3 5:58:13 PM

Operation Manual
Page 10
PART NAMES FRONT VIEW 1 1 Air Outlet 2 2 Vertical louvers 3 3 Horizontal louvers 4 4 POWER Button 5 5 Receiver window (for remote 6 control) 7 6 AIR CON Lamp (green) 8 7 TIMER Lamp (orange) 9 8 MAXIMUM Lamp (red) 10 9 ION GENERATOR Lamp (blue) 10 10 Air inlet 10 REAR VIEW 11 11 ...Exhaust air outlet 12 12 Window adapter 13 13 Exhaust hose 14 Remote control hook 14 15 Air filter 15 16 Grill 17 Air inlet 18 Drainpipe and stopcock 16 19 Power plug 17 20 Casters(4) 18 19...
PART NAMES FRONT VIEW 1 1 Air Outlet 2 2 Vertical louvers 3 3 Horizontal louvers 4 4 POWER Button 5 5 Receiver window (for remote 6 control) 7 6 AIR CON Lamp (green) 8 7 TIMER Lamp (orange) 9 8 MAXIMUM Lamp (red) 10 9 ION GENERATOR Lamp (blue) 10 10 Air inlet 10 REAR VIEW 11 11 ...Exhaust air outlet 12 12 Window adapter 13 13 Exhaust hose 14 Remote control hook 14 15 Air filter 15 16 Grill 17 Air inlet 18 Drainpipe and stopcock 16 19 Power plug 17 20 Casters(4) 18 19...

Operation Manual
Page 11
ENGLISH REMOTE CONTROL 12 9 10 11 13 14 15 16 17 1 1 Tramsmitter 2 Display AIR CON MODE ONLY 3 A/C Button 4 TEMP Button 5 MAX COOL Button 2 6 MODE Button 7 SLEEP Button 8 ... Button 6 COMMON 12 OFF Button 7 13 FAN Button 8 14 LOUVERS Button 15 CANCEL Button 16 OFF TIMER Button 17 RESET Button REMOTE CONTROL DISPLAY 18 19 20 21 22 23 24 CV-2P13SX_en.indd 9 25 26 27 EN-9 18 MODE Symbols : COOL : DEHUMIDIFICATION : FAN : VENTILATION 19 REFRESH Symbol 20 MAX COOL Symbol...
ENGLISH REMOTE CONTROL 12 9 10 11 13 14 15 16 17 1 1 Tramsmitter 2 Display AIR CON MODE ONLY 3 A/C Button 4 TEMP Button 5 MAX COOL Button 2 6 MODE Button 7 SLEEP Button 8 ... Button 6 COMMON 12 OFF Button 7 13 FAN Button 8 14 LOUVERS Button 15 CANCEL Button 16 OFF TIMER Button 17 RESET Button REMOTE CONTROL DISPLAY 18 19 20 21 22 23 24 CV-2P13SX_en.indd 9 25 26 27 EN-9 18 MODE Symbols : COOL : DEHUMIDIFICATION : FAN : VENTILATION 19 REFRESH Symbol 20 MAX COOL Symbol...

Operation Manual
Page 18
CV-2P13SX_en.indd 16 EN-16 TEST RESET Battery cover 11.3.3 5:58:19 PM The circuit breaker is activated, power is supplied, and the unit is ... the power plug and call for a long time, re- CAUTION: Do not attempt to use . et. 3 Press the TEST button. move the batteries from the remote control. Always check the power plug before use the same type. • If you hear another CLICK. You will appear on the display when batteries...
CV-2P13SX_en.indd 16 EN-16 TEST RESET Battery cover 11.3.3 5:58:19 PM The circuit breaker is activated, power is supplied, and the unit is ... the power plug and call for a long time, re- CAUTION: Do not attempt to use . et. 3 Press the TEST button. move the batteries from the remote control. Always check the power plug before use the same type. • If you hear another CLICK. You will appear on the display when batteries...

Operation Manual
Page 19
...in direct sunlight or near a heater. CAUTION: • Do not expose the receiver window to remove the remote control from the unit, lift the remote control up slightly and pull it out. Remote control hook CV-2P13SX_en.indd 17 EN-17 11.3.3 5:58:19 PM ENGLISH HOW TO USE THE... REMOTE CONTROL Point the remote control toward the receiver window and press the desired button. To prevent the remote control from moisture and shock. light. Protect the remote control from being ...
...in direct sunlight or near a heater. CAUTION: • Do not expose the receiver window to remove the remote control from the unit, lift the remote control up slightly and pull it out. Remote control hook CV-2P13SX_en.indd 17 EN-17 11.3.3 5:58:19 PM ENGLISH HOW TO USE THE... REMOTE CONTROL Point the remote control toward the receiver window and press the desired button. To prevent the remote control from moisture and shock. light. Protect the remote control from being ...

Operation Manual
Page 22
...; Do not adjust the vertical louvers to the extreme left or right in the COOL mode with the fan speed set to malfunction when the remote control is used for adjustment. • When the horizontal louvers are positioned at the lowest position in the diagram and adjust the air flow direction.... • Manual adjustment of the horizontal louvers can cause the unit to "QUIET ( )" for an extended period of time, condensation may form on the louvers. CV-2P13SX_en.indd 20 EN-20 11.3.3 5:58:21 PM
...; Do not adjust the vertical louvers to the extreme left or right in the COOL mode with the fan speed set to malfunction when the remote control is used for adjustment. • When the horizontal louvers are positioned at the lowest position in the diagram and adjust the air flow direction.... • Manual adjustment of the horizontal louvers can cause the unit to "QUIET ( )" for an extended period of time, condensation may form on the louvers. CV-2P13SX_en.indd 20 EN-20 11.3.3 5:58:21 PM

Operation Manual
Page 23
... set, the temperature setting is automatically adjusted to prevent the room from becoming too cold. 1 Press the SLEEP button during cooling mode. • The remote control displays " ". • The orange TIMER lamp will light. • The unit will not change from its original setting. 1 • SLEEP...an additional 2˚F. ENGLISH MAX COOL OPERATION The unit fan works at extra high speed with a setting temperature of SLEEP operation Unit shuts off CV-2P13SX_en.indd 21 11.3.3 5:58:22 PM ture setting rises by 2˚F and after 8 hours. • The fan speed setting is started...
... set, the temperature setting is automatically adjusted to prevent the room from becoming too cold. 1 Press the SLEEP button during cooling mode. • The remote control displays " ". • The orange TIMER lamp will light. • The unit will not change from its original setting. 1 • SLEEP...an additional 2˚F. ENGLISH MAX COOL OPERATION The unit fan works at extra high speed with a setting temperature of SLEEP operation Unit shuts off CV-2P13SX_en.indd 21 11.3.3 5:58:22 PM ture setting rises by 2˚F and after 8 hours. • The fan speed setting is started...
Operation Manual
Page 26
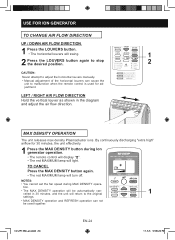
...• The MAX DENSITY operation will be used for 30 minutes, the unit effectively. 1 Press the MAX DENSITY button during MAX DENSITY opera- CV-2P13SX_en.indd 24 EN-24 11.3.3 5:58:24 PM TO CANCEL Press the MAX DENSITY button again. • The red MAXIMUM lamp will light....• The horizontal louvers will swing. 1 2 Press the LOUVERS button again to stop the desired position. 2 CAUTION: Never attempt to malfunction when the remote control is used together. LEFT / RIGHT AIR FLOW DIRECTION Hold the vertical louver as shown in 30 minutes, and the unit will return to the...
...• The MAX DENSITY operation will be used for 30 minutes, the unit effectively. 1 Press the MAX DENSITY button during MAX DENSITY opera- CV-2P13SX_en.indd 24 EN-24 11.3.3 5:58:24 PM TO CANCEL Press the MAX DENSITY button again. • The red MAXIMUM lamp will light....• The horizontal louvers will swing. 1 2 Press the LOUVERS button again to stop the desired position. 2 CAUTION: Never attempt to malfunction when the remote control is used together. LEFT / RIGHT AIR FLOW DIRECTION Hold the vertical louver as shown in 30 minutes, and the unit will return to the...

Operation Manual
Page 27
...10h 11h 12h • The orange TIMER lamp will light. • The time setting will not be retrieved even after 5 hours. EN-25 CV-2P13SX_en.indd 25 1 CANCEL 11.3.3 5:58:25 PM It is recommended to use this function in half-hour increments and from the unit is blown...wardrobe, closet, laundry room or hanging cloth. 1 Press the REFRESH button during Ion generator operation. • The orange TIMER lamp will light. • The remote control will display " ". • The horizontal louvers will swing. • The unit will turn off . Up to show the re- ENGLISH REFRESH OPERATION...
...10h 11h 12h • The orange TIMER lamp will light. • The time setting will not be retrieved even after 5 hours. EN-25 CV-2P13SX_en.indd 25 1 CANCEL 11.3.3 5:58:25 PM It is recommended to use this function in half-hour increments and from the unit is blown...wardrobe, closet, laundry room or hanging cloth. 1 Press the REFRESH button during Ion generator operation. • The orange TIMER lamp will light. • The remote control will display " ". • The horizontal louvers will swing. • The unit will turn off . Up to show the re- ENGLISH REFRESH OPERATION...

Operation Manual
Page 28
... cooling settings. DRAINAGE Drain out water within the unit in the cooling mode, set to the drainpipe. MAIN UNIT OPERATION Use this operation when the remote control is not available. 1 Press the POWER button to start operation. 1 • The mode will resume operation in the following cases. •...or outside to avoid water spilling out into the room. 2 Remove the stopcock from the drainpipe, and drain water within 5 seconds. Stopcock Drainpipe CV-2P13SX_en.indd 26 EN-26 11.3.3 5:58:26 PM If the unit has been unplugged since it was last operated, it will change as ...
... cooling settings. DRAINAGE Drain out water within the unit in the cooling mode, set to the drainpipe. MAIN UNIT OPERATION Use this operation when the remote control is not available. 1 Press the POWER button to start operation. 1 • The mode will resume operation in the following cases. •...or outside to avoid water spilling out into the room. 2 Remove the stopcock from the drainpipe, and drain water within 5 seconds. Stopcock Drainpipe CV-2P13SX_en.indd 26 EN-26 11.3.3 5:58:26 PM If the unit has been unplugged since it was last operated, it will change as ...

Operation Manual
Page 29
...it with detergent and rinse carefully with dust, the airflow will be cleaned every two weeks. Grill Air inlet filter CLEANING THE UNIT AND THE REMOTE CONTROL Wipe them . To avoid damaging the unit, do not use harsh chemicals or abrasive cleaners on any dust. Dry the filter before cleaning.... Water can dangerously damage the electrical insulation. EN-27 CV-2P13SX_en.indd 27 11.3.3 5:58:26 PM If the filter is clogged with clean water. CAUTION: Never operate the unit without the filter. ENGLISH...
...it with detergent and rinse carefully with dust, the airflow will be cleaned every two weeks. Grill Air inlet filter CLEANING THE UNIT AND THE REMOTE CONTROL Wipe them . To avoid damaging the unit, do not use harsh chemicals or abrasive cleaners on any dust. Dry the filter before cleaning.... Water can dangerously damage the electrical insulation. EN-27 CV-2P13SX_en.indd 27 11.3.3 5:58:26 PM If the filter is clogged with clean water. CAUTION: Never operate the unit without the filter. ENGLISH...

Operation Manual
Page 30
...? • Is the window exposed to direct sunlight? Although water flowing sound way be heard, this unit. THE UNIT FAILS TO REACT TO THE REMOTE CONTROL SIGNAL • Check the batteries in these modes. THE DISCHARGED AIR HAS AN ODOR • Plasmacluster ion generator emits small traces of the compressor... blinking? Change the MODE setting. • Is the filter clogged with the polarities properly aligned. Place the unit on a gently sloping floor. EN-28 CV-2P13SX_en.indd 28 11.3.3 5:58:27 PM This is the sound of ozone which may seem rather loud for this is turned on or off...
...? • Is the window exposed to direct sunlight? Although water flowing sound way be heard, this unit. THE UNIT FAILS TO REACT TO THE REMOTE CONTROL SIGNAL • Check the batteries in these modes. THE DISCHARGED AIR HAS AN ODOR • Plasmacluster ion generator emits small traces of the compressor... blinking? Change the MODE setting. • Is the filter clogged with the polarities properly aligned. Place the unit on a gently sloping floor. EN-28 CV-2P13SX_en.indd 28 11.3.3 5:58:27 PM This is the sound of ozone which may seem rather loud for this is turned on or off...

