
Operation Manual
Page 9
... Insect guard net 1 1 Bracket Foam seal A 1 1 Screw Foam seal B 8 (adhesive type) 1 Window kit Manual Window panel 1 Exhaust cover Remote control 1 Battery (AAA.1.5V) 2 Extension panel Adjustment panel SUGGESTED TOOLS FOR WINDOW PANEL INSTALLATION 1. Saw (In the event that the window panel needs to roll...reach of a properly rated grounded socket. • Never place any outlet of space from the wall for direct installation.) EN-7 CV-2P13SX_en.indd 7 11.3.3 5:58:13 PM Use caution when rolling on smooth, flat surfaces. ENGLISH LOCATION • The unit ...
... Insect guard net 1 1 Bracket Foam seal A 1 1 Screw Foam seal B 8 (adhesive type) 1 Window kit Manual Window panel 1 Exhaust cover Remote control 1 Battery (AAA.1.5V) 2 Extension panel Adjustment panel SUGGESTED TOOLS FOR WINDOW PANEL INSTALLATION 1. Saw (In the event that the window panel needs to roll...reach of a properly rated grounded socket. • Never place any outlet of space from the wall for direct installation.) EN-7 CV-2P13SX_en.indd 7 11.3.3 5:58:13 PM Use caution when rolling on smooth, flat surfaces. ENGLISH LOCATION • The unit ...

Operation Manual
Page 10
EN-8 CV-2P13SX_en.indd 8 11.3.3 5:58:14 PM PART NAMES FRONT VIEW 1 1 Air Outlet 2 2 Vertical louvers 3 3 Horizontal louvers 4 4 POWER Button 5 5 Receiver window (for remote 6 control) 7 6 AIR CON Lamp (green) 8 7 TIMER Lamp (orange) 9 8 MAXIMUM Lamp (red) 10 9 ION GENERATOR Lamp (blue) 10 10 Air inlet 10 REAR ...VIEW 11 11 Exhaust air outlet 12 12 Window adapter 13 13 Exhaust hose 14 Remote control hook 14 15 Air filter 15 16 Grill 17 Air inlet 18 Drainpipe and stopcock 16 19 Power plug 17 20 Casters(4) 18 19...
EN-8 CV-2P13SX_en.indd 8 11.3.3 5:58:14 PM PART NAMES FRONT VIEW 1 1 Air Outlet 2 2 Vertical louvers 3 3 Horizontal louvers 4 4 POWER Button 5 5 Receiver window (for remote 6 control) 7 6 AIR CON Lamp (green) 8 7 TIMER Lamp (orange) 9 8 MAXIMUM Lamp (red) 10 9 ION GENERATOR Lamp (blue) 10 10 Air inlet 10 REAR ...VIEW 11 11 Exhaust air outlet 12 12 Window adapter 13 13 Exhaust hose 14 Remote control hook 14 15 Air filter 15 16 Grill 17 Air inlet 18 Drainpipe and stopcock 16 19 Power plug 17 20 Casters(4) 18 19...

Operation Manual
Page 11
ENGLISH REMOTE CONTROL 12 9 10 11 13 14 15 16 17 1 1 Tramsmitter 2 Display AIR CON MODE ONLY 3 A/C Button 4 TEMP Button 5 MAX COOL Button 2 6 MODE Button 7 SLEEP Button 8 ON ... Button 6 COMMON 12 OFF Button 7 13 FAN Button 8 14 LOUVERS Button 15 CANCEL Button 16 OFF TIMER Button 17 RESET Button REMOTE CONTROL DISPLAY 18 19 20 21 22 23 24 CV-2P13SX_en.indd 9 25 26 27 EN-9 18 MODE Symbols : COOL : DEHUMIDIFICATION : FAN : VENTILATION 19 REFRESH Symbol 20 MAX COOL Symbol 21...
ENGLISH REMOTE CONTROL 12 9 10 11 13 14 15 16 17 1 1 Tramsmitter 2 Display AIR CON MODE ONLY 3 A/C Button 4 TEMP Button 5 MAX COOL Button 2 6 MODE Button 7 SLEEP Button 8 ON ... Button 6 COMMON 12 OFF Button 7 13 FAN Button 8 14 LOUVERS Button 15 CANCEL Button 16 OFF TIMER Button 17 RESET Button REMOTE CONTROL DISPLAY 18 19 20 21 22 23 24 CV-2P13SX_en.indd 9 25 26 27 EN-9 18 MODE Symbols : COOL : DEHUMIDIFICATION : FAN : VENTILATION 19 REFRESH Symbol 20 MAX COOL Symbol 21...

Operation Manual
Page 18
...CAUTION: Do not attempt to use . 1 Press the RESET button. 2 Insert the power plug into the wall sock- move the batteries from the remote control. Always check the power plug before use the unit if the above procedure cannot be using a thin pointed implement. LOADING BATTERIES 1 Remove the battery cover...the display when batteries are properly installed. 3 Reattach the battery cover. 4 Press the RESET button using the unit for a long time, re- CV-2P13SX_en.indd 16 EN-16 TEST RESET Battery cover 11.3.3 5:58:19 PM PRE-OPERATION CHECKS POWER PLUG CHECK This unit uses a fused power plug...
...CAUTION: Do not attempt to use . 1 Press the RESET button. 2 Insert the power plug into the wall sock- move the batteries from the remote control. Always check the power plug before use the unit if the above procedure cannot be using a thin pointed implement. LOADING BATTERIES 1 Remove the battery cover...the display when batteries are properly installed. 3 Reattach the battery cover. 4 Press the RESET button using the unit for a long time, re- CV-2P13SX_en.indd 16 EN-16 TEST RESET Battery cover 11.3.3 5:58:19 PM PRE-OPERATION CHECKS POWER PLUG CHECK This unit uses a fused power plug...

Operation Manual
Page 19
... not expose the receiver window to the unit when not in direct sunlight or near a heater. ENGLISH HOW TO USE THE REMOTE CONTROL Point the remote control toward the receiver window and press the desired button. light. This may adversely affect its operation. • Use of certain... fluorescent lamp in the same room may interfere with transmission of the signal. • Do not leave the remote control in use. Remote control hook CV-...
... not expose the receiver window to the unit when not in direct sunlight or near a heater. ENGLISH HOW TO USE THE REMOTE CONTROL Point the remote control toward the receiver window and press the desired button. light. This may adversely affect its operation. • Use of certain... fluorescent lamp in the same room may interfere with transmission of the signal. • Do not leave the remote control in use. Remote control hook CV-...

Operation Manual
Page 22
CV-2P13SX_en.indd 20 EN-20 11.3.3 5:58:21 PM CAUTION: • Do not adjust the vertical louvers to the extreme left or right in the COOL mode with the fan speed set to malfunction when the remote control is used for adjustment. • When the horizontal louvers are positioned at the lowest position...
CV-2P13SX_en.indd 20 EN-20 11.3.3 5:58:21 PM CAUTION: • Do not adjust the vertical louvers to the extreme left or right in the COOL mode with the fan speed set to malfunction when the remote control is used for adjustment. • When the horizontal louvers are positioned at the lowest position...

Operation Manual
Page 23
... 2˚F 2˚F EN-21 Start of 59°F. 1 Press the MAX COOL button during cooling mode. • The remote control will display " ". • The temperature display will go off. • The red MAXIMUM lamp will stop operating after 8...the most recent settings will not change from becoming too cold. 1 Press the SLEEP button during cooling mode. • The remote control displays " ". • The orange TIMER lamp will light. • The unit will light. NOTES: • You... with a setting temperature of SLEEP operation Unit shuts off CV-2P13SX_en.indd 21 11.3.3 5:58:22 PM
... 2˚F 2˚F EN-21 Start of 59°F. 1 Press the MAX COOL button during cooling mode. • The remote control will display " ". • The temperature display will go off. • The red MAXIMUM lamp will stop operating after 8...the most recent settings will not change from becoming too cold. 1 Press the SLEEP button during cooling mode. • The remote control displays " ". • The orange TIMER lamp will light. • The unit will light. NOTES: • You... with a setting temperature of SLEEP operation Unit shuts off CV-2P13SX_en.indd 21 11.3.3 5:58:22 PM
Operation Manual
Page 26
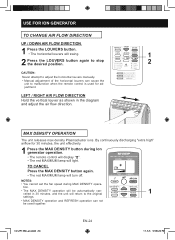
... ions. LEFT / RIGHT AIR FLOW DIRECTION Hold the vertical louver as shown in 30 minutes, and the unit will return to malfunction when the remote control is used together. tion. • The MAX DENSITY operation will be automatically cancelled in the diagram and adjust the air flow direction. TO CANCEL... Press the MAX DENSITY button again. • The red MAXIMUM lamp will turn off. CV-2P13SX_en.indd 24 EN-24 11.3.3 5:58:24 PM USE FOR ION GENERATOR TO CHANGE AIR FLOW DIRECTION UP / DOWN AIR FLOW DIRECTION 1 Press...
... ions. LEFT / RIGHT AIR FLOW DIRECTION Hold the vertical louver as shown in 30 minutes, and the unit will return to malfunction when the remote control is used together. tion. • The MAX DENSITY operation will be automatically cancelled in the diagram and adjust the air flow direction. TO CANCEL... Press the MAX DENSITY button again. • The red MAXIMUM lamp will turn off. CV-2P13SX_en.indd 24 EN-24 11.3.3 5:58:24 PM USE FOR ION GENERATOR TO CHANGE AIR FLOW DIRECTION UP / DOWN AIR FLOW DIRECTION 1 Press...

Operation Manual
Page 27
.... 1 Press the REFRESH button during Ion generator operation. • The orange TIMER lamp will light. • The remote control will display " ". • The horizontal louvers will swing. • The unit will turn off . EN-25 CV-2P13SX_en.indd 25 1 CANCEL 11.3.3 5:58:25 PM It is restored. TO CANCEL Press the CANCEL button...
.... 1 Press the REFRESH button during Ion generator operation. • The orange TIMER lamp will light. • The remote control will display " ". • The horizontal louvers will swing. • The unit will turn off . EN-25 CV-2P13SX_en.indd 25 1 CANCEL 11.3.3 5:58:25 PM It is restored. TO CANCEL Press the CANCEL button...

Operation Manual
Page 28
... settings. DRAINAGE Drain out water within the unit in the cooling mode, set to AUTO. Stopcock Drainpipe CV-2P13SX_en.indd 26 EN-26 11.3.3 5:58:26 PM MAIN UNIT OPERATION Use this operation when the remote control is not used for a long time. 1 Unplug the power plug and carefully move the unit to...
... settings. DRAINAGE Drain out water within the unit in the cooling mode, set to AUTO. Stopcock Drainpipe CV-2P13SX_en.indd 26 EN-26 11.3.3 5:58:26 PM MAIN UNIT OPERATION Use this operation when the remote control is not used for a long time. 1 Unplug the power plug and carefully move the unit to...

Operation Manual
Page 29
... Do not leave it with detergent and rinse carefully with a damp cloth and dry completely. Grill Air inlet filter CLEANING THE UNIT AND THE REMOTE CONTROL Wipe them with a soft, dry cloth or with a cloth moistened with a vacuum cleaner. The filter should be reduced, resulting in the ...filters, then reinstall them. 4 Disconnect the power from the wall socket before reinstalling them. Water can dangerously damage the electrical insulation. EN-27 CV-2P13SX_en.indd 27 11.3.3 5:58:26 PM If the filter is clogged with dust, the airflow will be cleaned every two weeks. CAUTION: ...
... Do not leave it with detergent and rinse carefully with a damp cloth and dry completely. Grill Air inlet filter CLEANING THE UNIT AND THE REMOTE CONTROL Wipe them with a soft, dry cloth or with a cloth moistened with a vacuum cleaner. The filter should be reduced, resulting in the ...filters, then reinstall them. 4 Disconnect the power from the wall socket before reinstalling them. Water can dangerously damage the electrical insulation. EN-27 CV-2P13SX_en.indd 27 11.3.3 5:58:26 PM If the filter is clogged with dust, the airflow will be cleaned every two weeks. CAUTION: ...

Operation Manual
Page 30
...to FAN, DEHUMIDIFICATION, VENTILATION, ION GENERATOR mode? For efficient operation, make the hose as short as possible. THE UNIT FAILS TO REACT TO THE REMOTE CONTROL SIGNAL • Check the batteries in these modes. THE DISCHARGED AIR HAS AN ODOR • Plasmacluster ion generator emits small traces of a power ...not be twisted or bent. This is normal for about 5 minutes. • Are the AIR CON, TIMER and MAXIMUM lamps blinking? EN-28 CV-2P13SX_en.indd 28 11.3.3 5:58:27 PM SOUNDS • The unit may produce an odor. This is the sound of the refrigerant flowing inside ...
...to FAN, DEHUMIDIFICATION, VENTILATION, ION GENERATOR mode? For efficient operation, make the hose as short as possible. THE UNIT FAILS TO REACT TO THE REMOTE CONTROL SIGNAL • Check the batteries in these modes. THE DISCHARGED AIR HAS AN ODOR • Plasmacluster ion generator emits small traces of a power ...not be twisted or bent. This is normal for about 5 minutes. • Are the AIR CON, TIMER and MAXIMUM lamps blinking? EN-28 CV-2P13SX_en.indd 28 11.3.3 5:58:27 PM SOUNDS • The unit may produce an odor. This is the sound of the refrigerant flowing inside ...


