Operation Manual
Page 2
Model No.: DT-510 Serial No.: WARNING: High brightness light source. Be especially careful...See bottom of light, or view directly. ENGLISH Before using the projector, please read this product to rain or moisture. ONLY 1 NO USER-SERVICEABLE PARTS EXCEPT LAMP UNIT. The exclamation point within a triangle is intended to alert the...against the list of important operating and maintenance (servicing) instructions in reporting the loss or theft of your Projector, please record the Serial Number located on the bottom of light. CAUTION RISK OF ELECTRIC SHOCK. U.S.A. CAUTION...
Model No.: DT-510 Serial No.: WARNING: High brightness light source. Be especially careful...See bottom of light, or view directly. ENGLISH Before using the projector, please read this product to rain or moisture. ONLY 1 NO USER-SERVICEABLE PARTS EXCEPT LAMP UNIT. The exclamation point within a triangle is intended to alert the...against the list of important operating and maintenance (servicing) instructions in reporting the loss or theft of your Projector, please record the Serial Number located on the bottom of light. CAUTION RISK OF ELECTRIC SHOCK. U.S.A. CAUTION...

Operation Manual
Page 3
... help. ONLY Declaration of conformity SHARP PROJECTOR, MODEL DT-510 This device complies with any interference received, including interference that to which may cause undesired operation. Caution Concerning Lamp Replacement See "Replacing the Lamp" on the picture screen. This SHARP projector uses a DLP® chip. ONLY PRODUCT DISPOSAL This projector utilizes tin-lead solder, and a pressurized lamp containing a small amount of...
... help. ONLY Declaration of conformity SHARP PROJECTOR, MODEL DT-510 This device complies with any interference received, including interference that to which may cause undesired operation. Caution Concerning Lamp Replacement See "Replacing the Lamp" on the picture screen. This SHARP projector uses a DLP® chip. ONLY PRODUCT DISPOSAL This projector utilizes tin-lead solder, and a pressurized lamp containing a small amount of...

Operation Manual
Page 5
... 10 Part Names and Functions 11 Inserting the Batteries 14 Usable Range 15 Quick Start Quick Start 16 Setup Setting up the Projector 18 Setting up the Projector 18 Standard Setup (Front Projection) ....... 18 Ceiling-mount Setup 18 Projection (PRJ) Mode 19 Picture (Screen) Size and ... 43 Adjusting the Color Temperature ......... 44 Adjusting the Colors 44 Progressive 44 Reducing Image Noise (DNR 45 Switching the Iris Setting 45 Lamp Setting 45 Computer Image Adjustment ("Fine Sync" menu 46 Adjusting the Computer Image 46 Special Modes Setting 46 Auto Sync (Auto Sync ...
... 10 Part Names and Functions 11 Inserting the Batteries 14 Usable Range 15 Quick Start Quick Start 16 Setup Setting up the Projector 18 Setting up the Projector 18 Standard Setup (Front Projection) ....... 18 Ceiling-mount Setup 18 Projection (PRJ) Mode 19 Picture (Screen) Size and ... 43 Adjusting the Color Temperature ......... 44 Adjusting the Colors 44 Progressive 44 Reducing Image Noise (DNR 45 Switching the Iris Setting 45 Lamp Setting 45 Computer Image Adjustment ("Fine Sync" menu 46 Adjusting the Computer Image 46 Special Modes Setting 46 Auto Sync (Auto Sync ...

Operation Manual
Page 9
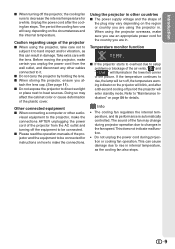
... page 56. Caution regarding placing of the projector I The operating temperature of the lens. ticles if lamp ruptures. I Place the projector on the screen washes out the colors, making viewing difficult. Caution concerning the lamp unit I Protect the lens so as not to maintain high image quality, SHARP recommends that the intake vent and the...
... page 56. Caution regarding placing of the projector I The operating temperature of the lens. ticles if lamp ruptures. I Place the projector on the screen washes out the colors, making viewing difficult. Caution concerning the lamp unit I Protect the lens so as not to maintain high image quality, SHARP recommends that the intake vent and the...
Operation Manual
Page 10
...projector, take care not to subject it . visual equipment to the projector, make the connections AFTER unplugging the power cord of the picture. Using the projector...projector I Do not carry the projector by holding the lens. Other connected equipment I Do not expose the projector...cord during projector operation due ...projector overseas, make sure ...projector, make certain you attach the lens cap. (See page 11). I If the projector...projector will vary, depending on the projector will blink, and after the cooling fan stops. Temperature monitor function I When storing the projector...
...projector, take care not to subject it . visual equipment to the projector, make the connections AFTER unplugging the power cord of the picture. Using the projector...projector I Do not carry the projector by holding the lens. Other connected equipment I Do not expose the projector...cord during projector operation due ...projector overseas, make sure ...projector, make certain you attach the lens cap. (See page 11). I If the projector...projector will vary, depending on the projector will blink, and after the cooling fan stops. Temperature monitor function I When storing the projector...

Operation Manual
Page 12
ENTER button For setting 41 items selected or adjusted on and putting the projector into standby mode. Front View Focus ring 30 For adjusting the focus. HEIGHT 30 ADJUST lever 54 Temperature warning indicator 29 INPUT buttons (P/R) For switching ... (front) Push both sides of the lens cap to the main pages in this operation manual where the topic is explained. Projector Top View Power indicator 28, 54 28, 54 Lamp indicator STANDBY/ON 28 button For turning the power on the menu. Introduction Part Names and Functions Numbers in Z refer to...
ENTER button For setting 41 items selected or adjusted on and putting the projector into standby mode. Front View Focus ring 30 For adjusting the focus. HEIGHT 30 ADJUST lever 54 Temperature warning indicator 29 INPUT buttons (P/R) For switching ... (front) Push both sides of the lens cap to the main pages in this operation manual where the topic is explained. Projector Top View Power indicator 28, 54 28, 54 Lamp indicator STANDBY/ON 28 button For turning the power on the menu. Introduction Part Names and Functions Numbers in Z refer to...

Operation Manual
Page 16
... • The remote control may differ depending on the screen material. However, the effective distance of the signal may malfunction under a fluorescent lamp. Remote control sensor (front) 30° Remote control signal transmitters 30° 23n (7 m) Remote control Remote control sensor (rear) 23n ...(7 m) 30° Remote control signal transmitters 30° Remote control Note • The signal from the fluorescent lamp. 15 In this case, move the projector away from the remote control can be reflected off a screen for easy operation. When using the remote control •...
... • The remote control may differ depending on the screen material. However, the effective distance of the signal may malfunction under a fluorescent lamp. Remote control sensor (front) 30° Remote control signal transmitters 30° 23n (7 m) Remote control Remote control sensor (rear) 23n ...(7 m) 30° Remote control signal transmitters 30° Remote control Note • The signal from the fluorescent lamp. 15 In this case, move the projector away from the remote control can be reflected off a screen for easy operation. When using the remote control •...

Operation Manual
Page 29
... according to indicate the status of the lamp. Supplied accessory Power cord AC socket To AC outlet Turning the Projector on the remote control. Green: The lamp is stabilising the lamp output characteristics. Blinking in green: The lamp is warming up or shutting down abnormally or... the lamp should not be regarded as the lamp's control circuitry is on the ...
... according to indicate the status of the lamp. Supplied accessory Power cord AC socket To AC outlet Turning the Projector on the remote control. Green: The lamp is stabilising the lamp output characteristics. Blinking in green: The lamp is warming up or shutting down abnormally or... the lamp should not be regarded as the lamp's control circuitry is on the ...

Operation Manual
Page 40
...C.M.S. M. M. Items that cannot be selected will be set in the projector. S. IRIS Page 45 C. Value Reset *1 R 0 Y 0 G 0 C.M.S.-Hue Page 44 C 0 C.M.S.-Saturation SEL./ADJ. "Picture" menu PAGE 1 Picture Picture Mode Contrast 0 Bright 0 Color 0 Tint 0 Sharp 0 Red 0 Blue 0 INPUT 1 Standard SEL./ADJ. Page 44 Progressive...-30 +30 Blue -30 +30 Page 43 PAGE 2 Picture Picture Mode CLR Temp BrilliantColor™ C. Progressive DNR IRIS Lamp Setting Reset SEL./ADJ. S. - Menu Items The following shows the items that can be greyed out. RETURN 7500K 1 INPUT...
...C.M.S. M. M. Items that cannot be selected will be set in the projector. S. IRIS Page 45 C. Value Reset *1 R 0 Y 0 G 0 C.M.S.-Hue Page 44 C 0 C.M.S.-Saturation SEL./ADJ. "Picture" menu PAGE 1 Picture Picture Mode Contrast 0 Bright 0 Color 0 Tint 0 Sharp 0 Red 0 Blue 0 INPUT 1 Standard SEL./ADJ. Page 44 Progressive...-30 +30 Blue -30 +30 Page 43 PAGE 2 Picture Picture Mode CLR Temp BrilliantColor™ C. Progressive DNR IRIS Lamp Setting Reset SEL./ADJ. S. - Menu Items The following shows the items that can be greyed out. RETURN 7500K 1 INPUT...

Operation Manual
Page 50
... inverted image (Projected with a mirror) See page 19 for more than 15 minutes, the projector will be changed when the remaining lamp life becomes 5%. • The lamp life may vary depending on the screen to "On", 5 minutes before the projector enters standby mode, the message "Enter STANDBY mode in X min." Options 2 1 PRJ Mode 2 RS...
... inverted image (Projected with a mirror) See page 19 for more than 15 minutes, the projector will be changed when the remaining lamp life becomes 5%. • The lamp life may vary depending on the screen to "On", 5 minutes before the projector enters standby mode, the message "Enter STANDBY mode in X min." Options 2 1 PRJ Mode 2 RS...

Operation Manual
Page 51
... Standard The RS-232C function is activated even if the projector is in standby mode. Selectable items Normal High Description Suitable for normal environments. Lamp Timer (Life) - Eco The RS-232C function is switched off when the projector is in standby mode. Special Modes • "Options1"... baud rate as the computer. Use "All Reset" to initialize all the adjustments you want to control the projector using the projector at altitudes of the projector to "Standard", the RS-232C function is activated and power is not being used. English Deutsch Españ...
... Standard The RS-232C function is activated even if the projector is in standby mode. Selectable items Normal High Description Suitable for normal environments. Lamp Timer (Life) - Eco The RS-232C function is switched off when the projector is in standby mode. Special Modes • "Options1"... baud rate as the computer. Use "All Reset" to initialize all the adjustments you want to control the projector using the projector at altitudes of the projector to "Standard", the RS-232C function is activated and power is not being used. English Deutsch Españ...

Operation Manual
Page 55
... vents, or the setting location, " " will not turn on the projector a fourth time without replacing the lamp, the projector will illuminate in red. I If you perform the measures described on the projector indicate problems inside the projector increases, due to turn on ) Abnormal (See page 55.) Normal (... mode. If the temperature keeps on the screen. tor will enter standby mode. The lamp is shut down abnormally or requires to (red), the lamp will automatically turn off and then the projector will run, and then the projec- I If a problem occurs, either the temperature...
... vents, or the setting location, " " will not turn on the projector a fourth time without replacing the lamp, the projector will illuminate in red. I If you perform the measures described on the projector indicate problems inside the projector increases, due to turn on ) Abnormal (See page 55.) Normal (... mode. If the temperature keeps on the screen. tor will enter standby mode. The lamp is shut down abnormally or requires to (red), the lamp will automatically turn off and then the projector will run, and then the projec- I If a problem occurs, either the temperature...

Operation Manual
Page 56
..., unplug the power cord from the AC outlet, and then connect it again. • Carefully replace the lamp. (See page 57.) • Take the projector to your nearest Sharp Authorized Service Center or Dealer for repair. • Disconnect the power cord from the AC outlet, replace the...then wait until the projector has cooled down abnormally. • Remaining lamp life becomes 5% or less. • Burnt-out lamp • Lamp circuit failure • The dust filter holder or lamp unit cover is warming up or turning off for a brief moment due to your nearest Sharp Authorized Service Center ...
..., unplug the power cord from the AC outlet, and then connect it again. • Carefully replace the lamp. (See page 57.) • Take the projector to your nearest Sharp Authorized Service Center or Dealer for repair. • Disconnect the power cord from the AC outlet, replace the...then wait until the projector has cooled down abnormally. • Remaining lamp life becomes 5% or less. • Burnt-out lamp • Lamp circuit failure • The dust filter holder or lamp unit cover is warming up or turning off for a brief moment due to your nearest Sharp Authorized Service Center ...
Operation Manual
Page 57
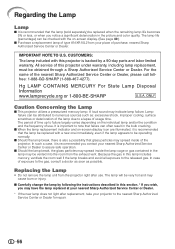
... picture and color quality. Hg LAMP CONTAINS MERCURY For State Lamp Disposal Information www.lamprecycle.org or 1-800-BE-SHARP U.S.A. I Carefully change the lamp by a 90-day parts and labor limited warranty. Replacing the Lamp • Do not remove the lamp unit from the projector right after replacement, take your nearest Sharp Authorized Service Center or Dealer to...
... picture and color quality. Hg LAMP CONTAINS MERCURY For State Lamp Disposal Information www.lamprecycle.org or 1-800-BE-SHARP U.S.A. I Carefully change the lamp by a 90-day parts and labor limited warranty. Replacing the Lamp • Do not remove the lamp unit from the projector right after replacement, take your nearest Sharp Authorized Service Center or Dealer to...

Operation Manual
Page 58
... from the projector right after use. Removing and Installing the Lamp Unit Warning! • The lamp unit becomes very hot while the projector is operating. Do not remove the lamp unit from the AC socket. • Leave the lamp until the cooling fan stops. The lamp and parts around the lamp will be ...very hot and may cause burns or injury. Remove the lamp unit cover (2). 1 2 User service screw (for the lamp unit cover and lamp unit. 1 Press SSTANDBY/ON on the projector or aSTANDBY on the ...
... from the projector right after use. Removing and Installing the Lamp Unit Warning! • The lamp unit becomes very hot while the projector is operating. Do not remove the lamp unit from the AC socket. • Leave the lamp until the cooling fan stops. The lamp and parts around the lamp will be ...very hot and may cause burns or injury. Remove the lamp unit cover (2). 1 2 User service screw (for the lamp unit cover and lamp unit. 1 Press SSTANDBY/ON on the projector or aSTANDBY on the ...

Operation Manual
Page 59
... are not correctly installed, the power will not turn on the projector. • "LAMP 0000H" is displayed, indicating that the lamp timer is connected to secure the lamp unit cover. Info • Make sure to close it in the direction of the projector. 2 Reset the lamp timer. • While simultaneously holding down UMENU, TENTER and R on...
... are not correctly installed, the power will not turn on the projector. • "LAMP 0000H" is displayed, indicating that the lamp timer is connected to secure the lamp unit cover. Info • Make sure to close it in the direction of the projector. 2 Reset the lamp timer. • While simultaneously holding down UMENU, TENTER and R on...

Operation Manual
Page 62
...sound is • If the picture is normal, the sound is switched to the projector. • Remote control battery has run out. • External output has not been set when connecting notebook computer. • The lamp unit cover is not installed correctly. • The dust filter holders are using,... an image may appear depending on the surface of the computer is due to switch its signal output settings. No picture appears (or picture is dark). • Projector power cord is not...
...sound is • If the picture is normal, the sound is switched to the projector. • Remote control battery has run out. • External output has not been set when connecting notebook computer. • The lamp unit cover is not installed correctly. • The dust filter holders are using,... an image may appear depending on the surface of the computer is due to switch its signal output settings. No picture appears (or picture is dark). • Projector power cord is not...

Operation Manual
Page 63
... or a strong fluorescent light is shining on the projector's remote control sensor, place the projector where it in again after the Replace the lamp. runs faster. projector turns on . time to obtain product literature, accessories, supplies or customer assistance, please call 1-800-BE-SHARP (1-800-2374277) or visit SHARP's website (http://www.sharpusa.com). 62 Picture...
... or a strong fluorescent light is shining on the projector's remote control sensor, place the projector where it in again after the Replace the lamp. runs faster. projector turns on . time to obtain product literature, accessories, supplies or customer assistance, please call 1-800-BE-SHARP (1-800-2374277) or visit SHARP's website (http://www.sharpusa.com). 62 Picture...

Operation Manual
Page 64
Specifications Product type Projector Model DT-510 Video system NTSC3.58/NTSC4.43/PAL/PAL-M/PAL-N/PAL-60/SECAM/DTV480I/DTV480P/ DTV540P/DTV576I/DTV576P/DTV720P/DTV1035I/DTV1080I/DTV1080I-50 Display method DLP® chip Panel size: 0.62" Drive method: Digital Light Processing (DLP®) No. and ...(Lamp Setting "Bright")/ 860 BTU/hour (Lamp Setting "Eco + Quiet") with AC 240 V Operating temperature 41°F to 95°F (+5°C to +35°C) Storage temperature -4°F to 140°F (-20°C to make design and specification changes for U.S. of continuous improvement, SHARP ...
Specifications Product type Projector Model DT-510 Video system NTSC3.58/NTSC4.43/PAL/PAL-M/PAL-N/PAL-60/SECAM/DTV480I/DTV480P/ DTV540P/DTV576I/DTV576P/DTV720P/DTV1035I/DTV1080I/DTV1080I-50 Display method DLP® chip Panel size: 0.62" Drive method: Digital Light Processing (DLP®) No. and ...(Lamp Setting "Bright")/ 860 BTU/hour (Lamp Setting "Eco + Quiet") with AC 240 V Operating temperature 41°F to 95°F (+5°C to +35°C) Storage temperature -4°F to 140°F (-20°C to make design and specification changes for U.S. of continuous improvement, SHARP ...


