
Operation Manual
Page 3
...PROJECTOR OFF BY DISCONNECTING THE POWER CORD. U.S.A. Responsible Party: SHARP ELECTRONICS CORPORATION Sharp Plaza, Mahwah, New Jersey 07430-2135 TEL: 1-800-BE-SHARP (1-800-237-4277) U.S.A. For disposal or recycling information, please contact your local authorities or, if you are located in inactive dots on the picture screen. Caution Concerning Lamp Replacement See "Replacing... (2) this projector continues to provide...SHARP PROJECTOR, MODEL DT-510 This device complies with the limits for about 90 seconds after the projector enters standby mode. ONLY PRODUCT DISPOSAL This projector...
...PROJECTOR OFF BY DISCONNECTING THE POWER CORD. U.S.A. Responsible Party: SHARP ELECTRONICS CORPORATION Sharp Plaza, Mahwah, New Jersey 07430-2135 TEL: 1-800-BE-SHARP (1-800-237-4277) U.S.A. For disposal or recycling information, please contact your local authorities or, if you are located in inactive dots on the picture screen. Caution Concerning Lamp Replacement See "Replacing... (2) this projector continues to provide...SHARP PROJECTOR, MODEL DT-510 This device complies with the limits for about 90 seconds after the projector enters standby mode. ONLY PRODUCT DISPOSAL This projector...

Operation Manual
Page 6
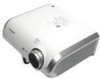
Introduction Reference Appendix Maintenance 51 Cleaning and Replacing the Dust Filters 52 Maintenance Indicators 54 Regarding the Lamp 56 Lamp 56 Caution Concerning the Lamp 56 Replacing the Lamp 56 Removing and Installing the Lamp Unit 57 Resetting the Lamp Timer 58 Connecting Pin Assignments 59 Computer Compatibility Chart 60 Troubleshooting 61 Service Information (For the U.S.) ..... 62 Specifications 63 Dimensions 64 Index 65 CONSUMER LIMITED WARRANTY (VALID IN USA ONLY 66 LIMITED WARRANTY (VALID IN CANADA ONLY 67 5
Introduction Reference Appendix Maintenance 51 Cleaning and Replacing the Dust Filters 52 Maintenance Indicators 54 Regarding the Lamp 56 Lamp 56 Caution Concerning the Lamp 56 Replacing the Lamp 56 Removing and Installing the Lamp Unit 57 Resetting the Lamp Timer 58 Connecting Pin Assignments 59 Computer Compatibility Chart 60 Troubleshooting 61 Service Information (For the U.S.) ..... 62 Specifications 63 Dimensions 64 Index 65 CONSUMER LIMITED WARRANTY (VALID IN USA ONLY 66 LIMITED WARRANTY (VALID IN CANADA ONLY 67 5
Operation Manual
Page 8
...a qualified technician to restore the product to Texas Instruments. c. Adjust only those controls that produce heat. • The DLP® logo, the DLP® medallion and BrilliantColor™ are trademarks of Texas Instruments. • Microsoft® and Windows® are covered by...If liquid has been spilled, or objects have the same characteristics as an improper adjustment of fire or electric shock. 16. Replacement Parts When replacement parts are trademarks or registered trademarks of their respective companies. • Some IC chips in the United States. • Macintosh...
...a qualified technician to restore the product to Texas Instruments. c. Adjust only those controls that produce heat. • The DLP® logo, the DLP® medallion and BrilliantColor™ are trademarks of Texas Instruments. • Microsoft® and Windows® are covered by...If liquid has been spilled, or objects have the same characteristics as an improper adjustment of fire or electric shock. 16. Replacement Parts When replacement parts are trademarks or registered trademarks of their respective companies. • Some IC chips in the United States. • Macintosh...

Operation Manual
Page 9
...the lens so as not to avoid personal injury caused by a Sharp Authorized Service Center or Dealer. Warning about placing the projector in high-altitude areas such as the projector is used for replacement. I When placing the projector in a high position, make certain it is not in these environments...bright light. Do not set "Fan Mode" to maintain high image quality, SHARP recommends that it is subjected to +35°C). Caution regarding placing of temperature. I Place the projector on . See "Replacing the Lamp" on the screen washes out the colors, making viewing difficult. ...
...the lens so as not to avoid personal injury caused by a Sharp Authorized Service Center or Dealer. Warning about placing the projector in high-altitude areas such as the projector is used for replacement. I When placing the projector in a high position, make certain it is not in these environments...bright light. Do not set "Fan Mode" to maintain high image quality, SHARP recommends that it is subjected to +35°C). Caution regarding placing of temperature. I Place the projector on . See "Replacing the Lamp" on the screen washes out the colors, making viewing difficult. ...

Operation Manual
Page 15
Caution • Danger of explosion if battery is harmful to leak or explode. Replace only with this projector may run down in a short period, depending on the cover and slide it in the direction of the arrow. 2 Insert the batteries. • Insert the ... to leak. This may shorten the life of new batteries or may cause them to leak. • Remove the batteries from leaked batteries is incorrectly replaced. Part Names and Functions (Continued) Inserting the Batteries 1 Press the P mark on how they have different properties, therefore do not mix batteries of different types...
Caution • Danger of explosion if battery is harmful to leak or explode. Replace only with this projector may run down in a short period, depending on the cover and slide it in the direction of the arrow. 2 Insert the batteries. • Insert the ... to leak. This may shorten the life of new batteries or may cause them to leak. • Remove the batteries from leaked batteries is incorrectly replaced. Part Names and Functions (Continued) Inserting the Batteries 1 Press the P mark on how they have different properties, therefore do not mix batteries of different types...

Operation Manual
Page 29
...shutting down abnormally or the lamp should be done before performing the operations written below. (See pages 23 to start projection. Turning the Projector On/Off Connecting the Power Cord Plug the supplied power cord into the AC socket on . Then plug into standby mode and immediately...change the language according to indicate the status of the lamp. It should be replaced. • When switching on the remote control. Supplied accessory Power cord AC socket To AC outlet Turning the Projector on Note that the connections to external equipment and power outlet should not be ...
...shutting down abnormally or the lamp should be done before performing the operations written below. (See pages 23 to start projection. Turning the Projector On/Off Connecting the Power Cord Plug the supplied power cord into the AC socket on . Then plug into standby mode and immediately...change the language according to indicate the status of the lamp. It should be replaced. • When switching on the remote control. Supplied accessory Power cord AC socket To AC outlet Turning the Projector on Note that the connections to external equipment and power outlet should not be ...

Operation Manual
Page 53
...a dusty or smoky location. 1 Press SSTANDBY/ON on the projector to put the projector into standby mode. • Wait until the cooling fan stops. • Disconnect the power cord and unplug the power cord from the AC socket. Cleaning and Replacing the Dust Filters Cleaning the Dust Filters Info • The dust... filters should be cleaned every 100 hours of use. Clean the filters more often when the projector is used in the tabs while lifting up. 3 Clean the ...
...a dusty or smoky location. 1 Press SSTANDBY/ON on the projector to put the projector into standby mode. • Wait until the cooling fan stops. • Disconnect the power cord and unplug the power cord from the AC socket. Cleaning and Replacing the Dust Filters Cleaning the Dust Filters Info • The dust... filters should be cleaned every 100 hours of use. Clean the filters more often when the projector is used in the tabs while lifting up. 3 Clean the ...

Operation Manual
Page 54
... the filters become too dirty to lock them out of "Cleaning the Dust Filters"), remove the dust filters, then replace with new ones. • Pick the dust filters up with your nearest Sharp Authorized Service Center or Dealer. Appendix 53 Reinforcement seal After removing the filter holders (see step 2 of the filter...
... the filters become too dirty to lock them out of "Cleaning the Dust Filters"), remove the dust filters, then replace with new ones. • Pick the dust filters up with your nearest Sharp Authorized Service Center or Dealer. Appendix 53 Reinforcement seal After removing the filter holders (see step 2 of the filter...

Operation Manual
Page 55
... the picture. The lamp is abnormally high. (See page 55.) 54 I If you perform the measures described on the projector a fourth time without replacing the lamp, the projector will enter standby mode. After the projector has entered standby mode, follow the procedures given below. I If a problem occurs, either the temperature warning indicator or the...
... the picture. The lamp is abnormally high. (See page 55.) 54 I If you perform the measures described on the projector a fourth time without replacing the lamp, the projector will enter standby mode. After the projector has entered standby mode, follow the procedures given below. I If a problem occurs, either the temperature warning indicator or the...

Operation Manual
Page 56
...holders and lamp unit cover are securely installed, contact your nearest Sharp Authorized Service Center or Dealer for about 90 seconds. Time to your nearest Sharp Authorized Service Center or Dealer for repair. • Please exercise care when replacing the lamp. • Securely install the cover. •... In this case, unplug the power cord from the AC outlet, and then connect it again. • Carefully replace the lamp. (See page 57.) • Take the projector to change and this function is turned off .) Red on Green blinks (Cooling) Red blinks The power indicator blinks...
...holders and lamp unit cover are securely installed, contact your nearest Sharp Authorized Service Center or Dealer for about 90 seconds. Time to your nearest Sharp Authorized Service Center or Dealer for repair. • Please exercise care when replacing the lamp. • Securely install the cover. •... In this case, unplug the power cord from the AC outlet, and then connect it again. • Carefully replace the lamp. (See page 57.) • Take the projector to change and this function is turned off .) Red on Green blinks (Cooling) Red blinks The power indicator blinks...
Operation Manual
Page 57
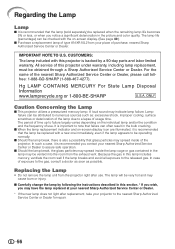
...Carefully change the lamp by a 90-day parts and labor limited warranty. In case of type AN-XR10L2 from the projector right after replacement, take your nearest Sharp Authorized Service Center or Dealer to assure safe operation. The lamp life (percentage) can be checked with the on-screen...4277). In such a case, it is recommended that the lamp (sold separately) be replaced when the remaining lamp life becomes 5% or less, or when you contact your projector to the nearest Sharp Authorized Service Center or Dealer for repair. 56 IMPORTANT NOTE TO U.S. Regarding the Lamp ...
...Carefully change the lamp by a 90-day parts and labor limited warranty. In case of type AN-XR10L2 from the projector right after replacement, take your nearest Sharp Authorized Service Center or Dealer to assure safe operation. The lamp life (percentage) can be checked with the on-screen...4277). In such a case, it is recommended that the lamp (sold separately) be replaced when the remaining lamp life becomes 5% or less, or when you contact your projector to the nearest Sharp Authorized Service Center or Dealer for repair. 56 IMPORTANT NOTE TO U.S. Regarding the Lamp ...

Operation Manual
Page 59
..., keep the lamp unit horizontal and do not tilt it in the direction of the projector. 2 Reset the lamp timer. • While simultaneously holding down UMENU, TENTER and R on the projector, press SSTANDBY/ON on the projector. • "LAMP 0000H" is displayed, indicating that the lamp timer is connected to...8226; Press the lamp unit firmly into the AC socket of the arrow. Securing screws 2 3 1 Resetting the Lamp Timer Reset the lamp timer after replacing the lamp. Info • If the lamp unit and lamp unit cover are not correctly installed, the power will not turn on the lamp unit...
..., keep the lamp unit horizontal and do not tilt it in the direction of the projector. 2 Reset the lamp timer. • While simultaneously holding down UMENU, TENTER and R on the projector, press SSTANDBY/ON on the projector. • "LAMP 0000H" is displayed, indicating that the lamp timer is connected to...8226; Press the lamp unit firmly into the AC socket of the arrow. Securing screws 2 3 1 Resetting the Lamp Timer Reset the lamp timer after replacing the lamp. Info • If the lamp unit and lamp unit cover are not correctly installed, the power will not turn on the lamp unit...

Operation Manual
Page 63
...8226; The remote control may be too far away from the projector. • If direct sunlight or a strong fluorescent light is shining on the projector's remote control sensor, place the projector where it in again after the Replace the lamp. Service Information (For the U.S.) For the location ...Service Center, or to turn on . time to obtain product literature, accessories, supplies or customer assistance, please call 1-800-BE-SHARP (1-800-2374277) or visit SHARP's website (http://www.sharpusa.com). 62 Picture is selected. • Select the HDMI Setting ("Standard" or "Enhanced") that ...
...8226; The remote control may be too far away from the projector. • If direct sunlight or a strong fluorescent light is shining on the projector's remote control sensor, place the projector where it in again after the Replace the lamp. Service Information (For the U.S.) For the location ...Service Center, or to turn on . time to obtain product literature, accessories, supplies or customer assistance, please call 1-800-BE-SHARP (1-800-2374277) or visit SHARP's website (http://www.sharpusa.com). 62 Picture is selected. • Select the HDMI Setting ("Standard" or "Enhanced") that ...

Operation Manual
Page 64
...input: 0-0.7 Vp-p, positive, 75 Ω terminated (INPUT 5) HORIZONTAL SYNC. of continuous improvement, SHARP reserves the right to +60°C) Cabinet Plastic I/R carrier frequency 38 kHz Dimensions (approx.) 12 ...215; 294 (D) mm) (including adjustment foot and projecting parts) Weight (approx.) 8.8 lbs. (4.0 kg) Replacement parts Remote control, Power cord for product improvement without prior notice. SIGNAL: Same as above HDMI input signal ...these values in individual units. 63 Appendix Specifications Product type Projector Model DT-510 Video system NTSC3.58/NTSC4.43/PAL/PAL-M/PAL-N/PAL-...
...input: 0-0.7 Vp-p, positive, 75 Ω terminated (INPUT 5) HORIZONTAL SYNC. of continuous improvement, SHARP reserves the right to +60°C) Cabinet Plastic I/R carrier frequency 38 kHz Dimensions (approx.) 12 ...215; 294 (D) mm) (including adjustment foot and projecting parts) Weight (approx.) 8.8 lbs. (4.0 kg) Replacement parts Remote control, Power cord for product improvement without prior notice. SIGNAL: Same as above HDMI input signal ...these values in individual units. 63 Appendix Specifications Product type Projector Model DT-510 Video system NTSC3.58/NTSC4.43/PAL/PAL-M/PAL-N/PAL-...

Operation Manual
Page 66
... Power cord 28 PRJ Mode 19, 49 Progressive 44 R-03 batteries 14 Rear adjustment foot 31 Red 43 Remote control 13 Remote control sensor 15 Replacing the lamp 56, 57 Resize 36, 37 RESIZE button 36 RETURN button 41 RGB/COMP. button 48 RS-232C Setting 50 Saturation 44... Sharp 43 SIDE BAR 36, 37 Special Modes 46 STANDBY button 29 STANDBY/ON button 28, 29 STANDBY Mode 50 STRETCH 36, 37 Subtitle 47 Supplied ...
... Power cord 28 PRJ Mode 19, 49 Progressive 44 R-03 batteries 14 Rear adjustment foot 31 Red 43 Remote control 13 Remote control sensor 15 Replacing the lamp 56, 57 Resize 36, 37 RESIZE button 36 RETURN button 41 RGB/COMP. button 48 RS-232C Setting 50 Saturation 44... Sharp 43 SIDE BAR 36, 37 Special Modes 46 STANDBY button 29 STANDBY/ON button 28, 29 STANDBY Mode 50 STRETCH 36, 37 Subtitle 47 Supplied ...


