
LC-32D42U | LC-37D42U Operation Manual
Page 2
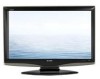
...OR ELECTRIC SHOCK, DO NOT EXPOSE THIS PRODUCT TO RAIN OR MOISTURE. ENGLISH LC-32D42U LC-37D42U LIQUID CRYSTAL TELEVISION ENGLISH OPERATION MANUAL • The illustrations and on-screen displays in this manual are based on the LC-32D42U model. The exclamation point within the product's enclosure that may vary ...; The examples used throughout this operation manual are located at the rear of electric shock to persons. The numbers are for explanation purposes and may be of sufficient magnitude to the presence of loss or theft, please record the TV's model and serial numbers in the ...
...OR ELECTRIC SHOCK, DO NOT EXPOSE THIS PRODUCT TO RAIN OR MOISTURE. ENGLISH LC-32D42U LC-37D42U LIQUID CRYSTAL TELEVISION ENGLISH OPERATION MANUAL • The illustrations and on-screen displays in this manual are based on the LC-32D42U model. The exclamation point within the product's enclosure that may vary ...; The examples used throughout this operation manual are located at the rear of electric shock to persons. The numbers are for explanation purposes and may be of sufficient magnitude to the presence of loss or theft, please record the TV's model and serial numbers in the ...
LC-32D42U | LC-37D42U Operation Manual
Page 7
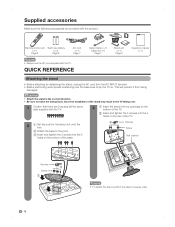
... it from the AC INPUT terminal. • Before performing work spread cushioning over . 1 Confirm that there are provided with the TV. CAUTION • Attach the stand in the TV falling over the base area to the post. 3 Insert and tighten the 5 screws into the 5 holes on . Hex key Screw Soft... • To detach the stand, perform the steps in reverse order. QUICK REFERENCE Cable Clamp (g1) Cable tie (g1) Page 7 Stand unit (g1) Page 6 Operation manual (g1) Attaching the stand • Before attaching (or detaching) the stand, unplug the AC cord from being damaged.
... it from the AC INPUT terminal. • Before performing work spread cushioning over . 1 Confirm that there are provided with the TV. CAUTION • Attach the stand in the TV falling over the base area to the post. 3 Insert and tighten the 5 screws into the 5 holes on . Hex key Screw Soft... • To detach the stand, perform the steps in reverse order. QUICK REFERENCE Cable Clamp (g1) Cable tie (g1) Page 7 Stand unit (g1) Page 6 Operation manual (g1) Attaching the stand • Before attaching (or detaching) the stand, unplug the AC cord from being damaged.

LC-32D42U | LC-37D42U Operation Manual
Page 9
... and basic channel setup functions and USING EXTERNAL EQUIPMENT SECTION for an extended period of new batteries or cause chemical leakage in your AQUOS operation manual. 8 If you find any chemical leakage, wipe thoroughly with a cloth. • The batteries supplied with this product may have a ... IF YOU STILL ENCOUNTER NO POWER, PLEASE CONTACT US AT 1-800-BE-SHARP. IMPORTANT: IF THE UNIT DOES NOT POWER ON - Please refer to the AQUOS television. QUICK REFERENCE If the remote control fails to operate TV functions, replace the batteries in the remote control unit. 1 Open the ...
... and basic channel setup functions and USING EXTERNAL EQUIPMENT SECTION for an extended period of new batteries or cause chemical leakage in your AQUOS operation manual. 8 If you find any chemical leakage, wipe thoroughly with a cloth. • The batteries supplied with this product may have a ... IF YOU STILL ENCOUNTER NO POWER, PLEASE CONTACT US AT 1-800-BE-SHARP. IMPORTANT: IF THE UNIT DOES NOT POWER ON - Please refer to the AQUOS television. QUICK REFERENCE If the remote control fails to operate TV functions, replace the batteries in the remote control unit. 1 Open the ...

LC-32D42U | LC-37D42U Operation Manual
Page 14
... from INPUT on the remote control unit or on the TV. (See pages 29 and 30.) CAUTION • To protect equipment, always turn off the TV before connecting any external equipment. • Please read the relevant operation manual (Blu-ray disc player, etc.) carefully before making connections.... • If your TV like a Blu-ray disc player, HD-DVD player, DVD player, VCR, Digital TV tuner, HDMI equipment, game console or camcorder. When using ...
... from INPUT on the remote control unit or on the TV. (See pages 29 and 30.) CAUTION • To protect equipment, always turn off the TV before connecting any external equipment. • Please read the relevant operation manual (Blu-ray disc player, etc.) carefully before making connections.... • If your TV like a Blu-ray disc player, HD-DVD player, DVD player, VCR, Digital TV tuner, HDMI equipment, game console or camcorder. When using ...

LC-32D42U | LC-37D42U Operation Manual
Page 20
... feature allows a TV station to toggle between audio modes. In addition, it is possible for the program. You can receive mono sound, stereo sound and Secondary Audio Programs (SAP). This feature is difficult to hear. • Obtain a clearer sound by manually switching to fi... language, supplementary commentary or other information. (SAP is mono sound.) If stereo sound is called Multi-channel Television Sound (MTS). The TV with MTS can enjoy Hi-Fi stereo sound or SAP broadcasts where available. • Stereo broadcasts View programs like weather information. Press ...
... feature allows a TV station to toggle between audio modes. In addition, it is possible for the program. You can receive mono sound, stereo sound and Secondary Audio Programs (SAP). This feature is difficult to hear. • Obtain a clearer sound by manually switching to fi... language, supplementary commentary or other information. (SAP is mono sound.) If stereo sound is called Multi-channel Television Sound (MTS). The TV with MTS can enjoy Hi-Fi stereo sound or SAP broadcasts where available. • Stereo broadcasts View programs like weather information. Press ...

LC-32D42U | LC-37D42U Operation Manual
Page 21
... explanation purposes (some are the same. • The screens in gray • This indicates that the item cannot be selected. 4 Item displayed in the operation manual are for the remote control. ENTER: Press to go to operate the menu. NOTE • Menu options differ in the selected input modes, but the...
... explanation purposes (some are the same. • The screens in gray • This indicates that the item cannot be selected. 4 Item displayed in the operation manual are for the remote control. ENTER: Press to go to operate the menu. NOTE • Menu options differ in the selected input modes, but the...
LC-32D42U | LC-37D42U Operation Manual
Page 23
... already set area. 6 When "Air" is found , confirm the type of connection made with your region, follow the instructions below to manually memorize the channels. When "Cable" is selected in Antenna setting: Press a/b to select "Analog & Digital Search Start" to search both analog and ..., select "Cancel", and then press ENTER. 4 Press MENU to select "Air" or "Cable". Antenna setting Make sure what kind of connection made with your TV when selecting "Air" or "Cable". 5 Press c/d to exit. Press ENTER to enter the setting. 5 Press MENU to step 4. 3 Input the 4-digit...
... already set area. 6 When "Air" is found , confirm the type of connection made with your region, follow the instructions below to manually memorize the channels. When "Cable" is selected in Antenna setting: Press a/b to select "Analog & Digital Search Start" to search both analog and ..., select "Cancel", and then press ENTER. 4 Press MENU to select "Air" or "Cable". Antenna setting Make sure what kind of connection made with your TV when selecting "Air" or "Cable". 5 Press c/d to exit. Press ENTER to enter the setting. 5 Press MENU to step 4. 3 Input the 4-digit...

LC-32D42U | LC-37D42U Operation Manual
Page 28
... item. 3 Press c/d to adjust the item to select "Yes", and then press ENTER. 27 NOTE • You can adjust the sound quality to the operation manual of your preference with the following settings. NOTE • Audio menu is grayed out when Output Select is set to "Variable". • For resetting all...
... item. 3 Press c/d to adjust the item to select "Yes", and then press ENTER. 27 NOTE • You can adjust the sound quality to the operation manual of your preference with the following settings. NOTE • Audio menu is grayed out when Output Select is set to "Variable". • For resetting all...

LC-32D42U | LC-37D42U Operation Manual
Page 30
... any color. NOTE • See pages 13 and 14 for the signal type. • Setting INPUT 1 signal selection to your external equipment operation manual for the signal type. • If you set , and then press ENTER. • If the selected signal type is connected will automatically select ...select "Option". 2 Press a/b to select "Input Select", and then press ENTER. 3 Press a/b to select the signal type you may need to Auto, the TV will result in clearly from the external equipment connected to INPUT 1, you want to set INPUT 1 to change the input. Input Select If the image...
... any color. NOTE • See pages 13 and 14 for the signal type. • Setting INPUT 1 signal selection to your external equipment operation manual for the signal type. • If you set , and then press ENTER. • If the selected signal type is connected will automatically select ...select "Option". 2 Press a/b to select "Input Select", and then press ENTER. 3 Press a/b to select the signal type you may need to Auto, the TV will result in clearly from the external equipment connected to INPUT 1, you want to set INPUT 1 to change the input. Input Select If the image...

LC-32D42U | LC-37D42U Operation Manual
Page 31
... a/b/c/d to select the desired setting and press ENTER. 4 Press c/d to select "Yes", and then press ENTER. 5 Press MENU to exit. INPUT SOURCE TV INPUT1 INPUT2 INPUT3 INPUT4 INPUT5 INPUT6 Input Skip This setting allows you to skip the HDMI/PC-IN Input on the Input Selection operation. 1 Press... 5 or INPUT 6) you wish to the HDMI terminal, the image may not come in clearly. 30 NOTE • Refer to your external equipment operation manual for the signal type. • "Audio Select" is only available for an audio signal via the R-AUDIO -L terminal. 6 Press MENU to exit. ...
... a/b/c/d to select the desired setting and press ENTER. 4 Press c/d to select "Yes", and then press ENTER. 5 Press MENU to exit. INPUT SOURCE TV INPUT1 INPUT2 INPUT3 INPUT4 INPUT5 INPUT6 Input Skip This setting allows you to skip the HDMI/PC-IN Input on the Input Selection operation. 1 Press... 5 or INPUT 6) you wish to the HDMI terminal, the image may not come in clearly. 30 NOTE • Refer to your external equipment operation manual for the signal type. • "Audio Select" is only available for an audio signal via the R-AUDIO -L terminal. 6 Press MENU to exit. ...

LC-32D42U | LC-37D42U Operation Manual
Page 32
... adjustment Ordinarily you can easily adjust the picture as necessary to select "Yes", and then press ENTER. • Auto Sync. In some cases, however, manual adjustment is successful, "Completed" displays. may fail even if "Completed" displays. • Auto Sync. adjustment (for Analog PC input mode only) For ... it on before starting Auto Sync. • It is moved while executing Auto Sync. • Be sure to connect the PC to the TV and switch it to select the specific adjustment item. is needed to optimize the image. 1 Press MENU to display the MENU screen,...
... adjustment Ordinarily you can easily adjust the picture as necessary to select "Yes", and then press ENTER. • Auto Sync. In some cases, however, manual adjustment is successful, "Completed" displays. may fail even if "Completed" displays. • Auto Sync. adjustment (for Analog PC input mode only) For ... it on before starting Auto Sync. • It is moved while executing Auto Sync. • Be sure to connect the PC to the TV and switch it to select the specific adjustment item. is needed to optimize the image. 1 Press MENU to display the MENU screen,...

LC-32D42U | LC-37D42U Operation Manual
Page 33
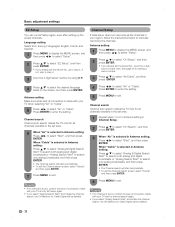
...be changed. • The Language settings will not be changed. • The Secret number settings will not be automatically adjusted. It cannot be manually adjusted. • Adjustments are made and the settings cannot be restored to normal, you can also select a language from among 3 languages: English,... power shuts off and then comes back on the screen. 3 Press c/d to select "Yes", and then press ENTER. • "Now, TV will be changed. Useful adjustment settings Language setting You can reset the settings to the factory preset values. 1 Press MENU to display the MENU screen...
...be changed. • The Language settings will not be changed. • The Secret number settings will not be automatically adjusted. It cannot be manually adjusted. • Adjustments are made and the settings cannot be restored to normal, you can also select a language from among 3 languages: English,... power shuts off and then comes back on the screen. 3 Press c/d to select "Yes", and then press ENTER. • "Now, TV will be changed. Useful adjustment settings Language setting You can reset the settings to the factory preset values. 1 Press MENU to display the MENU screen...

LC-32D42U | LC-37D42U Operation Manual
Page 38
... the mode for each input mode. (For example, select STANDARD for TV input and DYNAMIC for VIDEO input.) • "Enhanced Picture Contrast" ... settings AV MODE AV MODE gives you have to be registered manually to customize settings as shown below are allowed. [Enhanced Picture Contrast...AV MODE: GAME AV MODE: DYNAMIC (Fixed) AV MODE: USER [TV] When the input source is TV, INPUT 1, 2 or 3 terminals (Example) AV MODE: STANDARD ... AV MODE: USER [ ] NOTE • You can set the correct signal manually. Input Signal (for each input source. [Enhanced Picture Contrast: off ] USER ...
... the mode for each input mode. (For example, select STANDARD for TV input and DYNAMIC for VIDEO input.) • "Enhanced Picture Contrast" ... settings AV MODE AV MODE gives you have to be registered manually to customize settings as shown below are allowed. [Enhanced Picture Contrast...AV MODE: GAME AV MODE: DYNAMIC (Fixed) AV MODE: USER [TV] When the input source is TV, INPUT 1, 2 or 3 terminals (Example) AV MODE: STANDARD ... AV MODE: USER [ ] NOTE • You can set the correct signal manually. Input Signal (for each input source. [Enhanced Picture Contrast: off ] USER ...

LC-32D42U | LC-37D42U Operation Manual
Page 54
... number is . Option aaaa 3 Press and hold both CHr and VOLk on the TV simultaneously until the message appears on the screen. NOTE • As a precautionary measure, make a note of your secret number above, cut it from this manual, and keep it in a safe place. 53 Setup Secret No. CLEARING THE SECRET...
... number is . Option aaaa 3 Press and hold both CHr and VOLk on the TV simultaneously until the message appears on the screen. NOTE • As a precautionary measure, make a note of your secret number above, cut it from this manual, and keep it in a safe place. 53 Setup Secret No. CLEARING THE SECRET...


