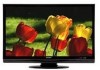
Operation Manual
Page 1
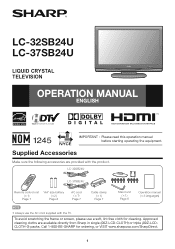
Approved cleaning cloths are provided with the TV. Supplied Accessories Make sure the following accessories are available directly from Sharp in single (00Z-LCD-CLOTH) or triple (00Z-LCDCLOTH-3) packs. Call 1-800-BE-SHARP for cleaning. LC-32SB24U LC-37SB24U Remote control unit (g1) Page 7 "AA" size battery (g2) Page 8 AC cord (g1) Page 7 Cable clamp (g1) Page 7 Stand unit...
Approved cleaning cloths are provided with the TV. Supplied Accessories Make sure the following accessories are available directly from Sharp in single (00Z-LCD-CLOTH) or triple (00Z-LCDCLOTH-3) packs. Call 1-800-BE-SHARP for cleaning. LC-32SB24U LC-37SB24U Remote control unit (g1) Page 7 "AA" size battery (g2) Page 8 AC cord (g1) Page 7 Cable clamp (g1) Page 7 Stand unit...
Operation Manual
Page 7
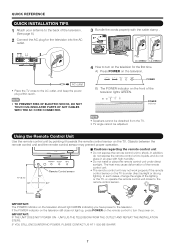
... CONTACT US AT 1-800-BE-SHARP. 7 LC-32SB24U LC-37SB24U 4 How to turn the power on. The heat may cause deformation of the remote control unit. • The remote control unit may prevent proper operation. 17´ (5 m) 30º Remote Control sensor 30º 30º ■ Cautions regarding the remote control unit • Do not expose the remote control unit to shock. A) Press...
... CONTACT US AT 1-800-BE-SHARP. 7 LC-32SB24U LC-37SB24U 4 How to turn the power on. The heat may cause deformation of the remote control unit. • The remote control unit may prevent proper operation. 17´ (5 m) 30º Remote Control sensor 30º 30º ■ Cautions regarding the remote control unit • Do not expose the remote control unit to shock. A) Press...
Operation Manual
Page 8
...75-ohm coaxial cable 300/75-ohm adapter (commercially available) IN OUT Combiner (commercially available) To TV antenna terminal Installing Batteries in the Remote Control Unit If the remote control fails to the (e) and (f) indications in the illustration as they are worn out. Chemicals that ...are used , it may have a shorter life expectancy due to the TV using the remote control unit for a coaxial cable. CAUTION • Place the batteries with their terminals corresponding to operate TV functions, replace the batteries in contact with F-type connector that are used ...
...75-ohm coaxial cable 300/75-ohm adapter (commercially available) IN OUT Combiner (commercially available) To TV antenna terminal Installing Batteries in the Remote Control Unit If the remote control fails to the (e) and (f) indications in the illustration as they are worn out. Chemicals that ...are used , it may have a shorter life expectancy due to the TV using the remote control unit for a coaxial cable. CAUTION • Place the batteries with their terminals corresponding to operate TV functions, replace the batteries in contact with F-type connector that are used ...
Operation Manual
Page 9
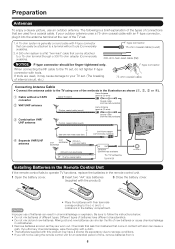
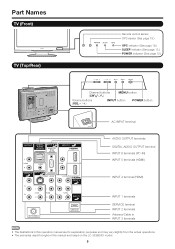
Part Names TV (Front) TV (Top/Rear) Remote control sensor OPC sensor (See page 18.) OPC indicator (See page 18.) SLEEP indicator (See page 13.) POWER indicator (See page 12.) Channel buttons (CHV/U) MENU ... operation manual are for explanation purposes and may vary slightly from the actual operations. • The examples used throughout this manual are based on the LC-32SB24U model. 9
Part Names TV (Front) TV (Top/Rear) Remote control sensor OPC sensor (See page 18.) OPC indicator (See page 18.) SLEEP indicator (See page 13.) POWER indicator (See page 12.) Channel buttons (CHV/U) MENU ... operation manual are for explanation purposes and may vary slightly from the actual operations. • The examples used throughout this manual are based on the LC-32SB24U model. 9
Operation Manual
Page 10
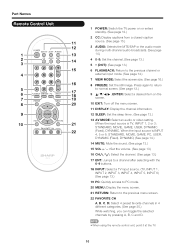
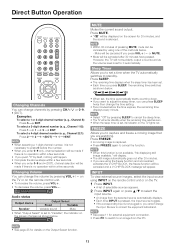
...watching, you can toggle the selected channels by pressing A, B, C and D. • When using the remote control unit, point it at the TV. 10 Part Names Remote Control Unit 1 2 3 4 5 6 7 8 9 10 1 POWER: Switch the TV power on the screen. 20 10 EXIT: Turn off the menu screen. 11 DISPLAY: Display the channel ...13.) 16 CHr/s: Select the channel. (See page 13.) 17 ENT: Jumps to a channel after selecting with the 0-9 buttons. 18 INPUT: Select a TV input source. (TV, INPUT 1, INPUT 2, INPUT 3, INPUT 4, INPUT 5, INPUT 6) (See page 13.) 19 PC: Quickly access to PC mode. 20 MENU: Display the...
...watching, you can toggle the selected channels by pressing A, B, C and D. • When using the remote control unit, point it at the TV. 10 Part Names Remote Control Unit 1 2 3 4 5 6 7 8 9 10 1 POWER: Switch the TV power on the screen. 20 10 EXIT: Turn off the menu screen. 11 DISPLAY: Display the channel ...13.) 16 CHr/s: Select the channel. (See page 13.) 17 ENT: Jumps to a channel after selecting with the 0-9 buttons. 18 INPUT: Select a TV input source. (TV, INPUT 1, INPUT 2, INPUT 3, INPUT 4, INPUT 5, INPUT 6) (See page 13.) 19 PC: Quickly access to PC mode. 20 MENU: Display the...
Operation Manual
Page 11
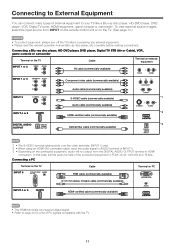
... the input source from INPUT on the remote control unit or on the connected equipment, audio will not output from the DIGITAL AUDIO OUTPUT terminal in HDMI connection. Connecting a Blu-ray disc player, HD-DVD player, DVD player, Digital TV STB (Air or Cable), VCR, game...external equipment. • Please read the relevant operation manual (Blu-ray disc player, etc.) carefully before making connections. Connecting a PC Terminal on the TV INPUT 6 Cable RGB cable (commercially available) Terminal on PC Ø 3.5 mm stereo minijack cable (commercially available) INPUT 4 or 5 HDMI-certi&#...
... the input source from INPUT on the remote control unit or on the connected equipment, audio will not output from the DIGITAL AUDIO OUTPUT terminal in HDMI connection. Connecting a Blu-ray disc player, HD-DVD player, DVD player, Digital TV STB (Air or Cable), VCR, game...external equipment. • Please read the relevant operation manual (Blu-ray disc player, etc.) carefully before making connections. Connecting a PC Terminal on the TV INPUT 6 Cable RGB cable (commercially available) Terminal on PC Ø 3.5 mm stereo minijack cable (commercially available) INPUT 4 or 5 HDMI-certi&#...
Operation Manual
Page 12
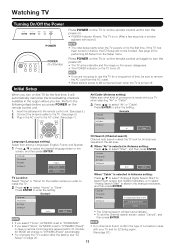
...Cable CH Search Start Cancel When "Cable" is set to "STANDARD". • If you press POWER on the remote control unit. 1. See page 20 for a long period of connection made with your TV and try EZ Setup again. (See page 20.) Setup" on page 20. 12 Press ENTER to "DYNAMIC (... • For changing the TV Location after the setting, see "EZ • If no remote control signal is turned off. Watching TV Turning On/Off the Power Press POWER on the TV or on the remote control unit to enter the setting. Press POWER on the TV or on the remote control unit again to turn the ...
...Cable CH Search Start Cancel When "Cable" is set to "STANDARD". • If you press POWER on the remote control unit. 1. See page 20 for a long period of connection made with your TV and try EZ Setup again. (See page 20.) Setup" on page 20. 12 Press ENTER to "DYNAMIC (... • For changing the TV Location after the setting, see "EZ • If no remote control signal is turned off. Watching TV Turning On/Off the Power Press POWER on the TV or on the remote control unit to enter the setting. Press POWER on the TV or on the remote control unit again to turn the ...
Operation Manual
Page 13
... on the screen for details on the remote control unit. • To increase the volume, press VOLk. • To decrease the volume, press VOLl. 20 Audio status Output device Speaker Output Select Fixed Variable Variable sound Mute • When "Output Select" is set a time when the TV automatically switches to cancel the function...
... on the screen for details on the remote control unit. • To increase the volume, press VOLk. • To decrease the volume, press VOLl. 20 Audio status Output device Speaker Output Select Fixed Variable Variable sound Mute • When "Output Select" is set a time when the TV automatically switches to cancel the function...
Operation Manual
Page 17
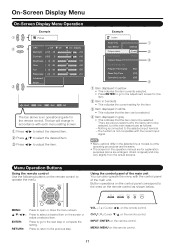
... Setup Digital Caption Info. VOLl/k: Cursor c/d on the remote control. 17 On-Screen Display Menu On-Screen Display Menu Operation Example Picture OPC Off On Backlight [b12] a16 Contrast [b30] 0 Brightness [ 0] a30 Color [ 0] a30 Tint [ 0] a30 Sharpness [ b2] a10 Advanced Reset On : Display b16 b40...the actual screens. Press to return to open or close the menu screen. MENU: MENU on the remote control. Menu Operation Buttons Using the remote control Use the following buttons on the screen or adjust a selected item. Press to select a desired item on the...
... Setup Digital Caption Info. VOLl/k: Cursor c/d on the remote control. 17 On-Screen Display Menu On-Screen Display Menu Operation Example Picture OPC Off On Backlight [b12] a16 Contrast [b30] 0 Brightness [ 0] a30 Color [ 0] a30 Tint [ 0] a30 Sharpness [ b2] a10 Advanced Reset On : Display b16 b40...the actual screens. Press to return to open or close the menu screen. MENU: MENU on the remote control. Menu Operation Buttons Using the remote control Use the following buttons on the screen or adjust a selected item. Press to select a desired item on the...

Operation Manual
Page 20
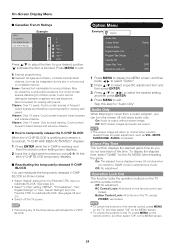
... Press a/b (or c/d) to select the desired setting, and then press ENTER. 4 Press MENU to "DYNAMIC (Fixed)". CH Search: Channel auto search makes the TV look for 15 minutes. • Five minutes before the power shuts down, the remaining time displays every minute. • "Disable" is based on page 12...64257;rm the antenna configuration through the "Antenna Setup DIGITAL" screen. Air/Cable: Make sure what kind of connection is no remote control signal is received within 30 minutes, AV MODE will automatically shut down if there is found , confirm the type of connection...
... Press a/b (or c/d) to select the desired setting, and then press ENTER. 4 Press MENU to "DYNAMIC (Fixed)". CH Search: Channel auto search makes the TV look for 15 minutes. • Five minutes before the power shuts down, the remaining time displays every minute. • "Disable" is based on page 12...64257;rm the antenna configuration through the "Antenna Setup DIGITAL" screen. Air/Cable: Make sure what kind of connection is no remote control signal is received within 30 minutes, AV MODE will automatically shut down if there is found , confirm the type of connection...
Operation Manual
Page 24
...locks the operation buttons on the remote control are locked. • To unlock the buttons on the remote control, press MENU on the TV, and then select "Off" on the MENU screen. • To unlock the buttons on the TV, press MENU on the remote control, and then select "Off" on...(or c/d) to select the desired setting, and then press ENTER. 4 Press MENU to your desired position. RC Control Lock: All buttons on the TV and the remote control. Button Control Lock: All buttons on the TV, except POWER, are locked. Press MENU to reactivate BLOCK. (See page 22.) • Select "V-Chip" setting...
...locks the operation buttons on the remote control are locked. • To unlock the buttons on the remote control, press MENU on the TV, and then select "Off" on the MENU screen. • To unlock the buttons on the TV, press MENU on the remote control, and then select "Off" on...(or c/d) to select the desired setting, and then press ENTER. 4 Press MENU to your desired position. RC Control Lock: All buttons on the TV and the remote control. Button Control Lock: All buttons on the TV, except POWER, are locked. Press MENU to reactivate BLOCK. (See page 22.) • Select "V-Chip" setting...

Operation Manual
Page 25
...Text2, and is muted. does not display. Fixed: Sound via the AUDIO OUTPUT terminal is adjusted with VOLk/l on the remote control unit or VOLl/k on the TV. Yes: "Program Info." No: "Program Info." To delete all or are not displayed at a consistent level. Color System... ENTER. • The default value depends on signal recognition, including an HDMI signal. Type 1: Monospaced with VOLk/l on the remote control unit or VOLl/k on the TV. Select "Yes" and then press ENTER. You can select your external equipment operation manual for the INPUT 1 VIDEO and INPUT...
...Text2, and is muted. does not display. Fixed: Sound via the AUDIO OUTPUT terminal is adjusted with VOLk/l on the remote control unit or VOLl/k on the TV. Yes: "Program Info." No: "Program Info." To delete all or are not displayed at a consistent level. Color System... ENTER. • The default value depends on signal recognition, including an HDMI signal. Type 1: Monospaced with VOLk/l on the remote control unit or VOLl/k on the TV. Select "Yes" and then press ENTER. You can select your external equipment operation manual for the INPUT 1 VIDEO and INPUT...
Operation Manual
Page 28
...in a location exposed to malfunction. Appendix Troubleshooting Problem • No power Possible Solution • Check if you pressed MUTE on the remote control unit? (See page 13.) • The TV sometimes makes a cracking sound. • This is cut off . • No picture • No sound • Is the..."Variable" selected in "Output Select"? (See page 25.) • Have you pressed POWER on the remote control unit. (See page 12.) If the indicator on the TV does not light up, press POWER on the TV. • Is the AC cord disconnected? (See page 7.) • Has the power been turned...
...in a location exposed to malfunction. Appendix Troubleshooting Problem • No power Possible Solution • Check if you pressed MUTE on the remote control unit? (See page 13.) • The TV sometimes makes a cracking sound. • This is cut off . • No picture • No sound • Is the..."Variable" selected in "Output Select"? (See page 25.) • Have you pressed POWER on the remote control unit. (See page 12.) If the indicator on the TV does not light up, press POWER on the TV. • Is the AC cord disconnected? (See page 7.) • Has the power been turned...


