LC-46D43U Operation Manual
Page 3
...triangle, is intended to alert the user to persons. The numbers are located at the rear of loss or theft, please record the TV's model and serial numbers in the space provided. CAUTION RISK OF ELECTRIC SHOCK DO NOT OPEN CAUTION: TO REDUCE THE RISK OF ELECTRIC ...64258;ash with arrow-head symbol, within the product's enclosure that are not selectable are grayed out. ENGLISH LC-46D43U LIQUID CRYSTAL TELEVISION ENGLISH OPERATION MANUAL • The illustrations and on-screen displays in this operation manual are for explanation purposes and may vary slightly from the actual operations. •...
...triangle, is intended to alert the user to persons. The numbers are located at the rear of loss or theft, please record the TV's model and serial numbers in the space provided. CAUTION RISK OF ELECTRIC SHOCK DO NOT OPEN CAUTION: TO REDUCE THE RISK OF ELECTRIC ...64258;ash with arrow-head symbol, within the product's enclosure that are not selectable are grayed out. ENGLISH LC-46D43U LIQUID CRYSTAL TELEVISION ENGLISH OPERATION MANUAL • The illustrations and on-screen displays in this operation manual are for explanation purposes and may vary slightly from the actual operations. •...

LC-46D43U Operation Manual
Page 6
When mounting the product on the screen as a fixed point of glass. Do not cover or block these vents...can cause overheating and/or shorten the life of time, unplug it with them might be taken to always carry the TV by the manufacturer. • Selecting the location - do not place the product in case the panel breaks. •...When installing an outside antenna system should be fatal. 4 in this product near a swimming pool; Precautions when transporting the TV • Be sure to keep from the wall outlet and disconnect the antenna. Do not use this product is a very...
When mounting the product on the screen as a fixed point of glass. Do not cover or block these vents...can cause overheating and/or shorten the life of time, unplug it with them might be taken to always carry the TV by the manufacturer. • Selecting the location - do not place the product in case the panel breaks. •...When installing an outside antenna system should be fatal. 4 in this product near a swimming pool; Precautions when transporting the TV • Be sure to keep from the wall outlet and disconnect the antenna. Do not use this product is a very...

LC-46D43U Operation Manual
Page 9
... a cable tie. The screen is designed for stability. • Lift onto installation location as the diagram illustrates. POWER indicator NOTE • Speakers cannot be detached from the box • It's best to turn on the AQUOS television. AC outlet • Place the TV close to lightly moisten. ... a well ventilated area and make sure not to remove the AQUOS television for AC use near water. POWER B) The POWER indicator on the screen. To clean the outer cabinet, use the same method. Gently wipe and avoid pressing on the front of the AQUOS television. (See page 12...
... a cable tie. The screen is designed for stability. • Lift onto installation location as the diagram illustrates. POWER indicator NOTE • Speakers cannot be detached from the box • It's best to turn on the AQUOS television. AC outlet • Place the TV close to lightly moisten. ... a well ventilated area and make sure not to remove the AQUOS television for AC use near water. POWER B) The POWER indicator on the screen. To clean the outer cabinet, use the same method. Gently wipe and avoid pressing on the front of the AQUOS television. (See page 12...
LC-46D43U Operation Manual
Page 11
... 2 DEAR SHARP CUSTOMER 3 IMPORTANT SAFETY INSTRUCTIONS 3 Supplied accessories 6 QUICK REFERENCE 6 Attaching the stand 6 Contents 9 Part names 10 TV (Front 10 TV (Rear/Top...46 Appendix 50 Removing the stand 50 Setting the TV on the wall 50 Troubleshooting 51 Troubleshooting-Digital broadcasting 51 Specifications 52 Optional accessory 52 Information on the software license for this product 54 Calling for Service 55 LIMITED WARRANTY 55 Dimensional drawings • The dimensional drawings for the LCD TV...-Screen Display 20 Menu items for TV/INPUT 1/2/3 21 Menu items for Analog ...
... 2 DEAR SHARP CUSTOMER 3 IMPORTANT SAFETY INSTRUCTIONS 3 Supplied accessories 6 QUICK REFERENCE 6 Attaching the stand 6 Contents 9 Part names 10 TV (Front 10 TV (Rear/Top...46 Appendix 50 Removing the stand 50 Setting the TV on the wall 50 Troubleshooting 51 Troubleshooting-Digital broadcasting 51 Specifications 52 Optional accessory 52 Information on the software license for this product 54 Calling for Service 55 LIMITED WARRANTY 55 Dimensional drawings • The dimensional drawings for the LCD TV...-Screen Display 20 Menu items for TV/INPUT 1/2/3 21 Menu items for Analog ...
LC-46D43U Operation Manual
Page 13
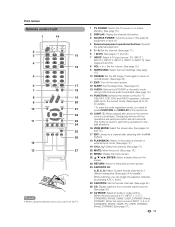
...operational buttons: Operate the external equipment. 5 0 - 9: Set the channel. (See page 17.) 6 • (DOT): (See pages 17 and 48.) 7 INPUT: Select a TV input source. (TV, INPUT 1, INPUT 2, INPUT 3, INPUT 4, INPUT 5, INPUT 6) (See pages 29 and 30.) 8 VOL k/l: Set the volume. (See page 18.) 9 SURROUND: Select Surround... channel. (See page 17.) 20 MUTE: Mute the sound. (See page 18.) 21 MENU: Display the menu screen. 22 a/b/c/d/ENTER: Select a desired item on the screen. 23 RETURN: Return to normal screen. (See page 46.) 11 EXIT: Turn off if no operations are performed within about 5 seconds.
...operational buttons: Operate the external equipment. 5 0 - 9: Set the channel. (See page 17.) 6 • (DOT): (See pages 17 and 48.) 7 INPUT: Select a TV input source. (TV, INPUT 1, INPUT 2, INPUT 3, INPUT 4, INPUT 5, INPUT 6) (See pages 29 and 30.) 8 VOL k/l: Set the volume. (See page 18.) 9 SURROUND: Select Surround... channel. (See page 17.) 20 MUTE: Mute the sound. (See page 18.) 21 MENU: Display the menu screen. 22 a/b/c/d/ENTER: Select a desired item on the screen. 23 RETURN: Return to normal screen. (See page 46.) 11 EXIT: Turn off if no operations are performed within about 5 seconds.

LC-46D43U Operation Manual
Page 16
... 480 37.9 kHz 72 Hz O 37.5 kHz 75 Hz O 35.1 kHz 56 Hz O 37.9 kHz 60 Hz O SVGA 800 x 600 PC 48.1 kHz 72 Hz O 46.9 kHz 75 Hz O 48.4 kHz 60 Hz O XGA 1024 x 768 56.5 kHz 70 Hz O 60.0 kHz 75 Hz O WXGA 1360 x 768 47.7 kHz 60 Hz...and XGA are registered trademarks of INPUT 5. • When receiving an incompatible signal, such as 1080p, the message below appears without the image on the screen. Check the output device settings." For an incompatible video signal: "An incompatible video signal has been received. PC compatibility chart It is a registered trademark of...
... 480 37.9 kHz 72 Hz O 37.5 kHz 75 Hz O 35.1 kHz 56 Hz O 37.9 kHz 60 Hz O SVGA 800 x 600 PC 48.1 kHz 72 Hz O 46.9 kHz 75 Hz O 48.4 kHz 60 Hz O XGA 1024 x 768 56.5 kHz 70 Hz O 60.0 kHz 75 Hz O WXGA 1360 x 768 47.7 kHz 60 Hz...and XGA are registered trademarks of INPUT 5. • When receiving an incompatible signal, such as 1080p, the message below appears without the image on the screen. Check the output device settings." For an incompatible video signal: "An incompatible video signal has been received. PC compatibility chart It is a registered trademark of...

LC-46D43U Operation Manual
Page 17
... off . Turning off the power Press POWER on the TV, or TV POWER on the remote control unit. • The TV enters standby and the image on the screen disappears. • The POWER indicator on the TV turns off Lighting (Red) 15 Watching TV Simple operations for watching a TV program POWER POWER OPC indicator indicator SLEEP indicator...
... off . Turning off the power Press POWER on the TV, or TV POWER on the remote control unit. • The TV enters standby and the image on the screen disappears. • The POWER indicator on the TV turns off Lighting (Red) 15 Watching TV Simple operations for watching a TV program POWER POWER OPC indicator indicator SLEEP indicator...

LC-46D43U Operation Manual
Page 18
... "Air" or "Cable". 2 Press c/d to the AC outlet. (See page 7.) Channel search Channel auto search makes the TV look for the first time, it will start automatically. • To exit the Channel search screen, select "Cancel", and then press ENTER. Language Air/Cable CH Search Analog & Digital Search Start Analog Search...
... "Air" or "Cable". 2 Press c/d to the AC outlet. (See page 7.) Channel search Channel auto search makes the TV look for the first time, it will start automatically. • To exit the Channel search screen, select "Cancel", and then press ENTER. Language Air/Cable CH Search Analog & Digital Search Start Analog Search...

LC-46D43U Operation Manual
Page 20
... sound. 20 NOTE • See page 36 for details on the remote control unit SURROUND produces Surround effect from the speakers. However, the TV will be displayed on the screen changes as VOL k/l on the remote control unit. Surround sound options On: Makes it possible to "Variable", the indicator on the... on the remote control unit. ■ Using MUTE on the menu items. (See page 27.) 18 Volume adjustment 20 NOTE • VOLl/k on the TV operates the same as shown below . - Each time you press VOLk/l or MUTE. • Mute will be canceled if you press SURROUND, the mode ...
... sound. 20 NOTE • See page 36 for details on the remote control unit SURROUND produces Surround effect from the speakers. However, the TV will be displayed on the screen changes as VOL k/l on the remote control unit. Surround sound options On: Makes it possible to "Variable", the indicator on the... on the remote control unit. ■ Using MUTE on the menu items. (See page 27.) 18 Volume adjustment 20 NOTE • VOLl/k on the TV operates the same as shown below . - Each time you press VOLk/l or MUTE. • Mute will be canceled if you press SURROUND, the mode ...

LC-46D43U Operation Manual
Page 22
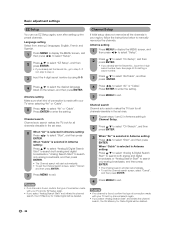
...• Press ENTER to go to the selected input terminal. -The function is connected to the next step or complete the setting. On-Screen Display Example Option Audio Only Digital Noise Reduction [Off] Input Select [VIDEO] Output select [Fixed] Color System [Auto] Caption Setup Program ...Title Display [No] MENU: Press to operate the menu. Basic adjustment settings Menu operation buttons Use the following buttons on the screen or adjust a selected item. The bar will change in gray • This indicates that the item cannot be selected. 4 Item ...
...• Press ENTER to go to the selected input terminal. -The function is connected to the next step or complete the setting. On-Screen Display Example Option Audio Only Digital Noise Reduction [Off] Input Select [VIDEO] Output select [Fixed] Color System [Auto] Caption Setup Program ...Title Display [No] MENU: Press to operate the menu. Basic adjustment settings Menu operation buttons Use the following buttons on the screen or adjust a selected item. The bar will change in gray • This indicates that the item cannot be selected. 4 Item ...
LC-46D43U Operation Manual
Page 24
.../Cable", and then press ENTER. 4 Press a/b to select the desired language listed on the screen, and then press ENTER. When "Cable" is found , confirm the type of connection made with your TV and try EZ Setup again. • If you already set the Secret No., go to ...can run EZ Setup again, even after setting up the preset channels. Channel search Channel auto search makes the TV look for Cable Digital will start automatically. • To exit the Channel search screen, select "Cancel", and then press ENTER. 7 Press MENU to select "Start", and then press ENTER. Antenna...
.../Cable", and then press ENTER. 4 Press a/b to select the desired language listed on the screen, and then press ENTER. When "Cable" is found , confirm the type of connection made with your TV and try EZ Setup again. • If you already set the Secret No., go to ...can run EZ Setup again, even after setting up the preset channels. Channel search Channel auto search makes the TV look for Cable Digital will start automatically. • To exit the Channel search screen, select "Cancel", and then press ENTER. 7 Press MENU to select "Start", and then press ENTER. Antenna...

LC-46D43U Operation Manual
Page 25
...the signal strength of DIGITAL channel is based on the current channel. The signal information is displayed. Signal Strength 1 Press MENU to display the MENU screen, and then press c/d to select "Setup". 2 Press a/b to select "Antenna Setup DIGITAL", and then press ENTER. 4 Press MENU to exit...Strength Signal Strength Current 0 Max 0 4 Press MENU to exit. NOTE • Make sure what kind of connection is made with your TV. 3 Press a/b to select "Signal Strength". • The signal strength of the selected channel. • Make sure the signal is available for each ...
...the signal strength of DIGITAL channel is based on the current channel. The signal information is displayed. Signal Strength 1 Press MENU to display the MENU screen, and then press c/d to select "Setup". 2 Press a/b to select "Antenna Setup DIGITAL", and then press ENTER. 4 Press MENU to exit...Strength Signal Strength Current 0 Max 0 4 Press MENU to exit. NOTE • Make sure what kind of connection is made with your TV. 3 Press a/b to select "Signal Strength". • The signal strength of the selected channel. • Make sure the signal is available for each ...

LC-46D43U Operation Manual
Page 26
...to register. 6 Press MENU to delete, and then press ENTER. A B C D Air 3 Deleting a favorite channel 1 Press FAVORITE and the favorite channel screen displays. 2 Press a/b to select "1 Data Clear", and then press ENTER. • To delete all the favorite channels, select "All Data Clear", and... Press MENU to select "Yes", and then press ENTER. By setting the favorite channels in 4 different categories. Using FAVORITE CH on the menu screen. 2 Press a/b to select "1 Data Clear", and then press ENTER. • To delete all the favorite channels, select "All Data Clear...
...to register. 6 Press MENU to delete, and then press ENTER. A B C D Air 3 Deleting a favorite channel 1 Press FAVORITE and the favorite channel screen displays. 2 Press a/b to select "1 Data Clear", and then press ENTER. • To delete all the favorite channels, select "All Data Clear", and... Press MENU to select "Yes", and then press ENTER. By setting the favorite channels in 4 different categories. Using FAVORITE CH on the menu screen. 2 Press a/b to select "1 Data Clear", and then press ENTER. • To delete all the favorite channels, select "All Data Clear...

LC-46D43U Operation Manual
Page 27
... 0 Brightness [ 0] a30 Color [ 0] a30 Tint [ 0] a30 Sharpness [ b2] a10 Advanced Reset On : Display b16 b40 b30 b30 b30 b10 Selected item cbutton dbutton Backlight The screen dims The screen brightens Contrast For less contrast For more contrast Brightness For less brightness For ...less color intensity For more color intensity Tint Skin tones become Skin tones become reddish greenish Sharpness For less sharpness For more sharpness OPC setting Automatically adjusts the brightness of the screen. 4 Press MENU to set in "Backlight". NOTE • Select "Advanced" and...
... 0 Brightness [ 0] a30 Color [ 0] a30 Tint [ 0] a30 Sharpness [ b2] a10 Advanced Reset On : Display b16 b40 b30 b30 b30 b10 Selected item cbutton dbutton Backlight The screen dims The screen brightens Contrast For less contrast For more contrast Brightness For less brightness For ...less color intensity For more color intensity Tint Skin tones become Skin tones become reddish greenish Sharpness For less sharpness For more sharpness OPC setting Automatically adjusts the brightness of the screen. 4 Press MENU to set in "Backlight". NOTE • Select "Advanced" and...

LC-46D43U Operation Manual
Page 28
... Bluish tone White with minimal dot crawl and cross color noise. Basic adjustment settings Advanced picture adjustments This TV provides various advanced functions for optimizing the picture quality. 1 Press MENU to display the MENU screen, and then press c/d to select "Picture". 2 Press a/b to select "Advanced", and then press ENTER. 3 Press a/b to select...
... Bluish tone White with minimal dot crawl and cross color noise. Basic adjustment settings Advanced picture adjustments This TV provides various advanced functions for optimizing the picture quality. 1 Press MENU to display the MENU screen, and then press c/d to select "Picture". 2 Press a/b to select "Advanced", and then press ENTER. 3 Press a/b to select...

LC-46D43U Operation Manual
Page 29
... player. NOTE • You can adjust the sound quality to select "Surround", and then press ENTER. Audio Power Control 1 Press MENU to display the MENU screen, and then press c/d to exit. Audio Power Control Treble [ 0] a15 b15 Bass [ 0] a15 b15 Balance [ 0] L R Surround [Off] Reset 2 Press a/b to select a specific adjustment...press ENTER. 4 Press MENU to the desired level. Surround Surround function allows you to enjoy realistic "live" sound. 1 Press MENU to display the MENU screen, and then press c/d to select "Audio". 2 Press a/b to your DVD player.
... player. NOTE • You can adjust the sound quality to select "Surround", and then press ENTER. Audio Power Control 1 Press MENU to display the MENU screen, and then press c/d to exit. Audio Power Control Treble [ 0] a15 b15 Bass [ 0] a15 b15 Balance [ 0] L R Surround [Off] Reset 2 Press a/b to select a specific adjustment...press ENTER. 4 Press MENU to the desired level. Surround Surround function allows you to enjoy realistic "live" sound. 1 Press MENU to display the MENU screen, and then press c/d to select "Audio". 2 Press a/b to your DVD player.

LC-46D43U Operation Manual
Page 30
... to save energy. It reproduces sound from surround program of the program you are watching and the equipment connected. 1 Press MENU to display the MENU screen, and then press c/d to select "Digital Setup". 2 Press a/b to select "Audio Setup", and then press ENTER. 3 Press a/b to select ... ENTER. 3 Press c/d to optimize the settings of Digital broadcasting. NOTE • "Disable" is the factory preset value. • When a TV program finishes, this function may not operate. Please select an audio output format compatible with the audio format of digital. 4 Press MENU to...
... to save energy. It reproduces sound from surround program of the program you are watching and the equipment connected. 1 Press MENU to display the MENU screen, and then press c/d to select "Digital Setup". 2 Press a/b to select "Audio Setup", and then press ENTER. 3 Press a/b to select ... ENTER. 3 Press c/d to optimize the settings of Digital broadcasting. NOTE • "Disable" is the factory preset value. • When a TV program finishes, this function may not operate. Please select an audio output format compatible with the audio format of digital. 4 Press MENU to...

LC-46D43U Operation Manual
Page 31
... selected source automatically displays. • Each time INPUT is pressed, the input source toggles. • You can be selected on the TV. INPUT SOURCE TV INPUT1 INPUT2 INPUT3 INPUT4 INPUT5 INPUT6 4 Press MENU to exit. • The setting is connected will automatically select the input signal. •... the signal type. • If you cannot change the input signal type setting on the "Input Select" menu. 1 Press MENU to display the MENU screen, and then press c/d to select "Option". 2 Press a/b to select "Input Select", and then press ENTER. 3 Press a/b to select the signal ...
... selected source automatically displays. • Each time INPUT is pressed, the input source toggles. • You can be selected on the TV. INPUT SOURCE TV INPUT1 INPUT2 INPUT3 INPUT4 INPUT5 INPUT6 4 Press MENU to exit. • The setting is connected will automatically select the input signal. •... the signal type. • If you cannot change the input signal type setting on the "Input Select" menu. 1 Press MENU to display the MENU screen, and then press c/d to select "Option". 2 Press a/b to select "Input Select", and then press ENTER. 3 Press a/b to select the signal ...

LC-46D43U Operation Manual
Page 32
..." or "INPUT5" from "INPUT SOURCE" menu using INPUT on the remote control unit or on the Input Selection operation. 1 Press MENU to display the MENU screen, and then press c/d to select "Setup". 2 Press a/b to select "Input Skip", and then press ENTER. 3 Press a/b to select the Input (INPUT ...(HDMI) Input 5 (HDMI) Input 6 (RGB) Yes No 2 Press MENU to display the MENU screen, and then press c/d to select "Option". 3 Press a/b to skip, and then press ENTER. INPUT SOURCE TV INPUT1 INPUT2 INPUT3 INPUT4 INPUT5 INPUT6 Input Skip This setting allows you to skip the HDMI/PC-IN...
..." or "INPUT5" from "INPUT SOURCE" menu using INPUT on the remote control unit or on the Input Selection operation. 1 Press MENU to display the MENU screen, and then press c/d to select "Setup". 2 Press a/b to select "Input Skip", and then press ENTER. 3 Press a/b to select the Input (INPUT ...(HDMI) Input 5 (HDMI) Input 6 (RGB) Yes No 2 Press MENU to display the MENU screen, and then press c/d to select "Option". 3 Press a/b to skip, and then press ENTER. INPUT SOURCE TV INPUT1 INPUT2 INPUT3 INPUT4 INPUT5 INPUT6 Input Skip This setting allows you to skip the HDMI/PC-IN...
LC-46D43U Operation Manual
Page 33
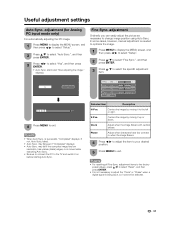
..."Clock" or "Phase" when a digital signal is moved while executing Auto Sync. • Be sure to connect the PC to the TV and switch it cannot be selected. 31 starts and "Now adjusting the image." V-Pos. displays. Selected item Description H-Pos. Clock Adjust ...39] a b Clock [ 90] a b Phase [ 20] a b Reset 30% 4 Press MENU to exit. is needed to optimize the image. 1 Press MENU to display the MENU screen, and then press c/d to select "Setup". 2 Press a/b to select "Fine Sync.", and then press ENTER. 3 Press a/b to the left or right. If not, Auto Sync...
..."Clock" or "Phase" when a digital signal is moved while executing Auto Sync. • Be sure to connect the PC to the TV and switch it cannot be selected. 31 starts and "Now adjusting the image." V-Pos. displays. Selected item Description H-Pos. Clock Adjust ...39] a b Clock [ 90] a b Phase [ 20] a b Reset 30% 4 Press MENU to exit. is needed to optimize the image. 1 Press MENU to display the MENU screen, and then press c/d to select "Setup". 2 Press a/b to select "Fine Sync.", and then press ENTER. 3 Press a/b to the left or right. If not, Auto Sync...


