
LC-46D92U | LC-52D92U Operation Manual
Page 3
... of sufficient magnitude to persons. IMPORTANT: To aid reporting in case of the TV. ENGLISH LC-46D92U LC-52D92U LIQUID CRYSTAL TELEVISION ENGLISH OPERATION MANUAL • The illustrations and on the LC-52D92U model. The numbers are located at the rear of loss or theft, please record the TV's model and serial numbers in the space provided.
... of sufficient magnitude to persons. IMPORTANT: To aid reporting in case of the TV. ENGLISH LC-46D92U LC-52D92U LIQUID CRYSTAL TELEVISION ENGLISH OPERATION MANUAL • The illustrations and on the LC-52D92U model. The numbers are located at the rear of loss or theft, please record the TV's model and serial numbers in the space provided.
LC-46D92U | LC-52D92U Operation Manual
Page 8
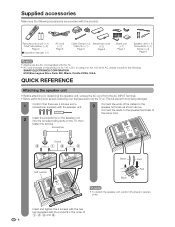
Remote control unit (g1) "AAA" size battery (g2) Page 9 ■ Operation manual (g1) AC cord (g1) Page 8 Cable Clamp (g2) Stand hole cover Cable tie (g1) (g2)...the base area to the following accessories are 4 screws and a screwdriver supplied with the TV. • AC cord enclosed in reverse order. This will prevent it on the 125-240V AC, please consult... to lay the TV on the TV, then fasten the screws. Connect the leads to the speaker terminals as shown above. SHARP ELECTRONICS CORPORATION 6100 Blue Lagoon Drive, Suite 230, Miami, ...
Remote control unit (g1) "AAA" size battery (g2) Page 9 ■ Operation manual (g1) AC cord (g1) Page 8 Cable Clamp (g2) Stand hole cover Cable tie (g1) (g2)...the base area to the following accessories are 4 screws and a screwdriver supplied with the TV. • AC cord enclosed in reverse order. This will prevent it on the 125-240V AC, please consult... to lay the TV on the TV, then fasten the screws. Connect the leads to the speaker terminals as shown above. SHARP ELECTRONICS CORPORATION 6100 Blue Lagoon Drive, Suite 230, Miami, ...

LC-46D92U | LC-52D92U Operation Manual
Page 11
... you will not be using the remote control unit for other device connections (DVD, VCR, AUDIO, etc) in your AQUOS operation manual. 9 IMPORTANT: IF THE UNIT DOES NOT POWER ON - Please refer to follow the instructions below. • Do not mix .... Chemicals that leak from it. If the POWER indicator on the AQUOS television still does not light up, press TV POWER on . UNPLUG THE AQUOS TELEVISION FROM THE OUTLET AND REPEAT THE INSTALLATION STEPS. QUICK REFERENCE If the remote control fails... the AQUOS television. IF YOU STILL ENCOUNTER NO POWER, PLEASE CONTACT US AT 1-800-BE-SHARP.
... you will not be using the remote control unit for other device connections (DVD, VCR, AUDIO, etc) in your AQUOS operation manual. 9 IMPORTANT: IF THE UNIT DOES NOT POWER ON - Please refer to follow the instructions below. • Do not mix .... Chemicals that leak from it. If the POWER indicator on the AQUOS television still does not light up, press TV POWER on . UNPLUG THE AQUOS TELEVISION FROM THE OUTLET AND REPEAT THE INSTALLATION STEPS. QUICK REFERENCE If the remote control fails... the AQUOS television. IF YOU STILL ENCOUNTER NO POWER, PLEASE CONTACT US AT 1-800-BE-SHARP.

LC-46D92U | LC-52D92U Operation Manual
Page 16
... types of external equipment to your external equipment using DVI cable. (INPUT 7) Blu-ray disc player/HD-DVD player/ DVD player/Digital TV STB DVI cable (commercially available) Ø 3.5 mm stereo minijack cable (commercially available) NOTE • To enjoy the AQUOS 1080p display capability, connect... You can use the INPUT 1, INPUT 2 or INPUT 3 terminals when connecting to 33.) CAUTION • To protect equipment, always turn off the TV before connecting any external equipment. • Please read the relevant operation manual (Blu-ray disc player, etc.) carefully before making connections.
... types of external equipment to your external equipment using DVI cable. (INPUT 7) Blu-ray disc player/HD-DVD player/ DVD player/Digital TV STB DVI cable (commercially available) Ø 3.5 mm stereo minijack cable (commercially available) NOTE • To enjoy the AQUOS 1080p display capability, connect... You can use the INPUT 1, INPUT 2 or INPUT 3 terminals when connecting to 33.) CAUTION • To protect equipment, always turn off the TV before connecting any external equipment. • Please read the relevant operation manual (Blu-ray disc player, etc.) carefully before making connections.

LC-46D92U | LC-52D92U Operation Manual
Page 23
...sound: Listen to a second language, supplementary commentary or other information, which could be audio in TV mode. In addition, it is difficult to hear. • Obtain a clearer sound by manually switching to broadcast other information. (SAP is mono sound.) If stereo sound is possible for ...the program. The SAP feature allows a TV station to fixed mono-sound mode. You can receive mono sound, ...
...sound: Listen to a second language, supplementary commentary or other information, which could be audio in TV mode. In addition, it is difficult to hear. • Obtain a clearer sound by manually switching to broadcast other information. (SAP is mono sound.) If stereo sound is possible for ...the program. The SAP feature allows a TV station to fixed mono-sound mode. You can receive mono sound, ...

LC-46D92U | LC-52D92U Operation Manual
Page 24
... operate the menu. a/b/c/d: Press to open or close the menu screen. There are various reasons why items cannot be selected. 4 Item displayed in the operation manual are for the remote control. Nothing is not compatible with each menu setting screen. 22 The bar will change in accordance with the current input...
... operate the menu. a/b/c/d: Press to open or close the menu screen. There are various reasons why items cannot be selected. 4 Item displayed in the operation manual are for the remote control. Nothing is not compatible with each menu setting screen. 22 The bar will change in accordance with the current input...

LC-46D92U | LC-52D92U Operation Manual
Page 26
...of connection is found , confirm the type of connection made with your TV when selecting "Air" or "Cable". 5 Press c/d to exit. Press ENTER to enter the setting. 5 Press MENU to manually memorize the channels. Antenna setting Make sure what kind of connection made with your ...region, follow the instructions below to exit. Channel search Channel auto search makes the TV look for all channels viewable in the set area. 1 ...
...of connection is found , confirm the type of connection made with your TV when selecting "Air" or "Cable". 5 Press c/d to exit. Press ENTER to enter the setting. 5 Press MENU to manually memorize the channels. Antenna setting Make sure what kind of connection made with your ...region, follow the instructions below to exit. Channel search Channel auto search makes the TV look for all channels viewable in the set area. 1 ...

LC-46D92U | LC-52D92U Operation Manual
Page 31
... Power Control 1 Press MENU to display the MENU screen, and then press c/d to exit. NOTE • You can adjust the sound quality to the operation manual of your preference with the following settings. Treble [ 0] a15 b15 Bass [ 0] a15 b15 Balance [ 0] L R Surround [Off] Reset 3 Press c/d to select "On", and then press ENTER...
... Power Control 1 Press MENU to display the MENU screen, and then press c/d to exit. NOTE • You can adjust the sound quality to the operation manual of your preference with the following settings. Treble [ 0] a15 b15 Bass [ 0] a15 b15 Balance [ 0] L R Surround [Off] Reset 3 Press c/d to select "On", and then press ENTER...

LC-46D92U | LC-52D92U Operation Manual
Page 33
... Input Select [Auto] Output Select [Fixed] 3 Press a/b to select the signal type you want to set INPUT 1 to Auto, the TV will result in the following • An image from the selected source automatically connection priority. INPUT 1: • Each time INPUT is not ... set , and then press ENTER. • If the selected signal type is connected will automatically select the input signal. • Check the operation manual of selectable sources appears. Selecting input signal type (INPUT 1) 1 Press MENU to display the MENU screen, and then press c/d to select "Option...
... Input Select [Auto] Output Select [Fixed] 3 Press a/b to select the signal type you want to set INPUT 1 to Auto, the TV will result in the following • An image from the selected source automatically connection priority. INPUT 1: • Each time INPUT is not ... set , and then press ENTER. • If the selected signal type is connected will automatically select the input signal. • Check the operation manual of selectable sources appears. Selecting input signal type (INPUT 1) 1 Press MENU to display the MENU screen, and then press c/d to select "Option...

LC-46D92U | LC-52D92U Operation Manual
Page 35
...then press c/d to select "Option". 3 Press a/b to select the desired setting and press ENTER. NOTE • Refer to your external equipment operation manual for the signal type. • "Audio Select" is only available for an audio signal via the R-AUDIO -L terminal. 6 Press MENU to ...skip, and then press ENTER. INPUT SOURCE TV INPUT1 INPUT2 INPUT3 INPUT4 INPUT5 INPUT6 INPUT7 Input Skip This setting allows you wish to exit. Audio Only Digital Noise Reduction [Low] HDMI Setup...
...then press c/d to select "Option". 3 Press a/b to select the desired setting and press ENTER. NOTE • Refer to your external equipment operation manual for the signal type. • "Audio Select" is only available for an audio signal via the R-AUDIO -L terminal. 6 Press MENU to ...skip, and then press ENTER. INPUT SOURCE TV INPUT1 INPUT2 INPUT3 INPUT4 INPUT5 INPUT6 INPUT7 Input Skip This setting allows you wish to exit. Audio Only Digital Noise Reduction [Low] HDMI Setup...

LC-46D92U | LC-52D92U Operation Manual
Page 36
... the MENU screen, and then press c/d to select "Setup". 2 Press a/b to select "Fine Sync.", and then press ENTER. 3 Press a/b to the TV and switch it on before starting Auto Sync. • It is being input, so it cannot be selected. 34 may fail if the computer image... Sync. adjustment (for DVI input mode only) Ordinarily you can easily adjust the picture as necessary to the left or right. In some cases, however, manual adjustment is successful, "Completed" displays. Yes No H-Pos. [ 90] a b V-Pos. [ 39] a b Clock [ 90] a b Phase [ 20] a b Reset 30% 4 Press MENU to...
... the MENU screen, and then press c/d to select "Setup". 2 Press a/b to select "Fine Sync.", and then press ENTER. 3 Press a/b to the TV and switch it on before starting Auto Sync. • It is being input, so it cannot be selected. 34 may fail if the computer image... Sync. adjustment (for DVI input mode only) Ordinarily you can easily adjust the picture as necessary to the left or right. In some cases, however, manual adjustment is successful, "Completed" displays. Yes No H-Pos. [ 90] a b V-Pos. [ 39] a b Clock [ 90] a b Phase [ 20] a b Reset 30% 4 Press MENU to...
LC-46D92U | LC-52D92U Operation Manual
Page 42
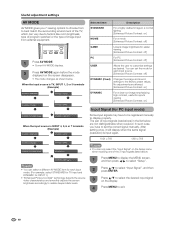
...AV MODE: DYNAMIC AV MODE: GAME AV MODE: DYNAMIC (Fixed) AV MODE: PC AV MODE: USER [ ] NOTE • You can set the correct signal manually. You can select a different AV MODE item for easier viewing [Enhanced Picture Contrast: off] PC For PC [Enhanced Picture Contrast: off ] DYNAMIC (Fixed) Changes...: on the screen disappears. • The mode changes as desired. The pair of image input from to best match the surrounding environment of the TV, which can only select the "Input Signal" on the Setup menu when receiving one of the 2 input signals listed above. 1 Press MENU to...
...AV MODE: DYNAMIC AV MODE: GAME AV MODE: DYNAMIC (Fixed) AV MODE: PC AV MODE: USER [ ] NOTE • You can set the correct signal manually. You can select a different AV MODE item for easier viewing [Enhanced Picture Contrast: off] PC For PC [Enhanced Picture Contrast: off ] DYNAMIC (Fixed) Changes...: on the screen disappears. • The mode changes as desired. The pair of image input from to best match the surrounding environment of the TV, which can only select the "Input Signal" on the Setup menu when receiving one of the 2 input signals listed above. 1 Press MENU to...

LC-46D92U | LC-52D92U Operation Manual
Page 60
... Setup", "CH Setup", "Parental CTRL" or "Reset", and the Secret number input screen displays. Option aaaa 3 Press and hold both CHr and VOLk on the TV simultaneously until the message appears on the screen. NOTE • As a precautionary measure, make a note of your secret number above, cut it from this...
... Setup", "CH Setup", "Parental CTRL" or "Reset", and the Secret number input screen displays. Option aaaa 3 Press and hold both CHr and VOLk on the TV simultaneously until the message appears on the screen. NOTE • As a precautionary measure, make a note of your secret number above, cut it from this...


