Operation Manual
Page 3
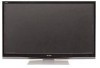
... in the literature accompanying the product. The numbers are located at the rear and right side of loss or theft, please record the TV's model and serial numbers in the space provided. ENGLISH LC-70C8470U LC-60C8470U LC-70C7450U LC-60C7450U LIQUID CRYSTAL TELEVISION ENGLISH OPERATION MANUAL IMPORTANT: To aid reporting in case of the...
... in the literature accompanying the product. The numbers are located at the rear and right side of loss or theft, please record the TV's model and serial numbers in the space provided. ENGLISH LC-70C8470U LC-60C8470U LC-70C7450U LC-60C7450U LIQUID CRYSTAL TELEVISION ENGLISH OPERATION MANUAL IMPORTANT: To aid reporting in case of the...

Operation Manual
Page 4
... responsible for an uncontrolled environment. Note that interference will not occur in a particular installation. Setting "TV Location" to "Home" allows the TV to correct the interference by the technology. These limits are used in accordance with FCC radiation exposure ... communications. To prevent electromagnetic interference with Part 15 of the FCC Rules. DECLARATION OF CONFORMITY: SHARP LIQUID CRYSTAL TELEVISION, MODEL LC-70C8470U/LC-60C8470U/LC-70C7450U/LC-60C7450U This device complies with electric appliances such as practical." Operation is subject to comply with minimum...
... responsible for an uncontrolled environment. Note that interference will not occur in a particular installation. Setting "TV Location" to "Home" allows the TV to correct the interference by the technology. These limits are used in accordance with FCC radiation exposure ... communications. To prevent electromagnetic interference with Part 15 of the FCC Rules. DECLARATION OF CONFORMITY: SHARP LIQUID CRYSTAL TELEVISION, MODEL LC-70C8470U/LC-60C8470U/LC-70C7450U/LC-60C7450U This device complies with electric appliances such as practical." Operation is subject to comply with minimum...

Operation Manual
Page 6
... may cause the cabinet to deform and cause the paint to grounding electrodes, and requirements for ventilation. blue, green or red (LC-70C7450U/LC-60C7450U). Plasticizers inside the plastic may appear on an unstable base can cause overheating and/or shorten the life of antenna-discharge unit.... • To prevent fire, never place any type of your product. • Lightning - Precautions when transporting the TV • When transporting the TV, never carry it from touching such power lines or circuits as to keep from the wall outlet and disconnect the antenna. Be sure...
... may cause the cabinet to deform and cause the paint to grounding electrodes, and requirements for ventilation. blue, green or red (LC-70C7450U/LC-60C7450U). Plasticizers inside the plastic may appear on an unstable base can cause overheating and/or shorten the life of antenna-discharge unit.... • To prevent fire, never place any type of your product. • Lightning - Precautions when transporting the TV • When transporting the TV, never carry it from touching such power lines or circuits as to keep from the wall outlet and disconnect the antenna. Be sure...

Operation Manual
Page 8
... images, discontinue use the 3D Glasses that may cause injury. Doing so may lead to a USB terminal of a 3D compatible SHARP TV for this product. Recharging using this TV. • Use the 3D Glasses only for the specified purpose. • Do not move around while wearing the ... heat, such as doing so may result in falling or other devices may result in the hinge section of a 3D compatible SHARP TV when recharging. Caution for LC-70C8470U/LC-60C8470U) • Use only the cloth provided with high humidity. Doing so may damage the glass section, which may damage ...
... images, discontinue use the 3D Glasses that may cause injury. Doing so may lead to a USB terminal of a 3D compatible SHARP TV for this product. Recharging using this TV. • Use the 3D Glasses only for the specified purpose. • Do not move around while wearing the ... heat, such as doing so may result in falling or other devices may result in the hinge section of a 3D compatible SHARP TV when recharging. Caution for LC-70C8470U/LC-60C8470U) • Use only the cloth provided with high humidity. Doing so may damage the glass section, which may damage ...
Operation Manual
Page 9
...Using Applications via the Internet 76-77 Enjoying Skype 78-81 DISCLAIMERS 82 Appendix Removing the Stand 83 Setting the TV on the LC-70C7450U model. 7 Contents IMPORTANT INFORMATION 1-2 DEAR SHARP CUSTOMER 3 IMPORTANT SAFETY INSTRUCTIONS 3-6 Accessories 8 Supplied Accessories 8 Optional Accessories 8 QUICK REFERENCE Attaching the Stand 9... Power Control 32 System Options 33-35 Initial Setup 36-39 Information 40-42 Enjoying 3D Image Viewing Display Methods for 3D and 2D Images 43 3D Glasses (for the LCD TV set are shown on the inside back cover. • The illustrations and...
...Using Applications via the Internet 76-77 Enjoying Skype 78-81 DISCLAIMERS 82 Appendix Removing the Stand 83 Setting the TV on the LC-70C7450U model. 7 Contents IMPORTANT INFORMATION 1-2 DEAR SHARP CUSTOMER 3 IMPORTANT SAFETY INSTRUCTIONS 3-6 Accessories 8 Supplied Accessories 8 Optional Accessories 8 QUICK REFERENCE Attaching the Stand 9... Power Control 32 System Options 33-35 Initial Setup 36-39 Information 40-42 Enjoying 3D Image Viewing Display Methods for 3D and 2D Images 43 3D Glasses (for the LCD TV set are shown on the inside back cover. • The illustrations and...

Operation Manual
Page 10
...unit (x1) "AAA" size battery (x2) Stand unit (x1) (for LC-70C8470U/LC-70C7450U) Page 10 Stand unit (x1) (for LC-60C8470U/LC-60C7450U) Page 11 Cable tie (x1) Page 9 3D Glasses (x2) (for LC-70C8470U/LC-60C8470U) Page 9 Operation manual (x1) Page 10 Connection guide (x1) ... Additional optional accessories may vary slightly from the actual accessories. Accessories Supplied Accessories Make sure the following accessories are provided with the TV. • The illustrations above are available for compatibility and check the availability. 8 Part name Wall mount bracket 3D Glasses Model...
...unit (x1) "AAA" size battery (x2) Stand unit (x1) (for LC-70C8470U/LC-70C7450U) Page 10 Stand unit (x1) (for LC-60C8470U/LC-60C7450U) Page 11 Cable tie (x1) Page 9 3D Glasses (x2) (for LC-70C8470U/LC-60C8470U) Page 9 Operation manual (x1) Page 10 Connection guide (x1) ... Additional optional accessories may vary slightly from the actual accessories. Accessories Supplied Accessories Make sure the following accessories are provided with the TV. • The illustrations above are available for compatibility and check the availability. 8 Part name Wall mount bracket 3D Glasses Model...
Operation Manual
Page 11
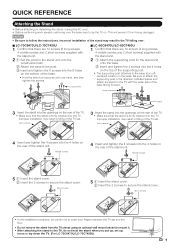
...then tighten the screws. 3 Long screws 2 1 1 FRONT ■ LC-60C8470U/LC-60C7450U 1 Confirm that the stand is firmly inserted into the TV. Be sure to attach the supporting post in the TV falling over the base area to lay the TV on. Improper installation may result in tilting of the... unit onto the base. 2 Insert and tighten the 4 screws into the TV. Improper installation may result in tilting of the TV set up, move or lay down the TV. (For LC-70C8470U/LC-70C7450U) 9 This will prevent it from the TV unless using an optional wall mount bracket to mount it. • After ...
...then tighten the screws. 3 Long screws 2 1 1 FRONT ■ LC-60C8470U/LC-60C7450U 1 Confirm that the stand is firmly inserted into the TV. Be sure to attach the supporting post in the TV falling over the base area to lay the TV on. Improper installation may result in tilting of the... unit onto the base. 2 Insert and tighten the 4 screws into the TV. Improper installation may result in tilting of the TV set up, move or lay down the TV. (For LC-70C8470U/LC-70C7450U) 9 This will prevent it from the TV unless using an optional wall mount bracket to mount it. • After ...

Operation Manual
Page 12
...pointing it towards the remote control sensor on the TV, you should get HD programming from the TV. • The TV angle cannot be adjusted. (For LC-70C8470U/LC- 70C7450U) • The TV can be rotated up to 20 degrees to right and left. (For LC-60C8470U/LC-60C7450U) IMPORTANT: IF THE UNIT DOES NOT ... or place the remote control unit under direct sunlight or strong lighting. IF YOU STILL ENCOUNTER NO POWER, PLEASE CONTACT US AT 1-800-BE-SHARP. 10 POWER ■ Cautions regarding the remote control unit • Do not expose the remote control unit to HD programming, ask your antenna...
...pointing it towards the remote control sensor on the TV, you should get HD programming from the TV. • The TV angle cannot be adjusted. (For LC-70C8470U/LC- 70C7450U) • The TV can be rotated up to 20 degrees to right and left. (For LC-60C8470U/LC-60C7450U) IMPORTANT: IF THE UNIT DOES NOT ... or place the remote control unit under direct sunlight or strong lighting. IF YOU STILL ENCOUNTER NO POWER, PLEASE CONTACT US AT 1-800-BE-SHARP. 10 POWER ■ Cautions regarding the remote control unit • Do not expose the remote control unit to HD programming, ask your antenna...

Operation Manual
Page 13
...enjoy a clearer picture, use of batteries can result in chemical leakage or explosion. Connecting Antenna Cable • Connect the antenna cable to operate TV functions, replace the batteries in the remote control unit. 1 Open the battery cover. 2 Insert two "AAA" size batteries (supplied with F-...leakage in old batteries. • Remove batteries as soon as shown (1, 2, 3 or 4). 1 Cable without a CATV converter 2 VHF/UHF antenna Cable TV lead-In 75-ohm coaxial cable (round) Home Antenna terminal (75-ohm) Coaxial cable Home Antenna terminal (75-ohm) 3 Combination VHF/ UHF antenna ...
...enjoy a clearer picture, use of batteries can result in chemical leakage or explosion. Connecting Antenna Cable • Connect the antenna cable to operate TV functions, replace the batteries in the remote control unit. 1 Open the battery cover. 2 Insert two "AAA" size batteries (supplied with F-...leakage in old batteries. • Remove batteries as soon as shown (1, 2, 3 or 4). 1 Cable without a CATV converter 2 VHF/UHF antenna Cable TV lead-In 75-ohm coaxial cable (round) Home Antenna terminal (75-ohm) Coaxial cable Home Antenna terminal (75-ohm) 3 Combination VHF/ UHF antenna ...

Operation Manual
Page 14
... *3 Remote control sensor *1 See pages 14, 19 and 27 for details on the 3D Glasses. When the TV is in 3D mode, the emitter may look reddish. *3 OPC: Optical Picture Control (See page 29.) TV (Rear) *1 RS-232C terminal PC IN terminal VIDEO 2 terminals VIDEO 1 terminals COMPONENT terminals *1 AUDIO OUT terminal *1 USB... 3 terminal HDMI 4 terminal MHL: Mobile High-Definition Link (See page 65.) 12 Do not place anything between the 3D infrared emitter on the TV and the infrared receiver on the Audio Select function.
... *3 Remote control sensor *1 See pages 14, 19 and 27 for details on the 3D Glasses. When the TV is in 3D mode, the emitter may look reddish. *3 OPC: Optical Picture Control (See page 29.) TV (Rear) *1 RS-232C terminal PC IN terminal VIDEO 2 terminals VIDEO 1 terminals COMPONENT terminals *1 AUDIO OUT terminal *1 USB... 3 terminal HDMI 4 terminal MHL: Mobile High-Definition Link (See page 65.) 12 Do not place anything between the 3D infrared emitter on the TV and the infrared receiver on the Audio Select function.

Operation Manual
Page 15
... 29 16 30 17 • When using the remote control unit, point it at the TV. 1 POWER: Switch the TV power on or enter standby. (See page 19.) 2 TV, STB, DVD•VCR, AUDIO: Switches the remote control for TV, STB, BD, DVD, VCR and AUDIO operation. (See pages 59 to 60 for details... previous channel or external input mode. (See page 24.) 24 VIEW MODE: Select the screen size. (See pages 26 and 66.) 25 INPUT: Select a TV input source. (TV, HDMI1, HDMI2, HDMI3, HDMI4, COMPONENT, VIDEO1, VIDEO2, PC IN, Home Network (DLNA), USB) (See pages 14 and 23.) 26 CHU/V: Select the channel. (See...
... 29 16 30 17 • When using the remote control unit, point it at the TV. 1 POWER: Switch the TV power on or enter standby. (See page 19.) 2 TV, STB, DVD•VCR, AUDIO: Switches the remote control for TV, STB, BD, DVD, VCR and AUDIO operation. (See pages 59 to 60 for details... previous channel or external input mode. (See page 24.) 24 VIEW MODE: Select the screen size. (See pages 26 and 66.) 25 INPUT: Select a TV input source. (TV, HDMI1, HDMI2, HDMI3, HDMI4, COMPONENT, VIDEO1, VIDEO2, PC IN, Home Network (DLNA), USB) (See pages 14 and 23.) 26 CHU/V: Select the channel. (See...

Operation Manual
Page 16
... mm stereo minijack cable DVI-HDMI conversion cable AUDIO DVI OUT Pages 15, 18 Standard Quality ■ Connecting to audio equipment Terminal on the TV Component video cable Audio cable AV cable Cable Optical fiber cable Ø3.5 mm stereo minijack to RCA audio cable Page 16 Page 16 ...; You can also select the input source by pressing INPUT on the remote control unit or on the terminal used. INPUT TV HDMI1 HDMI2 HDMI3 HDMI1 HDMI2 HDMI3 TV HDMI4 • An image from the actual products. ■ Connecting to video equipment or PC Image quality differs depending on...
... mm stereo minijack cable DVI-HDMI conversion cable AUDIO DVI OUT Pages 15, 18 Standard Quality ■ Connecting to audio equipment Terminal on the TV Component video cable Audio cable AV cable Cable Optical fiber cable Ø3.5 mm stereo minijack to RCA audio cable Page 16 Page 16 ...; You can also select the input source by pressing INPUT on the remote control unit or on the terminal used. INPUT TV HDMI1 HDMI2 HDMI3 HDMI1 HDMI2 HDMI3 TV HDMI4 • An image from the actual products. ■ Connecting to video equipment or PC Image quality differs depending on...

Operation Manual
Page 17
...; DVD player • HD cable/satellite set-top box HDMI-certified cable HDMI OUT • To enjoy 1080p display capability, connect your TV. Connecting to External Equipment You can connect many types of external equipment to your external equipment using an HDMI-certified cable or a component...• When using a single cable. To view external source images, select the input source from INPUT on the remote control unit or on the TV. (See pages 14 and 23.) For connecting the TV to "HDMI+Analog". (See page 67.) 15 CAUTION • To protect equipment, always turn off the...
...; DVD player • HD cable/satellite set-top box HDMI-certified cable HDMI OUT • To enjoy 1080p display capability, connect your TV. Connecting to External Equipment You can connect many types of external equipment to your external equipment using an HDMI-certified cable or a component...• When using a single cable. To view external source images, select the input source from INPUT on the remote control unit or on the TV. (See pages 14 and 23.) For connecting the TV to "HDMI+Analog". (See page 67.) 15 CAUTION • To protect equipment, always turn off the...

Operation Manual
Page 19
...;ed cable *1 HD Cable/Satellite set-top box HDMI OUT OPTICAL DIGITAL AUDIO INPUT HDMI OUT HDMI IN Optical fiber cable *2 • Letting the TV output the audio to an AV amplifier: *1 When you connect ARC-compatible equipment, use the HDMI 1 terminal. *2 If the equipment to be connected...
...;ed cable *1 HD Cable/Satellite set-top box HDMI OUT OPTICAL DIGITAL AUDIO INPUT HDMI OUT HDMI IN Optical fiber cable *2 • Letting the TV output the audio to an AV amplifier: *1 When you connect ARC-compatible equipment, use the HDMI 1 terminal. *2 If the equipment to be connected...

Operation Manual
Page 20
... cable AUDIO RGB • When using an analog RGB cable, input the audio signal to the AUDIO IN terminal of PC signals compatible with the TV. ■ When using a DVI-HDMI conversion cable, you should make an analog audio connection.
... cable AUDIO RGB • When using an analog RGB cable, input the audio signal to the AUDIO IN terminal of PC signals compatible with the TV. ■ When using a DVI-HDMI conversion cable, you should make an analog audio connection.

Operation Manual
Page 21
...unit again to turn the power on. • The Initial Installation starts when the TV powers on the TV for the first time, it will not be invoked. Language Location & Time TV Location Antenna & Cable/STB Air/Cable CH Search Network Completed English Français ...among 3 languages: English, French and Spanish. 1 Press a/b to select "United States", "Canada" or "Mexico", and then press ENTER. If the TV has been turned on the screen, and then press ENTER. Perform the following steps before , the Initial Installation will automatically memorize the broadcasting channels available...
...unit again to turn the power on. • The Initial Installation starts when the TV powers on the TV for the first time, it will not be invoked. Language Location & Time TV Location Antenna & Cable/STB Air/Cable CH Search Network Completed English Français ...among 3 languages: English, French and Spanish. 1 Press a/b to select "United States", "Canada" or "Mexico", and then press ENTER. If the TV has been turned on the screen, and then press ENTER. Perform the following steps before , the Initial Installation will automatically memorize the broadcasting channels available...

Operation Manual
Page 22
...or "Store". Press ENTER to select "On", and then press ENTER. Air Cable • ENERGY STAR qualification is the default selection. Watching TV 3 Press a/b to select the time zone where you are completed, the Feature Demo screen is displayed if there is no operation for details on the... MODE is selected, after all the settings are using the remote control unit or menu. (e.g. AV MODE will be set to install the TV. To watch TV via an antenna or cable connection (without using a set -top box. This product qualifies for the location where you plan to...
...or "Store". Press ENTER to select "On", and then press ENTER. Air Cable • ENERGY STAR qualification is the default selection. Watching TV 3 Press a/b to select the time zone where you are completed, the Feature Demo screen is displayed if there is no operation for details on the... MODE is selected, after all the settings are using the remote control unit or menu. (e.g. AV MODE will be set to install the TV. To watch TV via an antenna or cable connection (without using a set -top box. This product qualifies for the location where you plan to...

Operation Manual
Page 23
...Internet Setup > Network Setup. (See page 71.) 21 Start Cancel Network When you change the network settings, refer to the Internet on the TV, select the desired connection method and follow the instructions shown on the display. • Wireless LAN connection is possible only when the WPS ... To exit the Channel search screen, select "Cancel", and then press ENTER. 2 The Channel search results may include scrambled channels or channels that the TV is used , make settings by the WPS method: 1 Select "Wireless" and press ENTER. 2 Follow the instructions on the display to search only ...
...Internet Setup > Network Setup. (See page 71.) 21 Start Cancel Network When you change the network settings, refer to the Internet on the TV, select the desired connection method and follow the instructions shown on the display. • Wireless LAN connection is possible only when the WPS ... To exit the Channel search screen, select "Cancel", and then press ENTER. 2 The Channel search results may include scrambled channels or channels that the TV is used , make settings by the WPS method: 1 Select "Wireless" and press ENTER. 2 Follow the instructions on the display to search only ...

Operation Manual
Page 24
.... When no channel is incorrect. OK When "Set-top box" was selected in step 6 and a search was carried out. Language Location & Time TV Location Antenna & Cable/STB Air/Cable Search Result Network Connection : English : United States/EST/Auto : Home : Antenna & Cable : Air : Digital... channel is displayed. Confirm the information displayed on page 36. • To see the list of channels found . Language Location & Time TV Location Antenna & Cable/STB Air/Cable Search Result Network Connection : English : United States/EST/Auto : Home : Antenna & Cable : Cable :...
.... When no channel is incorrect. OK When "Set-top box" was selected in step 6 and a search was carried out. Language Location & Time TV Location Antenna & Cable/STB Air/Cable Search Result Network Connection : English : United States/EST/Auto : Home : Antenna & Cable : Air : Digital... channel is displayed. Confirm the information displayed on page 36. • To see the list of channels found . Language Location & Time TV Location Antenna & Cable/STB Air/Cable Search Result Network Connection : English : United States/EST/Auto : Home : Antenna & Cable : Cable :...

Operation Manual
Page 25
... buttons 0-9, • (DOT). MUTE Mutes the current sound output. Press FREEZE. • A moving image that you to set a time when the TV automatically switches to standby. will enter standby when the remaining time reaches 0. Be sure to connect the equipment beforehand. • See pages 14 to 0 .... • When you can press SLEEP twice then change channels in , you cannot change the volume by pressing VOLk/l on the TV or on the TV. To select a 3-digit channel number (e. Direct Button Operation INPUT To view external source images, select the input source by pressing INPUT...
... buttons 0-9, • (DOT). MUTE Mutes the current sound output. Press FREEZE. • A moving image that you to set a time when the TV automatically switches to standby. will enter standby when the remaining time reaches 0. Be sure to connect the equipment beforehand. • See pages 14 to 0 .... • When you can press SLEEP twice then change channels in , you cannot change the volume by pressing VOLk/l on the TV or on the TV. To select a 3-digit channel number (e. Direct Button Operation INPUT To view external source images, select the input source by pressing INPUT...


