
Operating Guide
Page 43
MAINTENANCE REGULAR MAINTENANCE 1-70 • CLEANING THE DOCUMENT GLASS AND AUTOMATIC DOCUMENT FEEDER . . . 1-70 • CLEANING THE MAIN CHARGER OF THE PHOTOCONDUCTIVE DRUM 1-72 • CLEANING THE BYPASS FEED ROLLER . . . 1-74 • CLEANING THE ORIGINAL FEED ROLLER 1-74 REPLACING THE TONER CARTRIDGE 1-75 REPLACING THE TONER COLLECTION CONTAINER 1-77 REPLACING THE STAMP CARTRIDGE 1-79 ENTERING TEXT FUNCTIONS OF THE MAIN KEYS 1-80 • KEYBOARD 1-81 BEFORE USING THE MACHINE 1-2
MAINTENANCE REGULAR MAINTENANCE 1-70 • CLEANING THE DOCUMENT GLASS AND AUTOMATIC DOCUMENT FEEDER . . . 1-70 • CLEANING THE MAIN CHARGER OF THE PHOTOCONDUCTIVE DRUM 1-72 • CLEANING THE BYPASS FEED ROLLER . . . 1-74 • CLEANING THE ORIGINAL FEED ROLLER 1-74 REPLACING THE TONER CARTRIDGE 1-75 REPLACING THE TONER COLLECTION CONTAINER 1-77 REPLACING THE STAMP CARTRIDGE 1-79 ENTERING TEXT FUNCTIONS OF THE MAIN KEYS 1-80 • KEYBOARD 1-81 BEFORE USING THE MACHINE 1-2
Operating Guide
Page 46
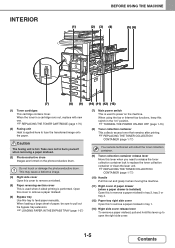
...misfeed in tray 2, tray 3 or tray 4. (12) Paper tray right side cover Open this switch in the "on the photoconductive drum. Do not touch or damage the photoconductive drum. INTERIOR BEFORE USING THE MACHINE (1) (2) (3) (4) (5) (6) (7) (8) (9) (1) Toner cartridges This cartridge contains toner. Open this cover... to remove a paper misfeed. (6) Bypass tray Use this tray to burn yourself when removing a paper misfeed. (3) Photoconductive drum Images are formed on " position. + TURNING THE POWER ON AND OFF (page 1-15) (8) Toner collection container This collects excess ...
...misfeed in tray 2, tray 3 or tray 4. (12) Paper tray right side cover Open this switch in the "on the photoconductive drum. Do not touch or damage the photoconductive drum. INTERIOR BEFORE USING THE MACHINE (1) (2) (3) (4) (5) (6) (7) (8) (9) (1) Toner cartridges This cartridge contains toner. Open this cover... to remove a paper misfeed. (6) Bypass tray Use this tray to burn yourself when removing a paper misfeed. (3) Photoconductive drum Images are formed on " position. + TURNING THE POWER ON AND OFF (page 1-15) (8) Toner collection container This collects excess ...

Operating Guide
Page 113
...hands as you have cleaned the document glass and automatic document feeder, use the charger cleaner to clean the main charger that charges the photoconductive drum. Press up , and gently push it in until it will fall forward as far as it clicks into the machine. 4 Push the container... in . 3 Push the toner collection container into place. 1-72 Contents BEFORE USING THE MACHINE CLEANING THE MAIN CHARGER OF THE PHOTOCONDUCTIVE DRUM If black lines appear even after you let it fall forward as shown. Clean the main charger. Gently pull the charger cleaner all the way...
...hands as you have cleaned the document glass and automatic document feeder, use the charger cleaner to clean the main charger that charges the photoconductive drum. Press up , and gently push it in until it will fall forward as far as it clicks into the machine. 4 Push the container... in . 3 Push the toner collection container into place. 1-72 Contents BEFORE USING THE MACHINE CLEANING THE MAIN CHARGER OF THE PHOTOCONDUCTIVE DRUM If black lines appear even after you let it fall forward as shown. Clean the main charger. Gently pull the charger cleaner all the way...

Operating Guide
Page 114
BEFORE USING THE MACHINE Close the front cover. 5 • If cleaning the main charger of the photoconductive drum does not solve the problem, pull the knob out and push it back three more times. • When pulling and pushing the knob to clean the charger, pull and push the knob slowly from one end to the other. 1-73 Contents
BEFORE USING THE MACHINE Close the front cover. 5 • If cleaning the main charger of the photoconductive drum does not solve the problem, pull the knob out and push it back three more times. • When pulling and pushing the knob to clean the charger, pull and push the knob slowly from one end to the other. 1-73 Contents

Operating Guide
Page 797
...in the machine. When the key is hot. TROUBLESHOOTING REMOVING MISFEEDS This section explains what to do not touch or damage the photoconductive drum. • Carefully pull the paper out without tearing it. • A misfeed may have occurred inside the machine. Information OK misfeed...location • While the message appears, printing and scanning cannot be sure to remove all pieces from the machine. Fusing unit Photoconductive drum REMOVING MISFEEDS When a paper misfeed occurs, the message "A misfeed has occurred." When the misfeed is cleared, the message will stop....
...in the machine. When the key is hot. TROUBLESHOOTING REMOVING MISFEEDS This section explains what to do not touch or damage the photoconductive drum. • Carefully pull the paper out without tearing it. • A misfeed may have occurred inside the machine. Information OK misfeed...location • While the message appears, printing and scanning cannot be sure to remove all pieces from the machine. Fusing unit Photoconductive drum REMOVING MISFEEDS When a paper misfeed occurs, the message "A misfeed has occurred." When the misfeed is cleared, the message will stop....


