

Operation Manual
Page 5
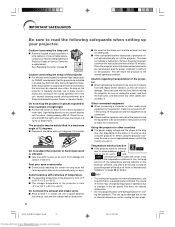
...ONLY WARNING: High brightness light source. DO NOT REMOVE SCREWS EXCEPT SPECIFIED USER SERVICE SCREW. NO USER-SERVICEABLE PARTS EXCEPT LAMP UNIT. ONLY INFORMATION This equipment has been tested and found to comply with FCC Class A verification. ONLY WARNING: This ...a domestic environment this equipment in accordance with arrowhead symbol, within a triangle is likely to your new SHARP Projector, using the projector, please read this equip- See bottom of projector. These limits are two important reasons for a Class A digital device, pursuant to ensure that children...
...ONLY WARNING: High brightness light source. DO NOT REMOVE SCREWS EXCEPT SPECIFIED USER SERVICE SCREW. NO USER-SERVICEABLE PARTS EXCEPT LAMP UNIT. ONLY INFORMATION This equipment has been tested and found to comply with FCC Class A verification. ONLY WARNING: This ...a domestic environment this equipment in accordance with arrowhead symbol, within a triangle is likely to your new SHARP Projector, using the projector, please read this equip- See bottom of projector. These limits are two important reasons for a Class A digital device, pursuant to ensure that children...

Operation Manual
Page 6
... UNE LAMPE SHARP DE TYPE BQC-PGA10X//1. LAMPE A HAUTE PRESSION : RISQUE D'EXPLOSION. When Attaching the "QUICK GUIDE" Label Attaching the "QUICK GUIDE" Label (supplied) on the projector will help you are located in the United States of these materials may be sure to environmental considerations. LAMP REPLACEMENT CAUTION...off . DURING NORMAL OPERATION, NEVER TURN THE PROJECTOR OFF BY DISCONNECTING THE POWER CORD. When you attach the "QUICK GUIDE" Label on the projector, be regulated due to align the label bottom and the upper part of the "Notevision" logo on the top cabinet of mercury....
... UNE LAMPE SHARP DE TYPE BQC-PGA10X//1. LAMPE A HAUTE PRESSION : RISQUE D'EXPLOSION. When Attaching the "QUICK GUIDE" Label Attaching the "QUICK GUIDE" Label (supplied) on the projector will help you are located in the United States of these materials may be sure to environmental considerations. LAMP REPLACEMENT CAUTION...off . DURING NORMAL OPERATION, NEVER TURN THE PROJECTOR OFF BY DISCONNECTING THE POWER CORD. When you attach the "QUICK GUIDE" Label on the projector, be regulated due to align the label bottom and the upper part of the "Notevision" logo on the top cabinet of mercury....

Operation Manual
Page 7
... SECAM, PAL-N, PAL-M, PAL-60 and NTSC4.43) • HD input compatible (1080I, 720P and 480P) • Computer input compatible (VGA, SVGA, XGA, SXGA and SXGA+) 6. tion. 4. A10X_A10S#E_Print#p01_03.p65 3 Downloaded from room to room or location to location. 2. Simply and Easy ... reduces noise levels and power consumption while also extending lamp life. 5. High Brightness Despite Compact Size • Use of 100" at just 3.2 meters (10' 6"). 3. Introduction Outstanding Features 1. Light and Compact Design • A4 / letter size projector weighing only 2.9 kg / 6.4 lbs can be ...
... SECAM, PAL-N, PAL-M, PAL-60 and NTSC4.43) • HD input compatible (1080I, 720P and 480P) • Computer input compatible (VGA, SVGA, XGA, SXGA and SXGA+) 6. tion. 4. A10X_A10S#E_Print#p01_03.p65 3 Downloaded from room to room or location to location. 2. Simply and Easy ... reduces noise levels and power consumption while also extending lamp life. 5. High Brightness Despite Compact Size • Use of 100" at just 3.2 meters (10' 6"). 3. Introduction Outstanding Features 1. Light and Compact Design • A4 / letter size projector weighing only 2.9 kg / 6.4 lbs can be ...

Operation Manual
Page 8
...Accessories 14 Connections and Setup Connecting the Projector to Other Devices .... 15 Before Connecting 15 This projector can be connected to 15 Connecting the Power Cord 15 Connecting the Projector to a Computer 16 Connecting to Video Equipment 18 Controlling the Projector Using a Computer ........ 20 Setup ...Image 42 Keylock Function 43 Locking the operation Buttons 43 Taking the Keylock off 43 Using the "Options" Menu 44 Lamp Timer (Life) (Checking the Lamp Life Status 44 OSD Display (Setting On-screen Display 44 Video System (Setting the Video System 45 Background (Selecting...
...Accessories 14 Connections and Setup Connecting the Projector to Other Devices .... 15 Before Connecting 15 This projector can be connected to 15 Connecting the Power Cord 15 Connecting the Projector to a Computer 16 Connecting to Video Equipment 18 Controlling the Projector Using a Computer ........ 20 Setup ...Image 42 Keylock Function 43 Locking the operation Buttons 43 Taking the Keylock off 43 Using the "Options" Menu 44 Lamp Timer (Life) (Checking the Lamp Life Status 44 OSD Display (Setting On-screen Display 44 Video System (Setting the Video System 45 Background (Selecting...

Operation Manual
Page 9
...5 A10X_A10S#E_Print#p04_05.p65 5 03.2.4, 2:01 PM Downloaded from www.Manualslib.com manuals search engine Introduction Appendix Carrying the Projector 51 How to Use the Carrying Case 51 Maintenance 52 Replacing the Air Filter 53 Cleaning and Replacing the Air Filter 53... Caution Concerning the Lamp 57 Replacing the Lamp 57 Removing and Installing the Lamp Unit 58 Resetting the Lamp Timer 59 Connecting Pin Assignments 60 RS-232C Specifications and Command Settings 61 Computer Compatibility Chart 62 Troubleshooting 63 For SHARP Assistance 65 Specifications 66 Dimensions 67 ...
...5 A10X_A10S#E_Print#p04_05.p65 5 03.2.4, 2:01 PM Downloaded from www.Manualslib.com manuals search engine Introduction Appendix Carrying the Projector 51 How to Use the Carrying Case 51 Maintenance 52 Replacing the Air Filter 53 Cleaning and Replacing the Air Filter 53... Caution Concerning the Lamp 57 Replacing the Lamp 57 Removing and Installing the Lamp Unit 58 Resetting the Lamp Timer 59 Connecting Pin Assignments 60 RS-232C Specifications and Command Settings 61 Computer Compatibility Chart 62 Troubleshooting 63 For SHARP Assistance 65 Specifications 66 Dimensions 67 ...
Operation Manual
Page 12
... Sharp Authorized Projector Dealer or Service Center for a replacement. I Position the screen so that it is from 41°F to 95°F (+5°C to +35°C). I When transporting the projector, be sure not to subject it . In case of lamp rupture, contact your eyes. When the projector is... on page 57. I The power supply voltage and the shape of the plug may be shut off the projector. I Placement should only be performed by a Sharp Authorized Projector Dealer or Service Center. This will illuminate in these environments, the lens must be sure to +60°C)....
... Sharp Authorized Projector Dealer or Service Center for a replacement. I Position the screen so that it is from 41°F to 95°F (+5°C to +35°C). I When transporting the projector, be sure not to subject it . In case of lamp rupture, contact your eyes. When the projector is... on page 57. I The power supply voltage and the shape of the plug may be shut off the projector. I Placement should only be performed by a Sharp Authorized Projector Dealer or Service Center. This will illuminate in these environments, the lens must be sure to +60°C)....

Operation Manual
Page 14
... For turning the power on , this indicator will illuminate green. KEYSTONE button 29 For entering the Keystone Correction mode. Replace the lamp when the indicator illuminates red. 55 Temperature warning indicator When the internal temperature rises, this indicator will illuminate red. 27 INPUT button...input mode 1, 2 or 3. 27 Volume buttons For adjusting the speaker sound level or the Keystone Correction. Projector (Front and Top View) Power indicator 26 Illuminates red when the projector is explained. Remote control 13 sensor Exhaust vent 52 Foot release 21 (on the side of the...
... For turning the power on , this indicator will illuminate green. KEYSTONE button 29 For entering the Keystone Correction mode. Replace the lamp when the indicator illuminates red. 55 Temperature warning indicator When the internal temperature rises, this indicator will illuminate red. 27 INPUT button...input mode 1, 2 or 3. 27 Volume buttons For adjusting the speaker sound level or the Keystone Correction. Projector (Front and Top View) Power indicator 26 Illuminates red when the projector is explained. Remote control 13 sensor Exhaust vent 52 Foot release 21 (on the side of the...

Operation Manual
Page 17
... control for easy operation. Incorrect use of the batteries may malfunction under a fluorescent lamp. This may shorten the life of different types. • Do not mix new and old batteries. In this projector may differ depending on how they have different properties, therefore do not mix batteries...and marks inside the battery compartment. • Batteries of the signal may run out, as possible with this case, move the projector away from the remote control can cause them in a short period, depending on the screen material. Note • The signal from the...
... control for easy operation. Incorrect use of the batteries may malfunction under a fluorescent lamp. This may shorten the life of different types. • Do not mix new and old batteries. In this projector may differ depending on how they have different properties, therefore do not mix batteries...and marks inside the battery compartment. • Batteries of the signal may run out, as possible with this case, move the projector away from the remote control can cause them in a short period, depending on the screen material. Note • The signal from the...

Operation Manual
Page 30
...; When "Anti-Theft" (see page 48) is set on the projector or the remote control. • For details about the Anti-Theft function, refer to the projector before carrying out the following procedures. Red: The lamp should be operated while the warming up and shutting down. Enter the keycode...Anti-Theft (Setting the Anti-Theft)" on , and then transmit the commands. • The projector cannot be replaced. • If the power is turned off and immediately switched on again, the lamp replacement indicator may take some time to start operation. Note • When entering the keycode, press...
...; When "Anti-Theft" (see page 48) is set on the projector or the remote control. • For details about the Anti-Theft function, refer to the projector before carrying out the following procedures. Red: The lamp should be operated while the warming up and shutting down. Enter the keycode...Anti-Theft (Setting the Anti-Theft)" on , and then transmit the commands. • The projector cannot be replaced. • If the power is turned off and immediately switched on again, the lamp replacement indicator may take some time to start operation. Note • When entering the keycode, press...

Operation Manual
Page 34
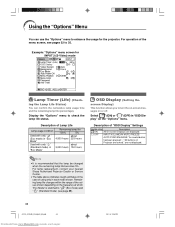
...30 V-Pos −30 +30 Reset Special Modes Signal Info Main menu Options Page 44 Language Page 28 Lamp Timer (Life) OSD Display [ON/OFF] Background Eco Mode [Eco/Standard] Auto Power Off [ON/...OFF] Menu Position Menu Color [Opaque/Translucent] Password Anti-Theft Sub menu Sharp Blue None Center Upper Right Lower Right Upper Left Lower Left Old Password New Password Reconfirm Old ..." menu of INPUT 1, "Signal Info" can be selected when "Signal Type" is set in the projector. Menu Items This list shows the items that can only be set to "Component". 30 A10X_A10S#E_Print#...
...30 V-Pos −30 +30 Reset Special Modes Signal Info Main menu Options Page 44 Language Page 28 Lamp Timer (Life) OSD Display [ON/OFF] Background Eco Mode [Eco/Standard] Auto Power Off [ON/...OFF] Menu Position Menu Color [Opaque/Translucent] Password Anti-Theft Sub menu Sharp Blue None Center Upper Right Lower Right Upper Left Lower Left Old Password New Password Reconfirm Old ..." menu of INPUT 1, "Signal Info" can be selected when "Signal Type" is set in the projector. Menu Items This list shows the items that can only be set to "Component". 30 A10X_A10S#E_Print#...
Operation Manual
Page 48
... the frequency at which "Eco Mode" is recommended that the lamp be changed when the remaining lamp life becomes 5%. ing the Lamp Life Status) You can use the "Options" menu to check the lamp life status. are locked." For lamp replacement, contact your nearest Sharp Authorized Projector Dealer or Service Center. • The table above indicates rough...
... the frequency at which "Eco Mode" is recommended that the lamp be changed when the remaining lamp life becomes 5%. ing the Lamp Life Status) You can use the "Options" menu to check the lamp life status. are locked." For lamp replacement, contact your nearest Sharp Authorized Projector Dealer or Service Center. • The table above indicates rough...

Operation Manual
Page 49
...however, a clear picture from www.Manualslib.com manuals search engine 45 03.2.4, 2:06 PM Sharp Blue None Description of Background Images Selectable settings Description Sharp SHARP default image Blue Blue screen None Black screen Description of Eco Mode Selectable settings Brightness Power consumption...Note • Although lamp life and noise are received. When connected to SECAM video equipment. In that case, switch the video signal. When reproducing NTSC signals in "Eco Mode" on the "Options" menu and the image displayed upon the projector's startup and when no...
...however, a clear picture from www.Manualslib.com manuals search engine 45 03.2.4, 2:06 PM Sharp Blue None Description of Background Images Selectable settings Description Sharp SHARP default image Blue Blue screen None Black screen Description of Eco Mode Selectable settings Brightness Power consumption...Note • Although lamp life and noise are received. When connected to SECAM video equipment. In that case, switch the video signal. When reproducing NTSC signals in "Eco Mode" on the "Options" menu and the image displayed upon the projector's startup and when no...

Operation Manual
Page 57
... (2), remove the filter/lamp unit cover (3). 3 Remove the air filter. • Pick the air filter up with air filters to clean. Clean the filters more often when the projector is used in a dusty or smoky location. • Ask your fingers and lift it is equipped with your nearest Sharp Authorized Projector Dealer or Service...
... (2), remove the filter/lamp unit cover (3). 3 Remove the air filter. • Pick the air filter up with air filters to clean. Clean the filters more often when the projector is used in a dusty or smoky location. • Ask your fingers and lift it is equipped with your nearest Sharp Authorized Projector Dealer or Service...

Operation Manual
Page 58
... cover (1) and place it while pressing the tab (2) to secure the filter/ lamp unit cover. Then tighten the user service screw (3) to close it is securely installed. Replacing the Air Filter 4 Clean the air filter. • Clean the ... A10X_A10S#E_Print#p51_62.p65 54 Downloaded from www.Manualslib.com manuals search engine User service screw 03.2.4, 2:07 PM Note • Be sure the filter/lamp unit cover is correctly installed. • If dust or dirt has collected inside the rear and bottom air filters (not removable), clean the filter with...
... cover (1) and place it while pressing the tab (2) to secure the filter/ lamp unit cover. Then tighten the user service screw (3) to close it is securely installed. Replacing the Air Filter 4 Clean the air filter. • Clean the ... A10X_A10S#E_Print#p51_62.p65 54 Downloaded from www.Manualslib.com manuals search engine User service screw 03.2.4, 2:07 PM Note • Be sure the filter/lamp unit cover is correctly installed. • If dust or dirt has collected inside the rear and bottom air filters (not removable), clean the filter with...
Operation Manual
Page 59
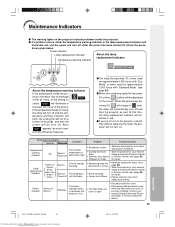
... the temperature warning indicator will blink, the cooling fan will run for repair. • Lamp circuit failure • Please exercise care when replacing the lamp. Red on Green blinks when the lamp is securely installed, contact your nearest down Sharp Authorized Projector Dealer • Internal circuit failure or Service Center (see page 65) • Burnt...
... the temperature warning indicator will blink, the cooling fan will run for repair. • Lamp circuit failure • Please exercise care when replacing the lamp. Red on Green blinks when the lamp is securely installed, contact your nearest down Sharp Authorized Projector Dealer • Internal circuit failure or Service Center (see page 65) • Burnt...

Operation Manual
Page 60
..., and the power turns off, follow the above possible solutions and then wait until the projector has cooled down completely before plugging in again. • If you want to first press on the projector or on the remote control and after the power has turned off and the cooling fan ... turned off and while the cooling fan is turned off and then turned on again, as during a brief test, the lamp replacement indicator may be sure to clean the air vents during projector operation, be triggered, preventing the power from going on . (At least 5 minutes.) • If the power is running....
..., and the power turns off, follow the above possible solutions and then wait until the projector has cooled down completely before plugging in again. • If you want to first press on the projector or on the remote control and after the power has turned off and the cooling fan ... turned off and while the cooling fan is turned off and then turned on again, as during a brief test, the lamp replacement indicator may be sure to clean the air vents during projector operation, be triggered, preventing the power from going on . (At least 5 minutes.) • If the power is running....
Operation Manual
Page 61
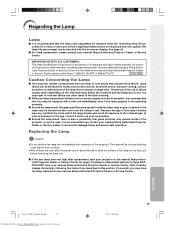
... icon are illuminated, it can be checked with a new one hour after the power cord is disconnected to allow the surface of the lamp unit to the nearest Sharp Authorized Projector Dealer or Service Center for repair. In case of exposure to the gas, consult a doctor as soon as : excessive shock, improper cooling...
... icon are illuminated, it can be checked with a new one hour after the power cord is disconnected to allow the surface of the lamp unit to the nearest Sharp Authorized Projector Dealer or Service Center for repair. In case of exposure to the gas, consult a doctor as soon as : excessive shock, improper cooling...

Operation Manual
Page 62
...to carefully follow the steps below. • Do not loosen other screws except for the filter/lamp unit cover and lamp unit. • Please refer to the installation manual included with the lamp unit. 1 Press on the projector to turn off the power. • Wait until it has fully cooled down (about 1 ...to touch the glass surface of the lamp unit or the inside of the projector. • To avoid injury to yourself and damage to remove the lamp unit using the handle. Regarding the Lamp Removing and Installing the Lamp Unit Info • Be sure to the lamp, be very hot and may cause...
...to carefully follow the steps below. • Do not loosen other screws except for the filter/lamp unit cover and lamp unit. • Please refer to the installation manual included with the lamp unit. 1 Press on the projector to turn off the power. • Wait until it has fully cooled down (about 1 ...to touch the glass surface of the lamp unit or the inside of the projector. • To avoid injury to yourself and damage to remove the lamp unit using the handle. Regarding the Lamp Removing and Installing the Lamp Unit Info • Be sure to the lamp, be very hot and may cause...

Operation Manual
Page 63
..., the power will not turn on the projector. • "LAMP 0000H" is displayed, indicating that the lamp timer is connected to the projector. Info • Make sure to secure the filter/ lamp unit cover. At this may cause the lamp to use the same lamp, this time, keep the lamp unit horizontal and do not tilt it . A10X_A10S...
..., the power will not turn on the projector. • "LAMP 0000H" is displayed, indicating that the lamp timer is connected to the projector. Info • Make sure to secure the filter/ lamp unit cover. At this may cause the lamp to use the same lamp, this time, keep the lamp unit horizontal and do not tilt it . A10X_A10S...

Operation Manual
Page 65
... or ERR I V E D _ _ _ 1 OK or ERR I V E D _ _ _ 2 OK or ERR T L T T _ _ _ 1 0~9999 T L T L _ _ _ 1 0~100 T L P S _ _ _ 1 0:Off, 1:On, 2:Retry, 3:Waiting, 4:Lamp Error T A B N _ _ _ 1 0:Normal, 1:Temp High, 2:Fan Err, 4:Filter Cover Err, 8:Lamp 100 hours, 16:Lamp Burnt-out, 32:Lamp Not Lit, 64:Temp Abnormally High T N A M _ _ _ 1 PROJECTOR NAME I M B K _ _ _ 0 OK or ERR I M B K _ _ _ 1 OK or ERR A D J S _ _ _ 1 OK or ERR Note • If an underbar...
... or ERR I V E D _ _ _ 1 OK or ERR I V E D _ _ _ 2 OK or ERR T L T T _ _ _ 1 0~9999 T L T L _ _ _ 1 0~100 T L P S _ _ _ 1 0:Off, 1:On, 2:Retry, 3:Waiting, 4:Lamp Error T A B N _ _ _ 1 0:Normal, 1:Temp High, 2:Fan Err, 4:Filter Cover Err, 8:Lamp 100 hours, 16:Lamp Burnt-out, 32:Lamp Not Lit, 64:Temp Abnormally High T N A M _ _ _ 1 PROJECTOR NAME I M B K _ _ _ 0 OK or ERR I M B K _ _ _ 1 OK or ERR A D J S _ _ _ 1 OK or ERR Note • If an underbar...

