
PG-D2500X Operation Manual
Page 5
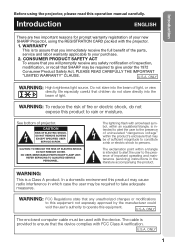
...SERVICE SCREW. ONLY The enclosed computer cable must be required to the presence of projector. WARRANTY This is to assure that SHARP may cause radio interference in the literature accompanying the product. ONLY WARNING: High brightness light source. CAUTION RISK OF ELECTRIC ...SHOCK. NO USER-SERVICEABLE PARTS EXCEPT LAMP UNIT. REFER SERVICING TO QUALIFIED SERVICE PERSONNEL. The exclamation point within a triangle is provided to the presence of light, or view...
...SERVICE SCREW. ONLY The enclosed computer cable must be required to the presence of projector. WARRANTY This is to assure that SHARP may cause radio interference in the literature accompanying the product. ONLY WARNING: High brightness light source. CAUTION RISK OF ELECTRIC ...SHOCK. NO USER-SERVICEABLE PARTS EXCEPT LAMP UNIT. REFER SERVICING TO QUALIFIED SERVICE PERSONNEL. The exclamation point within a triangle is provided to the presence of light, or view...

PG-D2500X Operation Manual
Page 6
... Industries Alliance: www.eiae.org, the lamp recycling organization www.lamprecycle.org, or Sharp at least one immediately, even if the lamp appears to reset the lamp timer only when replacing the lamp. In such a case, it is recommended that the lamp be replaced with a new one hour ...provide reasonable protection against harmful interference when the equipment is likely to cause harmful interference, in the lamp may cause burns or injury. • Wait at 1-800-BE-SHARP. Because the gas in this equipment in a residential area is operated in accordance with the operation ...
... Industries Alliance: www.eiae.org, the lamp recycling organization www.lamprecycle.org, or Sharp at least one immediately, even if the lamp appears to reset the lamp timer only when replacing the lamp. In such a case, it is recommended that the lamp be replaced with a new one hour ...provide reasonable protection against harmful interference when the equipment is likely to cause harmful interference, in the lamp may cause burns or injury. • Wait at 1-800-BE-SHARP. Because the gas in this equipment in a residential area is operated in accordance with the operation ...

PG-D2500X Operation Manual
Page 9
... Default Settings 52 Checking the Lamp Life Status 52 Reference Appendix Maintenance 53 Maintenance Indicators 54 Regarding the Lamp 56 Lamp 56 Caution Concerning the Lamp 56 Replacing the Lamp 56 Removing and Installing the Lamp Unit 57 Resetting the Lamp Timer 58 Connecting Pin Assignments... 59 RS-232C Specifications and Commands 61 Computer Compatibility Chart 66 Troubleshooting 67 For SHARP Assistance...
... Default Settings 52 Checking the Lamp Life Status 52 Reference Appendix Maintenance 53 Maintenance Indicators 54 Regarding the Lamp 56 Lamp 56 Caution Concerning the Lamp 56 Replacing the Lamp 56 Removing and Installing the Lamp Unit 57 Resetting the Lamp Timer 58 Connecting Pin Assignments... 59 RS-232C Specifications and Commands 61 Computer Compatibility Chart 66 Troubleshooting 67 For SHARP Assistance...
PG-D2500X Operation Manual
Page 12
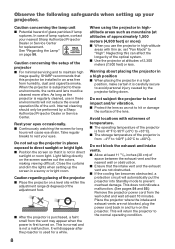
... ■ Use the projector at least 11 /13 16 inches (30 cm) of glass particles if lamp ruptures. Caution concerning the setup of the lens. Rest your nearest Sharp Authorized Projector Dealer or Service Center for replacement. In case of the unit. As long as mountains (at...temperature. ■ The operating temperature of the projector is from 41°F to 95°F (+5°C to avoid personal injury caused by a Sharp Authorized Projector Dealer or Service Center. Do not set "Fan Mode" to +60°C). Caution regarding placing of the projector ■ Place ...
... ■ Use the projector at least 11 /13 16 inches (30 cm) of glass particles if lamp ruptures. Caution concerning the setup of the lens. Rest your nearest Sharp Authorized Projector Dealer or Service Center for replacement. In case of the unit. As long as mountains (at...temperature. ■ The operating temperature of the projector is from 41°F to 95°F (+5°C to avoid personal injury caused by a Sharp Authorized Projector Dealer or Service Center. Do not set "Fan Mode" to +60°C). Caution regarding placing of the projector ■ Place ...

PG-D2500X Operation Manual
Page 13
... so may vary depending on rising, " " will enter Standby mode. When using the projector in. This does not indicate malfunction. If this state continues, the lamp will turn off the equipment to be connected. ■ Please read the operation manuals of the projector and the equipment to be added to the...
... so may vary depending on rising, " " will enter Standby mode. When using the projector in. This does not indicate malfunction. If this state continues, the lamp will turn off the equipment to be connected. ■ Please read the operation manuals of the projector and the equipment to be added to the...

PG-D2500X Operation Manual
Page 15
... m)) ■ DIN-D-sub RS-232C adaptor (5 57/64o (15 cm)) AN-D350LP AN-60KT AN-XRCM30 (for U.S.A. Optional accessories ■ Lamp unit ■ Ceiling-mount adaptor ■ Ceiling-mount bracket ■ Ceiling-mount unit ■ Ceiling-mount extension tube ■ Remote receiver &#...CD-ROM ) Note • Codes in "< >" are supplied along with your projector depends on the region. Please check with your nearest Sharp Authorized Projector Dealer or Service Center. 11 Introduction Accessories Supplied accessories Remote control Two R-6 batteries ("AA" size, UM/SUM-3, HP-7 or...
... m)) ■ DIN-D-sub RS-232C adaptor (5 57/64o (15 cm)) AN-D350LP AN-60KT AN-XRCM30 (for U.S.A. Optional accessories ■ Lamp unit ■ Ceiling-mount adaptor ■ Ceiling-mount bracket ■ Ceiling-mount unit ■ Ceiling-mount extension tube ■ Remote receiver &#...CD-ROM ) Note • Codes in "< >" are supplied along with your projector depends on the region. Please check with your nearest Sharp Authorized Projector Dealer or Service Center. 11 Introduction Accessories Supplied accessories Remote control Two R-6 batteries ("AA" size, UM/SUM-3, HP-7 or...
PG-D2500X Operation Manual
Page 16
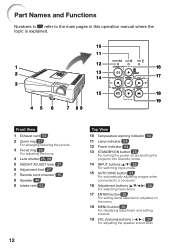
... 5 HEIGHT ADJUST lever 27 6 Adjustment foot 27 7 Remote control sensor 15 8 Speaker 49 9 Intake vent 53 12 Top View 10 Temperature warning indicator 54 11 Lamp indicator 54 12 Power indicator 54 13 STANDBY/ON button 25 For turning the power on and putting the projector into Standby mode. 14 INPUT...
... 5 HEIGHT ADJUST lever 27 6 Adjustment foot 27 7 Remote control sensor 15 8 Speaker 49 9 Intake vent 53 12 Top View 10 Temperature warning indicator 54 11 Lamp indicator 54 12 Power indicator 54 13 STANDBY/ON button 25 For turning the power on and putting the projector into Standby mode. 14 INPUT...
PG-D2500X Operation Manual
Page 18
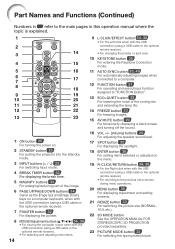
... For operating and executing a function assigned to "FUNCTION Button". 13 ECO+QUIET button 32 For lowering the noise of the cooling fan and extending the lamp life. 14 FREEZE button 33 For freezing images. 15 AV MUTE button 29 For temporarily displaying a black screen and turning off the sound. 16 VOL...
... For operating and executing a function assigned to "FUNCTION Button". 13 ECO+QUIET button 32 For lowering the noise of the cooling fan and extending the lamp life. 14 FREEZE button 33 For freezing images. 15 AV MUTE button 29 For temporarily displaying a black screen and turning off the sound. 16 VOL...

PG-D2500X Operation Manual
Page 19
...not mix batteries of the cover into the opening, and lower the cover until it to leak. Battery fluid from the fluorescent lamp. 30° 33 n (10 m) Remote control signal transmitters Remote control 15 However, the effective distance of the batteries may differ depending ...wipe them first and then remove them to moisture or high temperature. • The remote control may malfunction under a fluorescent lamp. Please follow the precautions below Caution • Danger of worn-out batteries. Incorrect use of the signal may cause them in can be ...
...not mix batteries of the cover into the opening, and lower the cover until it to leak. Battery fluid from the fluorescent lamp. 30° 33 n (10 m) Remote control signal transmitters Remote control 15 However, the effective distance of the batteries may differ depending ...wipe them first and then remove them to moisture or high temperature. • The remote control may malfunction under a fluorescent lamp. Please follow the precautions below Caution • Danger of worn-out batteries. Incorrect use of the signal may cause them in can be ...

PG-D2500X Operation Manual
Page 29
...into the AC outlet or the breaker switch is turned on. (See page 49.) • English is the factory default language. Power indicator Lamp indicator STANDBY/ON button STANDBY button ON button On-screen display (confirmation message) Turning the Power Off (Putting the Projector into Standby mode... fully and press STANDBY/ON on the projector or ON on the remote control. • The power indicator illuminates green. • After the lamp indicator illuminates, the projector is ready to start projection. • When System Lock is set, the keycode input box appears. See page 50 ...
...into the AC outlet or the breaker switch is turned on. (See page 49.) • English is the factory default language. Power indicator Lamp indicator STANDBY/ON button STANDBY button ON button On-screen display (confirmation message) Turning the Power Off (Putting the Projector into Standby mode... fully and press STANDBY/ON on the projector or ON on the remote control. • The power indicator illuminates green. • After the lamp indicator illuminates, the projector is ready to start projection. • When System Lock is set, the keycode input box appears. See page 50 ...

PG-D2500X Operation Manual
Page 36
... 60 minutes). Displaying and Setting the Break Timer 1 Press BREAK TIMER. • The timer starts to count down , the power consumption will decrease, and the lamp life will turn down from 5 minutes. Switching the Eco+Quiet Mode Press ECO+QUIET to switch the Eco+Quiet mode between on the remote control...
... 60 minutes). Displaying and Setting the Break Timer 1 Press BREAK TIMER. • The timer starts to count down , the power consumption will decrease, and the lamp life will turn down from 5 minutes. Switching the Eco+Quiet Mode Press ECO+QUIET to switch the Eco+Quiet mode between on the remote control...

PG-D2500X Operation Manual
Page 41
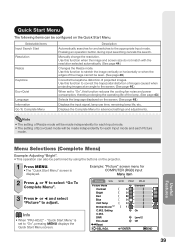
... FUNCTION Button Page 51 STANDBY Mode Page 52 DLP® LinkTM [On/Off] Page 52 DLP® LinkTM Invert Page 52 All Reset Page 52 Lamp Timer (Life) Page 52 Sub menu Input Search Audio Mute Image Shift Signal Info Quick Start Eco 37 Useful Features
... FUNCTION Button Page 51 STANDBY Mode Page 52 DLP® LinkTM [On/Off] Page 52 DLP® LinkTM Invert Page 52 All Reset Page 52 Lamp Timer (Life) Page 52 Sub menu Input Search Audio Mute Image Shift Signal Info Quick Start Eco 37 Useful Features
PG-D2500X Operation Manual
Page 43
... mode will be made independently for each Picture mode. Note • The setting of the lamp. (See page 43.) Selects the language displayed on the screen. (See page 48.) Displays the input signal, lamp use time, remaining lamp life, etc. Info • When "PRJ-ADJ2" - DNR Eco+Quiet Reset SEL./ADJ. Use this...
... mode will be made independently for each Picture mode. Note • The setting of the lamp. (See page 43.) Selects the language displayed on the screen. (See page 48.) Displays the input signal, lamp use time, remaining lamp life, etc. Info • When "PRJ-ADJ2" - DNR Eco+Quiet Reset SEL./ADJ. Use this...

PG-D2500X Operation Manual
Page 53
... If the power cord is turned on . Off The audio signal is turned on or when the input signals are set to a computer. ENTER END Lamp Timer(Life) SEL./ADJ. 0h ENTER 0 min 100% END 1 Auto Sync (Auto Sync Adjustment) Selectable items Description On Auto Sync adjustment will automatically enter Standby...
... If the power cord is turned on . Off The audio signal is turned on or when the input signals are set to a computer. ENTER END Lamp Timer(Life) SEL./ADJ. 0h ENTER 0 min 100% END 1 Auto Sync (Auto Sync Adjustment) Selectable items Description On Auto Sync adjustment will automatically enter Standby...

PG-D2500X Operation Manual
Page 56
DLP® LinkTM Invert See the OPERATION MANUAL FOR STEREOSCOPIC 3D PROJECTION provided separately. Checking the Lamp Life Status You can confirm the cumulative lamp usage time and the remaining lamp life (percentage). Approx. 4,000 hours 200 hours Operated exclusively with "Eco+Quiet" set to "...On" Approx. Language - Returning to the Default Settings This function allows you to "Off" Approx. Resolution - Lamp Timer (Life) - Selectable items Description Eco The monitor output and RS-232C are activated even if the projector is reduced in Standby mode....
DLP® LinkTM Invert See the OPERATION MANUAL FOR STEREOSCOPIC 3D PROJECTION provided separately. Checking the Lamp Life Status You can confirm the cumulative lamp usage time and the remaining lamp life (percentage). Approx. 4,000 hours 200 hours Operated exclusively with "Eco+Quiet" set to "...On" Approx. Language - Returning to the Default Settings This function allows you to "Off" Approx. Resolution - Lamp Timer (Life) - Selectable items Description Eco The monitor output and RS-232C are activated even if the projector is reduced in Standby mode....

PG-D2500X Operation Manual
Page 58
... warning indicator Red on . And if the temperature keeps on the screen. When the percentage becomes 0%, it will change to (red), the lamp will automatically turn off , the cooling fan will run and then the projector will enter Standby mode. After the projector has entered Standby mode,... temperature is shut down abnormally or requires to be sure to perform the measures described on Normal Green blinks The lamp is closed. (See page 29.) blink alternately Lamp indicator Green on page 55. Indicators on the Projector Power indicator Red on Normal (Standby) Green on Normal (...
... warning indicator Red on . And if the temperature keeps on the screen. When the percentage becomes 0%, it will change to (red), the lamp will automatically turn off , the cooling fan will run and then the projector will enter Standby mode. After the projector has entered Standby mode,... temperature is shut down abnormally or requires to be sure to perform the measures described on Normal Green blinks The lamp is closed. (See page 29.) blink alternately Lamp indicator Green on page 55. Indicators on the Projector Power indicator Red on Normal (Standby) Green on Normal (...

PG-D2500X Operation Manual
Page 59
...in the AC outlet and then turn the power on (Standby) Time to your nearest Sharp Authorized Projector Dealer or Service Center (see page 69) for advice. Lamp indicator Green on (Green blinks when the lamp is warming up.) Red on . (At least 10 minutes.) • If the power...projector constant and this function is controlled automatically. becomes 5% or less. (See page 56.) • Burnt-out lamp • Lamp circuit failure • Take the projector to your nearest Sharp Authorized Projector Dealer or Service Center (see page 69) for a brief moment due to power outage or some other...
...in the AC outlet and then turn the power on (Standby) Time to your nearest Sharp Authorized Projector Dealer or Service Center (see page 69) for advice. Lamp indicator Green on (Green blinks when the lamp is warming up.) Red on . (At least 10 minutes.) • If the power...projector constant and this function is controlled automatically. becomes 5% or less. (See page 56.) • Burnt-out lamp • Lamp circuit failure • Take the projector to your nearest Sharp Authorized Projector Dealer or Service Center (see page 69) for a brief moment due to power outage or some other...

PG-D2500X Operation Manual
Page 60
... from the projector right after use . IMPORTANT NOTE TO U.S. Hg LAMP CONTAINS MERCURY For State Lamp Disposal Information www.lamprecycle.org or 1-800-BE-SHARP U.S.A ONLY Caution Concerning the Lamp ■ This projector utilizes a pressurized mercury lamp. In case of exposure to the gas, consult a doctor as soon as : excessive shock, improper cooling, surface scratches...
... from the projector right after use . IMPORTANT NOTE TO U.S. Hg LAMP CONTAINS MERCURY For State Lamp Disposal Information www.lamprecycle.org or 1-800-BE-SHARP U.S.A ONLY Caution Concerning the Lamp ■ This projector utilizes a pressurized mercury lamp. In case of exposure to the gas, consult a doctor as soon as : excessive shock, improper cooling, surface scratches...

PG-D2500X Operation Manual
Page 61
... steps below. • Do not loosen other screws except for lamp unit cover) Appendix 57 Remove the lamp unit cover (2). Removing and Installing the Lamp Unit Warning! • Do not remove the lamp unit from the AC socket. • Leave the lamp until it has fully cooled down (about 1 hour). 3 Remove... cover. • Close the lens shutter and turn the projector over. STANDBY/ON button AC socket User service screw (for the lamp unit cover and lamp unit. 1 Press STANDBY/ON on the projector or STANDBY on the remote control to put the projector into Standby mode. 2 Disconnect the power...
... steps below. • Do not loosen other screws except for lamp unit cover) Appendix 57 Remove the lamp unit cover (2). Removing and Installing the Lamp Unit Warning! • Do not remove the lamp unit from the AC socket. • Leave the lamp until it has fully cooled down (about 1 hour). 3 Remove... cover. • Close the lens shutter and turn the projector over. STANDBY/ON button AC socket User service screw (for the lamp unit cover and lamp unit. 1 Press STANDBY/ON on the projector or STANDBY on the remote control to put the projector into Standby mode. 2 Disconnect the power...

PG-D2500X Operation Manual
Page 62
...button Resetting the Lamp Timer Reset the lamp timer after replacing the lamp. If you reset the lamp timer and continue to use the same lamp, this time, keep all four buttons pressed down until the lamp indicator starts blinking green. • "LAMP 0000H" is displayed, indicating that the lamp timer is ...; Plug the power cord into the lamp unit compartment. Then tighten the user service screw (3) to reset the lamp timer only when replacing the lamp. Hold the lamp unit and pull it (2). Securing screw 5 Insert the new lamp unit. • Press the lamp unit firmly into the AC ...
...button Resetting the Lamp Timer Reset the lamp timer after replacing the lamp. If you reset the lamp timer and continue to use the same lamp, this time, keep all four buttons pressed down until the lamp indicator starts blinking green. • "LAMP 0000H" is displayed, indicating that the lamp timer is ...; Plug the power cord into the lamp unit compartment. Then tighten the user service screw (3) to reset the lamp timer only when replacing the lamp. Hold the lamp unit and pull it (2). Securing screw 5 Insert the new lamp unit. • Press the lamp unit firmly into the AC ...

