
PN-655RU Operation Manual
Page 4
Operation of the FCC Rules. U.S.A. U.S.A. NOTE: This equipment has been tested and found to comply with the instruction manual, may be required to environmental considerations. ONLY CAUTION: Use the supplied power cord as it is likely to cause harmful interference in which case the ...
Operation of the FCC Rules. U.S.A. U.S.A. NOTE: This equipment has been tested and found to comply with the instruction manual, may be required to environmental considerations. ONLY CAUTION: Use the supplied power cord as it is likely to cause harmful interference in which case the ...

PN-655RU Operation Manual
Page 5
...the manufacturer. Do not place the product in a safe place for your purchase of a SHARP LCD product. Therefore, it can cause overheating and/or shorten the life of objects and liquids ...stepping on them or objects from the AC outlet before using the product. 1. Keep this manual in accidents. 7. These safety and operating instructions must be kept in an enclosed place such...spilled on safety. d. Do not touch the controls other openings in case the LCD panel breaks. 11. When the product displays an abnormal condition. To ensure your safety and prolong the service life of ...
...the manufacturer. Do not place the product in a safe place for your purchase of a SHARP LCD product. Therefore, it can cause overheating and/or shorten the life of objects and liquids ...stepping on them or objects from the AC outlet before using the product. 1. Keep this manual in accidents. 7. These safety and operating instructions must be kept in an enclosed place such...spilled on safety. d. Do not touch the controls other openings in case the LCD panel breaks. 11. When the product displays an abnormal condition. To ensure your safety and prolong the service life of ...

PN-655RU Operation Manual
Page 7
... or over may in electric shock. - Also, if the screen is viewed from the display source. The quality of the video signal may damage it. - Ensure that Sharp Corporation bears no responsibility for errors made with wet hands. Content must be formatted to be...manual, Microsoft Windows XP will be difficult to confirm operation. 5E The Power Cord - Do not remove or insert the power plug with the application of fluorescent tubes, the screen may be subject to fire. - The TFT color LCD panel used . - Do not display a still picture for portrait display...
... or over may in electric shock. - Also, if the screen is viewed from the display source. The quality of the video signal may damage it. - Ensure that Sharp Corporation bears no responsibility for errors made with wet hands. Content must be formatted to be...manual, Microsoft Windows XP will be difficult to confirm operation. 5E The Power Cord - Do not remove or insert the power plug with the application of fluorescent tubes, the screen may be subject to fire. - The TFT color LCD panel used . - Do not display a still picture for portrait display...

PN-655RU Operation Manual
Page 9
...garbage. Do not reproduce it without permission. • For environmental protection! Follow the disposal instructions for Windows) • Sharp Corporation holds authorship rights to the Utility Disk program. Supplied Accessories Make sure the following accessories are provided with the product.... If any component should be missing, please contact your area. 7E Liquid Crystal Display (1) ENGLISH Power cord (1) "AA" size battery (2) Stand hole Remote control unit (1) protection cover (2) BRIGHT DISLAY MODE SIZE ...
...garbage. Do not reproduce it without permission. • For environmental protection! Follow the disposal instructions for Windows) • Sharp Corporation holds authorship rights to the Utility Disk program. Supplied Accessories Make sure the following accessories are provided with the product.... If any component should be missing, please contact your area. 7E Liquid Crystal Display (1) ENGLISH Power cord (1) "AA" size battery (2) Stand hole Remote control unit (1) protection cover (2) BRIGHT DISLAY MODE SIZE ...
PN-655RU Operation Manual
Page 13
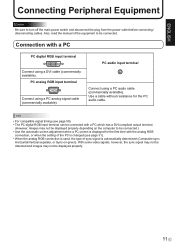
... • For compatible signal timing (see page 31). • When the analog RGB connection is used, the type of the equipment to be displayed properly depending on -green). PC analog RGB input terminal Connect using a PC audio cable (commercially available). With some video signals, however, the sync... signal may not be detected and images may not be connected. Also, read the manual of sync signal is changed (see page 50). • The PC digital RGB input terminal can be displayed properly. 11 E Use a cable without resistance for the first time with the analog...
... • For compatible signal timing (see page 31). • When the analog RGB connection is used, the type of the equipment to be displayed properly depending on -green). PC analog RGB input terminal Connect using a PC audio cable (commercially available). With some video signals, however, the sync... signal may not be detected and images may not be connected. Also, read the manual of sync signal is changed (see page 50). • The PC digital RGB input terminal can be displayed properly. 11 E Use a cable without resistance for the first time with the analog...
PN-655RU Operation Manual
Page 18
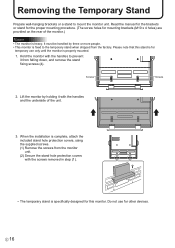
....) Caution • The monitor is complete, attach the included stand hole protection covers, using the supplied screws. (1) Remove the screws from the factory. Read the manual for the brackets or stand for the proper mounting procedure. (The screw holes for other devices. Lift the monitor by three or more people. •...
....) Caution • The monitor is complete, attach the included stand hole protection covers, using the supplied screws. (1) Remove the screws from the factory. Read the manual for the brackets or stand for the proper mounting procedure. (The screw holes for other devices. Lift the monitor by three or more people. •...

PN-655RU Operation Manual
Page 25
... 127 77 134 113 RESET ANALOG 1920x1080 V: 60 Hz H: 66.3 kHz 2. GAIN CONTROL MANUAL BLACK LEVEL CONTRAST AUTO 15 15 ANALOG 1920x1080 V: 60 Hz H: 66.3 kHz 23 E ENGLISH Menu Items Menus can be displayed on the screen. • / : Adjusts the selected item. Cursor control (UP/DOWN/... the screen to select CONTRAST. Press MENU to display the menu screen. Press MENU to display the GAIN CONTROL menu. 3. For more information, refer to the pages where each topic is explained. Displaying the menu screen MENU button • Displays and turns off the menu screen. • ...
... 127 77 134 113 RESET ANALOG 1920x1080 V: 60 Hz H: 66.3 kHz 2. GAIN CONTROL MANUAL BLACK LEVEL CONTRAST AUTO 15 15 ANALOG 1920x1080 V: 60 Hz H: 66.3 kHz 23 E ENGLISH Menu Items Menus can be displayed on the screen. • / : Adjusts the selected item. Cursor control (UP/DOWN/... the screen to select CONTRAST. Press MENU to display the menu screen. Press MENU to display the GAIN CONTROL menu. 3. For more information, refer to the pages where each topic is explained. Displaying the menu screen MENU button • Displays and turns off the menu screen. • ...

PN-655RU Operation Manual
Page 26
...frequency, or type of signal of setting items and their status GAIN CONTROL MANUAL BLACK LEVEL CONTRAST AUTO 15 15 ANALOG 1920x1080 V: 60 Hz H: 66.3 kHz Displays the input mode currently being selected. GAIN CONTROL MANUAL BLACK LEVEL CONTRAST AUTO 15 25 ANALOG 1920x1080 V: 60 Hz H: 66.3 ...kHz 5. Function not supported by the current input signal) E 24 Menu screen display Name of the menu Names of the...
...frequency, or type of signal of setting items and their status GAIN CONTROL MANUAL BLACK LEVEL CONTRAST AUTO 15 15 ANALOG 1920x1080 V: 60 Hz H: 66.3 kHz Displays the input mode currently being selected. GAIN CONTROL MANUAL BLACK LEVEL CONTRAST AUTO 15 25 ANALOG 1920x1080 V: 60 Hz H: 66.3 ...kHz 5. Function not supported by the current input signal) E 24 Menu screen display Name of the menu Names of the...

PN-655RU Operation Manual
Page 27
... page 27.) MODE SELECT 2 (See page 27.) MODE SELECT 3 (See page 28.) Item MANUAL AUTO CLOCK PHASE H-POS V-POS RESET MANUAL AUTO BLACK LEVEL CONTRAST WHITE BALANCE THRU PRESET USER COPY TO USER GAMMA CONTRAST BLACK LEVEL TINT COLORS SHARPNESS WHITE BALANCE GAMMA 480 LINES 768 LINES BEZEL ENLARGE ENLARGE-POS MULTI ZOOM...
... page 27.) MODE SELECT 2 (See page 27.) MODE SELECT 3 (See page 28.) Item MANUAL AUTO CLOCK PHASE H-POS V-POS RESET MANUAL AUTO BLACK LEVEL CONTRAST WHITE BALANCE THRU PRESET USER COPY TO USER GAMMA CONTRAST BLACK LEVEL TINT COLORS SHARPNESS WHITE BALANCE GAMMA 480 LINES 768 LINES BEZEL ENLARGE ENLARGE-POS MULTI ZOOM...

PN-655RU Operation Manual
Page 28
... it . GAIN CONTROL (DIGITAL/ANALOG) [MANUAL / AUTO] (ANALOG) Adjusts BLACK LEVEL and CONTRAST. E 26 ADJUSTMENT (ANALOG) [MANUAL / AUTO] Adjusts CLOCK, PHASE, H-POS (horizontal positioning), and V-POS (vertical positioning). COLOR CONTROL (DIGITAL/ANALOG) [WHITE BALANCE (color temperature)] THRU Displays the input signal level as is. (through....Use this automatic adjustment when you change the setting of the image. MANUAL The BLACK LEVEL and CONTRAST can be made only after CLOCK has been correctly set for PRESET to display a PC screen for the first time or when you use...
... it . GAIN CONTROL (DIGITAL/ANALOG) [MANUAL / AUTO] (ANALOG) Adjusts BLACK LEVEL and CONTRAST. E 26 ADJUSTMENT (ANALOG) [MANUAL / AUTO] Adjusts CLOCK, PHASE, H-POS (horizontal positioning), and V-POS (vertical positioning). COLOR CONTROL (DIGITAL/ANALOG) [WHITE BALANCE (color temperature)] THRU Displays the input signal level as is. (through....Use this automatic adjustment when you change the setting of the image. MANUAL The BLACK LEVEL and CONTRAST can be made only after CLOCK has been correctly set for PRESET to display a PC screen for the first time or when you use...

PN-655RU Operation Manual
Page 29
...480 LINES] (ANALOG) Manually selects input resolution. [768 LINES] (ANALOG) Manually selects input resolution. [BEZEL] (DIGITAL/ANALOG) Sets the frame width of the display when the enlargement function is used. [ENLARGE] (DIGITAL/ANALOG) Sets the number of one hour. Pressing displays the next menu. H-POS... brightness of bass-level sound. Selecting + changes the color towards magenta. [COLORS] Adjusts the color intensity. [SHARPNESS] Adjusts the sharpness of one second. Pressing displays the next menu. MODE SELECT 2 [OFF TIMER] Set the time until the monitor turns off (enters standby ...
...480 LINES] (ANALOG) Manually selects input resolution. [768 LINES] (ANALOG) Manually selects input resolution. [BEZEL] (DIGITAL/ANALOG) Sets the frame width of the display when the enlargement function is used. [ENLARGE] (DIGITAL/ANALOG) Sets the number of one hour. Pressing displays the next menu. H-POS... brightness of bass-level sound. Selecting + changes the color towards magenta. [COLORS] Adjusts the color intensity. [SHARPNESS] Adjusts the sharpness of one second. Pressing displays the next menu. MODE SELECT 2 [OFF TIMER] Set the time until the monitor turns off (enters standby ...

PN-655RU Operation Manual
Page 30
... or PbyP2 mode. [PbyP2 POS] Sets the position of the sub screen in PIP, PbyP, or PbyP2 mode. PIP Displays a sub screen inside a main screen. PbyP2 Displays a main screen which is displayed as a full screen. MANUAL Displays a main screen and a black sub screen. If the main screen is output in a line. Menu Items MODE SELECT...
... or PbyP2 mode. [PbyP2 POS] Sets the position of the sub screen in PIP, PbyP, or PbyP2 mode. PIP Displays a sub screen inside a main screen. PbyP2 Displays a main screen which is displayed as a full screen. MANUAL Displays a main screen and a black sub screen. If the main screen is output in a line. Menu Items MODE SELECT...

PN-655RU Operation Manual
Page 33
... the first time, or when you change the setting of the input signal and is 65,000 colors, the color levels in the ADJUSTMENT menu or GAIN CONTROL menu, display an image to quit the adjustment program. 6. Set the input mode to start the adjustment program.... Double-click [Adj_uty.exe] to "ANALOG" and display the adjustment pattern above. 2. Press MENU and display the ADJUSTMENT menu. 3. Press and select "AUTO". Try manual adjustment if necessary. 31 E Connect the monitor and computer. 2. The adjustment pattern will appear. Press ...
... the first time, or when you change the setting of the input signal and is 65,000 colors, the color levels in the ADJUSTMENT menu or GAIN CONTROL menu, display an image to quit the adjustment program. 6. Set the input mode to start the adjustment program.... Double-click [Adj_uty.exe] to "ANALOG" and display the adjustment pattern above. 2. Press MENU and display the ADJUSTMENT menu. 3. Press and select "AUTO". Try manual adjustment if necessary. 31 E Connect the monitor and computer. 2. The adjustment pattern will appear. Press ...

PN-655RU Operation Manual
Page 47
... WR 0 0 POS1 Yes 1 1 POS2 MW2P WR 0 0 POS3 1 1 POS2 Yes 2 2 POS1 MOFF WR 0 0 MANUAL Yes 1 1 AUTO AUTR WR -10 - 10 -10 - 10 AUBS WR -10 - 10 -10 - 10 Yes AUBL ... 1 1 ON RSET W 0 ALL RESET No LOSD WR 0 0 OSD DISPLAY ON Yes 1 1 OSD DISPLAY OFF 45 E This ID number is effective for the command immediately after this command...BLACK LEVEL BLVL WR 0 - 60 0 - 60 COLOR COLR WR 0 - 60 0 - 60 Yes TINT TINT WR 0 - 60 0 - 60 SHARPNESS SHRP WR 0 - 31 0 - 31 WHITE BALANCE CTMP WR 1 - 15 1 - 15 GAMMA GAMM WR 0 - 2 0 - 2 0:1.8, ...
... WR 0 0 POS1 Yes 1 1 POS2 MW2P WR 0 0 POS3 1 1 POS2 Yes 2 2 POS1 MOFF WR 0 0 MANUAL Yes 1 1 AUTO AUTR WR -10 - 10 -10 - 10 AUBS WR -10 - 10 -10 - 10 Yes AUBL ... 1 1 ON RSET W 0 ALL RESET No LOSD WR 0 0 OSD DISPLAY ON Yes 1 1 OSD DISPLAY OFF 45 E This ID number is effective for the command immediately after this command...BLACK LEVEL BLVL WR 0 - 60 0 - 60 COLOR COLR WR 0 - 60 0 - 60 Yes TINT TINT WR 0 - 60 0 - 60 SHARPNESS SHRP WR 0 - 31 0 - 31 WHITE BALANCE CTMP WR 1 - 15 1 - 15 GAMMA GAMM WR 0 - 2 0 - 2 0:1.8, ...

PN-655RU Operation Manual
Page 54
... product to fall, resulting in serious personal injuries as well as damage to the product. The screw and hole should come together with UL1678 standard. SHARP recommends using mounting interface that screw hole depth of the brackets or stand for mounting brackets 61-7/8 [1572] 59-7/16 [1509] Opening height (56-3/8 [1432...-9/16 [650] Opening width (31-3/4 [807]) 1-9/16 [40] 1/4 [6] 5-7/8 [150] 36-5/16 [923] 39-1/2 [1003] 1-9/16 [40] 17-5/16 [440] When mounting the monitor, read the manual of the monitor is 1-3/16 inch (30 mm).
... product to fall, resulting in serious personal injuries as well as damage to the product. The screw and hole should come together with UL1678 standard. SHARP recommends using mounting interface that screw hole depth of the brackets or stand for mounting brackets 61-7/8 [1572] 59-7/16 [1509] Opening height (56-3/8 [1432...-9/16 [650] Opening width (31-3/4 [807]) 1-9/16 [40] 1/4 [6] 5-7/8 [150] 36-5/16 [923] 39-1/2 [1003] 1-9/16 [40] 17-5/16 [440] When mounting the monitor, read the manual of the monitor is 1-3/16 inch (30 mm).


