XG-MB70X Operation Manual
Page 5
... High brightness light source. Be especially careful that you immediately receive the full benefit of the parts, service and labor warranty applicable to your new SHARP Projector, using the projector, please read this product may cause radio interference in which case the user will promptly receive ...this equipment in the literature accompanying the product. These limits are two important reasons for a Class A digital device, pursuant to Part 15 of sufficient magnitude to constitute a risk or electric shock to persons. ONLY The enclosed computer cable must be required to ...
... High brightness light source. Be especially careful that you immediately receive the full benefit of the parts, service and labor warranty applicable to your new SHARP Projector, using the projector, please read this product may cause radio interference in which case the user will promptly receive ...this equipment in the literature accompanying the product. These limits are two important reasons for a Class A digital device, pursuant to Part 15 of sufficient magnitude to constitute a risk or electric shock to persons. ONLY The enclosed computer cable must be required to ...
XG-MB70X Operation Manual
Page 8
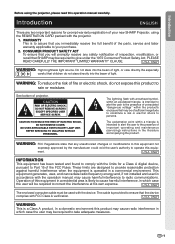
... 6 How to Access the PDF Operation Manuals ... 9 Accessories 10 Part Names and Functions 11 Using the Remote Control 15 Usable Range 15 Inserting the Batteries 15 Quick Start Quick Start 16 Setup Storing the Projector 18 How to Use the Storage Case 18 Using Basic Operation Turning... Temperature 45 sRGB Setting 46 Switching the High Brightness/High Contrast ....... 46 Signal Type Setting 47 Setting up the Projector 19 Setting up the Projector 19 Projecting a Reversed Image 20 Connections Connections 21 INPUT/OUTPUT Terminals and Connectable Main Equipment 21 Samples of Cables ...
... 6 How to Access the PDF Operation Manuals ... 9 Accessories 10 Part Names and Functions 11 Using the Remote Control 15 Usable Range 15 Inserting the Batteries 15 Quick Start Quick Start 16 Setup Storing the Projector 18 How to Use the Storage Case 18 Using Basic Operation Turning... Temperature 45 sRGB Setting 46 Switching the High Brightness/High Contrast ....... 46 Signal Type Setting 47 Setting up the Projector 19 Setting up the Projector 19 Projecting a Reversed Image 20 Connections Connections 21 INPUT/OUTPUT Terminals and Connectable Main Equipment 21 Samples of Cables ...

XG-MB70X Operation Manual
Page 10
... product. e. Unauthorized substitutions may result in a risk of other products (including amplifiers) that the service technician has used replacement parts specified by the manufacturer. 22. Retain Instructions The safety and operating instructions should be followed. 5. The product may cause the ... please contact your personal safety. Overloading Do not overload wall outlets, extension cords, or integral convenience receptacles as the original part. b. Heat This product should be read all servicing to qualified service personnel. 18. This product has been engineered and ...
... product. e. Unauthorized substitutions may result in a risk of other products (including amplifiers) that the service technician has used replacement parts specified by the manufacturer. 22. Retain Instructions The safety and operating instructions should be followed. 5. The product may cause the ... please contact your personal safety. Overloading Do not overload wall outlets, extension cords, or integral convenience receptacles as the original part. b. Heat This product should be read all servicing to qualified service personnel. 18. This product has been engineered and ...
XG-MB70X Operation Manual
Page 15
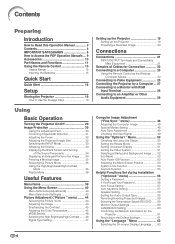
...is dirt or dust on the auto focus sensor. MENU button 40 For displaying adjustment and setting screens. STANDBY button 29 For putting the projector into position. • Removing the lens cap Pull the lens cap directly outward. -11 ENTER button 40 For setting items selected or ...adjusted on . KEYSTONE button 31 For entering the Keystone Correction mode. Introduction Part Names and Functions Numbers in refer to a computer. Projector Top View ON button 29 For turning the power on the menu. Remote control sensor 15 Auto focus sensor Auto...
...is dirt or dust on the auto focus sensor. MENU button 40 For displaying adjustment and setting screens. STANDBY button 29 For putting the projector into position. • Removing the lens cap Pull the lens cap directly outward. -11 ENTER button 40 For setting items selected or ...adjusted on . KEYSTONE button 31 For entering the Keystone Correction mode. Introduction Part Names and Functions Numbers in refer to a computer. Projector Top View ON button 29 For turning the power on the menu. Remote control sensor 15 Auto focus sensor Auto...

XG-MB70X Operation Manual
Page 16
... on ... Ensure to attach the "QUICK GUIDE" Label on the top cabinet of the projector as shown in the drawing on ... Normal Red on the right. Normal Green blinks ... Part Names and Functions About the Indicators on the Projector Power indicator Red on ... Normal (Power on) Lamp indicator Green on ... Do not attach... or exhaust vent. The lamp is abnormally high. (See page 64.) When Attaching the "QUICK GUIDE" Label Attaching the "QUICK GUIDE" Label (supplied) on the projector will help you check the setup procedure. The lamp has been shut down . "QUICK GUIDE" Label -12
... on ... Ensure to attach the "QUICK GUIDE" Label on the top cabinet of the projector as shown in the drawing on ... Normal Red on the right. Normal Green blinks ... Part Names and Functions About the Indicators on the Projector Power indicator Red on ... Normal (Power on) Lamp indicator Green on ... Do not attach... or exhaust vent. The lamp is abnormally high. (See page 64.) When Attaching the "QUICK GUIDE" Label Attaching the "QUICK GUIDE" Label (supplied) on the projector will help you check the setup procedure. The lamp has been shut down . "QUICK GUIDE" Label -12

XG-MB70X Operation Manual
Page 18
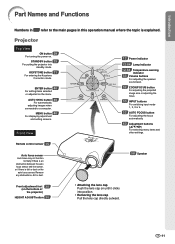
...refer to the main pages in this operation manual where the topic is visible in the dark. ENLARGE (Enlarge/Reduce) 34 buttons For enlarging/reducing part of luminous material that is explained. INPUT 1, 2, 3 and 4 buttons 33 For switching to the previous display. 34 AV MUTE button For... switching the picture mode. 36 RESIZE button For switching the screen size (NORMAL, BORDER, etc.). Remote Control STANDBY button 29 For putting the projector into focus. 35 IRIS button For switching "High Brightness" mode or "High Contrast" mode. 40 MENU button For displaying adjustment and setting screens...
...refer to the main pages in this operation manual where the topic is visible in the dark. ENLARGE (Enlarge/Reduce) 34 buttons For enlarging/reducing part of luminous material that is explained. INPUT 1, 2, 3 and 4 buttons 33 For switching to the previous display. 34 AV MUTE button For... switching the picture mode. 36 RESIZE button For switching the screen size (NORMAL, BORDER, etc.). Remote Control STANDBY button 29 For putting the projector into focus. 35 IRIS button For switching "High Brightness" mode or "High Contrast" mode. 40 MENU button For displaying adjustment and setting screens...

XG-MB70X Operation Manual
Page 27
... Connections RGB cable * ø3.5 mm stereo or mono audio cable (commercially available or available as Sharp service part QCNWGA038WJPZ) USB cable Connect to turn on the projector and then the other than those listed may cause some Macintosh computers. Contact your nearest Macintosh Dealer.... • Depending on the projector first and the connected computer last. Note • When connecting...
... Connections RGB cable * ø3.5 mm stereo or mono audio cable (commercially available or available as Sharp service part QCNWGA038WJPZ) USB cable Connect to turn on the projector and then the other than those listed may cause some Macintosh computers. Contact your nearest Macintosh Dealer.... • Depending on the projector first and the connected computer last. Note • When connecting...

XG-MB70X Operation Manual
Page 70
...be vented into the room from the exhaust vent. See page 50. ■ Purchase a replacement lamp of purchase, nearest Sharp Authorized Projector Dealer or Service Center. Lamp failure can be checked with the on the individual lamp and/or the condition and the frequency...SHARP (1-888-467-4277). ONLY Caution Concerning the Lamp ■ This projector utilizes a pressurized mercury lamp. In case of this lamp includes mercury, ventilate the room well if the lamp breaks and avoid all exposure to fully cool before removing the lamp unit. ■ Carefully change the lamp by a 90-day parts...
...be vented into the room from the exhaust vent. See page 50. ■ Purchase a replacement lamp of purchase, nearest Sharp Authorized Projector Dealer or Service Center. Lamp failure can be checked with the on the individual lamp and/or the condition and the frequency...SHARP (1-888-467-4277). ONLY Caution Concerning the Lamp ■ This projector utilizes a pressurized mercury lamp. In case of this lamp includes mercury, ventilate the room well if the lamp breaks and avoid all exposure to fully cool before removing the lamp unit. ■ Carefully change the lamp by a 90-day parts...
XG-MB70X Operation Manual
Page 71
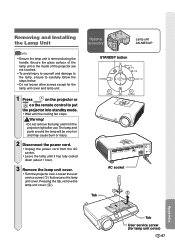
... • Leave the lamp until the cooling fan stops. The lamp and parts around the lamp will be very hot and may cause burn or injury. 2 Disconnect the power cord. • Unplug the power cord from the projector right after use. Loosen the user service screw (1) that secures the lamp unit... STANDBY button AC socket 1 2 Tab Appendix Tab User service screw (for the lamp unit cover and lamp unit. 1 Press on the projector or on the remote control to put the projector into standby mode. • Wait until it has fully cooled down (about 1 hour). 3 Remove the lamp unit cover. •...
... • Leave the lamp until the cooling fan stops. The lamp and parts around the lamp will be very hot and may cause burn or injury. 2 Disconnect the power cord. • Unplug the power cord from the projector right after use. Loosen the user service screw (1) that secures the lamp unit... STANDBY button AC socket 1 2 Tab Appendix Tab User service screw (for the lamp unit cover and lamp unit. 1 Press on the projector or on the remote control to put the projector into standby mode. • Wait until it has fully cooled down (about 1 hour). 3 Remove the lamp unit cover. •...

XG-MB70X Operation Manual
Page 77
...on green type analog input: 0-0.7 Vp-p, positive, 75 Ω terminated HORIZONTAL SYNC. Specifications Product type Multimedia Projector Model XG-MB70X Video system NTSC3.58/NTSC4.43/PAL/PAL-M/PAL-N/PAL-60/SECAM/ DTV480I/DTV480P/DTV540P/DTV576I/DTV576P/DTV720P/DTV1035I/...(QCNWGA014WJPZ), Storage case (GCASNA014WJSA), Lens cap (RCAPHA021WJSA), Projector manual and technical reference CD-ROM (UDSKAA052WJZZ), "QUICK GUIDE" label (TLABZA717WJZZ), Operation manual (TINSB416WJZZ) As a part of policy of continuous improvement, SHARP reserves the right to make design and specification changes for...
...on green type analog input: 0-0.7 Vp-p, positive, 75 Ω terminated HORIZONTAL SYNC. Specifications Product type Multimedia Projector Model XG-MB70X Video system NTSC3.58/NTSC4.43/PAL/PAL-M/PAL-N/PAL-60/SECAM/ DTV480I/DTV480P/DTV540P/DTV576I/DTV576P/DTV720P/DTV1035I/...(QCNWGA014WJPZ), Storage case (GCASNA014WJSA), Lens cap (RCAPHA021WJSA), Projector manual and technical reference CD-ROM (UDSKAA052WJZZ), "QUICK GUIDE" label (TLABZA717WJZZ), Operation manual (TINSB416WJZZ) As a part of policy of continuous improvement, SHARP reserves the right to make design and specification changes for...


