
XG-MB70X Operation Manual
Page 2
Before recycling the packaging, please ensure that you have checked the contents of the carton thoroughly against the list of the projector and retain this information. Model No.: XG-MB70X Serial No.: IMPORTANT For your assistance in reporting the loss or theft of your Projector, please record the Serial Number located on the bottom of "Supplied accessories" on page 10.
Before recycling the packaging, please ensure that you have checked the contents of the carton thoroughly against the list of the projector and retain this information. Model No.: XG-MB70X Serial No.: IMPORTANT For your assistance in reporting the loss or theft of your Projector, please record the Serial Number located on the bottom of "Supplied accessories" on page 10.
XG-MB70X Operation Manual
Page 5
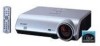
...provided to ensure that any safety notification of sufficient magnitude to constitute a risk or electric shock to the presence of projector. The exclamation point within an equilateral triangle, is intended to alert the user to persons. Operation of this product may... of important operating and maintenance (servicing) instructions in a commercial environment. Introduction ENGLISH There are designed to your new SHARP Projector, using the projector, please read this equip- The lightning flash with the limits for prompt warranty registration of the FCC Rules. Do ...
...provided to ensure that any safety notification of sufficient magnitude to constitute a risk or electric shock to the presence of projector. The exclamation point within an equilateral triangle, is intended to alert the user to persons. Operation of this product may... of important operating and maintenance (servicing) instructions in a commercial environment. Introduction ENGLISH There are designed to your new SHARP Projector, using the projector, please read this equip- The lightning flash with the limits for prompt warranty registration of the FCC Rules. Do ...
XG-MB70X Operation Manual
Page 6
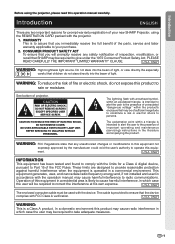
...which may be regulated due to environmental considerations. nies. -2 During normal operation, when putting the projector into standby mode always use the STANDBY button on the projector or on the remote control. Ensure the cooling fan has stopped before disconnecting the power cord. DURING...run for about 90 seconds after the projector enters the standby mode. LAMP REPLACEMENT WARNING : TURN OFF THE LAMP AND DISCONNECT POWER CORD BEFORE OPENING THIS COVER. This SHARP projector uses a DMD panel. AVERTISSEMENT - WARNING: The cooling fan in this projector continues to . SERVICEMAN-WARNING : ...
...which may be regulated due to environmental considerations. nies. -2 During normal operation, when putting the projector into standby mode always use the STANDBY button on the projector or on the remote control. Ensure the cooling fan has stopped before disconnecting the power cord. DURING...run for about 90 seconds after the projector enters the standby mode. LAMP REPLACEMENT WARNING : TURN OFF THE LAMP AND DISCONNECT POWER CORD BEFORE OPENING THIS COVER. This SHARP projector uses a DMD panel. AVERTISSEMENT - WARNING: The cooling fan in this projector continues to . SERVICEMAN-WARNING : ...
XG-MB70X Operation Manual
Page 7
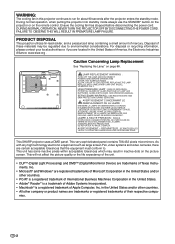
...button Buttons used in this operation Button used in this operation Using the Menu Screen The menu can also be performed by using the projector. Menu icon Menu screen Picture Fine Sync Options1 Options2 Language Note • The "Fine Sync" menu is displayed. This may ...differ from the actual on the projector. 1 Press . • The "Picture" menu screen for explanation. Buttons used in this operation manual, the illustrations and on-screen displays are...
...button Buttons used in this operation Button used in this operation Using the Menu Screen The menu can also be performed by using the projector. Menu icon Menu screen Picture Fine Sync Options1 Options2 Language Note • The "Fine Sync" menu is displayed. This may ...differ from the actual on the projector. 1 Press . • The "Picture" menu screen for explanation. Buttons used in this operation manual, the illustrations and on-screen displays are...
XG-MB70X Operation Manual
Page 8
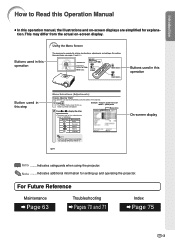
... Temperature 45 sRGB Setting 46 Switching the High Brightness/High Contrast ....... 46 Signal Type Setting 47 Setting up the Projector 19 Setting up the Projector 19 Projecting a Reversed Image 20 Connections Connections 21 INPUT/OUTPUT Terminals and Connectable Main Equipment 21 Samples of Cables ... 22 Connecting to a Computer 23 Using the Remote Control as the Wireless Computer Mouse 24 Connecting to Video Equipment 25 Controlling the Projector by a Computer ... 27 Connecting to a Monitor with RGB Input Terminal 28 Connecting to an Amplifier or Other Audio Equipment 28 Computer...
... Temperature 45 sRGB Setting 46 Switching the High Brightness/High Contrast ....... 46 Signal Type Setting 47 Setting up the Projector 19 Setting up the Projector 19 Projecting a Reversed Image 20 Connections Connections 21 INPUT/OUTPUT Terminals and Connectable Main Equipment 21 Samples of Cables ... 22 Connecting to a Computer 23 Using the Remote Control as the Wireless Computer Mouse 24 Connecting to Video Equipment 25 Controlling the Projector by a Computer ... 27 Connecting to a Monitor with RGB Input Terminal 28 Connecting to an Amplifier or Other Audio Equipment 28 Computer...

XG-MB70X Operation Manual
Page 11
... ■ Potential hazard of 12 degrees. ■ Placement should only be cleaned more often. Caution concerning the setup of the projector ■ For minimal servicing and to maintain high image quality, SHARP recommends that you read the following safeguards when setting up your eyes occasionally. ■ Continuously watching the screen for a replacement...
... ■ Potential hazard of 12 degrees. ■ Placement should only be cleaned more often. Caution concerning the setup of the projector ■ For minimal servicing and to maintain high image quality, SHARP recommends that you read the following safeguards when setting up your eyes occasionally. ■ Continuously watching the screen for a replacement...
XG-MB70X Operation Manual
Page 12
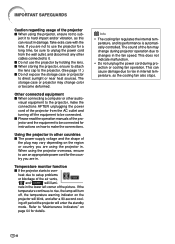
...from the wall outlet, and disconnect any other cables connected to it to make the connections AFTER unplugging the power cord of the projector from the AC outlet and turning off the equipment to sub- This does not indicate malfunction. • Do not unplug the power ... and " " will enter the standby mode. ing-off , the temperature warning indicator on the region or country you are using the projector in damage. When using the projector, ensure not to be connected for instructions on page 64 for the country you are in other audio- If the temperature continues to...
...from the wall outlet, and disconnect any other cables connected to it to make the connections AFTER unplugging the power cord of the projector from the AC outlet and turning off the equipment to sub- This does not indicate malfunction. • Do not unplug the power ... and " " will enter the standby mode. ing-off , the temperature warning indicator on the region or country you are using the projector in damage. When using the projector, ensure not to be connected for instructions on page 64 for the country you are in other audio- If the temperature continues to...

XG-MB70X Operation Manual
Page 13
... the operation manual 1) Double click the "MANUALS" folder. 2) Double click the language (name of the folder) that you need to access the projector manuals. Please download Adobe® Reader® from the Internet (http://www.adobe.com). Introduction How to Access the PDF Operation Manuals PDF operation ...in several languages are included in the CD-ROM, so that you want to view. 3) Double click the "MB70" pdf file to access the projector manuals. Info • If the desired pdf file cannot be opened by double clicking the mouse, start Adobe® Reader® first, then...
... the operation manual 1) Double click the "MANUALS" folder. 2) Double click the language (name of the folder) that you need to access the projector manuals. Please download Adobe® Reader® from the Internet (http://www.adobe.com). Introduction How to Access the PDF Operation Manuals PDF operation ...in several languages are included in the CD-ROM, so that you want to view. 3) Double click the "MB70" pdf file to access the projector manuals. Info • If the desired pdf file cannot be opened by double clicking the mouse, start Adobe® Reader® first, then...

XG-MB70X Operation Manual
Page 14
... on the region. For Australia, New Zealand and Oceania (6' (1.8 m)) QACCLA018WJPZ RGB cable (9'10" (3.0 m)) QCNWGA045WJPZ USB cable (9'10" (3.0 m)) QCNWGA014WJPZ Storage case GCASNA014WJSA Lens cap (attached) RCAPHA021WJSA Projector manual and technical reference CD-ROM UDSKAA052WJZZ "QUICK GUIDE" label TLABZA717WJZZ Optional accessories ■ 3 RCA to the wall outlet in your nearest...
... on the region. For Australia, New Zealand and Oceania (6' (1.8 m)) QACCLA018WJPZ RGB cable (9'10" (3.0 m)) QCNWGA045WJPZ USB cable (9'10" (3.0 m)) QCNWGA014WJPZ Storage case GCASNA014WJSA Lens cap (attached) RCAPHA021WJSA Projector manual and technical reference CD-ROM UDSKAA052WJZZ "QUICK GUIDE" label TLABZA717WJZZ Optional accessories ■ 3 RCA to the wall outlet in your nearest...
XG-MB70X Operation Manual
Page 15
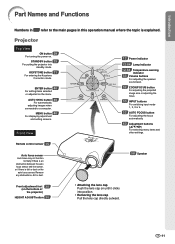
...32 AUTO FOCUS button For adjusting the focus automatically. 40 Adjustment buttons ('/"/\/|) For selecting menu items and other settings. STANDBY button 29 For putting the projector into position. • Removing the lens cap Pull the lens cap directly outward. -11 KEYSTONE button 31 For entering the Keystone Correction mode. ...Remove any obstructions, dirt or dust. 58 Speaker Front adjustment foot 30 (on the bottom of the projector) HEIGHT ADJUST button 30 • Attaching the lens cap Push the lens cap on until it clicks into standby mode...
...32 AUTO FOCUS button For adjusting the focus automatically. 40 Adjustment buttons ('/"/\/|) For selecting menu items and other settings. STANDBY button 29 For putting the projector into position. • Removing the lens cap Pull the lens cap directly outward. -11 KEYSTONE button 31 For entering the Keystone Correction mode. ...Remove any obstructions, dirt or dust. 58 Speaker Front adjustment foot 30 (on the bottom of the projector) HEIGHT ADJUST button 30 • Attaching the lens cap Push the lens cap on until it clicks into standby mode...

XG-MB70X Operation Manual
Page 16
... high. (See page 64.) When Attaching the "QUICK GUIDE" Label Attaching the "QUICK GUIDE" Label (supplied) on ... Normal Red on the projector will help you check the setup procedure. The internal temperature is warming up or shutting down abnormally or needs to avoid blocking an air intake ... warning indicator Off ... Ensure to attach the "QUICK GUIDE" Label on the top cabinet of the projector as shown in the drawing on ... Part Names and Functions About the Indicators on the Projector Power indicator Red on the right. "QUICK GUIDE" Label -12 The lamp has been shut down ...
... high. (See page 64.) When Attaching the "QUICK GUIDE" Label Attaching the "QUICK GUIDE" Label (supplied) on ... Normal Red on the projector will help you check the setup procedure. The internal temperature is warming up or shutting down abnormally or needs to avoid blocking an air intake ... warning indicator Off ... Ensure to attach the "QUICK GUIDE" Label on the top cabinet of the projector as shown in the drawing on ... Part Names and Functions About the Indicators on the Projector Power indicator Red on the right. "QUICK GUIDE" Label -12 The lamp has been shut down ...

XG-MB70X Operation Manual
Page 17
...audio input terminal for INPUT 3 and 4. 23 USB terminal 27 RS-232C terminal Terminal for controlling the projector using a computer. 27 LAN terminal Terminal for controlling the projector using a computer via network. AUDIO OUTPUT terminal 28 Audio output terminal of the cooling fan may change ...1, 2 terminal 23·25 Shared audio input terminal for connecting a monitor. This is explained. Using the Kensington Lock • This projector has a Kensington Security Standard connector for computer RGB and component signals. Refer to the AUDIO INPUT terminal. INPUT 2 terminal 23·25 ...
...audio input terminal for INPUT 3 and 4. 23 USB terminal 27 RS-232C terminal Terminal for controlling the projector using a computer. 27 LAN terminal Terminal for controlling the projector using a computer via network. AUDIO OUTPUT terminal 28 Audio output terminal of the cooling fan may change ...1, 2 terminal 23·25 Shared audio input terminal for connecting a monitor. This is explained. Using the Kensington Lock • This projector has a Kensington Security Standard connector for computer RGB and component signals. Refer to the AUDIO INPUT terminal. INPUT 2 terminal 23·25 ...

XG-MB70X Operation Manual
Page 18
... the power on the remote control, except the MOUSE/Adjustment button, are made of the image. Remote Control STANDBY button 29 For putting the projector into focus. 35 IRIS button For switching "High Brightness" mode or "High Contrast" mode. 40 MENU button For displaying adjustment and setting screens.... 24·40 MOUSE/Adjustment button For moving the computer cursor when connecting the projector USB terminal to the computer with USB cable. • For selecting menu items. 24·40 R-CLICK/UNDO button • For the...
... the power on the remote control, except the MOUSE/Adjustment button, are made of the image. Remote Control STANDBY button 29 For putting the projector into focus. 35 IRIS button For switching "High Brightness" mode or "High Contrast" mode. 40 MENU button For displaying adjustment and setting screens.... 24·40 MOUSE/Adjustment button For moving the computer cursor when connecting the projector USB terminal to the computer with USB cable. • For selecting menu items. 24·40 R-CLICK/UNDO button • For the...

XG-MB70X Operation Manual
Page 19
...3 Attach the cover and slide it un- However, the effective distance of the signal may run out, as possible with this case, move the projector away from the remote control can be using the remote control: • Ensure not to drop, expose to moisture or high temperature. • The...176; Remote control Inserting the Batteries The batteries (two R-03 batteries ("AAA" size, UM/SUM-4, HP-16 or similar)) are kept. In this projector may differ depending on the cover and slide it clicks into place. Using the Remote Control Introduction Usable Range The remote control can cause them...
...3 Attach the cover and slide it un- However, the effective distance of the signal may run out, as possible with this case, move the projector away from the remote control can be using the remote control: • Ensure not to drop, expose to moisture or high temperature. • The...176; Remote control Inserting the Batteries The batteries (two R-03 batteries ("AAA" size, UM/SUM-4, HP-16 or similar)) are kept. In this projector may differ depending on the cover and slide it clicks into place. Using the Remote Control Introduction Usable Range The remote control can cause them...

XG-MB70X Operation Manual
Page 20
Quick Start This section shows the basic operation (projector connecting with the computer). Place the projector facing a screen 6 INPUT 1 button Page 19 2. Connect the projector to the computer and plug the power cord into the AC socket of the projector and the computer is explained using one example. 3 ON ... see pages 25 and 26. Remove the lens cap and turn the projector on On the projector On the remote control Page 29 -16 Setup and Projection In this section, connection of the projector When connecting equipment other than the computer, see the page described below for...
Quick Start This section shows the basic operation (projector connecting with the computer). Place the projector facing a screen 6 INPUT 1 button Page 19 2. Connect the projector to the computer and plug the power cord into the AC socket of the projector and the computer is explained using one example. 3 ON ... see pages 25 and 26. Remove the lens cap and turn the projector on On the projector On the remote control Page 29 -16 Setup and Projection In this section, connection of the projector When connecting equipment other than the computer, see the page described below for...
XG-MB70X Operation Manual
Page 21
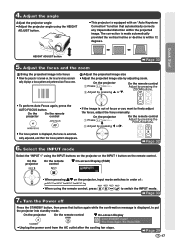
...Adjust the focus and the zoom Page 30 1 Bring the projected image into standby mode. Adjust the angle Adjust the projector angle • Adjust the projector angle using the remote control, press /// to finely adjust the focus, adjust the focus manually. On the remote control...and performs Auto Focus once. 2 Adjust the projected image size • Adjust the projected image size by pressing ' or ". On the projector 1 Press . On the projector On the remote control " On-screen Display (RGB) • When pressing '/" on the remote control. Quick Start HEIGHT ADJUST button ...
...Adjust the focus and the zoom Page 30 1 Bring the projected image into standby mode. Adjust the angle Adjust the projector angle • Adjust the projector angle using the remote control, press /// to finely adjust the focus, adjust the focus manually. On the remote control...and performs Auto Focus once. 2 Adjust the projected image size • Adjust the projected image size by pressing ' or ". On the projector 1 Press . On the projector On the remote control " On-screen Display (RGB) • When pressing '/" on the remote control. Quick Start HEIGHT ADJUST button ...

XG-MB70X Operation Manual
Page 22
... to the lens, and place it in the front pocket of the storage case. 2 Place the projector into the storage case with the lens facing the handle. • Ensure the projector is only for storing the projector. Lens cap Fixing band -18 Info • This storage case is held in place by using... the cover of the storage case. 4 Place the accessories in the supplied storage case. 1 Open the cover of the storage case. age case. Storing the Projector How to Use the Storage Case When storing the projector, attach the lens cap to the lens for protection. • Place the...
... to the lens, and place it in the front pocket of the storage case. 2 Place the projector into the storage case with the lens facing the handle. • Ensure the projector is only for storing the projector. Lens cap Fixing band -18 Info • This storage case is held in place by using... the cover of the storage case. 4 Place the accessories in the supplied storage case. 1 Open the cover of the storage case. age case. Storing the Projector How to Use the Storage Case When storing the projector, attach the lens cap to the lens for protection. • Place the...

XG-MB70X Operation Manual
Page 23
...will be centered in the middle of the screen. Close the curtains and dim the lights when setting up the Projector Position the projector perpendicular to the screen with the projector's feet flat and level to page 2 of the Projection Image Size and Projection Distance For details, refer to ... difficult. • For an optimal image, position the screen so that it is not in direct sunlight or room light. Setting up the Projector Setting up the projector in a sunny or bright room. Light falling directly on the supplied CD-ROM. Example : NORMAL Mode (4:3) Picture Size 300" 200" 100...
...will be centered in the middle of the screen. Close the curtains and dim the lights when setting up the Projector Position the projector perpendicular to the screen with the projector's feet flat and level to page 2 of the Projection Image Size and Projection Distance For details, refer to ... difficult. • For an optimal image, position the screen so that it is not in direct sunlight or room light. Setting up the Projector Setting up the projector in a sunny or bright room. Light falling directly on the supplied CD-ROM. Example : NORMAL Mode (4:3) Picture Size 300" 200" 100...

XG-MB70X Operation Manual
Page 24
...Mirror Audience Translucent screen Audience Mirror Info • When using a mirror, ensure that you use the optional Sharp ceiling-mount bracket for use of this installation. Setting up the Projector Projecting a Reversed Image Projection from behind the Screen ■ Place a translucent screen between the mirror and... ■ Place a mirror (normal flat type) in front of the lens. ■ When the translucent screen is placed between the projector and the audience. ■ Reverse the image by setting "Ceiling + Front" in "PRJ Mode". Ceiling-mount Setup ■ It is recommended ...
...Mirror Audience Translucent screen Audience Mirror Info • When using a mirror, ensure that you use the optional Sharp ceiling-mount bracket for use of this installation. Setting up the Projector Projecting a Reversed Image Projection from behind the Screen ■ Place a translucent screen between the mirror and... ■ Place a mirror (normal flat type) in front of the lens. ■ When the translucent screen is placed between the projector and the audience. ■ Reverse the image by setting "Ceiling + Front" in "PRJ Mode". Ceiling-mount Setup ■ It is recommended ...

XG-MB70X Operation Manual
Page 25
... INPUT 3, 4 terminal Connecting an audio cable. (Shared audio input terminal for INPUT 3 and 4.) (See page 26.) RS-232C terminal Connecting the computer to control the projector. (See page 27.) INPUT 3 terminal Connecting video equipment without S-video output terminal. (See page 26.) USB terminal Connecting the computer using a USB cable. (See page...
... INPUT 3, 4 terminal Connecting an audio cable. (Shared audio input terminal for INPUT 3 and 4.) (See page 26.) RS-232C terminal Connecting the computer to control the projector. (See page 27.) INPUT 3 terminal Connecting video equipment without S-video output terminal. (See page 26.) USB terminal Connecting the computer using a USB cable. (See page...


