XG-MB70X Operation Manual
Page 5
... or electric shock, do not stare directly into the beam of the parts, service and labor warranty applicable to your new SHARP Projector, using the projector, please read this product to rain or moisture. WARNING: FCC Regulations state that the device complies with FCC Class A verification...uses, and can radiate radio frequency energy and, if not installed and used with the device. NO USER-SERVICEABLE PARTS EXCEPT LAMP UNIT. Introduction ENGLISH There are designed to provide reasonable protection against harmful interference when the equipment is likely to cause harmful ...
... or electric shock, do not stare directly into the beam of the parts, service and labor warranty applicable to your new SHARP Projector, using the projector, please read this product to rain or moisture. WARNING: FCC Regulations state that the device complies with FCC Class A verification...uses, and can radiate radio frequency energy and, if not installed and used with the device. NO USER-SERVICEABLE PARTS EXCEPT LAMP UNIT. Introduction ENGLISH There are designed to provide reasonable protection against harmful interference when the equipment is likely to cause harmful ...
XG-MB70X Operation Manual
Page 6
...Microsoft® and Windows® are trademarks or registered trademarks of Apple Computer, Inc. Caution Concerning Lamp Replacement See "Replacing the Lamp" on the remote control. This SHARP projector uses a DMD panel. This very sophisticated panel contains 786,432 pixels micromirrors. During normal operation,... when putting the projector into standby mode always use the STANDBY button on the projector or on page 66. REPLACE WITH SAME SHARP LAMP UNIT MODEL AN-MB70LP ONLY. L'INTERIEUR DU BOITIER ETANT EXTREMEMENT CHAUD,...
...Microsoft® and Windows® are trademarks or registered trademarks of Apple Computer, Inc. Caution Concerning Lamp Replacement See "Replacing the Lamp" on the remote control. This SHARP projector uses a DMD panel. This very sophisticated panel contains 786,432 pixels micromirrors. During normal operation,... when putting the projector into standby mode always use the STANDBY button on the projector or on page 66. REPLACE WITH SAME SHARP LAMP UNIT MODEL AN-MB70LP ONLY. L'INTERIEUR DU BOITIER ETANT EXTREMEMENT CHAUD,...
XG-MB70X Operation Manual
Page 8
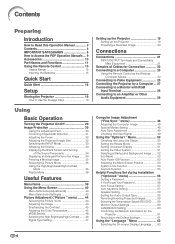
... Color Temperature 45 sRGB Setting 46 Switching the High Brightness/High Contrast ....... 46 Signal Type Setting 47 Setting up the Projector 19 Setting up the Projector 19 Projecting a Reversed Image 20 Connections Connections 21 INPUT/OUTPUT Terminals and Connectable Main Equipment 21 Samples of Cables for...Image 48 Special Modes Setting 48 Auto Sync Adjustment 49 Checking the Input Signal 49 Using the "Options1 " Menu 50 Checking the Lamp Life Status 50 Setting the Resize Mode 50 Setting On-screen Display 51 Setting the Video System 51 Selecting a Startup and Background Image...
... Color Temperature 45 sRGB Setting 46 Switching the High Brightness/High Contrast ....... 46 Signal Type Setting 47 Setting up the Projector 19 Setting up the Projector 19 Projecting a Reversed Image 20 Connections Connections 21 INPUT/OUTPUT Terminals and Connectable Main Equipment 21 Samples of Cables for...Image 48 Special Modes Setting 48 Auto Sync Adjustment 49 Checking the Input Signal 49 Using the "Options1 " Menu 50 Checking the Lamp Life Status 50 Setting the Resize Mode 50 Setting On-screen Display 51 Setting the Video System 51 Selecting a Startup and Background Image...

XG-MB70X Operation Manual
Page 11
...of temperature. ■ The operating temperature of the projector is not in places exposed to avoid personal injury caused by a Sharp Authorized Projector Dealer or Service Center. CAUTION PRECAUCION PRECAUTION AN-MB70LP See "Replacing the Lamp" on the screen washes out the colors, making ...9632; Placement should only be installed in and turn on the projector. Introduction Ensure that you read the following safeguards when setting up your nearest Sharp Authorized Projec- Caution concerning the lamp unit ■ Potential hazard of space between the exhaust vent and...
...of temperature. ■ The operating temperature of the projector is not in places exposed to avoid personal injury caused by a Sharp Authorized Projector Dealer or Service Center. CAUTION PRECAUCION PRECAUTION AN-MB70LP See "Replacing the Lamp" on the screen washes out the colors, making ...9632; Placement should only be installed in and turn on the projector. Introduction Ensure that you read the following safeguards when setting up your nearest Sharp Authorized Projec- Caution concerning the lamp unit ■ Potential hazard of space between the exhaust vent and...
XG-MB70X Operation Manual
Page 12
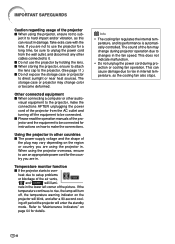
...does not indicate malfunction. • Do not unplug the power cord during projector operation due to rise, the lamp will enter the standby mode. IMPORTANT SAFEGUARDS Caution regarding usage of the projector ■ When using the projector in. ject it . ■ Do not use an appropriate power ..., as this can cause damage due to direct sunlight or near heat sources. The storage case or projector may change color or become deformed. Temperature monitor function ■ If the projector starts to setup problems or blockage of the air vents, " " and " " will blink, and...
...does not indicate malfunction. • Do not unplug the power cord during projector operation due to rise, the lamp will enter the standby mode. IMPORTANT SAFEGUARDS Caution regarding usage of the projector ■ When using the projector in. ject it . ■ Do not use an appropriate power ..., as this can cause damage due to direct sunlight or near heat sources. The storage case or projector may change color or become deformed. Temperature monitor function ■ If the projector starts to setup problems or blockage of the air vents, " " and " " will blink, and...

XG-MB70X Operation Manual
Page 14
...reference CD-ROM UDSKAA052WJZZ "QUICK GUIDE" label TLABZA717WJZZ Optional accessories ■ 3 RCA to the wall outlet in your nearest Sharp Authorized Projector Dealer or Service Center. -10 Please check with your country. Accessories Supplied accessories Remote control RRMCGA313WJSA Two R-03 batteries ("... that corresponds to 15-pin D-sub cable (9'10'' (3.0 m)) ■ DIN-D-sub RS-232C adaptor (5 57/64'' (15 cm)) ■ Lamp unit AN-C3CP AN-A1RS AN-MB70LP Operation manual (this manual) TINS-B416WJZZ Note • Some of the optional accessories may not be available depending...
...reference CD-ROM UDSKAA052WJZZ "QUICK GUIDE" label TLABZA717WJZZ Optional accessories ■ 3 RCA to the wall outlet in your nearest Sharp Authorized Projector Dealer or Service Center. -10 Please check with your country. Accessories Supplied accessories Remote control RRMCGA313WJSA Two R-03 batteries ("... that corresponds to 15-pin D-sub cable (9'10'' (3.0 m)) ■ DIN-D-sub RS-232C adaptor (5 57/64'' (15 cm)) ■ Lamp unit AN-C3CP AN-A1RS AN-MB70LP Operation manual (this manual) TINS-B416WJZZ Note • Some of the optional accessories may not be available depending...
XG-MB70X Operation Manual
Page 15
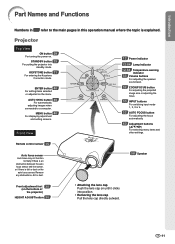
...selected or adjusted on the auto focus sensor. Remove any obstructions, dirt or dust. 58 Speaker Front adjustment foot 30 (on the bottom of the projector) HEIGHT ADJUST button 30 • Attaching the lens cap Push the lens cap on . MENU button 40 For displaying adjustment and setting screens. ...Functions Numbers in this operation manual where the topic is dirt or dust on the menu. Front View 12 Power indicator 12·64 Lamp indicator 12·64 Temperature warning indicator 33 Volume buttons For adjusting the speaker sound level. 32 ZOOM/FOCUS button For adjusting the projected...
...selected or adjusted on the auto focus sensor. Remove any obstructions, dirt or dust. 58 Speaker Front adjustment foot 30 (on the bottom of the projector) HEIGHT ADJUST button 30 • Attaching the lens cap Push the lens cap on . MENU button 40 For displaying adjustment and setting screens. ...Functions Numbers in this operation manual where the topic is dirt or dust on the menu. Front View 12 Power indicator 12·64 Lamp indicator 12·64 Temperature warning indicator 33 Volume buttons For adjusting the speaker sound level. 32 ZOOM/FOCUS button For adjusting the projected...

XG-MB70X Operation Manual
Page 16
... attach the "QUICK GUIDE" label anywhere else to attach the "QUICK GUIDE" Label on the top cabinet of the projector as shown in the drawing on ... The lamp is abnormally high. (See page 64.) When Attaching the "QUICK GUIDE" Label Attaching the "QUICK GUIDE" Label (...64.) Temperature warning indicator Off ... Normal (Standby) Green on ... Normal (Power on) Lamp indicator Green on ... Red on ... Normal Red on ... Part Names and Functions About the Indicators on the Projector Power indicator Red on the right. Normal Green blinks ... Ensure to avoid blocking an ...
... attach the "QUICK GUIDE" label anywhere else to attach the "QUICK GUIDE" Label on the top cabinet of the projector as shown in the drawing on ... The lamp is abnormally high. (See page 64.) When Attaching the "QUICK GUIDE" Label Attaching the "QUICK GUIDE" Label (...64.) Temperature warning indicator Off ... Normal (Standby) Green on ... Normal (Power on) Lamp indicator Green on ... Red on ... Normal Red on ... Part Names and Functions About the Indicators on the Projector Power indicator Red on the right. Normal Green blinks ... Ensure to avoid blocking an ...

XG-MB70X Operation Manual
Page 19
...the cover and slide it clicks into place. Note • The signal from the remote control can be used to control the projector within the ranges shown in can cause them in the illustration. Please follow the precautions below. Battery fluid from leaked batteries is harmful... may cause them to replace them using a cloth. • The batteries included with new batteries. • Remove the batteries from the fluorescent lamp. However, the effective distance of the arrow. 2 Insert the batteries. • Insert the batteries making sure the polarities correctly match the and ...
...the cover and slide it clicks into place. Note • The signal from the remote control can be used to control the projector within the ranges shown in can cause them in the illustration. Please follow the precautions below. Battery fluid from leaked batteries is harmful... may cause them to replace them using a cloth. • The batteries included with new batteries. • Remove the batteries from the fluorescent lamp. However, the effective distance of the arrow. 2 Insert the batteries. • Insert the batteries making sure the polarities correctly match the and ...

XG-MB70X Operation Manual
Page 33
...- See page 54 for about 90 seconds after the cooling fan stops. This can cause damage due to rise in this projector continues to the procedure on again, the lamp may be replaced. • When switching on the remote control, then press that you use with the...28.) Remove the lens cap and press on the projector or on the rear of the lamp. Supplied accessory Power cord Turning the Projector on Before performing the steps in internal temperature, as the lamp's control circuitry is ready. Turning the Projector On/Off Connecting the Power Cord Plug the supplied power...
...- See page 54 for about 90 seconds after the cooling fan stops. This can cause damage due to rise in this projector continues to the procedure on again, the lamp may be replaced. • When switching on the remote control, then press that you use with the...28.) Remove the lens cap and press on the projector or on the rear of the lamp. Supplied accessory Power cord Turning the Projector on Before performing the steps in internal temperature, as the lamp's control circuitry is ready. Turning the Projector On/Off Connecting the Power Cord Plug the supplied power...

XG-MB70X Operation Manual
Page 43
"Options1" menu Example: INPUT 3/INPUT 4 "Options2" menu "Language" menu Main Menu Options1 Page 50 Lamp Timer(Life) Page 50 Resize Page 50 OSD Display [ON/OFF] Page 51 Video System *2 Page 51 Background Page 52 Eco Mode [ON/OFF] Page ... Sub Menu Old Password New Password Reconfirm FAO VAO PRJ Mode Page 59 RS-232C Page 59 Monitor Out Page 60 LAN/RS232C Page 60 Projector Page 61 IP Address Page 61 MAC Address Page 61 All Reset Page 61 Front Ceiling + Front Rear Ceiling + Rear 9600 bps 115200 bps Enable...
"Options1" menu Example: INPUT 3/INPUT 4 "Options2" menu "Language" menu Main Menu Options1 Page 50 Lamp Timer(Life) Page 50 Resize Page 50 OSD Display [ON/OFF] Page 51 Video System *2 Page 51 Background Page 52 Eco Mode [ON/OFF] Page ... Sub Menu Old Password New Password Reconfirm FAO VAO PRJ Mode Page 59 RS-232C Page 59 Monitor Out Page 60 LAN/RS232C Page 60 Projector Page 61 IP Address Page 61 MAC Address Page 61 All Reset Page 61 Front Ceiling + Front Rear Ceiling + Rear 9600 bps 115200 bps Enable...
XG-MB70X Operation Manual
Page 54
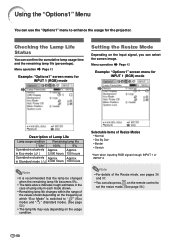
... or INPUT 2 Note • For details of Lamp Life Lamp usage condition Remaining lamp life "Life" 100% 5% Operated exclusively Approx. Checking the Lamp Life Status You can also press on the remote control to enhance the usage for the projector. Menu operation Page 42 Example: "Options1" screen menu... for INPUT 1 (RGB) mode Description of the Resize mode, see pages 36 and 37. • You can confirm the cumulative lamp usage time and the remaining lamp life (percentage). Using the...
... or INPUT 2 Note • For details of Lamp Life Lamp usage condition Remaining lamp life "Life" 100% 5% Operated exclusively Approx. Checking the Lamp Life Status You can also press on the remote control to enhance the usage for the projector. Menu operation Page 42 Example: "Options1" screen menu... for INPUT 1 (RGB) mode Description of the Resize mode, see pages 36 and 37. • You can confirm the cumulative lamp usage time and the remaining lamp life (percentage). Using the...
XG-MB70X Operation Manual
Page 65
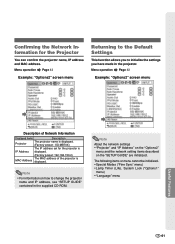
...8226; Special Modes ("Fine Sync" menu) • Lamp Timer (Life), System Lock ("Options1" menu) • "Language" menu -61 Confirming the Network Information for the projector is IP Address displayed. (Factory preset :192.168....projector name and IP address, see "SETUP GUIDE" contained in the projector. Menu operation Page 42 Example: "Options2" screen menu Useful Features Description of Network Information Displayed items Description Projector The projector name is displayed. (Factory preset : XG-MB70X) The IP address set for the Projector You can confirm the projector...
...8226; Special Modes ("Fine Sync" menu) • Lamp Timer (Life), System Lock ("Options1" menu) • "Language" menu -61 Confirming the Network Information for the projector is IP Address displayed. (Factory preset :192.168....projector name and IP address, see "SETUP GUIDE" contained in the projector. Menu operation Page 42 Example: "Options2" screen menu Useful Features Description of Network Information Displayed items Description Projector The projector name is displayed. (Factory preset : XG-MB70X) The IP address set for the Projector You can confirm the projector...

XG-MB70X Operation Manual
Page 68
...of the picture. When the percentage becomes 0%, it will change to " " (red), the lamp will automatically turn off and then the projector will not turn on page 65. After the projector has entered the standby mode, follow the procedures given below. If the temperature keeps on the ..." " will illuminate in red. ■ If you try to turn on the projector a fourth time without replacing the lamp, the projector will automatically enter the standby mode. will be displayed on rising, the lamp will turn off and the temperature warning indicator will blink, the cooling fan will run...
...of the picture. When the percentage becomes 0%, it will change to " " (red), the lamp will automatically turn off and then the projector will not turn on page 65. After the projector has entered the standby mode, follow the procedures given below. If the temperature keeps on the ..." " will illuminate in red. ■ If you try to turn on the projector a fourth time without replacing the lamp, the projector will automatically enter the standby mode. will be displayed on rising, the lamp will turn off and the temperature warning indicator will blink, the cooling fan will run...
XG-MB70X Operation Manual
Page 69
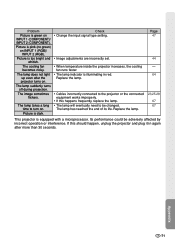
... from the AC outlet, and then connect it again. • Carefully replace the lamp. (See • Remaining lamp life page 67.) becomes 5% or less. • Take the projector to your nearest Sharp Authorized Projector Dealer or Service Center (see page 72) • Internal circuit failure for repair....; Clogged air intake • Clean the exhaust and intake vents. (See page 63.) Lamp indicator Green on . Sharp Authorized Projector Dealer down or Service Center (see page 72) • Burnt-out lamp for about 90 seconds. Time to power outage or some other cause while using the...
... from the AC outlet, and then connect it again. • Carefully replace the lamp. (See • Remaining lamp life page 67.) becomes 5% or less. • Take the projector to your nearest Sharp Authorized Projector Dealer or Service Center (see page 72) • Internal circuit failure for repair....; Clogged air intake • Clean the exhaust and intake vents. (See page 63.) Lamp indicator Green on . Sharp Authorized Projector Dealer down or Service Center (see page 72) • Burnt-out lamp for about 90 seconds. Time to power outage or some other cause while using the...

XG-MB70X Operation Manual
Page 70
... Center, please call toll-free: 1-888-GO-SHARP (1-888-467-4277). For the name of this projector under warranty, including lamp replacement, must be obtained through a Sharp Authorized Projector Dealer or Service Center. Replacing the Lamp Caution • Do not remove the lamp unit from your projector to the nearest Sharp Authorized Projector Dealer or Service Center for repair. -66...
... Center, please call toll-free: 1-888-GO-SHARP (1-888-467-4277). For the name of this projector under warranty, including lamp replacement, must be obtained through a Sharp Authorized Projector Dealer or Service Center. Replacing the Lamp Caution • Do not remove the lamp unit from your projector to the nearest Sharp Authorized Projector Dealer or Service Center for repair. -66...
XG-MB70X Operation Manual
Page 71
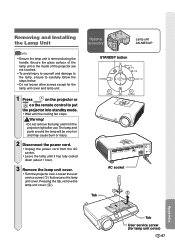
...the power cord from the projector right after use. Optional accessory Lamp unit AN-MB70LP STANDBY button AC socket 1 2 Tab Appendix Tab User service screw (for the lamp unit cover and lamp unit. 1 Press on the projector or on the remote control to put the projector into standby mode. &#...8226; Wait until it has fully cooled down (about 1 hour). 3 Remove the lamp unit cover. • Turn the projector over. Warning! • ...
...the power cord from the projector right after use. Optional accessory Lamp unit AN-MB70LP STANDBY button AC socket 1 2 Tab Appendix Tab User service screw (for the lamp unit cover and lamp unit. 1 Press on the projector or on the remote control to put the projector into standby mode. &#...8226; Wait until it has fully cooled down (about 1 hour). 3 Remove the lamp unit cover. • Turn the projector over. Warning! • ...

XG-MB70X Operation Manual
Page 72
Fasten the securing screws. 6 Replace the lamp unit cover. • Align the lamp unit cover and slide it to the projector. Resetting the Lamp Timer Reset the lamp timer after replacing the lamp. Hold the lamp unit by the handle and pull it . 5 Insert the new lamp unit. • Press the lamp unit firmly into the AC socket of the...
Fasten the securing screws. 6 Replace the lamp unit cover. • Align the lamp unit cover and slide it to the projector. Resetting the Lamp Timer Reset the lamp timer after replacing the lamp. Hold the lamp unit by the handle and pull it . 5 Insert the new lamp unit. • Press the lamp unit firmly into the AC socket of the...

XG-MB70X Operation Manual
Page 74
...not start. operation or performance. standby mode using the ON or STANDBY button on the computer. • Cables incorrectly connected to rear panel of the projector. 23,25-28 • "Bright" is set . • Adjust the focus. • The projection distance exceeds the focus range. (Computer ...• External output has not been set when connecting notebook computer. 69 • The lamp unit cover is not installed correctly. 67,68 • Cables incorrectly connected to the rear panel of the projector. • Volume is set to ON, all the buttons are incorrectly set. (Video...
...not start. operation or performance. standby mode using the ON or STANDBY button on the computer. • Cables incorrectly connected to rear panel of the projector. 23,25-28 • "Bright" is set . • Adjust the focus. • The projection distance exceeds the focus range. (Computer ...• External output has not been set when connecting notebook computer. 69 • The lamp unit cover is not installed correctly. 67,68 • Cables incorrectly connected to the rear panel of the projector. • Volume is set to ON, all the buttons are incorrectly set. (Video...
XG-MB70X Operation Manual
Page 75
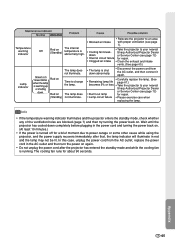
...interference. If this happens frequently, replace the lamp. • The lamp will eventually need to the projector or the connected equipment works improperly. • If this should happen, unplug the projector and plug it in red. The lamp does not light up even after more ...type setting. • Image adjustments are incorrectly set. • When temperature inside the projector increases, the cooling fan runs faster. • The lamp indicator is too bright and whitish. Replace the lamp. The lamp suddenly turns off during projection. Picture is pink (no green) on INPUT 1 (...
...interference. If this happens frequently, replace the lamp. • The lamp will eventually need to the projector or the connected equipment works improperly. • If this should happen, unplug the projector and plug it in red. The lamp does not light up even after more ...type setting. • Image adjustments are incorrectly set. • When temperature inside the projector increases, the cooling fan runs faster. • The lamp indicator is too bright and whitish. Replace the lamp. The lamp suddenly turns off during projection. Picture is pink (no green) on INPUT 1 (...


