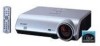
XG-MB70X Operation Manual
Page 9
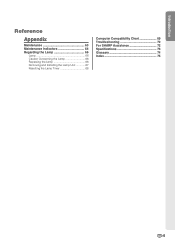
Introduction Reference Appendix Maintenance 63 Maintenance Indicators 64 Regarding the Lamp 66 Lamp 66 Caution Concerning the Lamp 66 Replacing the Lamp 66 Removing and Installing the Lamp Unit 67 Resetting the Lamp Timer 68 Computer Compatibility Chart 69 Troubleshooting 70 For SHARP Assistance 72 Specifications 73 Glossary 74 Index 75 -5
Introduction Reference Appendix Maintenance 63 Maintenance Indicators 64 Regarding the Lamp 66 Lamp 66 Caution Concerning the Lamp 66 Replacing the Lamp 66 Removing and Installing the Lamp Unit 67 Resetting the Lamp Timer 68 Computer Compatibility Chart 69 Troubleshooting 70 For SHARP Assistance 72 Specifications 73 Glossary 74 Index 75 -5

XG-MB70X Operation Manual
Page 43
"Options1" menu Example: INPUT 3/INPUT 4 "Options2" menu "Language" menu Main Menu Options1 Page 50 Lamp Timer(Life) Page 50 Resize Page 50 OSD Display [ON/OFF] Page 51 Video System *2 Page 51 Background Page 52 Eco Mode [ON/OFF] Page 52 ... Password Reconfirm FAO VAO PRJ Mode Page 59 RS-232C Page 59 Monitor Out Page 60 LAN/RS232C Page 60 Projector Page 61 IP Address Page 61 MAC Address Page 61 All Reset Page 61 Front Ceiling + Front Rear Ceiling + Rear 9600 bps 115200 bps Enable Disable Enable Disable Main Menu Language...
"Options1" menu Example: INPUT 3/INPUT 4 "Options2" menu "Language" menu Main Menu Options1 Page 50 Lamp Timer(Life) Page 50 Resize Page 50 OSD Display [ON/OFF] Page 51 Video System *2 Page 51 Background Page 52 Eco Mode [ON/OFF] Page 52 ... Password Reconfirm FAO VAO PRJ Mode Page 59 RS-232C Page 59 Monitor Out Page 60 LAN/RS232C Page 60 Projector Page 61 IP Address Page 61 MAC Address Page 61 All Reset Page 61 Front Ceiling + Front Rear Ceiling + Rear 9600 bps 115200 bps Enable Disable Enable Disable Main Menu Language...

XG-MB70X Operation Manual
Page 72
...the projector. 2 Reset the lamp timer. • While simultaneously holding down ", and on the projector, press on , even if the power cord is reset. -68 Handle Securing screws User service screw (for lamp unit...lamp unit cover. Resetting the Lamp Timer Reset the lamp timer after replacing the lamp. If you reset the lamp timer and continue to become damaged or explode. 1 Connect the power cord. • Plug the power cord into the lamp unit compartment. Then tighten the user service screw to close. Info • Make sure to the projector. Info • If the lamp unit and lamp...
...the projector. 2 Reset the lamp timer. • While simultaneously holding down ", and on the projector, press on , even if the power cord is reset. -68 Handle Securing screws User service screw (for lamp unit...lamp unit cover. Resetting the Lamp Timer Reset the lamp timer after replacing the lamp. If you reset the lamp timer and continue to become damaged or explode. 1 Connect the power cord. • Plug the power cord into the lamp unit compartment. Then tighten the user service screw to close. Info • Make sure to the projector. Info • If the lamp unit and lamp...
Setup Guide
Page 4
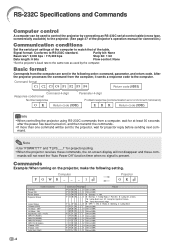
...Set the serial port settings of the computer to match that of the table. Computer P OWR _ _ _ 1 → ← Projector OK Control Contents Standby Power ON Power Status Projector Status Lamp Status Volume (0-60) AV Mute : OFF AV Mute : ON Keystone (-127 ~ +127) INPUT1 (RGB1) INPUT2 (RGB2) INPUT3 (...will not disappear and these com- Signal format: Conforms to the projector, wait for at least 30 seconds after the power has been turned on -screen display will not reset the "Auto Power Off" function timer when no signal is present. RS-232C Specifications and Commands Computer control...
...Set the serial port settings of the computer to match that of the table. Computer P OWR _ _ _ 1 → ← Projector OK Control Contents Standby Power ON Power Status Projector Status Lamp Status Volume (0-60) AV Mute : OFF AV Mute : ON Keystone (-127 ~ +127) INPUT1 (RGB1) INPUT2 (RGB2) INPUT3 (...will not disappear and these com- Signal format: Conforms to the projector, wait for at least 30 seconds after the power has been turned on -screen display will not reset the "Auto Power Off" function timer when no signal is present. RS-232C Specifications and Commands Computer control...


