XG-MB70X Operation Manual
Page 6
... IN PREMATURE LAMP FAILURE. LAMP REPLACEMENT WARNING : TURN OFF THE LAMP AND DISCONNECT POWER CORD BEFORE OPENING THIS COVER. NE REMPLACER QUE PAR UNE LAMPE SHARP DE MODÈLE AN-MB70LP. This SHARP projector uses a DMD panel. HOT SURFACE INSIDE. WARNING: The cooling fan in inactive ...dots on the picture screen. Ensure the cooling fan has stopped before disconnecting the power cord. ALLOW 1 HOUR TO COOL...
... IN PREMATURE LAMP FAILURE. LAMP REPLACEMENT WARNING : TURN OFF THE LAMP AND DISCONNECT POWER CORD BEFORE OPENING THIS COVER. NE REMPLACER QUE PAR UNE LAMPE SHARP DE MODÈLE AN-MB70LP. This SHARP projector uses a DMD panel. HOT SURFACE INSIDE. WARNING: The cooling fan in inactive ...dots on the picture screen. Ensure the cooling fan has stopped before disconnecting the power cord. ALLOW 1 HOUR TO COOL...
XG-MB70X Operation Manual
Page 8
... Temperature 45 sRGB Setting 46 Switching the High Brightness/High Contrast ....... 46 Signal Type Setting 47 Setting up the Projector 19 Setting up the Projector 19 Projecting a Reversed Image 20 Connections Connections 21 INPUT/OUTPUT Terminals and Connectable Main Equipment 21 Samples of Cables...50 Setting On-screen Display 51 Setting the Video System 51 Selecting a Startup and Background Image ....... 52 Eco Mode 52 Auto Power Off Function 53 Selecting the Menu Screen Position 53 System Lock Function 54 Keylock Function 55 Helpful Functions Set during Installation ("Options2 ...
... Temperature 45 sRGB Setting 46 Switching the High Brightness/High Contrast ....... 46 Signal Type Setting 47 Setting up the Projector 19 Setting up the Projector 19 Projecting a Reversed Image 20 Connections Connections 21 INPUT/OUTPUT Terminals and Connectable Main Equipment 21 Samples of Cables...50 Setting On-screen Display 51 Setting the Video System 51 Selecting a Startup and Background Image ....... 52 Eco Mode 52 Auto Power Off Function 53 Selecting the Menu Screen Position 53 System Lock Function 54 Keylock Function 55 Helpful Functions Set during Installation ("Options2 ...

XG-MB70X Operation Manual
Page 10
... sold with one of the following basic rules for service. 19. Ventilation Slots and openings in proper operating condition. 21. Power-Cord Protection Power-supply cords should be moved with a grounding terminal. Object and Liquid Entry Never push objects of any kind on the marking... wall outlet and disconnect the cable system. and the like. 8. Transportation A product and cart combination should be situated away from battery power, or other products (including amplifiers) that produce heat. -6 This product has been engineered and manufactured to a wall or ceiling only...
... sold with one of the following basic rules for service. 19. Ventilation Slots and openings in proper operating condition. 21. Power-Cord Protection Power-supply cords should be moved with a grounding terminal. Object and Liquid Entry Never push objects of any kind on the marking... wall outlet and disconnect the cable system. and the like. 8. Transportation A product and cart combination should be situated away from battery power, or other products (including amplifiers) that produce heat. -6 This product has been engineered and manufactured to a wall or ceiling only...

XG-MB70X Operation Manual
Page 11
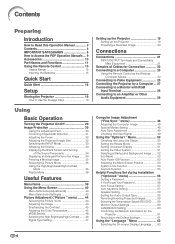
...9632; Ensure that the intake vent and the exhaust vent are not blocked, plug the power cord back in a high posi- Ensure to hit or damage the surface of horizontal. Remove the projector power cord from -4°F to 140°F (-20°C to the normal operating condition....prevent overheat damage. Caution concerning the lamp unit ■ Potential hazard of the projector ■ For minimal servicing and to avoid personal injury caused by a Sharp Authorized Projector Dealer or Service Center. When the projector is from the wall outlet and wait at least 7 7/8 inches (20 cm)...
...9632; Ensure that the intake vent and the exhaust vent are not blocked, plug the power cord back in a high posi- Ensure to hit or damage the surface of horizontal. Remove the projector power cord from -4°F to 140°F (-20°C to the normal operating condition....prevent overheat damage. Caution concerning the lamp unit ■ Potential hazard of the projector ■ For minimal servicing and to avoid personal injury caused by a Sharp Authorized Projector Dealer or Service Center. When the projector is from the wall outlet and wait at least 7 7/8 inches (20 cm)...
XG-MB70X Operation Manual
Page 12
... blink, and after a 90-second cool- This does not indicate malfunction. • Do not unplug the power cord during projector operation due to changes in the fan speed. When using the projector, ensure not to sub- Info • The cooling fan regulates the internal temperature, and its performance is automatically... voltage and the shape of the plug may vary depending on how to make the connections AFTER unplugging the power cord of the projector from the wall outlet, and disconnect any other cables connected to it to hard impact and/or vibration, as the cooling fan also stops...
... blink, and after a 90-second cool- This does not indicate malfunction. • Do not unplug the power cord during projector operation due to changes in the fan speed. When using the projector, ensure not to sub- Info • The cooling fan regulates the internal temperature, and its performance is automatically... voltage and the shape of the plug may vary depending on how to make the connections AFTER unplugging the power cord of the projector from the wall outlet, and disconnect any other cables connected to it to hard impact and/or vibration, as the cooling fan also stops...

XG-MB70X Operation Manual
Page 14
... ("AAA" size, UM/SUM-4, HP-16 or similar) Power cord* (1) (2) (3) (4) For U.S., Canada, etc. (6' (1.8 m)) QACCDA010WJPZ For Europe, except U.K. (6' (1.8 m)) QACCVA011WJPZ For U.K., Hong Kong and Singapore (6' (1.8 m)) QACCBA036WJPZ * Use the power cord that corresponds to 15-pin D-sub cable (9'10'' ..." (3.0 m)) QCNWGA045WJPZ USB cable (9'10" (3.0 m)) QCNWGA014WJPZ Storage case GCASNA014WJSA Lens cap (attached) RCAPHA021WJSA Projector manual and technical reference CD-ROM UDSKAA052WJZZ "QUICK GUIDE" label TLABZA717WJZZ Optional accessories ■ 3 RCA to the wall outlet...
... ("AAA" size, UM/SUM-4, HP-16 or similar) Power cord* (1) (2) (3) (4) For U.S., Canada, etc. (6' (1.8 m)) QACCDA010WJPZ For Europe, except U.K. (6' (1.8 m)) QACCVA011WJPZ For U.K., Hong Kong and Singapore (6' (1.8 m)) QACCBA036WJPZ * Use the power cord that corresponds to 15-pin D-sub cable (9'10'' ..." (3.0 m)) QCNWGA045WJPZ USB cable (9'10" (3.0 m)) QCNWGA014WJPZ Storage case GCASNA014WJSA Lens cap (attached) RCAPHA021WJSA Projector manual and technical reference CD-ROM UDSKAA052WJZZ "QUICK GUIDE" label TLABZA717WJZZ Optional accessories ■ 3 RCA to the wall outlet...
XG-MB70X Operation Manual
Page 15
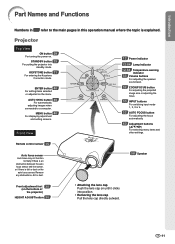
Projector Top View ON button 29 For turning the power on until it clicks into standby mode. KEYSTONE button 31 For entering the Keystone Correction mode. Front View 12 Power indicator 12·64 Lamp indicator 12·64 Temperature warning indicator 33 Volume buttons For adjusting the speaker sound level. 32 ZOOM/FOCUS...and the screen, or if there is explained. Remove any obstructions, dirt or dust. 58 Speaker Front adjustment foot 30 (on the bottom of the projector) HEIGHT ADJUST button 30 • Attaching the lens cap Push the lens cap on . STANDBY button 29 For putting the...
Projector Top View ON button 29 For turning the power on until it clicks into standby mode. KEYSTONE button 31 For entering the Keystone Correction mode. Front View 12 Power indicator 12·64 Lamp indicator 12·64 Temperature warning indicator 33 Volume buttons For adjusting the speaker sound level. 32 ZOOM/FOCUS...and the screen, or if there is explained. Remove any obstructions, dirt or dust. 58 Speaker Front adjustment foot 30 (on the bottom of the projector) HEIGHT ADJUST button 30 • Attaching the lens cap Push the lens cap on . STANDBY button 29 For putting the...

XG-MB70X Operation Manual
Page 16
...64.) When Attaching the "QUICK GUIDE" Label Attaching the "QUICK GUIDE" Label (supplied) on the projector will help you check the setup procedure. Normal Red on ... Normal Green blinks ... Normal (Power on) Lamp indicator Green on ... Do not attach the "QUICK GUIDE" label anywhere else to attach... the "QUICK GUIDE" Label on the top cabinet of the projector as shown in the drawing on ... Red on ... The...
...64.) When Attaching the "QUICK GUIDE" Label Attaching the "QUICK GUIDE" Label (supplied) on the projector will help you check the setup procedure. Normal Red on ... Normal Green blinks ... Normal (Power on) Lamp indicator Green on ... Do not attach the "QUICK GUIDE" label anywhere else to attach... the "QUICK GUIDE" Label on the top cabinet of the projector as shown in the drawing on ... Red on ... The...

XG-MB70X Operation Manual
Page 17
...for INPUT 3 and 4. 23 USB terminal 27 RS-232C terminal Terminal for controlling the projector using a computer via network. Using the Kensington Lock • This projector has a Kensington Security Standard connector for controlling the projector using a computer. 27 LAN terminal Terminal for use it to internal temperature changes. ... not indicate a malfunction. 15 Remote control sensor 13 Kensington Security Standard connector 29 AC socket Connect the supplied Power cord. INPUT 2 terminal 23·25 Terminal for connecting video equipment with a Kensington MicroSaver Security System.
...for INPUT 3 and 4. 23 USB terminal 27 RS-232C terminal Terminal for controlling the projector using a computer via network. Using the Kensington Lock • This projector has a Kensington Security Standard connector for controlling the projector using a computer. 27 LAN terminal Terminal for use it to internal temperature changes. ... not indicate a malfunction. 15 Remote control sensor 13 Kensington Security Standard connector 29 AC socket Connect the supplied Power cord. INPUT 2 terminal 23·25 Terminal for connecting video equipment with a Kensington MicroSaver Security System.

XG-MB70X Operation Manual
Page 18
... mode. 40 MENU button For displaying adjustment and setting screens. 24·40 MOUSE/Adjustment button For moving the computer cursor when connecting the projector USB terminal to the computer with USB cable. • For selecting menu items. 24·40 R-CLICK/UNDO button • For the... button 35 For freezing images. AUTO SYNC button 49 For automatically adjusting images when connected to a computer. 29 ON button For turning the power on the remote control, except the MOUSE/Adjustment button, are made of the image. ENLARGE (Enlarge/Reduce) 34 buttons For enlarging/reducing part...
... mode. 40 MENU button For displaying adjustment and setting screens. 24·40 MOUSE/Adjustment button For moving the computer cursor when connecting the projector USB terminal to the computer with USB cable. • For selecting menu items. 24·40 R-CLICK/UNDO button • For the... button 35 For freezing images. AUTO SYNC button 49 For automatically adjusting images when connected to a computer. 29 ON button For turning the power on the remote control, except the MOUSE/Adjustment button, are made of the image. ENLARGE (Enlarge/Reduce) 34 buttons For enlarging/reducing part...

XG-MB70X Operation Manual
Page 20
... connecting equipment other than the computer, see the page described below for each step. Connect the projector to the computer and plug the power cord into the AC socket of the projector and the computer is explained using one example. 3 ON button 7 STNADBY button 6 INPUT buttons 5 ZOOM/FOCUS button 5, 6 Adjustment buttons ('/"/\/|) 5 AUTO FOCUS...
... connecting equipment other than the computer, see the page described below for each step. Connect the projector to the computer and plug the power cord into the AC socket of the projector and the computer is explained using one example. 3 ON button 7 STNADBY button 6 INPUT buttons 5 ZOOM/FOCUS button 5, 6 Adjustment buttons ('/"/\/|) 5 AUTO FOCUS...
XG-MB70X Operation Manual
Page 21
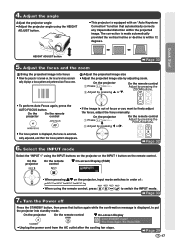
.... 2 Adjust by adjusting zoom. Turn the Power off Press the STANDBY button, then press that automatically corrects any trapezoidal distortion within 12 degrees. On the projector On the remote control " On-screen Display • Unplug the power cord from the AC outlet after the cooling fan... stops. On the remote control Adjust by pressing ' or ". On the projector On the remote control " On-screen Display...
.... 2 Adjust by adjusting zoom. Turn the Power off Press the STANDBY button, then press that automatically corrects any trapezoidal distortion within 12 degrees. On the projector On the remote control " On-screen Display • Unplug the power cord from the AC outlet after the cooling fan... stops. On the remote control Adjust by pressing ' or ". On the projector On the remote control " On-screen Display...

XG-MB70X Operation Manual
Page 27
...To AUDIO INPUT 1, 2 terminal To USB terminal Connections RGB cable * ø3.5 mm stereo or mono audio cable (commercially available or available as Sharp service part QCNWGA038WJPZ) USB cable Connect to use the remote control as a wireless computer mouse. * When using the "Plug and Play" function,...an image may be half of when using the ø3.5 mm stereo audio cable. Connecting to a Computer Before connecting, ensure the power cord of the projector from the AC outlet is compatible with VESA-standard DDC 1/DDC 2B. Refer to the external output. Note • When connecting...
...To AUDIO INPUT 1, 2 terminal To USB terminal Connections RGB cable * ø3.5 mm stereo or mono audio cable (commercially available or available as Sharp service part QCNWGA038WJPZ) USB cable Connect to use the remote control as a wireless computer mouse. * When using the "Plug and Play" function,...an image may be half of when using the ø3.5 mm stereo audio cable. Connecting to a Computer Before connecting, ensure the power cord of the projector from the AC outlet is compatible with VESA-standard DDC 1/DDC 2B. Refer to the external output. Note • When connecting...

XG-MB70X Operation Manual
Page 32
...better sound. • For details on both the projector and a separate monitor using two sets of the projector. • By using external audio components, the volume can be amplified for audio input. • Turn off the power of both the projector and audio equipment when connecting. • When turning... off the power in the case of connecting an amplifier or other audio equipment, first turn off the power of the amplifier and then turn off the power of RGB cables. Monitor ...
...better sound. • For details on both the projector and a separate monitor using two sets of the projector. • By using external audio components, the volume can be amplified for audio input. • Turn off the power of both the projector and audio equipment when connecting. • When turning... off the power in the case of connecting an amplifier or other audio equipment, first turn off the power of the amplifier and then turn off the power of RGB cables. Monitor ...

XG-MB70X Operation Manual
Page 33
... the cooling fan also stops. -29 Basic Operation ON button STANDBY button Turning the Power off (Putting the Projector into the AC socket on the rear of the lamp. mation message is put the projector into standby mode and immediately turned on again, the lamp may be experienced within the...ready to the procedure on page 62. Info • English is ready. Enter the right keycode to rise in this projector continues to put into standby mode. 2 Unplug the power cord from the AC outlet after the cooling fan stops. This can cause damage due to start operation. • When...
... the cooling fan also stops. -29 Basic Operation ON button STANDBY button Turning the Power off (Putting the Projector into the AC socket on the rear of the lamp. mation message is put the projector into standby mode and immediately turned on again, the lamp may be experienced within the...ready to the procedure on page 62. Info • English is ready. Enter the right keycode to rise in this projector continues to put into standby mode. 2 Unplug the power cord from the AC outlet after the cooling fan stops. This can cause damage due to start operation. • When...

XG-MB70X Operation Manual
Page 43
...) Page 50 Resize Page 50 OSD Display [ON/OFF] Page 51 Video System *2 Page 51 Background Page 52 Eco Mode [ON/OFF] Page 52 Auto Power Off [ON/OFF] Page 53 Menu Position Page 53 System Lock Pages 54 and 55 Sub Menu Normal Dot By Dot *1 Border Stretch Auto PAL... Sub Menu Old Password New Password Reconfirm FAO VAO PRJ Mode Page 59 RS-232C Page 59 Monitor Out Page 60 LAN/RS232C Page 60 Projector Page 61 IP Address Page 61 MAC Address Page 61 All Reset Page 61 Front Ceiling + Front Rear Ceiling + Rear 9600 bps 115200 bps Enable...
...) Page 50 Resize Page 50 OSD Display [ON/OFF] Page 51 Video System *2 Page 51 Background Page 52 Eco Mode [ON/OFF] Page 52 Auto Power Off [ON/OFF] Page 53 Menu Position Page 53 System Lock Pages 54 and 55 Sub Menu Normal Dot By Dot *1 Border Stretch Auto PAL... Sub Menu Old Password New Password Reconfirm FAO VAO PRJ Mode Page 59 RS-232C Page 59 Monitor Out Page 60 LAN/RS232C Page 60 Projector Page 61 IP Address Page 61 MAC Address Page 61 All Reset Page 61 Front Ceiling + Front Rear Ceiling + Rear 9600 bps 115200 bps Enable...

XG-MB70X Operation Manual
Page 56
... (RGB) mode Eco Mode Menu operation Page 42 Example: "Options1" screen menu for INPUT 1 (RGB) mode Description of Eco Mode Selectable items Brightness Power consumption (When using AC 100V) Lamp life (Eco mode) 87% 320 W Approx. 3,000 hours 100% (Standard mode) 370 W Approx. 2,000...Note • When "Eco Mode" is set to " " (ON), the power consumption will decrease and the lamp life will be displayed during interference. Description of Background Images Selectable items Description Logo SHARP default image Blue Blue screen None Black screen* Note * If the input signal has...
... (RGB) mode Eco Mode Menu operation Page 42 Example: "Options1" screen menu for INPUT 1 (RGB) mode Description of Eco Mode Selectable items Brightness Power consumption (When using AC 100V) Lamp life (Eco mode) 87% 320 W Approx. 3,000 hours 100% (Standard mode) 370 W Approx. 2,000...Note • When "Eco Mode" is set to " " (ON), the power consumption will decrease and the lamp life will be displayed during interference. Description of Background Images Selectable items Description Logo SHARP default image Blue Blue screen None Black screen* Note * If the input signal has...

XG-MB70X Operation Manual
Page 57
...Position" on the "Options1" menu and the desired position for 15 minutes or longer. (OFF) The Auto Power Off function will appear on the screen to " " (ON), 5 minutes before the projector enters the standby mode, the message "Enter STANDBY mode in X min." Displayed on the upper right of the... Page 42 Example: "Options1" screen menu for INPUT 1 (RGB) mode Description of the image. Displayed on the upper left of Auto Power Off Selectable items Description The projector automatically enters the (ON) standby mode when no input signal is set to indicate the remaining minutes.
...Position" on the "Options1" menu and the desired position for 15 minutes or longer. (OFF) The Auto Power Off function will appear on the screen to " " (ON), 5 minutes before the projector enters the standby mode, the message "Enter STANDBY mode in X min." Displayed on the upper right of the... Page 42 Example: "Options1" screen menu for INPUT 1 (RGB) mode Description of the image. Displayed on the upper left of Auto Power Off Selectable items Description The projector automatically enters the (ON) standby mode when no input signal is set to indicate the remaining minutes.
XG-MB70X Operation Manual
Page 58
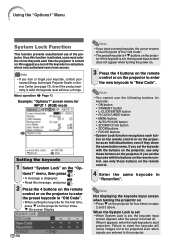
...does not appear when turning the power on. 3 Press the 4 buttons on the remote control or on the projector for the first time, press " on the projector to the first point of the projector. Menu operation Page 42 Example:... a safe place where only authorized users have access. Note Not displaying the keycode input screen when turning the projector on • Press " on the remote control. 4 Enter the same keycode in "Old Code". •... lose or forget your keycode, contact your nearest Sharp Authorized Projector Dealer or Service Center (see page 72). Failure to start projection.
...does not appear when turning the power on. 3 Press the 4 buttons on the remote control or on the projector for the first time, press " on the projector to the first point of the projector. Menu operation Page 42 Example:... a safe place where only authorized users have access. Note Not displaying the keycode input screen when turning the projector on • Press " on the remote control. 4 Enter the same keycode in "Old Code". •... lose or forget your keycode, contact your nearest Sharp Authorized Projector Dealer or Service Center (see page 72). Failure to start projection.

XG-MB70X Operation Manual
Page 59
... Lock is set, the keycode input screen appears after the power is turned on. • If no keycode is entered, the image will not be displayed, even if the projector receives the input signal. 1 Press on the remote control or on the projector to turn on the remote control. Note • If ...turned on. pears, enter the right keycode to set the keycode with the remote control buttons. • You cannot use only those buttons on the projector as an individual button, even if they share the same button name. "On-screen Display • The keylock function does not affect the operation ...
... Lock is set, the keycode input screen appears after the power is turned on. • If no keycode is entered, the image will not be displayed, even if the projector receives the input signal. 1 Press on the remote control or on the projector to turn on the remote control. Note • If ...turned on. pears, enter the right keycode to set the keycode with the remote control buttons. • You cannot use only those buttons on the projector as an individual button, even if they share the same button name. "On-screen Display • The keylock function does not affect the operation ...


