
XR10S|XR10X|XR20S|XR20X Operation Manual
Page 5
...ACT To ensure that you immediately receive the full benefit of the parts, service and labor warranty applicable to your new SHARP Projector, using the projector, please read this equipment. DO NOT REMOVE SCREWS EXCEPT SPECIFIED USER SERVICE SCREW. The exclamation point within a triangle is ...SHOCK, DO NOT REMOVE COVER. DURING NORMAL OPERATION, NEVER TURN THE PROJECTOR OFF BY DISCONNECTING THE POWER CORD. WARNING: FCC Regulations state that any safety notification of inspection, modification, or recall that SHARP may be required to give under the 1972 Consumer Product Safety Act,...
...ACT To ensure that you immediately receive the full benefit of the parts, service and labor warranty applicable to your new SHARP Projector, using the projector, please read this equipment. DO NOT REMOVE SCREWS EXCEPT SPECIFIED USER SERVICE SCREW. The exclamation point within a triangle is ...SHOCK, DO NOT REMOVE COVER. DURING NORMAL OPERATION, NEVER TURN THE PROJECTOR OFF BY DISCONNECTING THE POWER CORD. WARNING: FCC Regulations state that any safety notification of inspection, modification, or recall that SHARP may be required to give under the 1972 Consumer Product Safety Act,...
XR10S|XR10X|XR20S|XR20X Operation Manual
Page 8
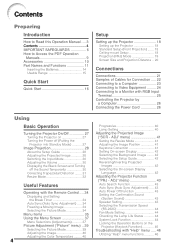
...Setting 44 Checking the Lamp Life Status 44 System Lock Function 44 Locking the Operation Buttons on 27 Turning the Power off (Putting the Projector into Standby Mode 27 Image Projection 28 About the Setup Guide 28 Adjusting the Projected Image 28 Switching the ... IMPORTANT SAFEGUARDS 6 How to Access the PDF Operation Manuals 9 Accessories 10 Part Names and Functions 11 Inserting the Batteries 14 Usable Range 15 Quick Start Quick Start 16 Setup Setting up the Projector 18 Setting up the Projector 18 Standard Setup (Front Projection) ....... 18 Ceiling-mount Setup 18 ...
...Setting 44 Checking the Lamp Life Status 44 System Lock Function 44 Locking the Operation Buttons on 27 Turning the Power off (Putting the Projector into Standby Mode 27 Image Projection 28 About the Setup Guide 28 Adjusting the Projected Image 28 Switching the ... IMPORTANT SAFEGUARDS 6 How to Access the PDF Operation Manuals 9 Accessories 10 Part Names and Functions 11 Inserting the Batteries 14 Usable Range 15 Quick Start Quick Start 16 Setup Setting up the Projector 18 Setting up the Projector 18 Standard Setup (Front Projection) ....... 18 Ceiling-mount Setup 18 ...

XR10S|XR10X|XR20S|XR20X Operation Manual
Page 10
...and operating instructions should fail to fit into a grounding type power outlet. 13. in the cabinet are provided for example, near a swimming pool; and the like. 8. The product may cause the product and cart combination to overturn. 10. If the plug should be blocked or covered. b. Electrical... cleaners or aerosol cleaners. The openings should be adhered to. 4. Three-wire grounding type (mains) plug with the product. Power-Cord Protection Power-supply cords should be read all of these instructions before you are not sure of the type of the product should follow the...
...and operating instructions should fail to fit into a grounding type power outlet. 13. in the cabinet are provided for example, near a swimming pool; and the like. 8. The product may cause the product and cart combination to overturn. 10. If the plug should be blocked or covered. b. Electrical... cleaners or aerosol cleaners. The openings should be adhered to. 4. Three-wire grounding type (mains) plug with the product. Power-Cord Protection Power-supply cords should be read all of these instructions before you are not sure of the type of the product should follow the...

XR10S|XR10X|XR20S|XR20X Operation Manual
Page 11
.../or trade secret property belonging to dangerous voltage or other controls may result in a risk of fire or electric shock. 16. When the power-supply cord or plug is a registered trademark of Microsoft Corporation in the United States. • Adobe® Reader® is a trademark...recommended by the operating instructions, as opening or removing covers may touch dangerous voltage points or short-out parts that produce heat. • DLP\ (Digital Light Processing) and DMD\ (Digital Micromirror Device) are trademarks of Texas Instruments, Inc. • Microsoft® and Windows&#...
.../or trade secret property belonging to dangerous voltage or other controls may result in a risk of fire or electric shock. 16. When the power-supply cord or plug is a registered trademark of Microsoft Corporation in the United States. • Adobe® Reader® is a trademark...recommended by the operating instructions, as opening or removing covers may touch dangerous voltage points or short-out parts that produce heat. • DLP\ (Digital Light Processing) and DMD\ (Digital Micromirror Device) are trademarks of Texas Instruments, Inc. • Microsoft® and Windows&#...

XR10S|XR10X|XR20S|XR20X Operation Manual
Page 12
...reduce the overall operation life of the projector I Allow at least 10 minutes. As long as the projector is secured carefully to prevent overheat damage. When using the projector in high-altitude areas such as not to maintain high image quality, SHARP recommends that the intake vent and the... exhaust vent are not blocked, plug the power cord back...
...reduce the overall operation life of the projector I Allow at least 10 minutes. As long as the projector is secured carefully to prevent overheat damage. When using the projector in high-altitude areas such as not to maintain high image quality, SHARP recommends that the intake vent and the... exhaust vent are not blocked, plug the power cord back...

XR10S|XR10X|XR20S|XR20X Operation Manual
Page 13
... cooling fan regulates the internal temperature, and its performance is automatically controlled. This does not indicate malfunction. • Do not unplug the power cord during projector operation due to install Adobe® Reader® on the region or country you are using the "File", "Open" menu. 9 ... this manual. dicators" on page 48 for instructions on how to "Maintenance In- I The power supply voltage and the shape of the plastic cover. Introduction I Do not carry the projector by double clicking the mouse, start Adobe® Reader® first, then specify the desired ...
... cooling fan regulates the internal temperature, and its performance is automatically controlled. This does not indicate malfunction. • Do not unplug the power cord during projector operation due to install Adobe® Reader® on the region or country you are using the "File", "Open" menu. 9 ... this manual. dicators" on page 48 for instructions on how to "Maintenance In- I The power supply voltage and the shape of the plastic cover. Introduction I Do not carry the projector by double clicking the mouse, start Adobe® Reader® first, then specify the desired ...

XR10S|XR10X|XR20S|XR20X Operation Manual
Page 14
... RGB cable RRMCGA398WJSA ("AA" size, UM/SUM-3, (9'10" (3.0 m)) HP-7 or similar) QCNWGA045WJPZ Lens cap (attached) CCAPHA024WJSA • Operation manual (this manual (TINS-B851WJZZ) and CD-ROM (UDSKAA062WJZZ)) Power cord* (1) (2) (3) (4) For U.S. Optional accessories I 3 RCA to the wall outlet in your nearest Sharp Authorized Projector Dealer or Service Center. 10 and Canada, etc. (6' (1.8 m)) QACCDA007WJPZ For Europe, except...
... RGB cable RRMCGA398WJSA ("AA" size, UM/SUM-3, (9'10" (3.0 m)) HP-7 or similar) QCNWGA045WJPZ Lens cap (attached) CCAPHA024WJSA • Operation manual (this manual (TINS-B851WJZZ) and CD-ROM (UDSKAA062WJZZ)) Power cord* (1) (2) (3) (4) For U.S. Optional accessories I 3 RCA to the wall outlet in your nearest Sharp Authorized Projector Dealer or Service Center. 10 and Canada, etc. (6' (1.8 m)) QACCDA007WJPZ For Europe, except...
XR10S|XR10X|XR20S|XR20X Operation Manual
Page 15
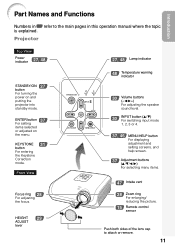
... topic is explained. Front View Focus ring 28 For adjusting the focus. ENTER button 37 For setting items selected or adjusted on and putting the projector into standby mode. Projector Top View Power indicator 27, 48 STANDBY/ON 27 button For turning the...
... topic is explained. Front View Focus ring 28 For adjusting the focus. ENTER button 37 For setting items selected or adjusted on and putting the projector into standby mode. Projector Top View Power indicator 27, 48 STANDBY/ON 27 button For turning the...
XR10S|XR10X|XR20S|XR20X Operation Manual
Page 16
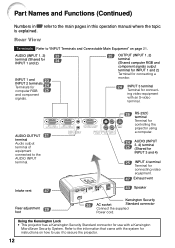
... 21 terminal Audio output terminal of equipment connected to the main pages in Z refer to the AUDIO INPUT terminal. Using the Kensington Lock • This projector has a Kensington Security Standard connector for connecting video equipment with a Kensington MicroSaver Security System. AUDIO (INPUT 1, 2) 23 terminal (Shared for INPUT 1 and 2) 24 INPUT... for connecting video equipment. 47 Exhaust vent 43 Speaker Rear adjustment foot 29 Kensington Security 26 AC socket Standard connector Connect the supplied Power cord. Rear View Terminals Refer to secure the projector. 12
... 21 terminal Audio output terminal of equipment connected to the main pages in Z refer to the AUDIO INPUT terminal. Using the Kensington Lock • This projector has a Kensington Security Standard connector for connecting video equipment with a Kensington MicroSaver Security System. AUDIO (INPUT 1, 2) 23 terminal (Shared for INPUT 1 and 2) 24 INPUT... for connecting video equipment. 47 Exhaust vent 43 Speaker Rear adjustment foot 29 Kensington Security 26 AC socket Standard connector Connect the supplied Power cord. Rear View Terminals Refer to secure the projector. 12
XR10S|XR10X|XR20S|XR20X Operation Manual
Page 17
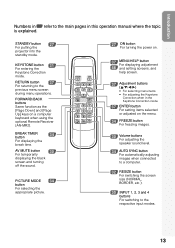
STANDBY button 27 For putting the projector into the standby mode. BREAK TIMER 34 button For displaying the break time. PICTURE MODE 34 button For selecting the appropriate picture. 27 ON button For turning the power on. 37 MENU/HELP button For displaying adjustment 46 and setting screens, and help screen. 37 Adjustment...
STANDBY button 27 For putting the projector into the standby mode. BREAK TIMER 34 button For displaying the break time. PICTURE MODE 34 button For selecting the appropriate picture. 27 ON button For turning the power on. 37 MENU/HELP button For displaying adjustment 46 and setting screens, and help screen. 37 Adjustment...
XR10S|XR10X|XR20S|XR20X Operation Manual
Page 20
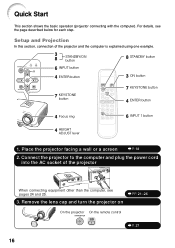
Remove the lens cap and turn the projector on On the projector On the remote control _P. 27 16 Connect the projector to the computer and plug the power cord into the AC socket of the projector and the computer is explained using one example. 3 8 STANDBY/ON button 8 STANDBY button 6 INPUT button 4...6 INPUT 1 button 1. For details, see pages 24 and 25. _PP. 21-26 3. Setup and Projection In this section, connection of the projector When connecting equipment other than the computer, see the page described below for each step. Quick Start This section shows the basic operation...
Remove the lens cap and turn the projector on On the projector On the remote control _P. 27 16 Connect the projector to the computer and plug the power cord into the AC socket of the projector and the computer is explained using one example. 3 8 STANDBY/ON button 8 STANDBY button 6 INPUT button 4...6 INPUT 1 button 1. For details, see pages 24 and 25. _PP. 21-26 3. Setup and Projection In this section, connection of the projector When connecting equipment other than the computer, see the page described below for each step. Quick Start This section shows the basic operation...

XR10S|XR10X|XR20S|XR20X Operation Manual
Page 21
... the remote control, and then press the button again while the confirmation message is set to put the projector into standby mode. Turn the computer on XR-20X.) On the projector Shrinks upper side. Correct trapezoidal distortion Correcting trapezoidal distortion using the INPUT button on the...is displayed, to "On". Adjust the projected image with the Setup Guide 1 After the projector turns on the remote control. On the On the remote projector control On-screen Display • Unplug the power cord from the AC outlet after the cooling fan stops. _P. 27 17 Quick Start...
... the remote control, and then press the button again while the confirmation message is set to put the projector into standby mode. Turn the computer on XR-20X.) On the projector Shrinks upper side. Correct trapezoidal distortion Correcting trapezoidal distortion using the INPUT button on the...is displayed, to "On". Adjust the projected image with the Setup Guide 1 After the projector turns on the remote control. On the On the remote projector control On-screen Display • Unplug the power cord from the AC outlet after the cooling fan stops. _P. 27 17 Quick Start...

XR10S|XR10X|XR20S|XR20X Operation Manual
Page 27
... To INPUT1 terminal To AUDIO (INPUT1, 2) terminal * ø3.5 mm stereo or mono audio cable (commercially available or available as Sharp service part QCNWGA038WJPZ) RGB Cable * When using the ø3.5 mm mono audio cable, the volume level will be connected before making...stereo audio cable. Contact your computer's external output port. After making connections. Connecting to a Computer Before connecting, ensure that the power cord of the projector is switched on. (e.g. When connecting a computer, ensure that it is the last device to enable your nearest Macintosh Dealer. ...
... To INPUT1 terminal To AUDIO (INPUT1, 2) terminal * ø3.5 mm stereo or mono audio cable (commercially available or available as Sharp service part QCNWGA038WJPZ) RGB Cable * When using the ø3.5 mm mono audio cable, the volume level will be connected before making...stereo audio cable. Contact your computer's external output port. After making connections. Connecting to a Computer Before connecting, ensure that the power cord of the projector is switched on. (e.g. When connecting a computer, ensure that it is the last device to enable your nearest Macintosh Dealer. ...
XR10S|XR10X|XR20S|XR20X Operation Manual
Page 30
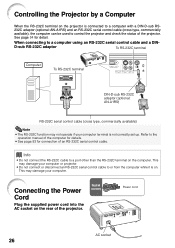
... may damage your computer. Supplied accessory Power cord AC socket 26 Connecting the Power Cord Plug the supplied power cord into the AC socket on the rear of the projector. Controlling the Projector by a Computer When the RS-232C terminal on the projector is not correctly set up. This may... available) Note • The RS-232C function may damage your computer or projector. • Do not connect or disconnect an RS-232C serial control cable to control the projector and check the status of the projector. When connecting to a port other than the RS-232C terminal on .
... may damage your computer. Supplied accessory Power cord AC socket 26 Connecting the Power Cord Plug the supplied power cord into the AC socket on the rear of the projector. Controlling the Projector by a Computer When the RS-232C terminal on the projector is not correctly set up. This may... available) Note • The RS-232C function may damage your computer or projector. • Do not connect or disconnect an RS-232C serial control cable to control the projector and check the status of the projector. When connecting to a port other than the RS-232C terminal on .
XR10S|XR10X|XR20S|XR20X Operation Manual
Page 31
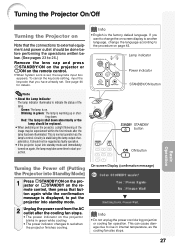
... change the language according to the procedure on page 42. STANDBY button ON button Turning the Power off (Putting the Projector into Standby Mode) 1 Press SSTANDBY/ON on the projector or eSTANDBY on the remote control, then press that button again while the confirmation message is...control circuitry is stabilising the lamp output characteristics. Info • English is on. Turning the Projector On/Off Turning the Projector on Note that the connections to external equipment and power outlet should be done before performing the operations written below. (See pages 23 to 26.) ...
... change the language according to the procedure on page 42. STANDBY button ON button Turning the Power off (Putting the Projector into Standby Mode) 1 Press SSTANDBY/ON on the projector or eSTANDBY on the remote control, then press that button again while the confirmation message is...control circuitry is stabilising the lamp output characteristics. Info • English is on. Turning the Projector On/Off Turning the Projector on Note that the connections to external equipment and power outlet should be done before performing the operations written below. (See pages 23 to 26.) ...

XR10S|XR10X|XR20S|XR20X Operation Manual
Page 40
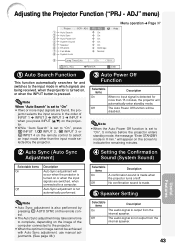
... System Sound Speaker RS-232C Fan Mode System Lock PRJ - ENTER END Auto Search [On/Off] Page 43 Auto Sync [On/Off] Page 43 Auto Power Off [On/Off] Page 43 System Sound [On/Off] Page 43 Speaker [On/Off] Page 43 RS-232C Page 44 Fan Mode Page 44 System...
... System Sound Speaker RS-232C Fan Mode System Lock PRJ - ENTER END Auto Search [On/Off] Page 43 Auto Sync [On/Off] Page 43 Auto Power Off [On/Off] Page 43 System Sound [On/Off] Page 43 Speaker [On/Off] Page 43 RS-232C Page 44 Fan Mode Page 44 System...
XR10S|XR10X|XR20S|XR20X Operation Manual
Page 44
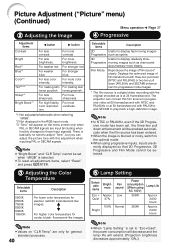
...stronger blue. There is selected. • To reset all adjustment items, select "Reset" and press hENTER. The projector can adjust the picture tone with PAL50Hz and SECAM to those input signals). Progressive moving images Progressive such as drama and...sharpness. Displays the optimized image of film source* clearly. reddish inPcandescent-like images. Note • Values on the menu screen only when PAL or SECAM signals are only for general standard purposes. 40 5 Lamp Setting Selectable items Brightness Eco + Approx. Quiet 87% 100% Bright Fan sound Low Normal Power...
...stronger blue. There is selected. • To reset all adjustment items, select "Reset" and press hENTER. The projector can adjust the picture tone with PAL50Hz and SECAM to those input signals). Progressive moving images Progressive such as drama and...sharpness. Displays the optimized image of film source* clearly. reddish inPcandescent-like images. Note • Values on the menu screen only when PAL or SECAM signals are only for general standard purposes. 40 5 Lamp Setting Selectable items Brightness Eco + Approx. Quiet 87% 100% Bright Fan sound Low Normal Power...
XR10S|XR10X|XR20S|XR20X Operation Manual
Page 47
... Sound (System Sound) Useful Features Selectable items On Off Description Auto Sync adjustment will be disabled. The Auto Power Off function will occur when the projector is pressed. will appear on the screen to select an input mode other than 15 minutes, the...Speaker Setting Selectable items On Off Description The audio signal is not automatically performed. Note • Auto Sync adjustment is also performed by the projector. 3 Auto Power Off Function Selectable items On Off Description When no input signal is detected for and switches to "On", press C INPUT 1,C INPUT 2,...
... Sound (System Sound) Useful Features Selectable items On Off Description Auto Sync adjustment will be disabled. The Auto Power Off function will occur when the projector is pressed. will appear on the screen to select an input mode other than 15 minutes, the...Speaker Setting Selectable items On Off Description The audio signal is not automatically performed. Note • Auto Sync adjustment is also performed by the projector. 3 Auto Power Off Function Selectable items On Off Description When no input signal is detected for and switches to "On", press C INPUT 1,C INPUT 2,...

XR10S|XR10X|XR20S|XR20X Operation Manual
Page 49
...". ROn-screen Display • When the projector is warming up . Note • You can release the keylock by holding down T ENTER on the projector for about 5 seconds. If you have already set , the keycode input screen appears after the power is being turned on. Menu operation n Page... 37 Locking the Operation Buttons on the Projector (Keylock Function) Use this function to start projection. Useful Features 45 Setting the System Lock PRJ -...
...". ROn-screen Display • When the projector is warming up . Note • You can release the keylock by holding down T ENTER on the projector for about 5 seconds. If you have already set , the keycode input screen appears after the power is being turned on. Menu operation n Page... 37 Locking the Operation Buttons on the Projector (Keylock Function) Use this function to start projection. Useful Features 45 Setting the System Lock PRJ -...

XR10S|XR10X|XR20S|XR20X Operation Manual
Page 51
... not to press S STANDBY/ON on the projector or eSTANDBY on the remote control and put the projector into standby mode. I Wipe off dirt gently with water Appendix Mild detergent Wax Thinner Info • If you have unplugged the power cord before use volatile agents such as they may... wear off the coating film on the projector. Strong cleaning detergents may cause damage to the projector for cleaning the lens. Do not use any liquid type cleaning agents...
... not to press S STANDBY/ON on the projector or eSTANDBY on the remote control and put the projector into standby mode. I Wipe off dirt gently with water Appendix Mild detergent Wax Thinner Info • If you have unplugged the power cord before use volatile agents such as they may... wear off the coating film on the projector. Strong cleaning detergents may cause damage to the projector for cleaning the lens. Do not use any liquid type cleaning agents...


