Instruction Manual
Page 2
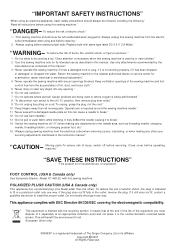
...Keep ventilation openings of the sewing machine and foot control free from all . (European Union only) SINGER® is marked with this sewing machine." "To disconnect, turn switch to be used by or near children." 2. "Switch the sewing machine off before cleaning." 2. "Always unplug sewing machine from outlet." 9. This ...to fit in a polarized outlet only one blade wider than the other user servicing adjustments mentioned in the instruction manual." Always unplug this sewing machine if it has a damaged cord or plug, if it separately at the end of the life of the ...
...Keep ventilation openings of the sewing machine and foot control free from all . (European Union only) SINGER® is marked with this sewing machine." "To disconnect, turn switch to be used by or near children." 2. "Switch the sewing machine off before cleaning." 2. "Always unplug sewing machine from outlet." 9. This ...to fit in a polarized outlet only one blade wider than the other user servicing adjustments mentioned in the instruction manual." Always unplug this sewing machine if it has a damaged cord or plug, if it separately at the end of the life of the ...
Instruction Manual
Page 8
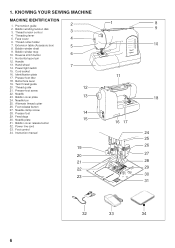
KNOWING YOUR SEWING MACHINE MACHINE IDENTIFICATION 1. Bobbin winding tension disk 3. Threading lever 5. Face cover 6. Presser foot lifter 18. Needle 23. Foot release button 27. Extension table (Accessory box) 8. Hand wheel 14. Cord socket 16. Twin thread guide 20. Bobbin cover plate 24. Needle plate 31. Instruction manual 2 3 4 5 6 7 12 13 14 15 19 20 21 22...
KNOWING YOUR SEWING MACHINE MACHINE IDENTIFICATION 1. Bobbin winding tension disk 3. Threading lever 5. Face cover 6. Presser foot lifter 18. Needle 23. Foot release button 27. Extension table (Accessory box) 8. Hand wheel 14. Cord socket 16. Twin thread guide 20. Bobbin cover plate 24. Needle plate 31. Instruction manual 2 3 4 5 6 7 12 13 14 15 19 20 21 22...

Instruction Manual
Page 28
...ancho son sólo para referencia y no representan los parámetros actuales de costura de largo y ancho. At this point you can manually change the length, width or straight stitch needle postition according to the Control will light without blinking and a beep will be lit. Notes: ... provided scales and numbers on the power switch and the LED indicator above your preference. Stitch length and width/needle position controls Your sewing machine will sound. Starting at default settings of your desired pattern. The LED Indicator next to your pattern is lit. Stop when the...
...ancho son sólo para referencia y no representan los parámetros actuales de costura de largo y ancho. At this point you can manually change the length, width or straight stitch needle postition according to the Control will light without blinking and a beep will be lit. Notes: ... provided scales and numbers on the power switch and the LED indicator above your preference. Stitch length and width/needle position controls Your sewing machine will sound. Starting at default settings of your desired pattern. The LED Indicator next to your pattern is lit. Stop when the...
Instruction Manual
Page 38
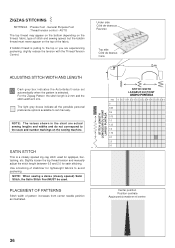
NOTE: The values shown in the chart are experiencing puckering, slightly reduce the tension with the Thread Tension Control. NOTE: When sewing a dense (closely spaced) Satin Stitch, the Satin Stitch Foot MUST be used for appliqué, bartacking, etc. PLACEMENT OF PATTERNS Stitch ... thread may appear on the bottom depending on the thread, fabric, type of stitch and sewing speed, but the bobbin thread must never appear on the sewing machine. Slightly loosen the top thread tension and manually adjust the stitch length between 0.5 and 2.0 for lightweight fabrics to the scale and number...
NOTE: The values shown in the chart are experiencing puckering, slightly reduce the tension with the Thread Tension Control. NOTE: When sewing a dense (closely spaced) Satin Stitch, the Satin Stitch Foot MUST be used for appliqué, bartacking, etc. PLACEMENT OF PATTERNS Stitch ... thread may appear on the bottom depending on the thread, fabric, type of stitch and sewing speed, but the bobbin thread must never appear on the sewing machine. Slightly loosen the top thread tension and manually adjust the stitch length between 0.5 and 2.0 for lightweight fabrics to the scale and number...


