
Instruction Manual
Page 2
.... Switch the sewing machine off the machine or unplug when the machine is intended for its service agent or a similar qualified person in order to be left unattended when plugged in this appliance only for household use only. Do not use by the manufacturer or its intended use as threading needle, changing needle, threading bobbin, or...
.... Switch the sewing machine off the machine or unplug when the machine is intended for its service agent or a similar qualified person in order to be left unattended when plugged in this appliance only for household use only. Do not use by the manufacturer or its intended use as threading needle, changing needle, threading bobbin, or...

Instruction Manual
Page 6
... Power Source...6 Two Step Presser Foot Lifter/ Adjusting Presser Foot Pressure...8 Accessories...10 Threading the Machine Winding the Bobbin...12 Inserting the Bobbin ...14 Threading the Upper Thread...16 Automatic Needle Threader ...18 Raising the Bobbin Thread ...20 Thread Tension ...22 Sewing How to Choose Your Pattern...24 Three Needle Position Dial ...26 Stitch Width Dial & Stitch...
... Power Source...6 Two Step Presser Foot Lifter/ Adjusting Presser Foot Pressure...8 Accessories...10 Threading the Machine Winding the Bobbin...12 Inserting the Bobbin ...14 Threading the Upper Thread...16 Automatic Needle Threader ...18 Raising the Bobbin Thread ...20 Thread Tension ...22 Sewing How to Choose Your Pattern...24 Three Needle Position Dial ...26 Stitch Width Dial & Stitch...

Instruction Manual
Page 9
Removable extension table/ accessory storage 5 13 9. One step buttonhole lever 14 15 2 Thread take-up lever 2 10 4. Stitch length dial 13. Pattern selector dial 8 14. EN Principal Parts of the Machine 1. Thread tension dial 2. Three needle position dial 6 10. Bobbin stopper 11. Automatic threader 15. Stitch width dial 7 12. Presser foot pressure adjustment 1 9 3. Needle plate cover 8. Reverse sewing lever 11 3 5. Thread cutter 6. Presser foot 4 12 7.
Removable extension table/ accessory storage 5 13 9. One step buttonhole lever 14 15 2 Thread take-up lever 2 10 4. Stitch length dial 13. Pattern selector dial 8 14. EN Principal Parts of the Machine 1. Thread tension dial 2. Three needle position dial 6 10. Bobbin stopper 11. Automatic threader 15. Stitch width dial 7 12. Presser foot pressure adjustment 1 9 3. Needle plate cover 8. Reverse sewing lever 11 3 5. Thread cutter 6. Presser foot 4 12 7.

Instruction Manual
Page 19
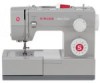
... on spindle. (5) - Push bobbin spindle to the left (10) and remove. Wind thread clockwise around bobbin winder tension discs. (4) - Place thread and corresponding spool holder on to right. (6) - Cut thread. (9) 2 - Please Note: When the bobbin winder spindle is in "bobbin winding" position, the machine will not sew and the handwheel turn. EN Winding the Bobbin -
... on spindle. (5) - Push bobbin spindle to the left (10) and remove. Wind thread clockwise around bobbin winder tension discs. (4) - Place thread and corresponding spool holder on to right. (6) - Cut thread. (9) 2 - Please Note: When the bobbin winder spindle is in "bobbin winding" position, the machine will not sew and the handwheel turn. EN Winding the Bobbin -

Instruction Manual
Page 39
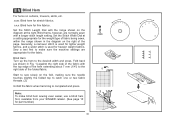
A Release the lever and the machine will sew forward again. (1) Removing the Work Turn the handwheel toward you (counterclockwise) to bring the thread take up lever to cut. (3) 32 B 3 Pull threads down the reverse sewing lever (A). Guide the threads to the side of a seam, press down to its ...highest position, raise the presser foot and remove work behind the needle and presser 1 2 foot. (2) Cutting the Thread Pull the threads under and behind the presser foot. Sew a few reverse stitches. EN Reverse Sewing To secure the beginning and the end of the face plate and into...
A Release the lever and the machine will sew forward again. (1) Removing the Work Turn the handwheel toward you (counterclockwise) to bring the thread take up lever to cut. (3) 32 B 3 Pull threads down the reverse sewing lever (A). Guide the threads to the side of a seam, press down to its ...highest position, raise the presser foot and remove work behind the needle and presser 1 2 foot. (2) Cutting the Thread Pull the threads under and behind the presser foot. Sew a few reverse stitches. EN Reverse Sewing To secure the beginning and the end of the face plate and into...
Instruction Manual
Page 43
...extending about 7 mm (1/4") to the right side of the folded fabric. 1 Start to sew slowly on the fold, making sure the needle touches slightly the folded top to catch one or two fabric threads. (2) Unfold the fabric when hemming is used for lighter weight fabrics, and a wider ...2 Note: To make sure the machine settings are normally sewn with a longer stitch length setting. Blind hems, however, are appropriate for stretch fabrics. Blind Hem: Turn up the hem to make blind hem sewing even easier, use a blind hem foot, available from your SINGER retailer. (See page 10 for ...
...extending about 7 mm (1/4") to the right side of the folded fabric. 1 Start to sew slowly on the fold, making sure the needle touches slightly the folded top to catch one or two fabric threads. (2) Unfold the fabric when hemming is used for lighter weight fabrics, and a wider ...2 Note: To make sure the machine settings are normally sewn with a longer stitch length setting. Blind hems, however, are appropriate for stretch fabrics. Blind Hem: Turn up the hem to make blind hem sewing even easier, use a blind hem foot, available from your SINGER retailer. (See page 10 for ...
Instruction Manual
Page 45
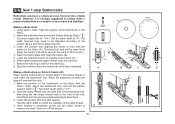
...b A PUSH B C Making a Buttonhole on Stretch Fabrics (E) When sewing buttonholes on the foot (b).) 4. Lower the presser foot and start the machine. 7. Making a Buttonhole 1. Sew a test first to the project. While lightly holding the upper thread, start sewing. *Set the stitch width to match the diameter of the foot, ...the mark on stretch fabric, hook heavy thread or cord under the buttonhole foot. Hook the heavy thread onto the back end of the buttonhole foot, PUSH then bring the two heavy thread ends to the front of the gimp thread. 4. Lower the buttonhole lever and...
...b A PUSH B C Making a Buttonhole on Stretch Fabrics (E) When sewing buttonholes on the foot (b).) 4. Lower the presser foot and start the machine. 7. Making a Buttonhole 1. Sew a test first to the project. While lightly holding the upper thread, start sewing. *Set the stitch width to match the diameter of the foot, ...the mark on stretch fabric, hook heavy thread or cord under the buttonhole foot. Hook the heavy thread onto the back end of the buttonhole foot, PUSH then bring the two heavy thread ends to the front of the gimp thread. 4. Lower the buttonhole lever and...

Instruction Manual
Page 64
... 1. Lint or oil have collected on the thread. Do not pull on the fabric while sewing, let the feed dogs pull the fabric under the foot. 1. The bobbin case is not threaded correctly. 2. Select a larger needle. 4. Insert the needle correctly. (flat side towards the back) 3. The machine is not inserted correctly. 2. The needle is...
... 1. Lint or oil have collected on the thread. Do not pull on the fabric while sewing, let the feed dogs pull the fabric under the foot. 1. The bobbin case is not threaded correctly. 2. Select a larger needle. 4. Insert the needle correctly. (flat side towards the back) 3. The machine is not inserted correctly. 2. The needle is...


