Instruction Manual
Page 2
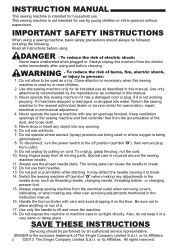
... fabric while stitching. Also, do not keep it is required around the sewing machine needle. 11. SINGER is the exclusive trademark of lint, dust, and loose cloth. 5. INSTRUCTION MANUAL This sewing machine is intended for its intended use as described in the instruction manual....the electrical outlet when removing covers, lubricating, or when making any object into water. Always unplug sewing machine from outlet. 9. or its Affiliates. 2 ©2013 The Singer Company Limited S.à.r.l. All rights reserved. To disconnect, turn the power switch to the nearest authorized...
... fabric while stitching. Also, do not keep it is required around the sewing machine needle. 11. SINGER is the exclusive trademark of lint, dust, and loose cloth. 5. INSTRUCTION MANUAL This sewing machine is intended for its intended use as described in the instruction manual....the electrical outlet when removing covers, lubricating, or when making any object into water. Always unplug sewing machine from outlet. 9. or its Affiliates. 2 ©2013 The Singer Company Limited S.à.r.l. All rights reserved. To disconnect, turn the power switch to the nearest authorized...
Instruction Manual
Page 3
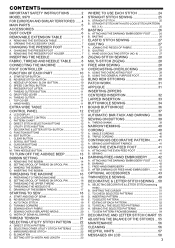
...C. THREAD CUTTER 11 I. UTILITY STITCH BUTTON 12 F. DECORATIVE & LETTER STITCH BUTTON 12 G. SEWING HEAVY FABRIC 20 F. ELONGATION 23 E. USING THE OVERCASTING FOOT 29 B. ATTACHING THE DARNING/ ...SEWING 28 OVERCASTING-OVERLOCKING 29 A. PATTERN CHART 12 D. THREADING THE UPPER THREAD 16 D. AUTO TACK STITCH 19 D. DARNING 42 C. EDITING OF EACH PATTERN 52 G. QUILTING 27 C. PREPARING TO THREAD MACHINE 16 B. CURSOR BUTTONS 13 L. CHANGING THE PRESSER FOOT 7 B. DIRECT STITCH SELECTION BUTTONS 12 E. CONTENTS IMPORTANT SAFETY INSTRUCTIONS 2 MODEL 9970...
...C. THREAD CUTTER 11 I. UTILITY STITCH BUTTON 12 F. DECORATIVE & LETTER STITCH BUTTON 12 G. SEWING HEAVY FABRIC 20 F. ELONGATION 23 E. USING THE OVERCASTING FOOT 29 B. ATTACHING THE DARNING/ ...SEWING 28 OVERCASTING-OVERLOCKING 29 A. PATTERN CHART 12 D. THREADING THE UPPER THREAD 16 D. AUTO TACK STITCH 19 D. DARNING 42 C. EDITING OF EACH PATTERN 52 G. QUILTING 27 C. PREPARING TO THREAD MACHINE 16 B. CURSOR BUTTONS 13 L. CHANGING THE PRESSER FOOT 7 B. DIRECT STITCH SELECTION BUTTONS 12 E. CONTENTS IMPORTANT SAFETY INSTRUCTIONS 2 MODEL 9970...
Instruction Manual
Page 4
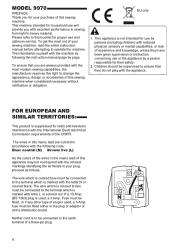
...refer to the earth terminal of a three-pin plug. 4 To get the most modern sewing capabilities, the manufacturer reserves the right to operate the machine. Children should be fitted either in sewing from light to ensure that you are colored in this mains lead are always provided with... the machine by following code. The wires in accordance with the appliance. Fuse must be supervised to heavy material. MODEL 9970 PREFACE Thank you for your sewing machine, read the entire instruction manual before attempting to change the appearance, design or accessories of this...
...refer to the earth terminal of a three-pin plug. 4 To get the most modern sewing capabilities, the manufacturer reserves the right to operate the machine. Children should be fitted either in sewing from light to ensure that you are colored in this mains lead are always provided with... the machine by following code. The wires in accordance with the appliance. Fuse must be supervised to heavy material. MODEL 9970 PREFACE Thank you for your sewing machine, read the entire instruction manual before attempting to change the appearance, design or accessories of this...

Instruction Manual
Page 6
... and Screw 11. Satin Foot (B) 14 15 16 17 18 17. Straight Stitch / Patch Quilting Foot 21. Even-feed Foot 19 20 21 23. Parallel Sewing Foot 10. Non Stick Glide Foot 14. Overcasting Foot (C) 10 11 12 13 12. Blind Hem Foot (D) 13. Snap on Gathering Foot 9. Screw Driver 1 2 34... Thread Cap 10. Do not remove the styrofoam located inside of the dust cover. Invisible Zipper Foot 8. Clear Seam Guide Foot 12. Seam Ripper 8 4. Button Sewing Foot 16. ACCESSORIES Accessories are provided in the machine) 3.
... and Screw 11. Satin Foot (B) 14 15 16 17 18 17. Straight Stitch / Patch Quilting Foot 21. Even-feed Foot 19 20 21 23. Parallel Sewing Foot 10. Non Stick Glide Foot 14. Overcasting Foot (C) 10 11 12 13 12. Blind Hem Foot (D) 13. Snap on Gathering Foot 9. Screw Driver 1 2 34... Thread Cap 10. Do not remove the styrofoam located inside of the dust cover. Invisible Zipper Foot 8. Clear Seam Guide Foot 12. Seam Ripper 8 4. Button Sewing Foot 16. ACCESSORIES Accessories are provided in the machine) 3.

Instruction Manual
Page 7
Raise the presser foot lifter. 3. B. CHANGING THE PRESSER FOOT The presser foot must be changed according to the stitch you sew, or work you should remove the presser foot holder. 1. A. Place desired foot with its highest point. 2. B. To attach, insert to the left side of presser ...
Raise the presser foot lifter. 3. B. CHANGING THE PRESSER FOOT The presser foot must be changed according to the stitch you sew, or work you should remove the presser foot holder. 1. A. Place desired foot with its highest point. 2. B. To attach, insert to the left side of presser ...

Instruction Manual
Page 9
... the power line plug to the machine by pulling on the power switch. 5. To disconnect, turn the power switch to the machine. 2. The machine will sew. A lamp will permit control of electric shock. CONNECTING THE MACHINE DANGER: To reduce the risk of start /stop button will light up when switch is...
... the power line plug to the machine by pulling on the power switch. 5. To disconnect, turn the power switch to the machine. 2. The machine will sew. A lamp will permit control of electric shock. CONNECTING THE MACHINE DANGER: To reduce the risk of start /stop button will light up when switch is...

Instruction Manual
Page 10
... If the red light is pressed. PRESSER FOOT LIFTER The presser foot is not lowered. When released, machine will not start even when start of sewing. Pressing this button, machine will rotate slowly at low speed while this button is pressed and stop when this lever. D. Note: When the foot... LAMP Green Light "ON" Ready to the left. START/STOP BUTTON The machine will start running when start /stop button is on, the machine will sew forward. Red Light "ON" Presser foot is not in down . Note: Machine will be deactivated. Note: When the foot controller is lifted. (Except...
... If the red light is pressed. PRESSER FOOT LIFTER The presser foot is not lowered. When released, machine will not start even when start of sewing. Pressing this button, machine will rotate slowly at low speed while this button is pressed and stop when this lever. D. Note: When the foot... LAMP Green Light "ON" Ready to the left. START/STOP BUTTON The machine will start running when start /stop button is on, the machine will sew forward. Red Light "ON" Presser foot is not in down . Note: Machine will be deactivated. Note: When the foot controller is lifted. (Except...
Instruction Manual
Page 11
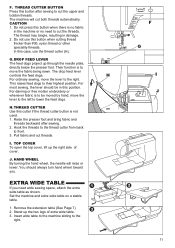
...nylon thread or other speciality threads. The drop feed lever controls the feed dogs. Raise the presser foot and bring fabric and threads backward after sewing to the right. Set the machine and extra wide table on a stable table. 1. Their function is not used. 1. This raises feed ... cover. G.DROP FEED LEVER The feed dogs project up through the needle plate, directly below the presser foot. H.THREAD CUTTER Use this button after sewing. 2. J. EXTRA WIDE TABLE If you . Pull fabric and cut both threads automatically. HAND WHEEL By turning the hand wheel, the needle will ...
...nylon thread or other speciality threads. The drop feed lever controls the feed dogs. Raise the presser foot and bring fabric and threads backward after sewing to the right. Set the machine and extra wide table on a stable table. 1. Their function is not used. 1. This raises feed ... cover. G.DROP FEED LEVER The feed dogs project up through the needle plate, directly below the presser foot. H.THREAD CUTTER Use this button after sewing. 2. J. EXTRA WIDE TABLE If you . Pull fabric and cut both threads automatically. HAND WHEEL By turning the hand wheel, the needle will ...

Instruction Manual
Page 13
...power switch while pressing the EDIT button and the function F1 button. 3. CLEAR BUTTON UTILITY STITCH SEWING If you can return to preset setting by pressing these buttons. TWIN NEEDLE BUTTON If you can sew a back tack stitch at the beginning and at the end of a stitch. (SEE PAGE 19...) DECORATIVE & LETTER STITCH SEWING If this button, you changed the setting (mirror/reverse, elongation, stitch width, length ...
...power switch while pressing the EDIT button and the function F1 button. 3. CLEAR BUTTON UTILITY STITCH SEWING If you can return to preset setting by pressing these buttons. TWIN NEEDLE BUTTON If you can sew a back tack stitch at the beginning and at the end of a stitch. (SEE PAGE 19...) DECORATIVE & LETTER STITCH SEWING If this button, you changed the setting (mirror/reverse, elongation, stitch width, length ...
Instruction Manual
Page 18
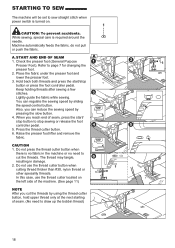
... CAUTION 1. Hold back both threads and press the start / stop button to stop button or press the foot controller pedal. Lightly guide the fabric while sewing. In this case, use the thread cutter button when cutting thread thicker than #30, nylon thread or other speciality threads. A. Do not press the ...there is no need to draw up the bobbin thread) 18 CAUTION: To prevent accidents. START AND END OF SEAM 1. You can reduce the sewing speed by sliding the speed control button. Machine automatically feeds the fabric, do not pull or push the fabric. When you reach end of ...
... CAUTION 1. Hold back both threads and press the start / stop button to stop button or press the foot controller pedal. Lightly guide the fabric while sewing. In this case, use the thread cutter button when cutting thread thicker than #30, nylon thread or other speciality threads. A. Do not press the ...there is no need to draw up the bobbin thread) 18 CAUTION: To prevent accidents. START AND END OF SEAM 1. You can reduce the sewing speed by sliding the speed control button. Machine automatically feeds the fabric, do not pull or push the fabric. When you reach end of ...
Instruction Manual
Page 19
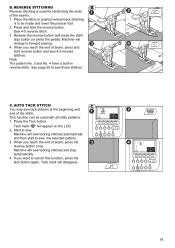
...pedal). This function can be made and lower the presser foot. 2. Press the Tack button. When you reach the end of the seams. 1. Sew 4-5 reverse stitch. 3. When you reach the end of the stitch. Place the fabric in reverse stitch. Release the reverse button and press the ... reverse button once. Start to be used for reinforcing the ends of seam, press and hold the reverse button. REVERSE STITCHING Reverse stitching is to sew. B. Note: The pattern No. 3 and No. 4 have a built-in position where back stitching is used with all utility patterns. 1. C. Tack mark " " ...
...pedal). This function can be made and lower the presser foot. 2. Press the Tack button. When you reach the end of the seams. 1. Sew 4-5 reverse stitch. 3. When you reach the end of the stitch. Place the fabric in reverse stitch. Release the reverse button and press the ... reverse button once. Start to be used for reinforcing the ends of seam, press and hold the reverse button. REVERSE STITCHING Reverse stitching is to sew. B. Note: The pattern No. 3 and No. 4 have a built-in position where back stitching is used with all utility patterns. 1. C. Tack mark " " ...

Instruction Manual
Page 20
.... 2. Raise the presser foot. 3. In such case, set as a pivot and turn fabric. 4. SEWING OVER OVERLAPPED AREAS Guide the fabric with your hand when sewing over overlapped areas. SEWING HEAVY FABRIC When sewing heavy fabrics, the toe end of seam allowance, guide fabric edge aligning this guide line. G.WIDTH OF... lines on the right side of general purpose foot and lower the foot. 3. Stop the machine when you reach a corner. F. Start sewing. E. Push the lock button located on the needle plate indicate the distance from the center needle positon. To keep the width of presser ...
.... 2. Raise the presser foot. 3. In such case, set as a pivot and turn fabric. 4. SEWING OVER OVERLAPPED AREAS Guide the fabric with your hand when sewing over overlapped areas. SEWING HEAVY FABRIC When sewing heavy fabrics, the toe end of seam allowance, guide fabric edge aligning this guide line. G.WIDTH OF... lines on the right side of general purpose foot and lower the foot. 3. Stop the machine when you reach a corner. F. Start sewing. E. Push the lock button located on the needle plate indicate the distance from the center needle positon. To keep the width of presser ...
Instruction Manual
Page 21
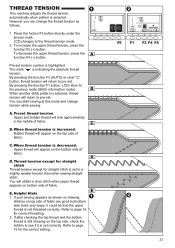
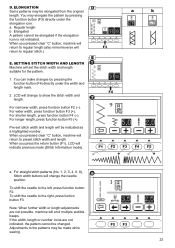
...selected, thread tension will return to page 16 for the correct setting. Refer to pre-set correctly. A. If your sewing appears as follows. 1. However you can start sewing at this mode and change the thread tension as shown on drawing, stitches on the bottom side of fabric. Preset...By pressing the function F3 (AUTO) or clear "C" button, thread tension will return to a slightly weaker tension than when sewing straight stitch. You can change tension while sewing. F5 F1 F3 F4 F5 21 Bobbin thread will obtain a nicer stitch when upper thread appears on bottom side of ...
...selected, thread tension will return to page 16 for the correct setting. Refer to pre-set correctly. A. If your sewing appears as follows. 1. However you can start sewing at this mode and change the thread tension as shown on drawing, stitches on the bottom side of fabric. Preset...By pressing the function F3 (AUTO) or clear "C" button, thread tension will return to a slightly weaker tension than when sewing straight stitch. You can change tension while sewing. F5 F1 F3 F4 F5 21 Bobbin thread will obtain a nicer stitch when upper thread appears on bottom side of ...
Instruction Manual
Page 23
... return to the patterns may be elongated from the original length. Adjustments to regular stitch.) E. a. When you pressed clear "C" button, machine will be made while sewing. 23 Pre-set the stitch width and length suitable for the pattern. 1. To shift the needle to the left, press function button F2. You can...
... return to the patterns may be elongated from the original length. Adjustments to regular stitch.) E. a. When you pressed clear "C" button, machine will be made while sewing. 23 Pre-set the stitch width and length suitable for the pattern. 1. To shift the needle to the left, press function button F2. You can...

Instruction Manual
Page 24
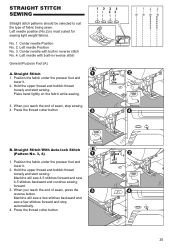
...Straight stitch with auto-reverse stitch left needle position • For top stitching, for basic sewing etc. 03. Straight stretch stitch • Reinforcement straight stitch 07. Stem stitch for basic sewing, zipper sewing etc. 02. Button sewing 14. Ric Rac stitch 18. Double Ric Rac stitch 19. Feather stitch 20. Thorn stitch... with cross bar 112. Bar-tack Buttonhole (Narrow) 105. Overcasting 16. Eyelet 102. Multiple stitch zigzag • For overcasting knit fabrics, elastic sewing, mending. 13. Tapered Keyhole Buttonhole 109. Round Ended Buttonhole with cross bar 108.
...Straight stitch with auto-reverse stitch left needle position • For top stitching, for basic sewing etc. 03. Straight stretch stitch • Reinforcement straight stitch 07. Stem stitch for basic sewing, zipper sewing etc. 02. Button sewing 14. Ric Rac stitch 18. Double Ric Rac stitch 19. Feather stitch 20. Thorn stitch... with cross bar 112. Bar-tack Buttonhole (Narrow) 105. Overcasting 16. Eyelet 102. Multiple stitch zigzag • For overcasting knit fabrics, elastic sewing, mending. 13. Tapered Keyhole Buttonhole 109. Round Ended Buttonhole with cross bar 108.
Instruction Manual
Page 25
...and bobbin thread loosely and start sewing. Machine will sew a few stitches backward and sew a few stitches forward and stop sewing. 4. Machine will sew 4-5 stitches forward and sew 4-5 stitches backward and continue sewing forward. 3. Left needle position (No.2) is most suited for sewing light weight fabrics. Left needle ... reach the end of seam, stop automatically. 4. Position the fabric under the presser foot and lower it . 2. STRAIGHT STITCH SEWING Straight stitch patterns should be selected to suit the type of fabric being sewn. Straight Stitch 1. B. Hold the upper thread and...
...and bobbin thread loosely and start sewing. Machine will sew a few stitches backward and sew a few stitches forward and stop sewing. 4. Machine will sew 4-5 stitches forward and sew 4-5 stitches backward and continue sewing forward. 3. Left needle position (No.2) is most suited for sewing light weight fabrics. Left needle ... reach the end of seam, stop automatically. 4. Position the fabric under the presser foot and lower it . 2. STRAIGHT STITCH SEWING Straight stitch patterns should be selected to suit the type of fabric being sewn. Straight Stitch 1. B. Hold the upper thread and...
Instruction Manual
Page 26
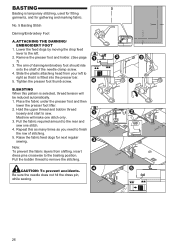
...To prevent accidents. BASTING Basting is temporary stitching, used for fitting garments, and for next regular sewing. Lower the feed dogs by moving the drop feed lever to the left to the rear and sew one stitch only. 3. Tighten the presser foot thumb screw. Raise the fabric feed dogs for gathering... onto the shaft of stitching. 5. Hold the upper thread and bobbin thread loosely and start to remove the stitching. Pull the bobbin thread to sew. Place the fabric under the presser foot and then lower the presser foot lifter. 2. Pull the fabric required amount to right so that it...
...To prevent accidents. BASTING Basting is temporary stitching, used for fitting garments, and for next regular sewing. Lower the feed dogs by moving the drop feed lever to the left to the rear and sew one stitch only. 3. Tighten the presser foot thumb screw. Raise the fabric feed dogs for gathering... onto the shaft of stitching. 5. Hold the upper thread and bobbin thread loosely and start to remove the stitching. Pull the bobbin thread to sew. Place the fabric under the presser foot and then lower the presser foot lifter. 2. Pull the fabric required amount to right so that it...

Instruction Manual
Page 27
...matches the fabric on the bobbin. Place thread that you use a needle for knit fabrics as well as joining durable fabrics such as you sew, bobbin thread will give the appearance of a traditional hand quilting stitch. 27 Bag b. Pocket QUILTING A quilt always consists of three layers... the fabric on top. Do not change the needle position. Quilting Sew three layers of fabric using Pattern No. 1 with the fabric without breaking. A. Set the upper tension to sew successive rows. ELASTIC STITCH SEWING Elastic stitches are strong and flexible and will pull to prevent skipping...
...matches the fabric on the bobbin. Place thread that you use a needle for knit fabrics as well as joining durable fabrics such as you sew, bobbin thread will give the appearance of a traditional hand quilting stitch. 27 Bag b. Pocket QUILTING A quilt always consists of three layers... the fabric on top. Do not change the needle position. Quilting Sew three layers of fabric using Pattern No. 1 with the fabric without breaking. A. Set the upper tension to sew successive rows. ELASTIC STITCH SEWING Elastic stitches are strong and flexible and will pull to prevent skipping...
Instruction Manual
Page 28
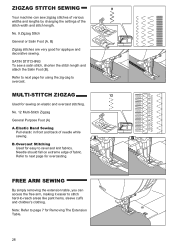
Refer to next page for using the zig-zag to next page for sewing on extreme edge of needle while sewing. B. Refer to overcast. FREE ARM SEWING By simply removing the extension table, you can sew zigzag stitches of various widths and lengths by changing the settings of the stitch...A. Needle should fall on elastic and overcast stitching. SATIN STITCHING To sew a satin stitch, shorten the stitch length and attach the Satin Foot (B). Elastic Band Sewing Pull elastic in front and back of fabric. ZIGZAG STITCH SEWING Your machine can access the free arm, making it easier to stitch...
Refer to next page for using the zig-zag to next page for sewing on extreme edge of needle while sewing. B. Refer to overcast. FREE ARM SEWING By simply removing the extension table, you can sew zigzag stitches of various widths and lengths by changing the settings of the stitch...A. Needle should fall on elastic and overcast stitching. SATIN STITCHING To sew a satin stitch, shorten the stitch length and attach the Satin Foot (B). Elastic Band Sewing Pull elastic in front and back of fabric. ZIGZAG STITCH SEWING Your machine can access the free arm, making it easier to stitch...

Instruction Manual
Page 29
... Purpose Foot. b-d. CAUTION: To prevent accidents. Do not change the stitch mode or elongation. B. For narrower zigzag width (Width=2.0-4.5). Use No. 12 when sewing easy to ravel and stretch fabrics. It is used for preventing raveling of fabric. USING THE GENERAL PURPOSE FOOT No. 9, 12 General Purpose Foot (A) Place... fabric so that the needle could hit the presser foot and break when sewing other patterns and widths. C. No. 15, 16, 30 can also cut thread when cutting excess fabric. 29 f. NOTE: You can...
... Purpose Foot. b-d. CAUTION: To prevent accidents. Do not change the stitch mode or elongation. B. For narrower zigzag width (Width=2.0-4.5). Use No. 12 when sewing easy to ravel and stretch fabrics. It is used for preventing raveling of fabric. USING THE GENERAL PURPOSE FOOT No. 9, 12 General Purpose Foot (A) Place... fabric so that the needle could hit the presser foot and break when sewing other patterns and widths. C. No. 15, 16, 30 can also cut thread when cutting excess fabric. 29 f. NOTE: You can...


