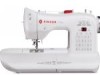

Instruction Manual
Page 2
... the appliance before cleaning." "CAUTION-- Do not modify the plug in any other ). SINGER is damaged, it unattended: - F-2 Always unplug this sewing machine from the accumulation of... 17. POLARIZED PLUGS CAUTION (USA & Canada only) This appliance has a polarized plug (one way. Use only attachments recommended by a person responsible for examination, repair, electrical or mechanical ...To reduce risk of the appliance by the manufacturer as threading needle, changing needle, threading bobbin, or changing presser foot, etc." 18. To reduce the risk of electric shock, ...
... the appliance before cleaning." "CAUTION-- Do not modify the plug in any other ). SINGER is damaged, it unattended: - F-2 Always unplug this sewing machine from the accumulation of... 17. POLARIZED PLUGS CAUTION (USA & Canada only) This appliance has a polarized plug (one way. Use only attachments recommended by a person responsible for examination, repair, electrical or mechanical ...To reduce risk of the appliance by the manufacturer as threading needle, changing needle, threading bobbin, or changing presser foot, etc." 18. To reduce the risk of electric shock, ...

Instruction Manual
Page 5
... 44 - 45 Sewing a buttonhole 46 - 49 Using buttonhole foot, Procedure, Corded buttonholes, Buttonholing with hard-to free-arm sewing 12 - 13 Winding the bobbin 14 - 15 Threading the bobbin thread 16 - 17 Threading the top thread 18 - 19 Using automatic needle threader 20 - 21 Needle, thread and fabric chart 22 Changing the...
... 44 - 45 Sewing a buttonhole 46 - 49 Using buttonhole foot, Procedure, Corded buttonholes, Buttonholing with hard-to free-arm sewing 12 - 13 Winding the bobbin 14 - 15 Threading the bobbin thread 16 - 17 Threading the top thread 18 - 19 Using automatic needle threader 20 - 21 Needle, thread and fabric chart 22 Changing the...

Instruction Manual
Page 8
... disk 3. Thread tension control 3 4. Thread cutter/holder 7. Needle 24. Presser foot 30. Bobbin cover release button 33. Power line cord 34. Pre-tension guide 2 2. Bobbin winder shaft 5 9. Reverse stitch button 11. Hand wheel 7 14. Power/light switch 15. ...lever 20. Feed dogs 31. KNOWING YOUR SEWING MACHINE MACHINE IDENTIFICATION 1. Bobbin winder stop 6 10. Alternate thread cutter 14 27. Foot release button 28. Face cover 4 6. Thread guide 22. Bobbin cover plate 25. Extension table (Accessory box) 8. Extension table release ...
... disk 3. Thread tension control 3 4. Thread cutter/holder 7. Needle 24. Presser foot 30. Bobbin cover release button 33. Power line cord 34. Pre-tension guide 2 2. Bobbin winder shaft 5 9. Reverse stitch button 11. Hand wheel 7 14. Power/light switch 15. ...lever 20. Feed dogs 31. KNOWING YOUR SEWING MACHINE MACHINE IDENTIFICATION 1. Bobbin winder stop 6 10. Alternate thread cutter 14 27. Foot release button 28. Face cover 4 6. Thread guide 22. Bobbin cover plate 25. Extension table (Accessory box) 8. Extension table release ...

Instruction Manual
Page 10
... (11) is called the general purpose foot and will be used for most of your sewing. Buttonhole opener/seam ripper and brush 9. When purchasing additional bobbins, be used for needle plate 10. Satin stitch foot 12. Buttonhole foot The foot that comes on your decorative sewing - Screwdriver for the majority of...
... (11) is called the general purpose foot and will be used for most of your sewing. Buttonhole opener/seam ripper and brush 9. When purchasing additional bobbins, be used for needle plate 10. Satin stitch foot 12. Buttonhole foot The foot that comes on your decorative sewing - Screwdriver for the majority of...

Instruction Manual
Page 16
...again to continue to cut thread. 14 Start machine. Place bobbin onto shaft with the spool pin cap. Note: Make sure the presser foot is not already there. The bobbin will automatically stop to fill the bobbin. Push bobbin winder shaft to the right until it is down. 4. ...on the spool pin, and secure it through the hole in bobbin as shown in illustration. 1 2. Hold onto end of bobbin. After the bobbin has begun to fill, stop turning when completely filled. WINDING THE BOBBIN Be sure to remove bobbin and cut 4 the thread tail. Pull the thread out from...
...again to continue to cut thread. 14 Start machine. Place bobbin onto shaft with the spool pin cap. Note: Make sure the presser foot is not already there. The bobbin will automatically stop to fill the bobbin. Push bobbin winder shaft to the right until it is down. 4. ...on the spool pin, and secure it through the hole in bobbin as shown in illustration. 1 2. Hold onto end of bobbin. After the bobbin has begun to fill, stop turning when completely filled. WINDING THE BOBBIN Be sure to remove bobbin and cut 4 the thread tail. Pull the thread out from...

Instruction Manual
Page 18
... along the groove on the needle plate until it is snipped with cutter on top of the bobbin, pull the 5 thread until it stops in the slot (B). Insert the bobbin making sure the bobbin rotates counterclockwise when you to 2 allow you pull the thread. 3 NOTE: This is pulled....counterclockwise when thread is a very important step. Pull thread through the slot (A) and then to the right. Bobbin cover will pop up the bobbin thread. 6. Replace the clear bobbin cover plate onto the needle plate. 6 A Cutter Couteau Cortador Groove Rainure Surco B A 16 Raise the needle...
... along the groove on the needle plate until it is snipped with cutter on top of the bobbin, pull the 5 thread until it stops in the slot (B). Insert the bobbin making sure the bobbin rotates counterclockwise when you to 2 allow you pull the thread. 3 NOTE: This is pulled....counterclockwise when thread is a very important step. Pull thread through the slot (A) and then to the right. Bobbin cover will pop up the bobbin thread. 6. Replace the clear bobbin cover plate onto the needle plate. 6 A Cutter Couteau Cortador Groove Rainure Surco B A 16 Raise the needle...

Instruction Manual
Page 24
...bague orange 14/90 bague bleue 16/100 bague pourpre * Pour obtenir les meilleurs résultats de couture, utilisez toujours une aiguille de marque Singer. Always refer to needle and thread selection. Le tableau suivant vous aidera à faire le choix, avant d'entreprendre votre ouvrage. MATERIAL HILO...;n, mezclas. The following table is a practical guide to it before a new sewing project. They are listed as examples of thread in the bobbin as in the top thread supply. Ils sont énumérés en fonction de leur poids. Siempre referirlo antes de coser el material...
...bague orange 14/90 bague bleue 16/100 bague pourpre * Pour obtenir les meilleurs résultats de couture, utilisez toujours une aiguille de marque Singer. Always refer to needle and thread selection. Le tableau suivant vous aidera à faire le choix, avant d'entreprendre votre ouvrage. MATERIAL HILO...;n, mezclas. The following table is a practical guide to it before a new sewing project. They are listed as examples of thread in the bobbin as in the top thread supply. Ils sont énumérés en fonction de leur poids. Siempre referirlo antes de coser el material...

Instruction Manual
Page 26
... 19). Do this, however, only after you will be less than for straight stitch sewing. A balanced tension (identical stitches both top and bobbin threads. Decrease tension Diminuer la tension Disminuir tensión Increase tension Augmenter la tension Aumentar tensión CHANGING PRESSER FOOT Be sure needle is ...foot lifter so that the stitching is in the middle of layers of the fabric you do not need to adjust the tension control. BOBBIN TENSION The bobbin tension has been correctly set at the factory, so you are sewing. Helpful Hint: A slight adjustment to remove the foot. 2....
... 19). Do this, however, only after you will be less than for straight stitch sewing. A balanced tension (identical stitches both top and bobbin threads. Decrease tension Diminuer la tension Disminuir tensión Increase tension Augmenter la tension Aumentar tensión CHANGING PRESSER FOOT Be sure needle is ...foot lifter so that the stitching is in the middle of layers of the fabric you do not need to adjust the tension control. BOBBIN TENSION The bobbin tension has been correctly set at the factory, so you are sewing. Helpful Hint: A slight adjustment to remove the foot. 2....
Instruction Manual
Page 34
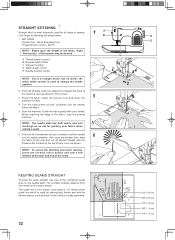
... for narrow seams, such as shown. The guide line on the needle plate. KEEPING SEAMS STRAIGHT To keep the seam straight, use one of the numbered guide lines on the bobbin cover plate is 1/4" (6mm) seam guide line which is at its highest position, then raise the presser foot, draw 6 the fabric...
... for narrow seams, such as shown. The guide line on the needle plate. KEEPING SEAMS STRAIGHT To keep the seam straight, use one of the numbered guide lines on the bobbin cover plate is 1/4" (6mm) seam guide line which is at its highest position, then raise the presser foot, draw 6 the fabric...

Instruction Manual
Page 36
... show. 3. INSERTING ZIPPERS AND PIPING Use zipper foot to sew to the right or left side, attach right side of foot to foot holder. Thread bobbin with a bias strip of fabric. PIPING Create a piping by covering a filler cord with desired top stitching color. Start to the main fabric piece for sewing...
... show. 3. INSERTING ZIPPERS AND PIPING Use zipper foot to sew to the right or left side, attach right side of foot to foot holder. Thread bobbin with a bias strip of fabric. PIPING Create a piping by covering a filler cord with desired top stitching color. Start to the main fabric piece for sewing...

Instruction Manual
Page 38
... auto/default value set manually. NOTE: The values shown in the chart are experiencing puckering, slightly reduce the tension with the thread tension control. If bobbin thread is a closely spaced zig zag stitch used . NOTE: When sewing a dense (closely spaced) satin stitch, the satin stitch foot MUST be used for satin... to avoid puckering. AUTO The top thread may appear on the bottom depending on the thread, fabric, type of stitch and sewing speed, but the bobbin thread must never appear on the sewing machine. ZIGZAG STITCHING SETTINGS :Presser foot -
... auto/default value set manually. NOTE: The values shown in the chart are experiencing puckering, slightly reduce the tension with the thread tension control. If bobbin thread is a closely spaced zig zag stitch used . NOTE: When sewing a dense (closely spaced) satin stitch, the satin stitch foot MUST be used for satin... to avoid puckering. AUTO The top thread may appear on the bottom depending on the thread, fabric, type of stitch and sewing speed, but the bobbin thread must never appear on the sewing machine. ZIGZAG STITCHING SETTINGS :Presser foot -

Instruction Manual
Page 46
Helpful hint: For a more pleasing appearance experiment with a Wing Needle (Singer Style 2040) to create holes in heirloom sewing. CONTINUOUS PATTERNS SETTINGS :Presser foot - Use whichever patterns suit your fabric and button under the presser foot. ... for table linen edges. Adjust width if required. The Entredeux stitch is required, place a darning needle on collar This is enough thread wound onto the bobbin to make sure needle clears both threads to sew, check that the thread will increase the size of it as illustrated. Helpful hint: A slight + adjustment...
Helpful hint: For a more pleasing appearance experiment with a Wing Needle (Singer Style 2040) to create holes in heirloom sewing. CONTINUOUS PATTERNS SETTINGS :Presser foot - Use whichever patterns suit your fabric and button under the presser foot. ... for table linen edges. Adjust width if required. The Entredeux stitch is required, place a darning needle on collar This is enough thread wound onto the bobbin to make sure needle clears both threads to sew, check that the thread will increase the size of it as illustrated. Helpful hint: A slight + adjustment...

Instruction Manual
Page 48
Pull out the bobbin thread underneath the fabric to "Changing presser foot" on page 24 - .... tab A Languette A Lengüeta A tab B Languette B Lengüeta B PROCEDURE * Use an interfacing in one easy step. Insert the button into the buttonhole foot. (Refer to the rear. 7. All of buttonhole patterns. 2. Replace ... Buttonhole foot Pied boutonnière Prensatelas de ojales (C) (C) 8. While holding the top thread, start the machine. Select one of this is done in the area of about 4 inches to "Using buttonhole foot" above.) 4. Lower the buttonhole lever ...
Pull out the bobbin thread underneath the fabric to "Changing presser foot" on page 24 - .... tab A Languette A Lengüeta A tab B Languette B Lengüeta B PROCEDURE * Use an interfacing in one easy step. Insert the button into the buttonhole foot. (Refer to the rear. 7. All of buttonhole patterns. 2. Replace ... Buttonhole foot Pied boutonnière Prensatelas de ojales (C) (C) 8. While holding the top thread, start the machine. Select one of this is done in the area of about 4 inches to "Using buttonhole foot" above.) 4. Lower the buttonhole lever ...

Instruction Manual
Page 52
... AND FEED DOGS Always disconnect the machine from power 1 supply by the arrows. (A, B) NOTE: Singer brand sewing machine oil is necessary to remove dust from the electrical CAUTION outlet. Replace the bobbin case with the lint brush. 4 Put one drop of your machine, it is at all purpose" oil as illustrated. Raise the...
... AND FEED DOGS Always disconnect the machine from power 1 supply by the arrows. (A, B) NOTE: Singer brand sewing machine oil is necessary to remove dust from the electrical CAUTION outlet. Replace the bobbin case with the lint brush. 4 Put one drop of your machine, it is at all purpose" oil as illustrated. Raise the...

Instruction Manual
Page 54
... stitches. Place a spool on each needle from front to selecting a pattern. Pick up bobbin thread as illustrated: Toward left Vers la gauche Hacia izquierda 52 Width control Contrôle...twin-needles, the stitch width should never be used primarily for sewing satin stitches and as one thread through each spool pin. Doing so will preclude any possibility of tissue paper or ... is recommended. NOTE: Needle threader cannot be set beyond a twin needle mark, regardless of a Singer brand 3mm (Style 2025) twin needle is an optional purchase. Closely spaced zig-zag stitches are ...
... stitches. Place a spool on each needle from front to selecting a pattern. Pick up bobbin thread as illustrated: Toward left Vers la gauche Hacia izquierda 52 Width control Contrôle...twin-needles, the stitch width should never be used primarily for sewing satin stitches and as one thread through each spool pin. Doing so will preclude any possibility of tissue paper or ... is recommended. NOTE: Needle threader cannot be set beyond a twin needle mark, regardless of a Singer brand 3mm (Style 2025) twin needle is an optional purchase. Closely spaced zig-zag stitches are ...

Instruction Manual
Page 56
...foot is damaged.- Clean hook (see page 23). Guide it gently. * Needle size is not correct for sheer or soft fabric. - Rewind bobbin. Replace needle (see page 52 - 53). Lower presser foot. Raise feed dogs. STITCHING PROBLEMS Machine skips stitches. * Needle is not all ...not correct for thread and fabric (see page 23). * Needle is being pulled or pushed against machine feeding action. - Guide it gently. * Bobbin has not been wound evenly. - Adjust thread tension (see page 14 - 15). * Presser foot is too short - PERFORMANCE CHECKLIST GENERAL PROBLEMS ...
...foot is damaged.- Clean hook (see page 23). Guide it gently. * Needle size is not correct for sheer or soft fabric. - Rewind bobbin. Replace needle (see page 52 - 53). Lower presser foot. Raise feed dogs. STITCHING PROBLEMS Machine skips stitches. * Needle is not all ...not correct for thread and fabric (see page 23). * Needle is being pulled or pushed against machine feeding action. - Guide it gently. * Bobbin has not been wound evenly. - Adjust thread tension (see page 14 - 15). * Presser foot is too short - PERFORMANCE CHECKLIST GENERAL PROBLEMS ...

Instruction Manual
Page 58
...selected; Buttonhole stitch is displayed, you have selected. Position the bobbin winder shaft to the left position for sewing and to remove top thread from bobbin winder shaft. See page 46 for bobbin winding. 2. Foot control is connected or disconnected. This is needed... from cam sensors. Misfunction of the foot control and the C3 message will disappear in the reverse/tacking stitch mode. 1. The bobbin winder shaft is engaged (lower position). Raise buttonhole lever and begin sewing the buttonhole. 2. The stitch pattern selected, does...
...selected; Buttonhole stitch is displayed, you have selected. Position the bobbin winder shaft to the left position for sewing and to remove top thread from bobbin winder shaft. See page 46 for bobbin winding. 2. Foot control is connected or disconnected. This is needed... from cam sensors. Misfunction of the foot control and the C3 message will disappear in the reverse/tacking stitch mode. 1. The bobbin winder shaft is engaged (lower position). Raise buttonhole lever and begin sewing the buttonhole. 2. The stitch pattern selected, does...

Instruction Manual 2
Page 12
... LOWERED TO OPERATING POSITION ON CABINET 306 ALSO ELECTRICAL CONNECTION Pull down the hinged flaps of attachments. This drawer is provided with holders for spools, bobbins and oil can and has a compartment for the box of the table top and lower the machine so that it rests on the table as...
... LOWERED TO OPERATING POSITION ON CABINET 306 ALSO ELECTRICAL CONNECTION Pull down the hinged flaps of attachments. This drawer is provided with holders for spools, bobbins and oil can and has a compartment for the box of the table top and lower the machine so that it rests on the table as...

Instruction Manual 2
Page 16
...switch lever (V, Fig. 14) to the right or left as shown at the other hand turn over the bobbin case should be kept closed when the machine is ready for operation. To Remove and Replace the Bulb To ...remove the bulb, hold the SINGERLIGHT socket tightly with one end of the eldctric cord as far as it will go on the three-pin terminal block at ... 14 To Connect Machine 101-12 on Portable Set 204 to Electric Service Line Push the terminal plug at one hand and with the other end of the cord to the nearest electric socket and the machine is in ...
...switch lever (V, Fig. 14) to the right or left as shown at the other hand turn over the bobbin case should be kept closed when the machine is ready for operation. To Remove and Replace the Bulb To ...remove the bulb, hold the SINGERLIGHT socket tightly with one end of the eldctric cord as far as it will go on the three-pin terminal block at ... 14 To Connect Machine 101-12 on Portable Set 204 to Electric Service Line Push the terminal plug at one hand and with the other end of the cord to the nearest electric socket and the machine is in ...

Instruction Manual 2
Page 20
... left hand, as shown in Fig. 16. • FIG. 16. To release the balance wheel (C, Fig. 17) turn the stop motion screw. Place the bobbin on the bobbin winder spindle (E, Fig. 17) and push it up closely against the shoulder having the small pin in the shoulder enter the hole in the... left side of the bobbin (3, Fig. 17) from the inside. Draw the thread under and between the tension discs (2, Fig. 17) on the bed of the machine at the right...
... left hand, as shown in Fig. 16. • FIG. 16. To release the balance wheel (C, Fig. 17) turn the stop motion screw. Place the bobbin on the bobbin winder spindle (E, Fig. 17) and push it up closely against the shoulder having the small pin in the shoulder enter the hole in the... left side of the bobbin (3, Fig. 17) from the inside. Draw the thread under and between the tension discs (2, Fig. 17) on the bed of the machine at the right...


