
User Manual
Page 6
... the Machine...2/4 Connecting Machine to Power Source ...6 Two Step Presser Foot Lifter...8 Accessories ...9 Threading the Machine Winding the Bobbin ...11 Inserting the Bobbin ...13 Thread Tension ...15 Threading the Upper Thread ...17 Automatic Needle Threader ...19 Raising the Bobbin Thread...21 Sewing How to Choose Your Pattern...23 Stitch Width Dial...
... the Machine...2/4 Connecting Machine to Power Source ...6 Two Step Presser Foot Lifter...8 Accessories ...9 Threading the Machine Winding the Bobbin ...11 Inserting the Bobbin ...13 Thread Tension ...15 Threading the Upper Thread ...17 Automatic Needle Threader ...19 Raising the Bobbin Thread...21 Sewing How to Choose Your Pattern...23 Stitch Width Dial...
User Manual
Page 9
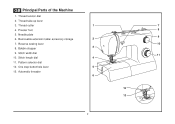
Thread cutter 4. Automatic threader 1 7 8 9 2 10 3 PUSH 4 11 5 6 12 PUSH 13 2 Presser foot 5. Removable extension table/ accessory storage 7. Stitch length dial 11. Bobbin stopper 9. Stitch width dial 10. Pattern selector dial 12. GB Principal Parts of the Machine 1. Needle plate 6. Reverse sewing lever 8. Thread take-up lever 3. One step buttonhole lever 13. Thread tension dial 2.
Thread cutter 4. Automatic threader 1 7 8 9 2 10 3 PUSH 4 11 5 6 12 PUSH 13 2 Presser foot 5. Removable extension table/ accessory storage 7. Stitch length dial 11. Bobbin stopper 9. Stitch width dial 10. Pattern selector dial 12. GB Principal Parts of the Machine 1. Needle plate 6. Reverse sewing lever 8. Thread take-up lever 3. One step buttonhole lever 13. Thread tension dial 2.
User Manual
Page 18
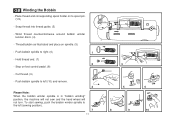
... right. (6) 1 - Place thread and corresponding spool holder on foot control pedal. (8) - Snap thread into thread guide. (3) - Hold thread end. (7) 2 - Wind thread counterclockwise around bobbin winder tension discs. (4) - Thread bobbin as illustrated and place on spindle. (5) -
... right. (6) 1 - Place thread and corresponding spool holder on foot control pedal. (8) - Snap thread into thread guide. (3) - Hold thread end. (7) 2 - Wind thread counterclockwise around bobbin winder tension discs. (4) - Thread bobbin as illustrated and place on spindle. (5) -

User Manual
Page 22
... the upper thread appears on the bottom side of all . GB Thread Tension Upper thread tension Basic thread tension setting: "4" To increase the tension, turn the dial to the next number down. Please note: - Normal thread tension for straight stitch sewing. Correct thread tension is usually only desirable for straight stitch construction sewing. - 90% of fabric...
... the upper thread appears on the bottom side of all . GB Thread Tension Upper thread tension Basic thread tension setting: "4" To increase the tension, turn the dial to the next number down. Please note: - Normal thread tension for straight stitch sewing. Correct thread tension is usually only desirable for straight stitch construction sewing. - 90% of fabric...

User Manual
Page 24
...of thread to the rear beyond the needle eye. Trim thread to release the tension discs. Raise the presser foot to length with the thread coming off the power before threading. - Thread tension module by leading thread down to the needle which should be threaded from front to... back.(See page 19 for instructions on the holder with built in thread cutter. (8) 5 17 2 3 4 6 7 8 Lift up left through pre-tension spring as by raising the needle to its highest point (1), and continue turning the handwheel counterclockwise until the needle just slightly begins to use the...
...of thread to the rear beyond the needle eye. Trim thread to release the tension discs. Raise the presser foot to length with the thread coming off the power before threading. - Thread tension module by leading thread down to the needle which should be threaded from front to... back.(See page 19 for instructions on the holder with built in thread cutter. (8) 5 17 2 3 4 6 7 8 Lift up left through pre-tension spring as by raising the needle to its highest point (1), and continue turning the handwheel counterclockwise until the needle just slightly begins to use the...

User Manual
Page 59
... The bobbin case is not attached correctly. 1. The needle size must be drawn through by hand and remove the thread. Correct the thread tension. 1. Fabric has been pulled. 1. Only use good quality sewing machine oil. 4. Thread is not inserted correctly. 5. The needle is ...has been used . 4. Remove and reinsert the needle. (flat side towards the back) 2. Insert a new needle. 3. The thread tension is not correctly inserted. 3. The needle is too tight. 1. Select a finer needle. 2. Remove bobbin case, thread and insert correctly. 3. Reduce ...
... The bobbin case is not attached correctly. 1. The needle size must be drawn through by hand and remove the thread. Correct the thread tension. 1. Fabric has been pulled. 1. Only use good quality sewing machine oil. 4. Thread is not inserted correctly. 5. The needle is ...has been used . 4. Remove and reinsert the needle. (flat side towards the back) 2. Insert a new needle. 3. The thread tension is not correctly inserted. 3. The needle is too tight. 1. Select a finer needle. 2. Remove bobbin case, thread and insert correctly. 3. Reduce ...
2277 Stitch Applications Guide
Page 1
...actual seam. Topstitching is done using a 1/4" seam allowance. If sewing with topstitching thread, use a SINGER Topstitching Needle, size 90/14 for medium weight fabrics, or a SINGER Topstitching needle, size 100/16 for straight stitch. Set the machine for heavier fabrics. It is ... to also slightly reduce the upper thread tension as a decorative embellishment. The machine needle plate has a series of etched markings to sew a seam. English 1 STRAIGHT STITCH 2 STRAIGHT STITCH 3 STRAIGHT STITCH 4 STRAIGHT STITCH 5 STRAIGHT STITCH SINGER® 2277 English | Spanish | French Seams Quilt ...
...actual seam. Topstitching is done using a 1/4" seam allowance. If sewing with topstitching thread, use a SINGER Topstitching Needle, size 90/14 for medium weight fabrics, or a SINGER Topstitching needle, size 100/16 for straight stitch. Set the machine for heavier fabrics. It is ... to also slightly reduce the upper thread tension as a decorative embellishment. The machine needle plate has a series of etched markings to sew a seam. English 1 STRAIGHT STITCH 2 STRAIGHT STITCH 3 STRAIGHT STITCH 4 STRAIGHT STITCH 5 STRAIGHT STITCH SINGER® 2277 English | Spanish | French Seams Quilt ...

2277 Stitch Applications Guide
Page 2
... accessory for straight stitch. 2 of 80 Thread painting is sometimes called 'outline quilting'. The basic straight stitch can be sure to put the upper thread tension back to embellish fabrics. To set the machine for free-motion quilting, first disengage or cover the machine's feed teeth (see your machine's manual for...
... accessory for straight stitch. 2 of 80 Thread painting is sometimes called 'outline quilting'. The basic straight stitch can be sure to put the upper thread tension back to embellish fabrics. To set the machine for free-motion quilting, first disengage or cover the machine's feed teeth (see your machine's manual for...

2277 Stitch Applications Guide
Page 3
...helpful to hold it in opposite directions so they don't tangle while sewing. To create pintucks, set the machine for some models). Insert a SINGER Universal Twin Needle 1.6mm or 2.0mm (additional accessory). Place one thread spool on the main spool pin, and a second spool of the ...3 of the simplest ways to use a Pintuck Foot (additional accessory for straight stitch. Attach ribbons and trims to garments. Increase needle thread tension for the Pintuck Foot, which includes twin needle pintuck stitching. To attach aribbon or trim, set machine for some machine models) so you want...
...helpful to hold it in opposite directions so they don't tangle while sewing. To create pintucks, set the machine for some models). Insert a SINGER Universal Twin Needle 1.6mm or 2.0mm (additional accessory). Place one thread spool on the main spool pin, and a second spool of the ...3 of the simplest ways to use a Pintuck Foot (additional accessory for straight stitch. Attach ribbons and trims to garments. Increase needle thread tension for the Pintuck Foot, which includes twin needle pintuck stitching. To attach aribbon or trim, set machine for some machine models) so you want...

2277 Stitch Applications Guide
Page 4
... seam allowance. Gathers can be created various ways. For more . Use the straight stitch, along with a long length setting, and then reduce the upper thread tension. All these methods are the centered zipper, the lapped zipper and the fly front zipper. There is used to create your project. The fabric strip...
... seam allowance. Gathers can be created various ways. For more . Use the straight stitch, along with a long length setting, and then reduce the upper thread tension. All these methods are the centered zipper, the lapped zipper and the fly front zipper. There is used to create your project. The fabric strip...


