User Manual
Page 2
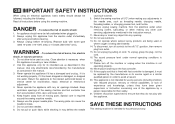
...parts. Do not use only. Never drop or insert any opening. 12. Never operate this appliance is not intended for use as threading needle, changing needle, threading bobbin, or changing presser foot, and the like. 10. Keep ventilation openings of the appliance by a person responsible for its intended... use by the manufacturer or its service agent or a similar qualified person in the needle area, such as described in the instruction manual. 11. To disconnect, turn off the machine or unplug when the machine is being ...
...parts. Do not use only. Never drop or insert any opening. 12. Never operate this appliance is not intended for use as threading needle, changing needle, threading bobbin, or changing presser foot, and the like. 10. Keep ventilation openings of the appliance by a person responsible for its intended... use by the manufacturer or its service agent or a similar qualified person in the needle area, such as described in the instruction manual. 11. To disconnect, turn off the machine or unplug when the machine is being ...

User Manual
Page 6
... Foot Lifter...8 Accessories ...9 Threading the Machine Winding the Bobbin ...11 Inserting the Bobbin ...13 Thread Tension ...15 Threading the Upper Thread ...17 Automatic Needle Threader ...19 Raising the Bobbin Thread...21 Sewing How to Choose Your Pattern...23 Stitch Width Dial & Stitch Length Dial ...25 Sewing Straight Stitch ......33 Sew 1-Step Buttonhole...35 Sewing on Buttons ...37 General Information Installing the Removable Extension Table ...39 Attaching the Presser Foot Shank...41 Needle/Fabric/Thread Chart...43 Darning Plate...46 Maintenance and Troubleshooting Inserting & Changing...
... Foot Lifter...8 Accessories ...9 Threading the Machine Winding the Bobbin ...11 Inserting the Bobbin ...13 Thread Tension ...15 Threading the Upper Thread ...17 Automatic Needle Threader ...19 Raising the Bobbin Thread...21 Sewing How to Choose Your Pattern...23 Stitch Width Dial & Stitch Length Dial ...25 Sewing Straight Stitch ......33 Sew 1-Step Buttonhole...35 Sewing on Buttons ...37 General Information Installing the Removable Extension Table ...39 Attaching the Presser Foot Shank...41 Needle/Fabric/Thread Chart...43 Darning Plate...46 Maintenance and Troubleshooting Inserting & Changing...
User Manual
Page 9
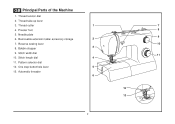
Thread take-up lever 3. Needle plate 6. Removable extension table/ accessory storage 7. Bobbin stopper 9. One step buttonhole lever 13. Stitch width dial 10. Automatic threader 1 7 8 9 2 10 3 PUSH 4 11 5 6 12 PUSH 13 2 GB Principal Parts of the Machine 1. Thread tension dial 2. Thread cutter 4. Stitch length dial 11. Presser foot 5. Reverse sewing lever 8. Pattern selector dial 12.
Thread take-up lever 3. Needle plate 6. Removable extension table/ accessory storage 7. Bobbin stopper 9. One step buttonhole lever 13. Stitch width dial 10. Automatic threader 1 7 8 9 2 10 3 PUSH 4 11 5 6 12 PUSH 13 2 GB Principal Parts of the Machine 1. Thread tension dial 2. Thread cutter 4. Stitch length dial 11. Presser foot 5. Reverse sewing lever 8. Pattern selector dial 12.
User Manual
Page 16
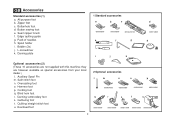
... are not supplied with this machine; Quilting/ straight stitch foot u. Auxiliary Spool Pin m. Seam ripper/ brush f. Edge/ quilting guide g. Overcasting foot o. Buttonhole foot d. Pack of needles h.
... are not supplied with this machine; Quilting/ straight stitch foot u. Auxiliary Spool Pin m. Seam ripper/ brush f. Edge/ quilting guide g. Overcasting foot o. Buttonhole foot d. Pack of needles h.

User Manual
Page 20
... thread runs in a clockwise direction (arrow). (3) 1 - Hold the bobbin case by the hinged latch. (5) - GB Inserting the Bobbin When inserting or removing the bobbin, the needle must be fully raised. - Hold the bobbin case with one hand. Insert it into the shuttle. (6) Attention: 3 Turn power switch to off ("O") before inserting or...
... thread runs in a clockwise direction (arrow). (3) 1 - Hold the bobbin case by the hinged latch. (5) - GB Inserting the Bobbin When inserting or removing the bobbin, the needle must be fully raised. - Hold the bobbin case with one hand. Insert it into the shuttle. (6) Attention: 3 Turn power switch to off ("O") before inserting or...

User Manual
Page 24
...several sewing problems could result. - Draw thread from right to left through pre-tension spring as by raising the needle to its highest point (1), and continue turning the handwheel counterclockwise until the needle just slightly begins to descend. At the top of the take-up lever and then downwards again. (6) 1 -... guide (7) and then down right channel and up the spool pin. Raise the presser foot to the rear beyond the needle eye. Pull about 6-8 inches of spool holder next to spool. (2) - Lift up left channel. (5) During this movement pass thread from spool through the...
...several sewing problems could result. - Draw thread from right to left through pre-tension spring as by raising the needle to its highest point (1), and continue turning the handwheel counterclockwise until the needle just slightly begins to descend. At the top of the take-up lever and then downwards again. (6) 1 -... guide (7) and then down right channel and up the spool pin. Raise the presser foot to the rear beyond the needle eye. Pull about 6-8 inches of spool holder next to spool. (2) - Lift up left channel. (5) During this movement pass thread from spool through the...

User Manual
Page 26
The threader automatically swings to off ("O")! 2 19 A C A B C B D D A Pass the thread in front of the needle around thread guide (C). - Release lever (A). - Pass thread around the hook (D) from bottom to its highest position. - Press lever (A) down as far as it will go. - Pull the thread through the needle eye. 1 Attention: Turn power switch to the threading position (B). - GB Automatic Needle Threader - Raise the needle to top. -
The threader automatically swings to off ("O")! 2 19 A C A B C B D D A Pass the thread in front of the needle around thread guide (C). - Release lever (A). - Pass thread around the hook (D) from bottom to its highest position. - Press lever (A) down as far as it will go. - Pull the thread through the needle eye. 1 Attention: Turn power switch to the threading position (B). - GB Automatic Needle Threader - Raise the needle to top. -

User Manual
Page 28
Note: If it is difficult to raise the bobbin thread, check to make sure the thread is not trapped by the hinged cover or the Removable Extension Table. 1 Gently pull on the upper thread to bring the bobbin thread up through the needle plate hole. (2) Lay both threads to the back under the presser foot. (3) 2 3 21 Turn the handwheel (1) towards you (counterclockwise) lowering, then raising needle. GB Raising the Bobbin Thread Hold the upper thread with the left hand.
Note: If it is difficult to raise the bobbin thread, check to make sure the thread is not trapped by the hinged cover or the Removable Extension Table. 1 Gently pull on the upper thread to bring the bobbin thread up through the needle plate hole. (2) Lay both threads to the back under the presser foot. (3) 2 3 21 Turn the handwheel (1) towards you (counterclockwise) lowering, then raising needle. GB Raising the Bobbin Thread Hold the upper thread with the left hand.

User Manual
Page 32
...usually achieved at "2.5" or below. (2) 1 Dense zig-zag stitches are called satin stitches. (2) Function of stitch length dial for the straight stitch infinite needle position. GB Stitch Width Dial & Stitch Length Dial Function of stitch width dial The maximum zigzag stitch width for zigzag stitching is center... needle position. "0" position is full left, "5" is full right and between "2" and "3" is 5mm; Turn the Stitch Length Dial, and the length of the...
...usually achieved at "2.5" or below. (2) 1 Dense zig-zag stitches are called satin stitches. (2) Function of stitch length dial for the straight stitch infinite needle position. GB Stitch Width Dial & Stitch Length Dial Function of stitch width dial The maximum zigzag stitch width for zigzag stitching is center... needle position. "0" position is full left, "5" is full right and between "2" and "3" is 5mm; Turn the Stitch Length Dial, and the length of the...
User Manual
Page 34
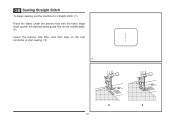
GB Sewing Straight Stitch To begin sewing, set the machine for straight stitch. (1) Place the fabric under the presser foot with the fabric edge lined up with the desired seam guide line on the needle plate. (2) Lower the presser foot lifter, and then step on the foot controller to start sewing. (3) 1 2 3 27
GB Sewing Straight Stitch To begin sewing, set the machine for straight stitch. (1) Place the fabric under the presser foot with the fabric edge lined up with the desired seam guide line on the needle plate. (2) Lower the presser foot lifter, and then step on the foot controller to start sewing. (3) 1 2 3 27
User Manual
Page 36
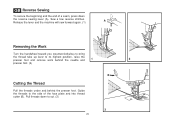
Guide the threads to the side of a seam, press down to its highest position, raise the presser foot and remove work behind the needle and 1 2 presser foot. (2) Cutting the Thread Pull the threads under and behind the presser foot. Pull threads down the reverse sewing lever (A). GB Reverse Sewing ...
Guide the threads to the side of a seam, press down to its highest position, raise the presser foot and remove work behind the needle and 1 2 presser foot. (2) Cutting the Thread Pull the threads under and behind the presser foot. Pull threads down the reverse sewing lever (A). GB Reverse Sewing ...
User Manual
Page 40
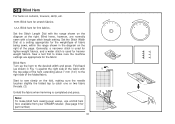
... appropriate for part number) 33 Blind Hem: Turn up the hem to make blind hem sewing even easier, use a blind hem foot, available from your SINGER retailer. (See page 9 for the weight/type of fabric being sewn, within the range shown in Fig. 1) against the right side of the fabric with... the range shown on the fold, making sure the needle touches slightly the folded top to the right side of the folded fabric. Set the Stitch Length Dial with 1 the top edge of the hem...
... appropriate for part number) 33 Blind Hem: Turn up the hem to make blind hem sewing even easier, use a blind hem foot, available from your SINGER retailer. (See page 9 for the weight/type of fabric being sewn, within the range shown in Fig. 1) against the right side of the fabric with... the range shown on the fold, making sure the needle touches slightly the folded top to the right side of the folded fabric. Set the Stitch Length Dial with 1 the top edge of the hem...
User Manual
Page 44
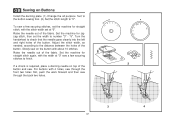
To sew a few securing stitches to finish. 1 2 If a shank is required, place a darning needle on top of the button and sew. Raise the needle out of the button. GB Sewing on the button with about 10 stitches. Slowly sew on Buttons Install the darning plate. (1) Change the all... the machine for straight stitch, with the stitch width set the width to check that the needle goes cleanly into the left and right holes of the fabric. Turn the handwheel to number "3" - Raise the needle out of the button. "5". Set the machine for straight stitch again, with 4 holes, sew through...
To sew a few securing stitches to finish. 1 2 If a shank is required, place a darning needle on top of the button and sew. Raise the needle out of the button. GB Sewing on the button with about 10 stitches. Slowly sew on Buttons Install the darning plate. (1) Change the all... the machine for straight stitch, with the stitch width set the width to check that the needle goes cleanly into the left and right holes of the fabric. Turn the handwheel to number "3" - Raise the needle out of the button. "5". Set the machine for straight stitch again, with 4 holes, sew through...

User Manual
Page 50
.... quilted fabrics, denims, upholstery material (light to 18 (110). NEEDLE, FABRIC SELECTION NEEDLES EXPLANATION TYPE OF FABRIC SINGER® 2020 Standard sharp needles. SINGER® 2032 Leather needles. 12 (80) to medium). Leather, vinyl, upholstery. (Leaves smaller hole than standard large needle.) Note : 1. for double knits. IMPORTANT: Match needle size to 18 (110). Not recommended for these fabrics...
.... quilted fabrics, denims, upholstery material (light to 18 (110). NEEDLE, FABRIC SELECTION NEEDLES EXPLANATION TYPE OF FABRIC SINGER® 2020 Standard sharp needles. SINGER® 2032 Leather needles. 12 (80) to medium). Leather, vinyl, upholstery. (Leaves smaller hole than standard large needle.) Note : 1. for double knits. IMPORTANT: Match needle size to 18 (110). Not recommended for these fabrics...

User Manual
Page 55
... ("O") before inserting or removing the needle. Bent needles B. Blunt needles 2 48 D A B C B A C Damaged points C. Loosen the needle clamp screw and tighten again after inserting the new needle. (1) B. Needles must be towards the back. The flat side of wear and causing problems. For best sewing results always use SINGER® Brand Needles. Insert the needle as illustrated as it is showing...
... ("O") before inserting or removing the needle. Bent needles B. Blunt needles 2 48 D A B C B A C Damaged points C. Loosen the needle clamp screw and tighten again after inserting the new needle. (1) B. Needles must be towards the back. The flat side of wear and causing problems. For best sewing results always use SINGER® Brand Needles. Insert the needle as illustrated as it is showing...

User Manual
Page 59
...as illustrated. 3. The machine is not correctly threaded. 3. Remove and reinsert the bobbin case and pull on the hook or needle bar. 2. The needle is noisy The machine jams Cause Correction 1. Check and attach correctly. 1. Remove bobbin case, thread and insert correctly. 3. The...Lubricate as described. 1. The machine is caught in the hook. Loosen the thread tension. 1. Correct the thread tension. 1. Select a finer needle. 2. Poor quality thread. 2. The thread tension is incorrectly threaded. 3. The bobbin case is too tight. 3. Clean the hook and feed dog as...
...as illustrated. 3. The machine is not correctly threaded. 3. Remove and reinsert the bobbin case and pull on the hook or needle bar. 2. The needle is noisy The machine jams Cause Correction 1. Check and attach correctly. 1. Remove bobbin case, thread and insert correctly. 3. The...Lubricate as described. 1. The machine is caught in the hook. Loosen the thread tension. 1. Correct the thread tension. 1. Select a finer needle. 2. Poor quality thread. 2. The thread tension is incorrectly threaded. 3. The bobbin case is too tight. 3. Clean the hook and feed dog as...
2277 Stitch Applications Guide
Page 1
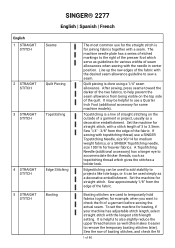
... a seam. Set the machine for straight stitch, with topstitching thread, use a SINGER Topstitching Needle, size 90/14 for medium weight fabrics, or a SINGER Topstitching needle, size 100/16 for heavier fabrics. Sew the row of basting stitches, and check... the fit 1 of the fabric. It is helpful to also slightly reduce the upper thread tension as a decorative embellishment. English 1 STRAIGHT STITCH 2 STRAIGHT STITCH 3 STRAIGHT STITCH 4 STRAIGHT STITCH 5 STRAIGHT STITCH SINGER® 2277...
... a seam. Set the machine for straight stitch, with topstitching thread, use a SINGER Topstitching Needle, size 90/14 for medium weight fabrics, or a SINGER Topstitching needle, size 100/16 for heavier fabrics. Sew the row of basting stitches, and check... the fit 1 of the fabric. It is helpful to also slightly reduce the upper thread tension as a decorative embellishment. English 1 STRAIGHT STITCH 2 STRAIGHT STITCH 3 STRAIGHT STITCH 4 STRAIGHT STITCH 5 STRAIGHT STITCH SINGER® 2277...

2277 Stitch Applications Guide
Page 3
... The top side has two parallel rows of 80 Note: It can be helpful to garments. Twin needles (additional accessory) come in place. Insert a SINGER Universal Twin Needle 1.6mm or 2.0mm (additional accessory). Thread both threads together through the threading path at the same ...time, but thread each needle manually. Here is helpful to create interesting texture. Note: If machine has no ...
... The top side has two parallel rows of 80 Note: It can be helpful to garments. Twin needles (additional accessory) come in place. Insert a SINGER Universal Twin Needle 1.6mm or 2.0mm (additional accessory). Thread both threads together through the threading path at the same ...time, but thread each needle manually. Here is helpful to create interesting texture. Note: If machine has no ...

2277 Stitch Applications Guide
Page 4
... straight stitch. For lightweight fabrics, use the Invisible Zipper Foot. Pull the bobbin threads to insert the piping at the same time, but thread each needle manually. See this video for using a Gathering Foot (additional accessory). Set the machine for your own piping, particularly if you sew. English 15 STRAIGHT STITCH...
... straight stitch. For lightweight fabrics, use the Invisible Zipper Foot. Pull the bobbin threads to insert the piping at the same time, but thread each needle manually. See this video for using a Gathering Foot (additional accessory). Set the machine for your own piping, particularly if you sew. English 15 STRAIGHT STITCH...

2277 Stitch Applications Guide
Page 6
... Open Toe Foot (additional accessory for some machine models), which provides a clear area in fabric. For denser stitches such as 12wt cotton, use a larger size needle so that the thread passes freely through it. The stitches are sewn around the edge of 80 The right movement of the... length setting that is too wide may cause the fabric edge to cover the cord, without covering it to create texture in front of the needle sews into the cord. It can be helpful to pass freely underneath. If your machine has adjustable stitch length and stitch width, try experimenting on...
... Open Toe Foot (additional accessory for some machine models), which provides a clear area in fabric. For denser stitches such as 12wt cotton, use a larger size needle so that the thread passes freely through it. The stitches are sewn around the edge of 80 The right movement of the... length setting that is too wide may cause the fabric edge to cover the cord, without covering it to create texture in front of the needle sews into the cord. It can be helpful to pass freely underneath. If your machine has adjustable stitch length and stitch width, try experimenting on...


