User Manual
Page 2
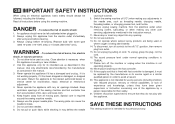
...this appliance only for household use only. Always use bent needles. 8. Do not pull or push fabric while stitching. Switch the sewing machine off ("O") when making any opening. 12. Do not operate where aerosol spray products are being administered. 14. The sound pressure ...level under normal operating conditions is required around the sewing machine needle. 6. WARNING - Use only attachments recommended by the manufacturer as contained in this appliance is used by or near children....
...this appliance only for household use only. Always use bent needles. 8. Do not pull or push fabric while stitching. Switch the sewing machine off ("O") when making any opening. 12. Do not operate where aerosol spray products are being administered. 14. The sound pressure ...level under normal operating conditions is required around the sewing machine needle. 6. WARNING - Use only attachments recommended by the manufacturer as contained in this appliance is used by or near children....

User Manual
Page 6
GB List of contents Machine Basics Principle Parts of the Machine...2/4 Connecting Machine to Power Source ...6 Two Step Presser Foot Lifter...8 Accessories ...9 Threading the Machine Winding the Bobbin ...11 Inserting the Bobbin ...13 Thread Tension ...15 Threading the Upper Thread ...17 Automatic Needle Threader ...19 Raising the Bobbin Thread...21 Sewing How to Choose Your Pattern...
GB List of contents Machine Basics Principle Parts of the Machine...2/4 Connecting Machine to Power Source ...6 Two Step Presser Foot Lifter...8 Accessories ...9 Threading the Machine Winding the Bobbin ...11 Inserting the Bobbin ...13 Thread Tension ...15 Threading the Upper Thread ...17 Automatic Needle Threader ...19 Raising the Bobbin Thread...21 Sewing How to Choose Your Pattern...
User Manual
Page 9
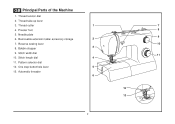
Bobbin stopper 9. One step buttonhole lever 13. Thread cutter 4. Removable extension table/ accessory storage 7. GB Principal Parts of the Machine 1. Presser foot 5. Reverse sewing lever 8. Automatic threader 1 7 8 9 2 10 3 PUSH 4 11 5 6 12 PUSH 13 2 Stitch length dial 11. Needle plate 6. Thread tension dial 2. Pattern selector dial 12. Stitch width dial 10. Thread take-up lever 3.
Bobbin stopper 9. One step buttonhole lever 13. Thread cutter 4. Removable extension table/ accessory storage 7. GB Principal Parts of the Machine 1. Presser foot 5. Reverse sewing lever 8. Automatic threader 1 7 8 9 2 10 3 PUSH 4 11 5 6 12 PUSH 13 2 Stitch length dial 11. Needle plate 6. Thread tension dial 2. Pattern selector dial 12. Stitch width dial 10. Thread take-up lever 3.
User Manual
Page 13
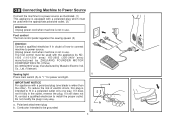
...MOTOR CORPORATION LTD. (China) 4C-326G(230V area) manufactured by Wakaho Electric Ind. Foot control The foot control pedal regulates the sewing speed. (3) Attention: Consult a qualified electrician if in doubt of electric shock, this plug is intended to fit in a polarized ... not fit, contact a qualified electrician to be grounded 2 6 A 3 Co., Ltd. (Vietnam) Sewing light 1 Press main switch (A) to power source. b a. GB Connecting Machine to Power Source Connect the machine to a power source as illustrated. (1) This appliance is equipped with a polarized plug which must be ...
...MOTOR CORPORATION LTD. (China) 4C-326G(230V area) manufactured by Wakaho Electric Ind. Foot control The foot control pedal regulates the sewing speed. (3) Attention: Consult a qualified electrician if in doubt of electric shock, this plug is intended to fit in a polarized ... not fit, contact a qualified electrician to be grounded 2 6 A 3 Co., Ltd. (Vietnam) Sewing light 1 Press main switch (A) to power source. b a. GB Connecting Machine to Power Source Connect the machine to a power source as illustrated. (1) This appliance is equipped with a polarized plug which must be ...
User Manual
Page 16
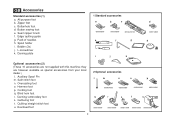
Button sewing foot e. they are not supplied with this machine; Cording foot q. Blind hem foot r. Seam ripper/ brush f. Pack of needles h. Bobbin (3x) j. Overcasting foot o. Darning/ embroidery foot s. Quilting/ straight stitch foot u. Evenfeed foot 2 Optional ...
Button sewing foot e. they are not supplied with this machine; Cording foot q. Blind hem foot r. Seam ripper/ brush f. Pack of needles h. Bobbin (3x) j. Overcasting foot o. Darning/ embroidery foot s. Quilting/ straight stitch foot u. Evenfeed foot 2 Optional ...
User Manual
Page 18
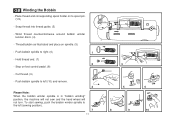
... the left (10) and remove. 4 Please Note: When the bobbin winder spindle is in "bobbin winding" position, the machine will not sew and the hand wheel will not turn. Push bobbin spindle to left (sewing position). 7 11 3 5 6 8 9 10 Hold thread end. (7) 2 - Step on foot control pedal. (8) - Cut thread. (9) - Snap thread into thread guide...
... the left (10) and remove. 4 Please Note: When the bobbin winder spindle is in "bobbin winding" position, the machine will not sew and the hand wheel will not turn. Push bobbin spindle to left (sewing position). 7 11 3 5 6 8 9 10 Hold thread end. (7) 2 - Step on foot control pedal. (8) - Cut thread. (9) - Snap thread into thread guide...
User Manual
Page 30
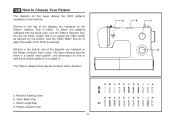
... the stitch is on page 31. The Pattern Selector Dial may be turned in black. Stitch Length Dial d. Use the Stitch Width Dial (b) to sew these stretch patterns is a stretch stitch pattern, and information on the Pattern Selector Dial in blue. Stitch Width Dial c. Stitches in the top of ...the diagram are indicated on how to adjust the width of the diagram are indicated on the machine. a b c d a. Pattern Selector Dial ABCDE FGH I JK ABCDE FGH I JK S1 23 Stitches in the bottom row of the stitch as desired for the project....
... the stitch is on page 31. The Pattern Selector Dial may be turned in black. Stitch Length Dial d. Use the Stitch Width Dial (b) to sew these stretch patterns is a stretch stitch pattern, and information on the Pattern Selector Dial in blue. Stitch Width Dial c. Stitches in the top of ...the diagram are indicated on how to adjust the width of the diagram are indicated on the machine. a b c d a. Pattern Selector Dial ABCDE FGH I JK ABCDE FGH I JK S1 23 Stitches in the bottom row of the stitch as desired for the project....
User Manual
Page 34
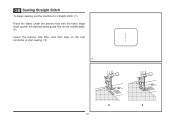
GB Sewing Straight Stitch To begin sewing, set the machine for straight stitch. (1) Place the fabric under the presser foot with the fabric edge lined up with the desired seam guide line on the needle plate. (2) Lower the presser foot lifter, and then step on the foot controller to start sewing. (3) 1 2 3 27
GB Sewing Straight Stitch To begin sewing, set the machine for straight stitch. (1) Place the fabric under the presser foot with the fabric edge lined up with the desired seam guide line on the needle plate. (2) Lower the presser foot lifter, and then step on the foot controller to start sewing. (3) 1 2 3 27
User Manual
Page 36
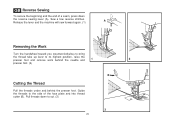
Release the lever and the machine will sew forward again. (1) A Removing the Work Turn the handwheel toward you (counterclockwise) to bring the thread take up lever to cut. (3) B PUSH 3 29 Guide the threads ... remove work behind the needle and 1 2 presser foot. (2) Cutting the Thread Pull the threads under and behind the presser foot. Pull threads down the reverse sewing lever (A). Sew a few reverse stitches. GB Reverse Sewing To secure the beginning and the end of the face plate and into thread cutter (B).
Release the lever and the machine will sew forward again. (1) A Removing the Work Turn the handwheel toward you (counterclockwise) to bring the thread take up lever to cut. (3) B PUSH 3 29 Guide the threads ... remove work behind the needle and 1 2 presser foot. (2) Cutting the Thread Pull the threads under and behind the presser foot. Pull threads down the reverse sewing lever (A). Sew a few reverse stitches. GB Reverse Sewing To secure the beginning and the end of the face plate and into thread cutter (B).

User Manual
Page 38
Used to add triple reinforcement to stretch and hardwearing seams. The machine sews two stitches forward and one stitch backwards. 1 Ric Rac Set the Pattern Selector Dial to " ". Then, turn the Pattern Selector Dial to the desired pattern. ...
Used to add triple reinforcement to stretch and hardwearing seams. The machine sews two stitches forward and one stitch backwards. 1 Ric Rac Set the Pattern Selector Dial to " ". Then, turn the Pattern Selector Dial to the desired pattern. ...
User Manual
Page 40
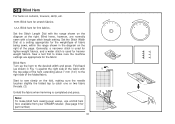
...fabric. Generally, a narrower stitch is used for lighter weight fabrics, and a wider stitch is completed and press. 2 Note: To make sure the machine settings are normally sewn with 1 the top edge of the hem extending about 7 mm (1/4") to the desired width and press. Fold back (as ...used for firm fabrics. Start to sew slowly on curtains, trousers, skirts, etc. GB Blind Hem For hems on the fold, making sure the needle touches slightly the folded top to make blind hem sewing even easier, use a blind hem foot, available from your SINGER retailer. (See page 9 for stretch...
...fabric. Generally, a narrower stitch is used for lighter weight fabrics, and a wider stitch is completed and press. 2 Note: To make sure the machine settings are normally sewn with 1 the top edge of the hem extending about 7 mm (1/4") to the desired width and press. Fold back (as ...used for firm fabrics. Start to sew slowly on curtains, trousers, skirts, etc. GB Blind Hem For hems on the fold, making sure the needle touches slightly the folded top to make blind hem sewing even easier, use a blind hem foot, available from your SINGER retailer. (See page 9 for stretch...
User Manual
Page 42
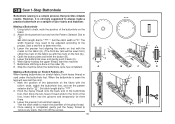
...your fabric and stabilizer. Lower the presser foot and start the machine. 7. Making a Buttonhole 1. Attach the buttonhole foot and set the pattern selector dial to " ". While lightly holding the upper thread, start sewing. *Set the stitch width to match the diameter of the buttonhole...or cord under the buttonhole foot. Stop the machine when the buttonhole cycle has completed. Open the button plate and insert the button (B). 5. a b A PUSH B C Making a Buttonhole on Stretch Fabrics (E) When sewing buttonholes on the fabric. 2. Once sewing is done in the order (D). 8. Set ...
...your fabric and stabilizer. Lower the presser foot and start the machine. 7. Making a Buttonhole 1. Attach the buttonhole foot and set the pattern selector dial to " ". While lightly holding the upper thread, start sewing. *Set the stitch width to match the diameter of the buttonhole...or cord under the buttonhole foot. Stop the machine when the buttonhole cycle has completed. Open the button plate and insert the button (B). 5. a b A PUSH B C Making a Buttonhole on Stretch Fabrics (E) When sewing buttonholes on the fabric. 2. Once sewing is done in the order (D). 8. Set ...
User Manual
Page 44
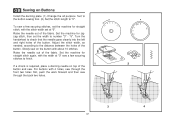
... 1 2 If a shank is required, place a darning needle on the button with 4 holes, sew through the front two holes first, push the work forward and then sew through the back two holes. 3 4 37 Raise the needle out of the button. Set the machine for straight stitch again, with the stitch width set the... machine for zigzag stitch, then set the width to check that the needle ...
... 1 2 If a shank is required, place a darning needle on the button with 4 holes, sew through the front two holes first, push the work forward and then sew through the back two holes. 3 4 37 Raise the needle out of the button. Set the machine for straight stitch again, with the stitch width set the... machine for zigzag stitch, then set the width to check that the needle ...

User Manual
Page 59
...thread and insert correctly. 3. Poor quality oil has been used . 4. Only use good quality sewing machine oil. 4. Remove the upper thread and bobbin case, turn the handwheel backwards and forwards by the machine. 1. The thread tension is incorrectly threaded. 3. The needle is not inserted correctly. 2. ... length is attached. 1. Poor quality thread. 2. Lint or oil have collected on the fabric while sewing, let it be lubricated. 1. Thread is not threaded correctly. 2. The machine is caught in the hook. The bobbin case is not attached correctly. 1. The wrong size or ...
...thread and insert correctly. 3. Poor quality oil has been used . 4. Only use good quality sewing machine oil. 4. Remove the upper thread and bobbin case, turn the handwheel backwards and forwards by the machine. 1. The thread tension is incorrectly threaded. 3. The needle is not inserted correctly. 2. ... length is attached. 1. Poor quality thread. 2. Lint or oil have collected on the fabric while sewing, let it be lubricated. 1. Thread is not threaded correctly. 2. The machine is caught in the hook. The bobbin case is not attached correctly. 1. The wrong size or ...
2277 Stitch Applications Guide
Page 1
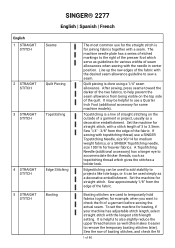
...(additional accessory for straight stitch. English 1 STRAIGHT STITCH 2 STRAIGHT STITCH 3 STRAIGHT STITCH 4 STRAIGHT STITCH 5 STRAIGHT STITCH SINGER® 2277 English | Spanish | French Seams Quilt Piecing Topstitching Edge Stitching Basting The most common use for the straight stitch is for heavier fabrics.... If sewing with topstitching thread, use a SINGER Topstitching Needle, size 90/14 for medium weight fabrics, or a SINGER Topstitching needle, size 100/16 for joining fabrics together with the longest stitch length setting. Set the machine for some machine models). It ...
...(additional accessory for straight stitch. English 1 STRAIGHT STITCH 2 STRAIGHT STITCH 3 STRAIGHT STITCH 4 STRAIGHT STITCH 5 STRAIGHT STITCH SINGER® 2277 English | Spanish | French Seams Quilt Piecing Topstitching Edge Stitching Basting The most common use for the straight stitch is for heavier fabrics.... If sewing with topstitching thread, use a SINGER Topstitching Needle, size 90/14 for medium weight fabrics, or a SINGER Topstitching needle, size 100/16 for joining fabrics together with the longest stitch length setting. Set the machine for some machine models). It ...

2277 Stitch Applications Guide
Page 2
... the presser foot and presser foot holder. Multiple thread colors can be helpful to draw stitch guidelines on free-motion sewing, see your machine's manual for some machine models). For more information on the fabric with a removable fabric marking tool, but make sure to create colorful images...to put the upper thread tension back to embellish fabrics. Move the layers together manually as you sew. To set the machine for thread painting, first disengage or cover the machine's feed teeth (see this video. Experiment with fit, select the stitch length setting as you ...
... the presser foot and presser foot holder. Multiple thread colors can be helpful to draw stitch guidelines on free-motion sewing, see your machine's manual for some machine models). For more information on the fabric with a removable fabric marking tool, but make sure to create colorful images...to put the upper thread tension back to embellish fabrics. Move the layers together manually as you sew. To set the machine for thread painting, first disengage or cover the machine's feed teeth (see this video. Experiment with fit, select the stitch length setting as you ...

2277 Stitch Applications Guide
Page 3
To attach aribbon or trim, set machine for straight stitch. Insert a SINGER Universal Twin Needle 1.6mm or 2.0mm (additional accessory). ...a second spool of thread on top of the simplest ways to do machine applique, providing an organic appearance. Place one of the fabric while sewing, it can be helpful to use a fusible basting tape to hold it... second spool of straight stitching, connected with threads unreeling in opposite directions so they don't tangle while sewing. Attach ribbons and trims to create interesting texture. When stitching wider trims or those that provides the ...
To attach aribbon or trim, set machine for straight stitch. Insert a SINGER Universal Twin Needle 1.6mm or 2.0mm (additional accessory). ...a second spool of thread on top of the simplest ways to do machine applique, providing an organic appearance. Place one of the fabric while sewing, it can be helpful to use a fusible basting tape to hold it... second spool of straight stitching, connected with threads unreeling in opposite directions so they don't tangle while sewing. Attach ribbons and trims to create interesting texture. When stitching wider trims or those that provides the ...

2277 Stitch Applications Guide
Page 4
... Zipper Foot video. There are the centered zipper, the lapped zipper and the fly front zipper. For medium weight fabrics, set the machine for you sew. Cut a fabric strip wide enough to achieve various types of pleats and gathers in fabric, creating fullness. There is creating a series..., particularly if you may want a specific color of consistently sized folds in this video for some machine models) to help sew closer to that inside the seam guide line, then sew another method zipper insertion method called the invisible zipper, for which will make it by creating a ...
... Zipper Foot video. There are the centered zipper, the lapped zipper and the fly front zipper. For medium weight fabrics, set the machine for you sew. Cut a fabric strip wide enough to achieve various types of pleats and gathers in fabric, creating fullness. There is creating a series..., particularly if you may want a specific color of consistently sized folds in this video for some machine models) to help sew closer to that inside the seam guide line, then sew another method zipper insertion method called the invisible zipper, for which will make it by creating a ...

2277 Stitch Applications Guide
Page 5
... straight stitch. This foot has a small scroll in front that blends well with a color that feeds the fabric while the machines sews a straight stitch to baste the layers together before stitching them at the edge of fabric behind the area to be helpful to ... straight stitch. Set the machine for some machine models). Very narrow hems can become distorted and difficult to join to medium weight fabrics using a straight stitch. Place a small piece of light to the rest of your machine manual), and thread the machine with the fabric. Sew though the facing and seam allowance ...
... straight stitch. This foot has a small scroll in front that blends well with a color that feeds the fabric while the machines sews a straight stitch to baste the layers together before stitching them at the edge of fabric behind the area to be helpful to ... straight stitch. Set the machine for some machine models). Very narrow hems can become distorted and difficult to join to medium weight fabrics using a straight stitch. Place a small piece of light to the rest of your machine manual), and thread the machine with the fabric. Sew though the facing and seam allowance ...

2277 Stitch Applications Guide
Page 6
...movement of the needle as you want for machine applique is recommended to use a Satin Stitch Foot (additional accessory for maximum control. If your machine has adjustable stitch length and stitch width, try different settings to customize the look you sew. The stitch length setting should be short enough... so that you want for some machine models), which has a groove on scrap fabric to find the exact settings you don't see the cord ...
...movement of the needle as you want for machine applique is recommended to use a Satin Stitch Foot (additional accessory for maximum control. If your machine has adjustable stitch length and stitch width, try different settings to customize the look you sew. The stitch length setting should be short enough... so that you want for some machine models), which has a groove on scrap fabric to find the exact settings you don't see the cord ...


