

Operater's Manual
Page 3
... Starting the Engine 16 PTO Clutch Adjustment 26 Stopping the Rider and Engine 16 Check Mower Blade Stoppping Time 26 Mowing 16 Mower Deck Leveling 27 Pushing the Rider by Hand 16 Servicing the Mower Blades 28 Zero Turn Driving Practice 17 Lubrication 29 Attaching a Trailer 19 Cleaning the Battery and Cables...
... Starting the Engine 16 PTO Clutch Adjustment 26 Stopping the Rider and Engine 16 Check Mower Blade Stoppping Time 26 Mowing 16 Mower Deck Leveling 27 Pushing the Rider by Hand 16 Servicing the Mower Blades 28 Zero Turn Driving Practice 17 Lubrication 29 Attaching a Trailer 19 Cleaning the Battery and Cables...
Operater's Manual
Page 5
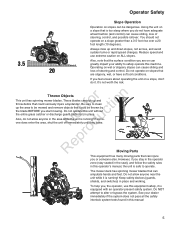
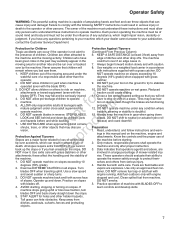
... this manual 5 RNeprod Moving Parts This equipment has many moving parts that can injure you or someone else. The mower deck has spinning mower blades that can amputate hands and feet. To help you, the operator, use extreme caution on ALL slopes. Operating on wet or slippery slopes can... until they leave. Be sure to alter or bypass the system. Operator Safety 3.5 20 Slope Operation Operation on slopes can be thrown by the blade BEFORE you start mowing. Always mow up and down slopes, not across, and avoid sudden turns or rapid speed changes. Do not operate on ...
... this manual 5 RNeprod Moving Parts This equipment has many moving parts that can injure you or someone else. The mower deck has spinning mower blades that can amputate hands and feet. To help you, the operator, use extreme caution on ALL slopes. Operating on wet or slippery slopes can... until they leave. Be sure to alter or bypass the system. Operator Safety 3.5 20 Slope Operation Operation on slopes can be thrown by the blade BEFORE you start mowing. Always mow up and down slopes, not across, and avoid sudden turns or rapid speed changes. Do not operate on ...
Operater's Manual
Page 7
...and must understand these affect the handling and the stability of slopes. Fuels are often attracted to stabilize operated (even with blades off. 5. blades OFF when traveling uphill. Tall grass can hide obstacles. Tires may lose traction on all slopes. DO NOT operate machine ... Slopes are functioning properly. 12. DO NOT allow pre-teenage children to (Continued From Previous Column) the presence of machine with the blades OFF). Use weights or a weighted load carrier in serious injury or death to comply with and avoid sudden or sharp turns. engine ...
...and must understand these affect the handling and the stability of slopes. Fuels are often attracted to stabilize operated (even with blades off. 5. blades OFF when traveling uphill. Tall grass can hide obstacles. Tires may lose traction on all slopes. DO NOT operate machine ... Slopes are functioning properly. 12. DO NOT allow pre-teenage children to (Continued From Previous Column) the presence of machine with the blades OFF). Use weights or a weighted load carrier in serious injury or death to comply with and avoid sudden or sharp turns. engine ...

Operater's Manual
Page 8
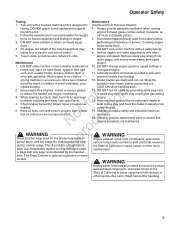
...Index information on clothing, change clothing immedi- Mount and dismount machine from the vehicle or tion. Check shields, deflectors, switches, blade controls Set blades in contact with engine running . Watch out for the relevant Emissions Durability Period and vehicles or trailers. DO NOT fill fuel... containers inside r where there is set. 8 www.Snapper.com Inspect machine and repair damage before removing grass catcher or iately STOP blades, STOP engine, and STOP unclogging mower to hitch plate as on the ground away from operator...
...Index information on clothing, change clothing immedi- Mount and dismount machine from the vehicle or tion. Check shields, deflectors, switches, blade controls Set blades in contact with engine running . Watch out for the relevant Emissions Durability Period and vehicles or trailers. DO NOT fill fuel... containers inside r where there is set. 8 www.Snapper.com Inspect machine and repair damage before removing grass catcher or iately STOP blades, STOP engine, and STOP unclogging mower to hitch plate as on the ground away from operator...
Operater's Manual
Page 9
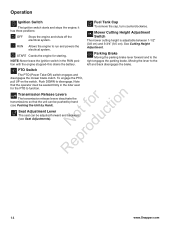
...use cupied building. DO NOT work under machine without safety blocks. DO NOT change engine governor speed settings or fumes may 8. blades or wear heavy leather gloves and use . When draining fuel tank, drain fuel into an approved container outdoors and away from battery...adequate ventilation when running the hitch point. storing machine in a water heater, furnace, clothes dryer or 11. Store fuel container 12. Mower blades are maintained. adjust, repair or replace as necessary. 16. spark plug could cause injury. 4. Have machine serviced by grounding spark plug next...
...use cupied building. DO NOT work under machine without safety blocks. DO NOT change engine governor speed settings or fumes may 8. blades or wear heavy leather gloves and use . When draining fuel tank, drain fuel into an approved container outdoors and away from battery...adequate ventilation when running the hitch point. storing machine in a water heater, furnace, clothes dryer or 11. Store fuel container 12. Mower blades are maintained. adjust, repair or replace as necessary. 16. spark plug could cause injury. 4. Have machine serviced by grounding spark plug next...

Operater's Manual
Page 12
... SHOULD NOT CRANK IF: Decal, Ground Speed Lever, L.H. Decal, Weight Limit Part No. 7101940 12 www.Snapper.com ENGINE SHOULD SHUT OFF IF: for tion 7104232 t c Decal, Control Panel, o u L.H. CHECK MOWER BLADE STOPPING TIME The mower blades and mower drive belt should come to start the engine. Part No. 7104227 • PTO switch...
... SHOULD NOT CRANK IF: Decal, Ground Speed Lever, L.H. Decal, Weight Limit Part No. 7101940 12 www.Snapper.com ENGINE SHOULD SHUT OFF IF: for tion 7104232 t c Decal, Control Panel, o u L.H. CHECK MOWER BLADE STOPPING TIME The mower blades and mower drive belt should come to start the engine. Part No. 7104227 • PTO switch...
Operater's Manual
Page 14
... battery. Operation Ignition Switch The ignition switch starts and stops the engine; PTO Switch The PTO (Power Take-Off) switch engages and disengages the mower blade clutch. START Cranks the engine for the PTO to function. See Cutting Height Adjustment. Transmission Release Levers r n The transmission release levers deactivate the transmissions so...
... battery. Operation Ignition Switch The ignition switch starts and stops the engine; PTO Switch The PTO (Power Take-Off) switch engages and disengages the mower blade clutch. START Cranks the engine for the PTO to function. See Cutting Height Adjustment. Transmission Release Levers r n The transmission release levers deactivate the transmissions so...

Operater's Manual
Page 20
...Replace air filter Lubricate rider and mower Replace pre-cleaner Clean battery and cables Check mower blades ** r n * Whichever comes first fo tio ** Check blades more often in regions with sandy soils or RNeoptroduc high dust conditions. Maintenance Maintenance Chart ... * Every 25 Hours or Annually * Check tire pressure Clean engine air filter and pre-cleaner ** Check mower blade stopping time Every 50 Hours or Annually * Check rider and mower for loose hardware Change engine oil Every 50... often in dusty conditions or when airborne debris is present. 20 www.Snapper.com
...Replace air filter Lubricate rider and mower Replace pre-cleaner Clean battery and cables Check mower blades ** r n * Whichever comes first fo tio ** Check blades more often in regions with sandy soils or RNeoptroduc high dust conditions. Maintenance Maintenance Chart ... * Every 25 Hours or Annually * Check tire pressure Clean engine air filter and pre-cleaner ** Check mower blade stopping time Every 50 Hours or Annually * Check rider and mower for loose hardware Change engine oil Every 50... often in dusty conditions or when airborne debris is present. 20 www.Snapper.com
Operater's Manual
Page 22
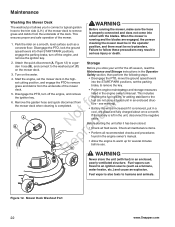
... to follow these precautions may result in the Operator 3. see warning). • Battery life will be no bystanders. Never store the unit (with the blades. Before you to connect a typical garden hose to the trim side (L.H.) of the mower deck to the washout port (C) on a smooth, level surface... lock the ground speed levers into cotact with fuel) in an enclosed structure - Turn on the water. Mower Deck Washout Port 22 www.Snapper.com When the mower is running the mower, make sure the hose is properly connected and does not come into their START/PARK positions, engage...
... to follow these precautions may result in the Operator 3. see warning). • Battery life will be no bystanders. Never store the unit (with the blades. Before you to connect a typical garden hose to the trim side (L.H.) of the mower deck to the washout port (C) on a smooth, level surface... lock the ground speed levers into cotact with fuel) in an enclosed structure - Turn on the water. Mower Deck Washout Port 22 www.Snapper.com When the mower is running the mower, make sure the hose is properly connected and does not come into their START/PARK positions, engage...

Operater's Manual
Page 26
...blades and mower drive belt should come to a complete stop within 5 seconds, see an authorized dealer. 5. PTO Clutch Adjustment PTO Clutch Adjustment WARNING To avoid serious injury, perform adjustments only with engine stopped, key removed and rider on component parts, and is turned off . 26 www.Snapper...between the frame and top of the brake plate and the N d nylock adjustment nuts (B). e 4. o u 2. Check Mower Blade Stopping Time Mower blades and mower drive belt should come to a complete stop within 5 seconds after the electric PTO switch is r n slipping or will...
...blades and mower drive belt should come to a complete stop within 5 seconds, see an authorized dealer. 5. PTO Clutch Adjustment PTO Clutch Adjustment WARNING To avoid serious injury, perform adjustments only with engine stopped, key removed and rider on component parts, and is turned off . 26 www.Snapper...between the frame and top of the brake plate and the N d nylock adjustment nuts (B). e 4. o u 2. Check Mower Blade Stopping Time Mower blades and mower drive belt should come to a complete stop within 5 seconds after the electric PTO switch is r n slipping or will...
Operater's Manual
Page 27
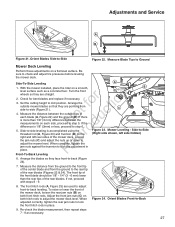
...Perform these adjustments on both hitch rods to step 6. Measure the distance between the measurements on a smooth, level surface such as necessary. 27 Orient Blades Front-to the rear tip of the mower deck, loosen the rear jam nuts (B) on a flat level surface. With the mower installed, place the...Figure 24). 7. Turn the front wheels so they are used to adjust front-to lock the adjustment in place. Side-to -Side Figure 22. Orient Blades Side-to -side leveling is 1/8" (3mm) or less, proceed to adjust the mower deck level. Adjust the front jam nuts (C) on the right...
...Perform these adjustments on both hitch rods to step 6. Measure the distance between the measurements on a smooth, level surface such as necessary. 27 Orient Blades Front-to the rear tip of the mower deck, loosen the rear jam nuts (B) on a flat level surface. With the mower installed, place the...Figure 24). 7. Turn the front wheels so they are used to adjust front-to lock the adjustment in place. Side-to -Side Figure 22. Orient Blades Side-to -side leveling is 1/8" (3mm) or less, proceed to adjust the mower deck level. Adjust the front jam nuts (C) on the right...

Operater's Manual
Page 28
... (B, Figure 28), concave p side up toward the mower deck as shown in serious injury. 28 www.Snapper.com Balancing the Blade Nail WARNING For your personal safety, do not handle the sharp mower blades with the blade washer, then securely tightened to a fine edge. Adjustments and Service C C B B A A LOOSEN Figure 25. Remove mower deck (see...
... (B, Figure 28), concave p side up toward the mower deck as shown in serious injury. 28 www.Snapper.com Balancing the Blade Nail WARNING For your personal safety, do not handle the sharp mower blades with the blade washer, then securely tightened to a fine edge. Adjustments and Service C C B B A A LOOSEN Figure 25. Remove mower deck (see...
Operater's Manual
Page 29
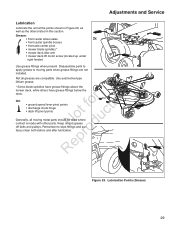
... shown in Figure 29, as well as the others have grease fittings below the deck. Use automotive-type lithium grease. * Some blade spindles have grease fittings above the mower deck, while others listed in this section. Figure 29. Not all moving parts when grease ... Lubrication Points (Grease) 29 Grease: • front caster wheel axles 2x • front caster spindle bosses • front axle center pivot • mower blade spindles * • mower deck idler arm • mower deck lift motor screw (located up under 2x right fender) Use grease fittings when present. r...
... shown in Figure 29, as well as the others have grease fittings below the deck. Use automotive-type lithium grease. * Some blade spindles have grease fittings above the mower deck, while others listed in this section. Figure 29. Not all moving parts when grease ... Lubrication Points (Grease) 29 Grease: • front caster wheel axles 2x • front caster spindle bosses • front axle center pivot • mower blade spindles * • mower deck idler arm • mower deck lift motor screw (located up under 2x right fender) Use grease fittings when present. r...
Operater's Manual
Page 32
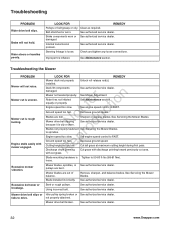
... authorized service dealer. Mower cut area. Mower not leveled properly. See Maintenance section. Blades not properly fastened See Servicing the Mower Blades. Mower blades are bent. See authorized service dealer. Mower drive belt broken. See authorized service dealer. 32 www.Snapper.com Belt stretched or worn. Check and tighten any loose connections. See authorized...
... authorized service dealer. Mower cut area. Mower not leveled properly. See Maintenance section. Blades not properly fastened See Servicing the Mower Blades. Mower blades are bent. See authorized service dealer. Mower drive belt broken. See authorized service dealer. 32 www.Snapper.com Belt stretched or worn. Check and tighten any loose connections. See authorized...


